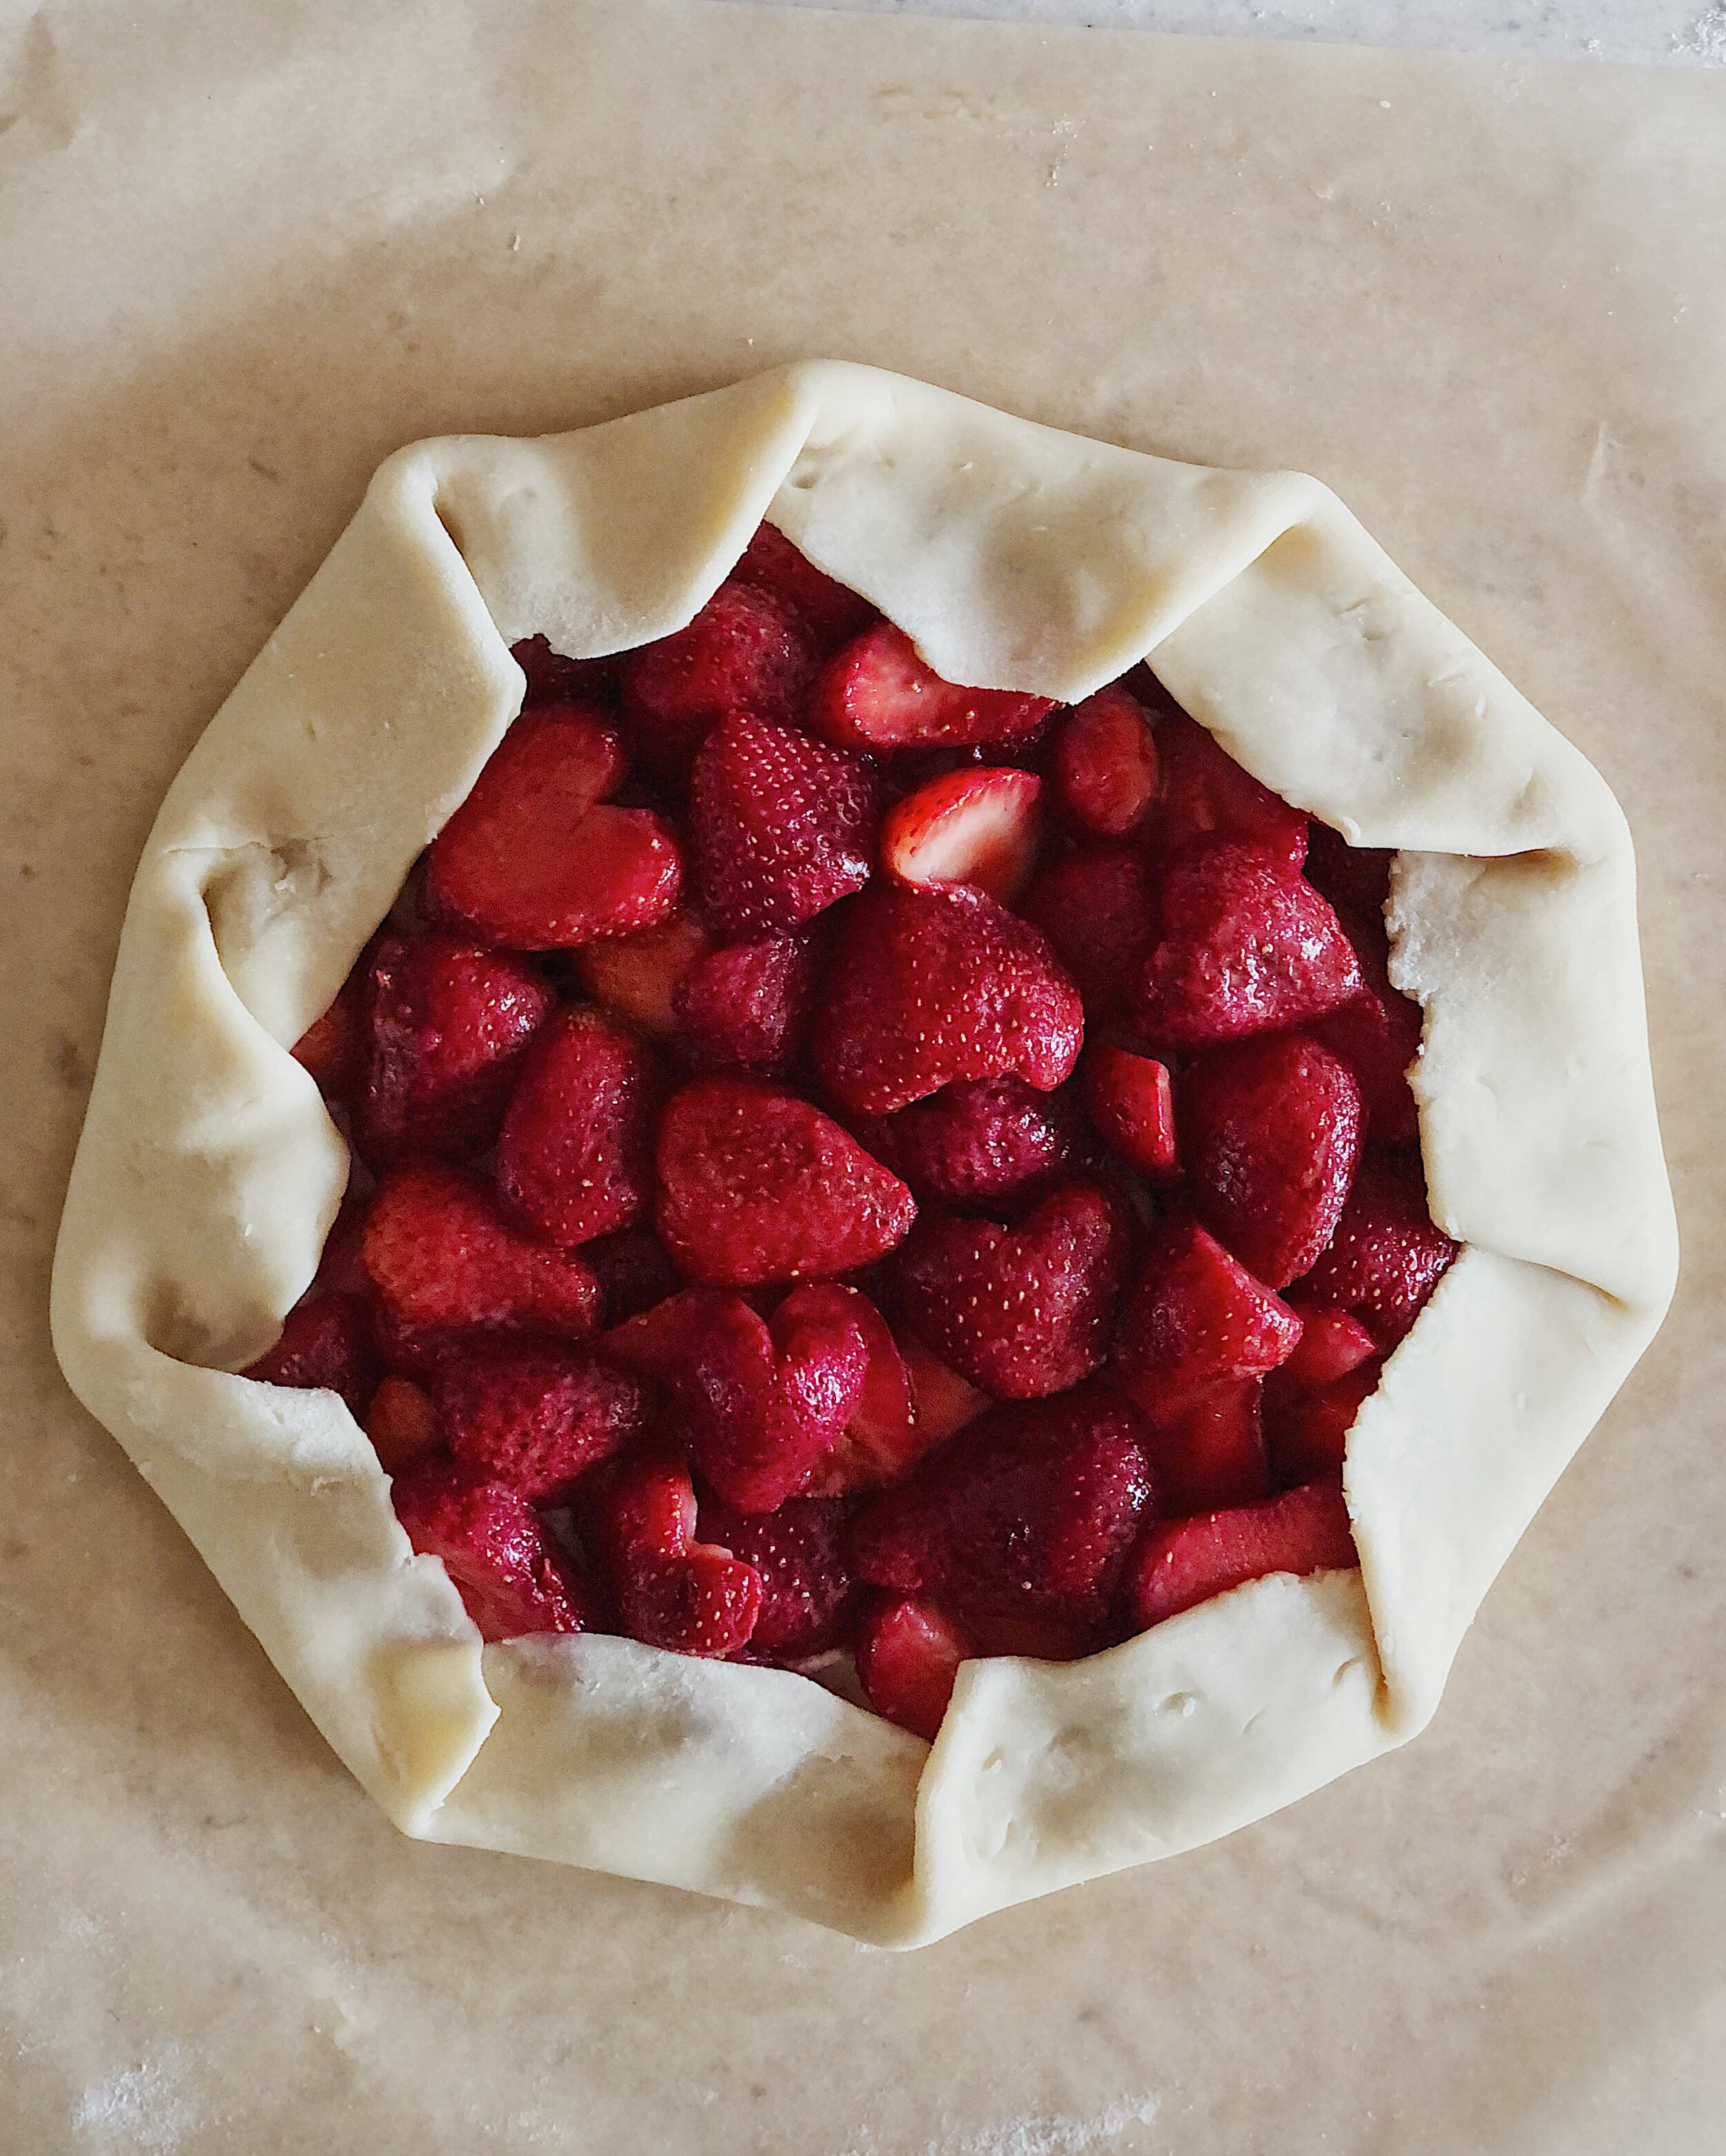
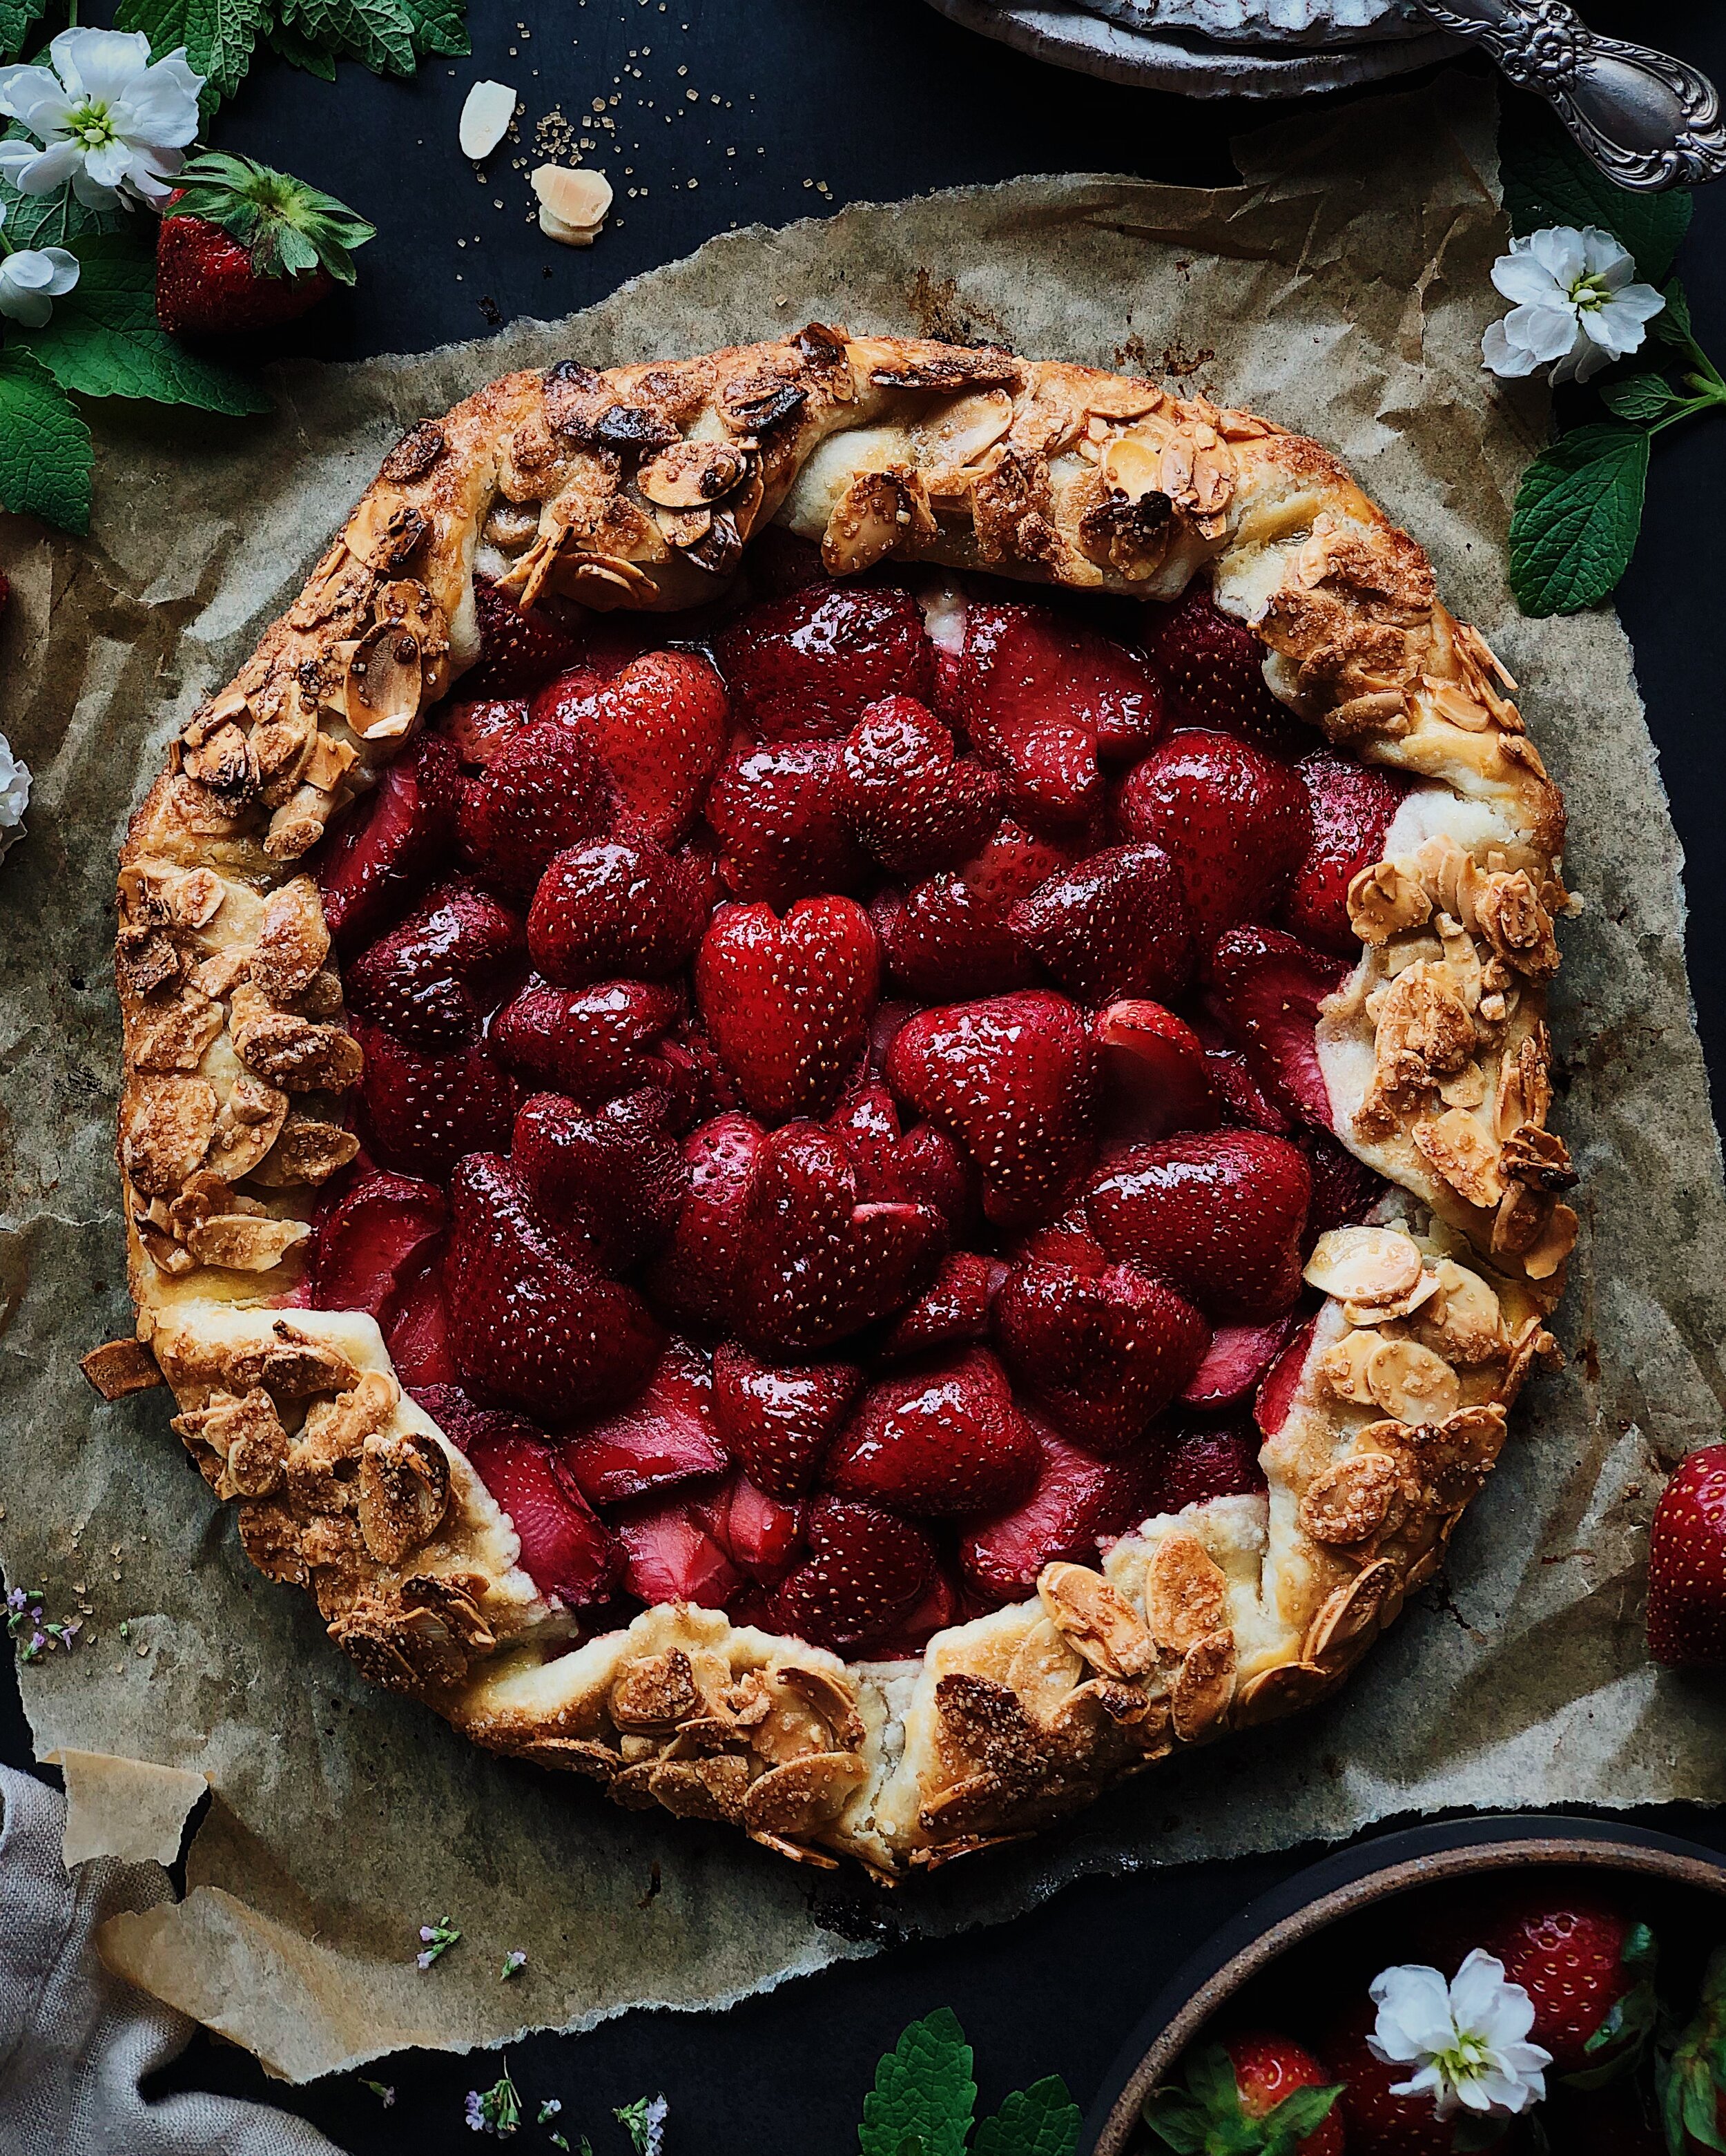
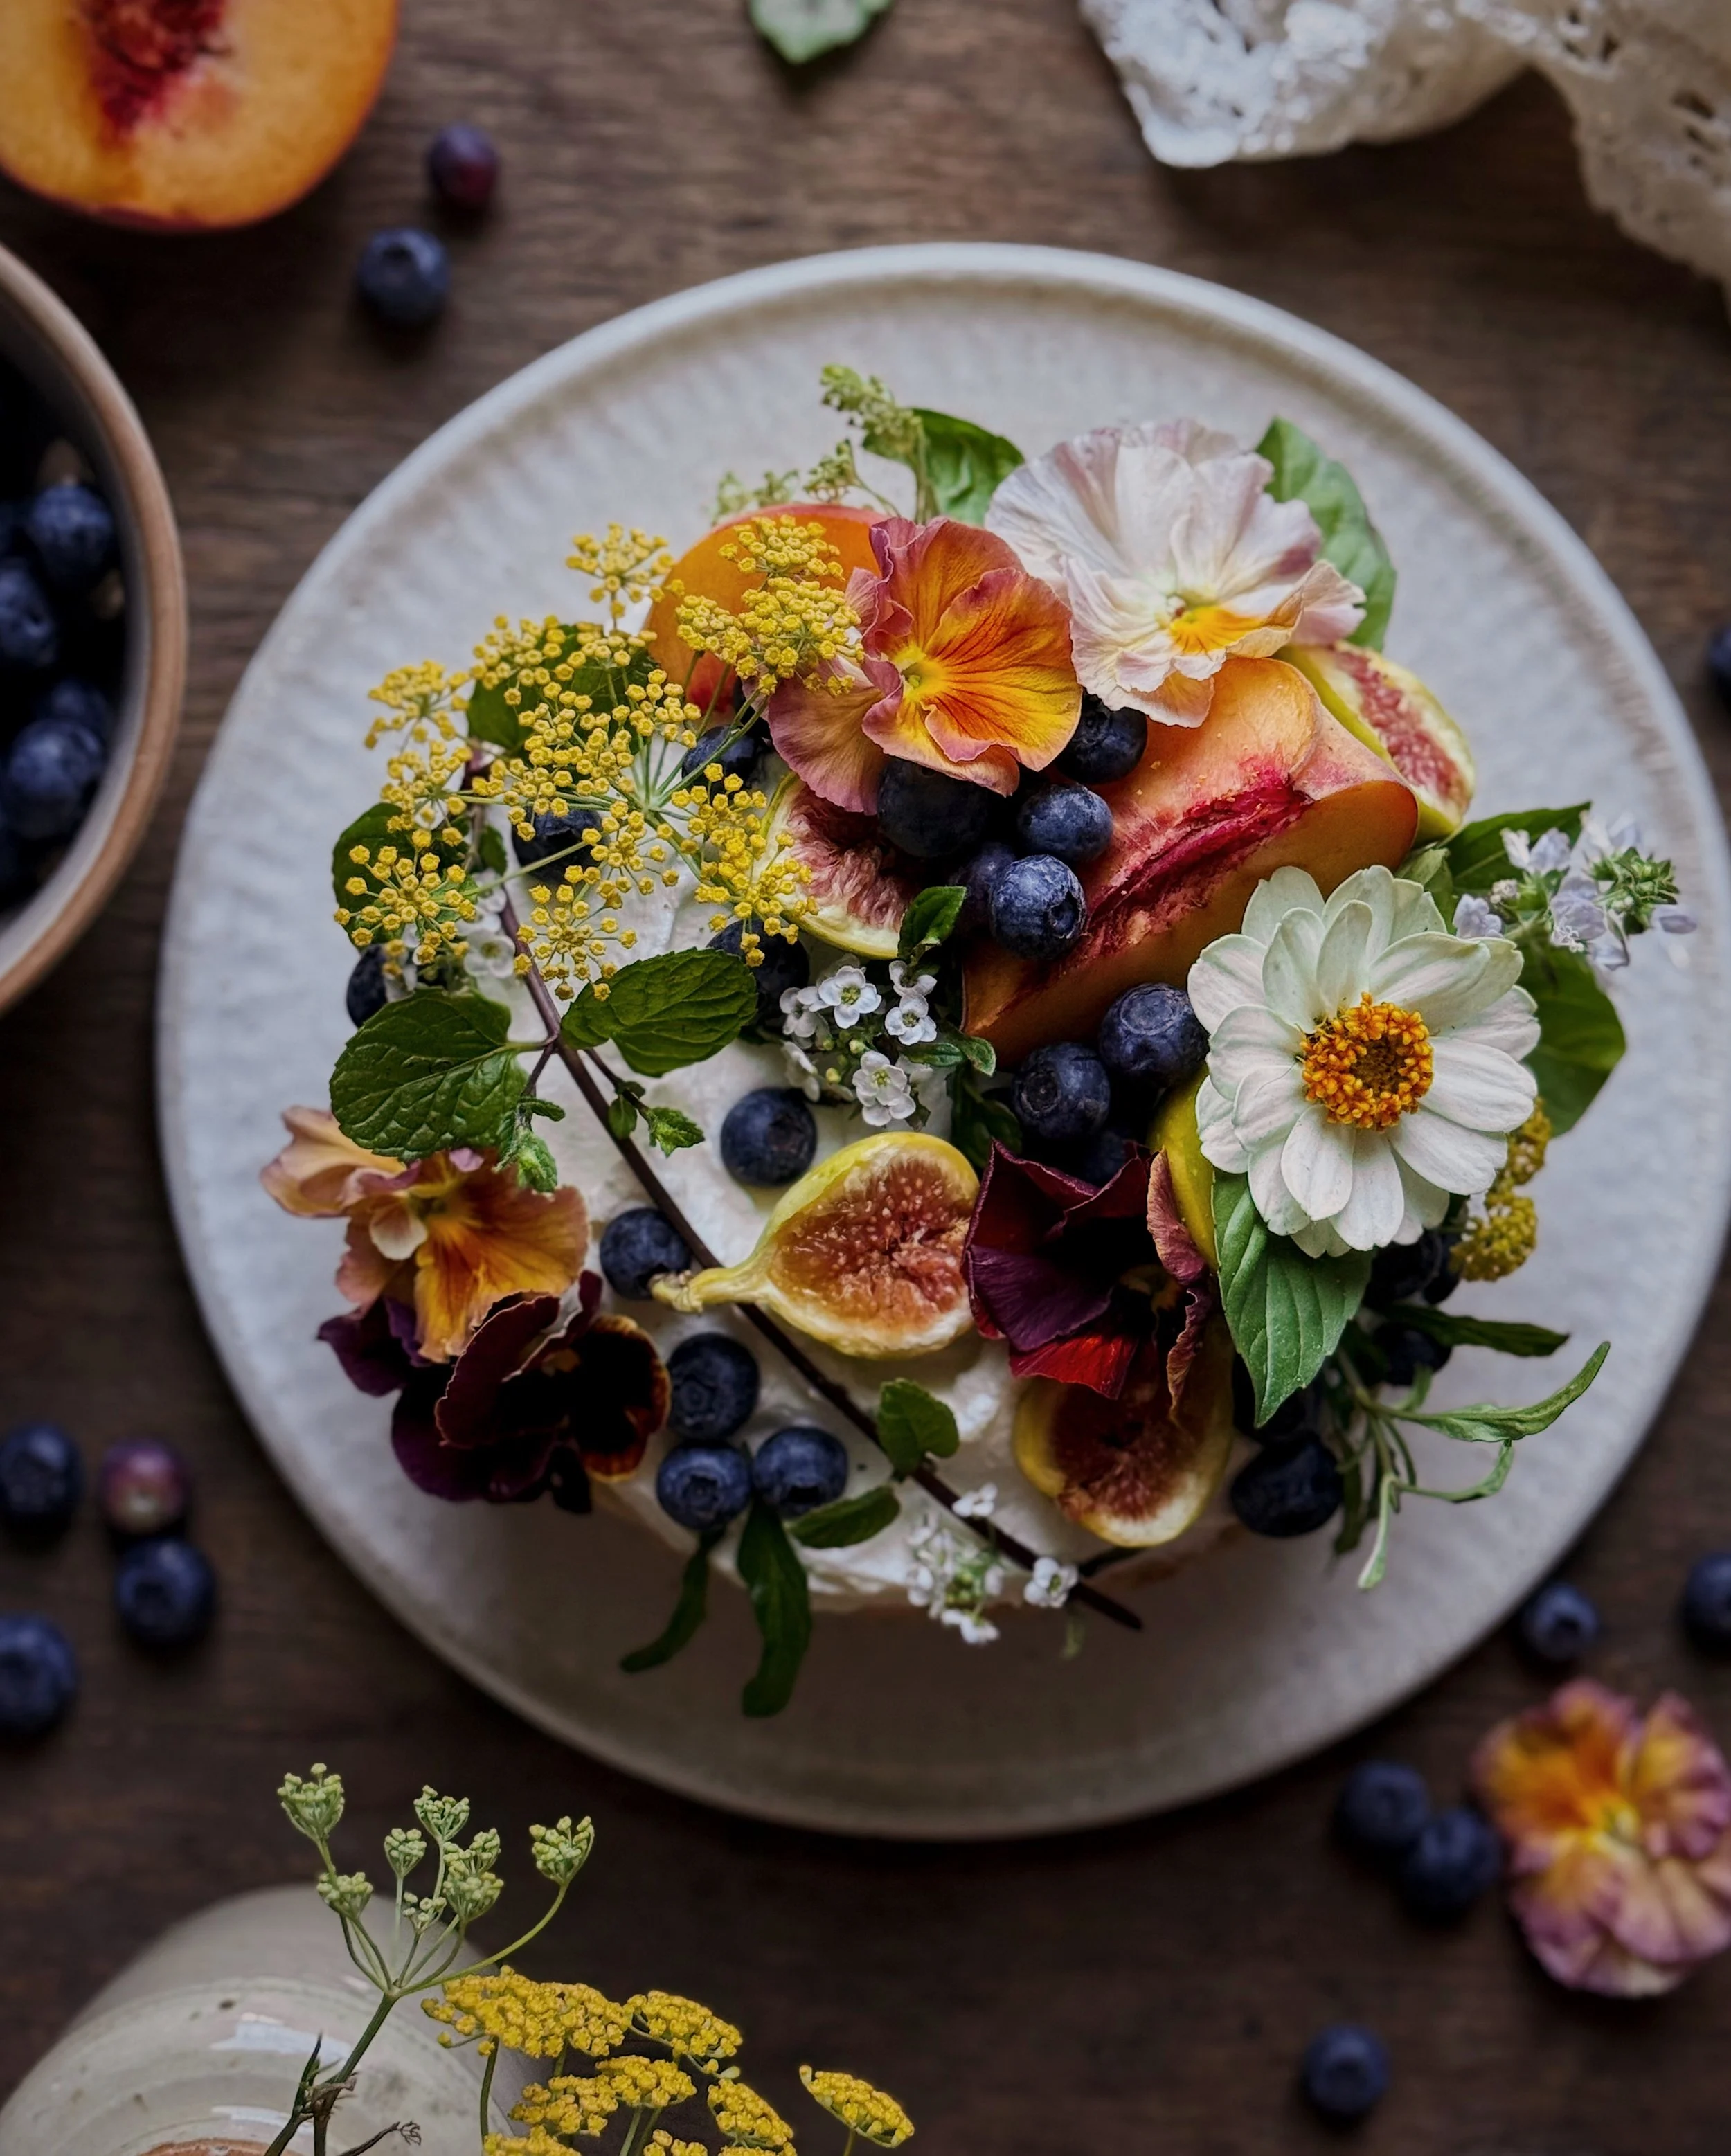
10 Ways to Make an Edible Flower Bouquet (Without a Garden)

I love flowers just as much as the next girlie girl but what I love to receive more than anything is the gift of good food. And if your Valentine this year is like me, you might want to consider skipping that generic bouquet of roses for something homemade and edible instead!

One of the most frequent questions I get about making pretty food is asking where I buy the flowers I incorporate into my food styling. The answer is that most of them come right from my own backyard—growing your own edible flowers is the best way ensure the freshest and safest blooms that you can eat. I totally understand, though, that not everyone has their own outdoor space to grow in, which is why I also love creating flowers that are made directly out of actual food. The truth about edible flowers like pansies, violas, and zinnias is that while they make your food look beautiful, they don’t actually add that much, taste-wise. That’s why making your own flowers out of food is an even better option!

You won’t need a garden or access to a farmer’s market to make these pretty and impressive edible bouquets below! Whether you are looking to make a thoughtful dish to wow someone on Valentine’s Day or just wanting to treat yourself or your dinner guests with something special for the eyes as well as the palate, here are 10 ideas for how to make your own edible flower bouquet.

Sashimi Rose Rice Bowls

I love making these with salmon sashimi but you could use any kind of sashimi you wish. Use the thinnest piece and roll it into a tight spiral for the center, then continue to wrap pieces of sashimi around until you have formed your desired size for your “rose”. Serve these over a bowl of sushi rice, which will help to hold the rose formation in place. I usually like to style these with leaves cut from cucumbers. Here is where I learned how to do the cucumber leaves. You could also roll Japanese pickled ginger into roses and serve that as part of your edible sushi bouquet as well.

Charcuterie Board Pizza with Charcuterie Roses

My Valentine’s Day tradition with Spouse is to have a chill pizza night at home. You could make your at-home pizza date even more epic and romantic by turning your pizza into an edible bouquet! For this pizza, I was inspired by my love for charcuterie boards and I other than the melty cheese, I actually added most of the ingredients on top of the pizza after it was baked. Rolling slices of charcuterie like salami and pepperoni into roses is an easy way to make one of the most delicious edible bouquets.

I developed the recipe for this Charcuterie Board Pizza for 3 Little Pigs. You can find the full recipe here on their website.

Radish Violas on Toast

Dress up a simple toast with your favorite spread by adding these cute violas made out of purple daikon. Or make a whole bunch of crostini to snack on while having a romantic movie night at home.

Here are step-by-step photos that show how I made these. I used mini toasts for the base and pâté for the spread in the tutorial but you could use whatever spread as you want. You just need something that will hold the cut radish pieces in place.

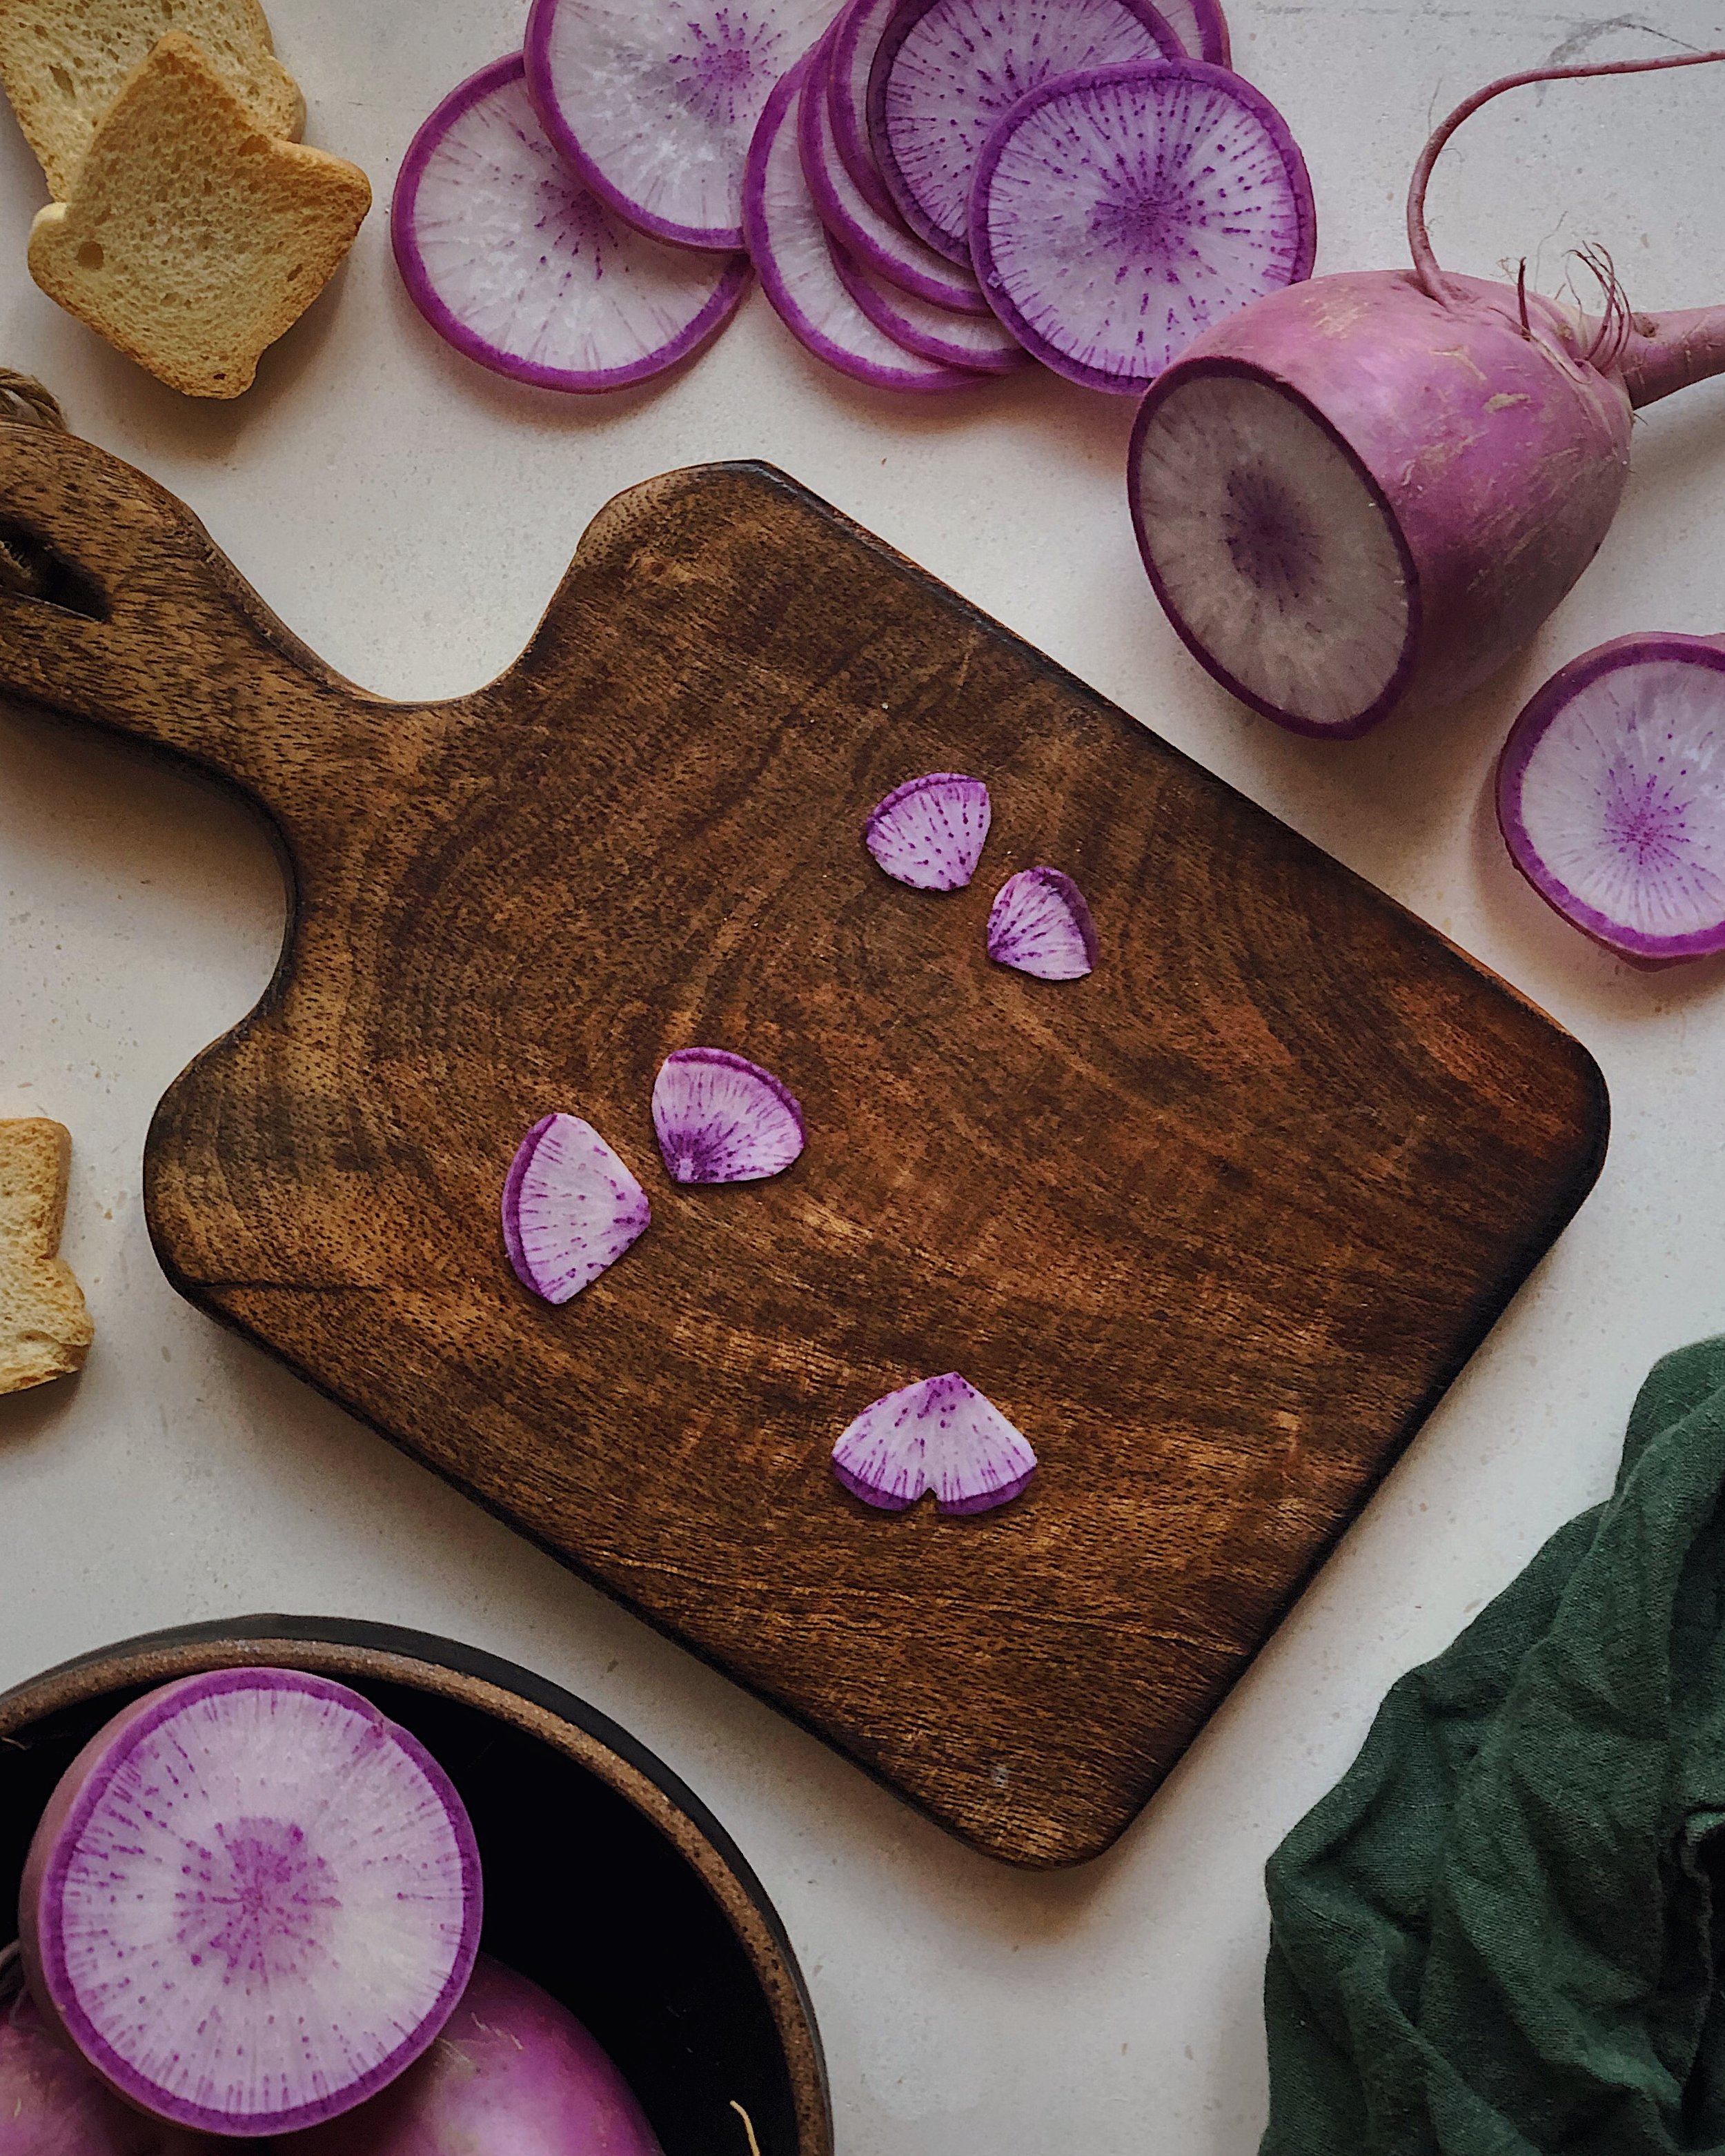
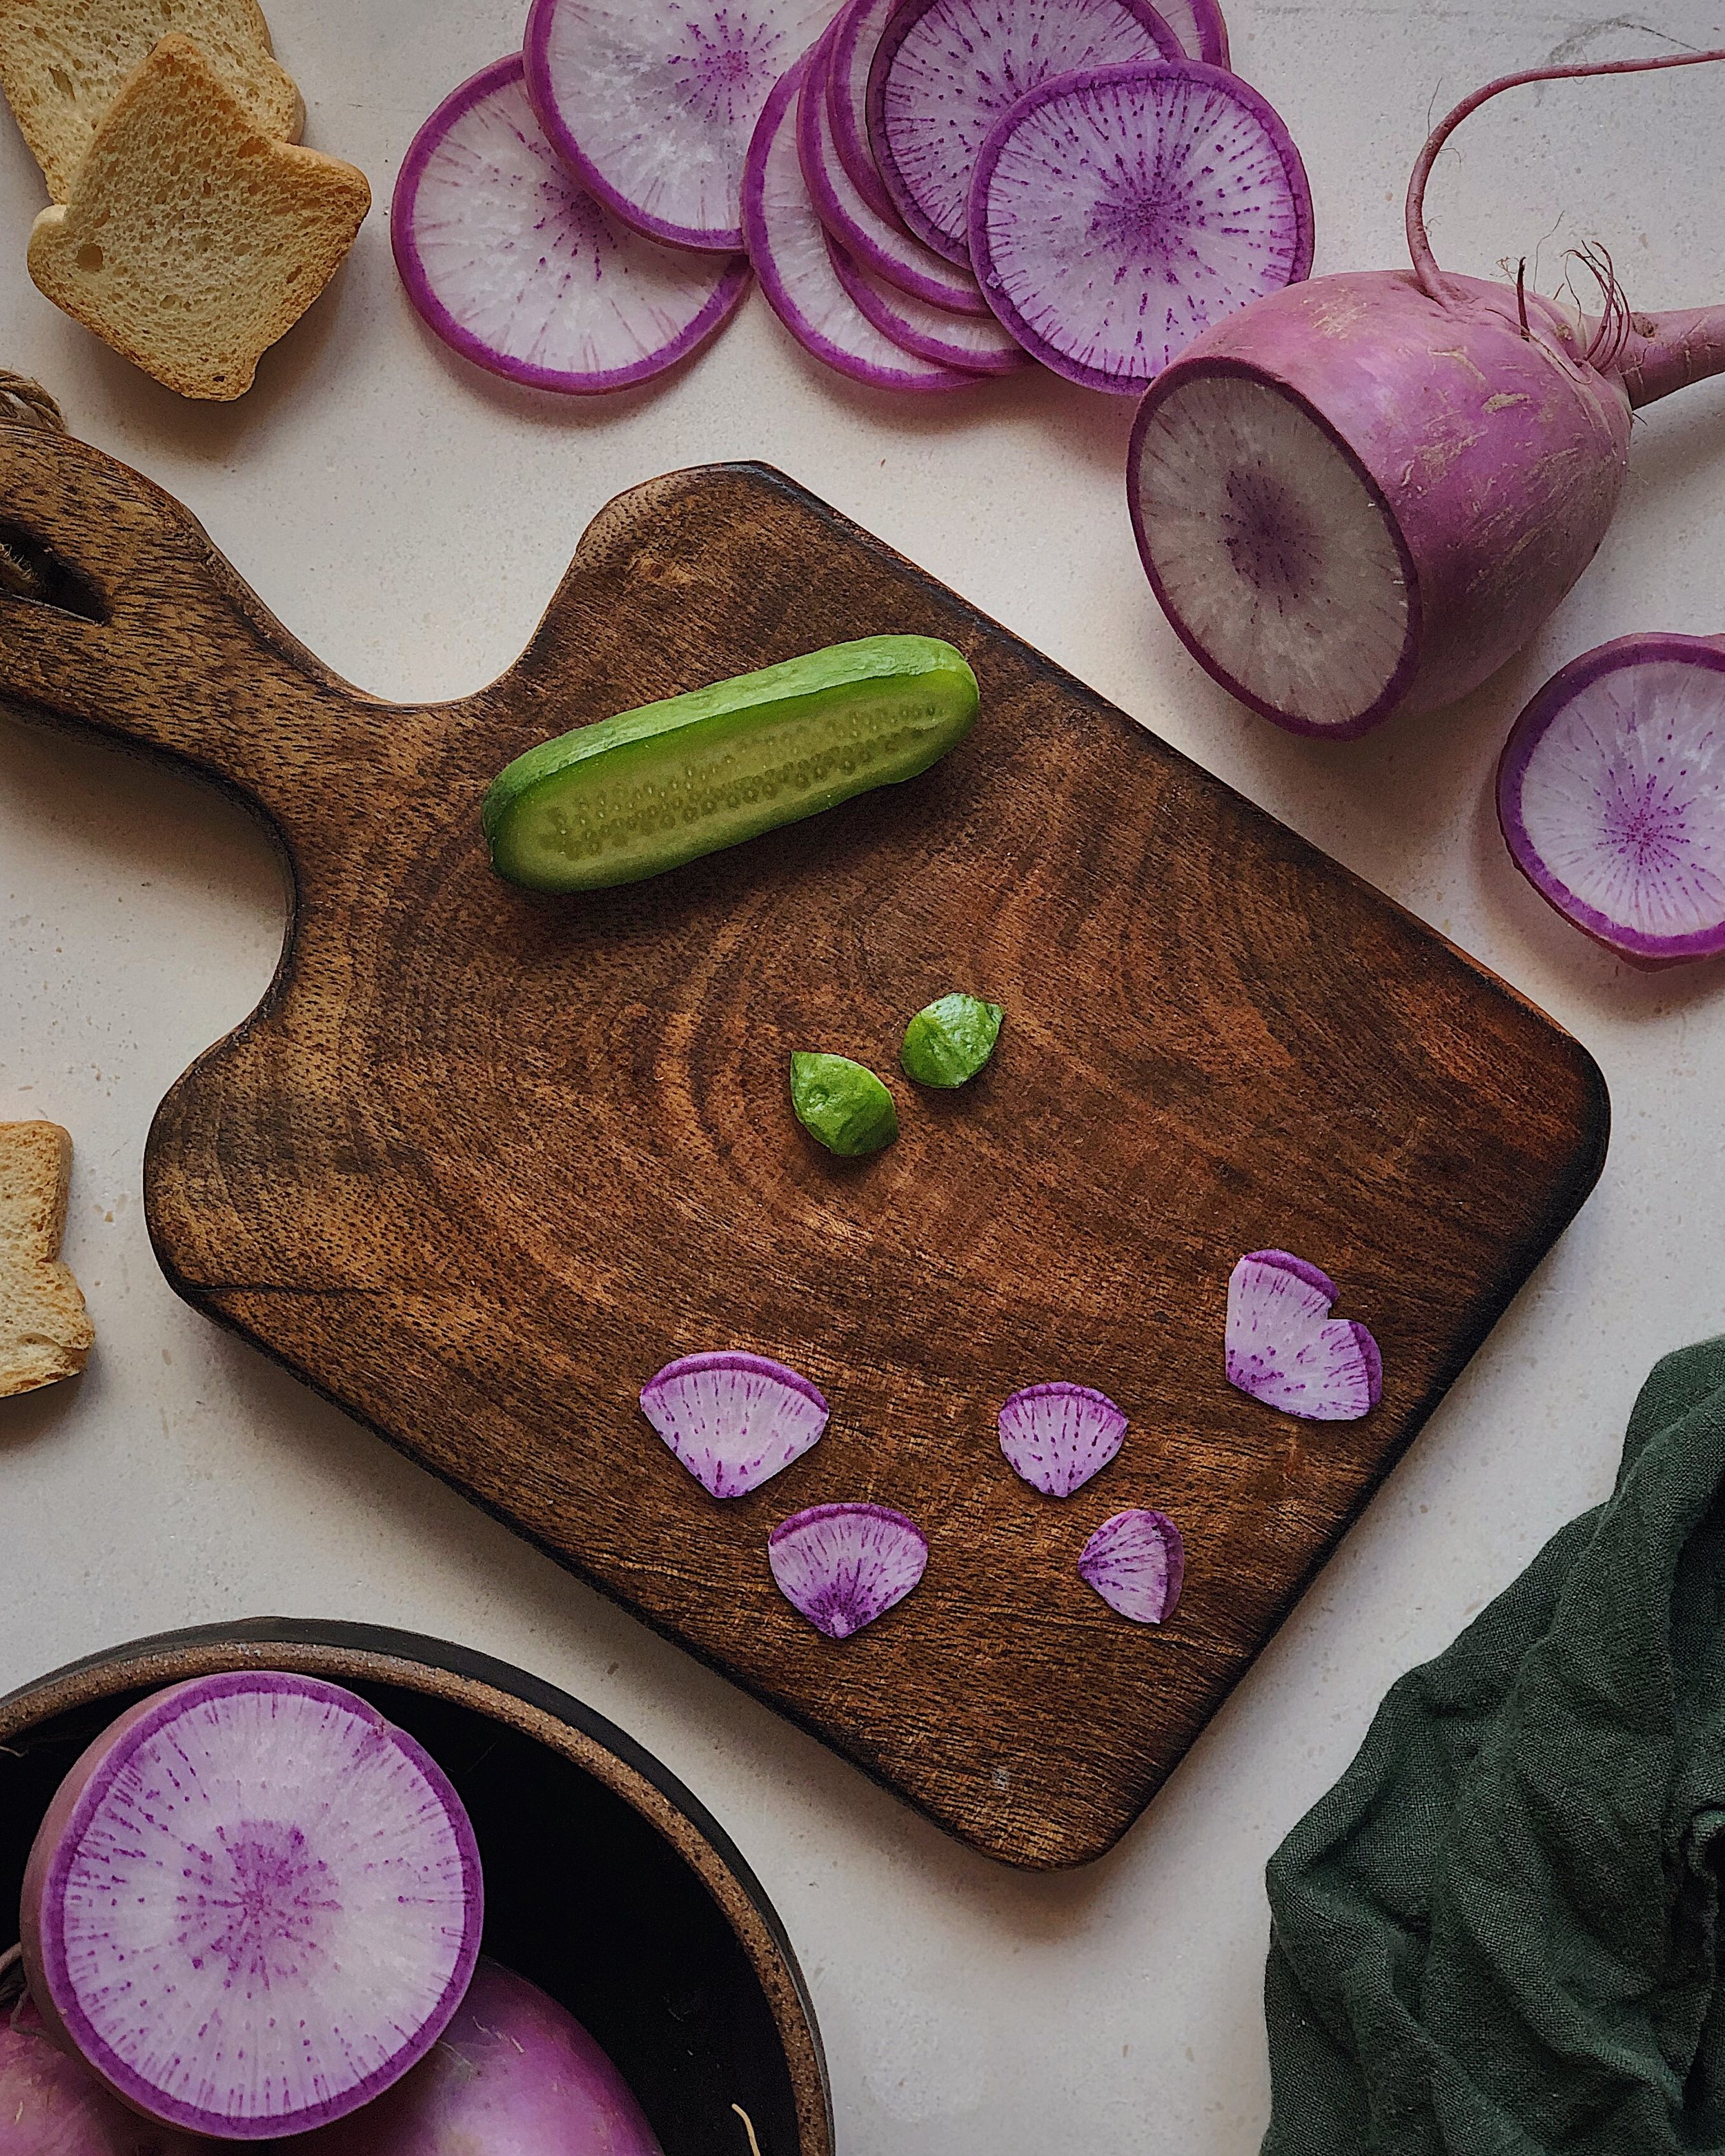
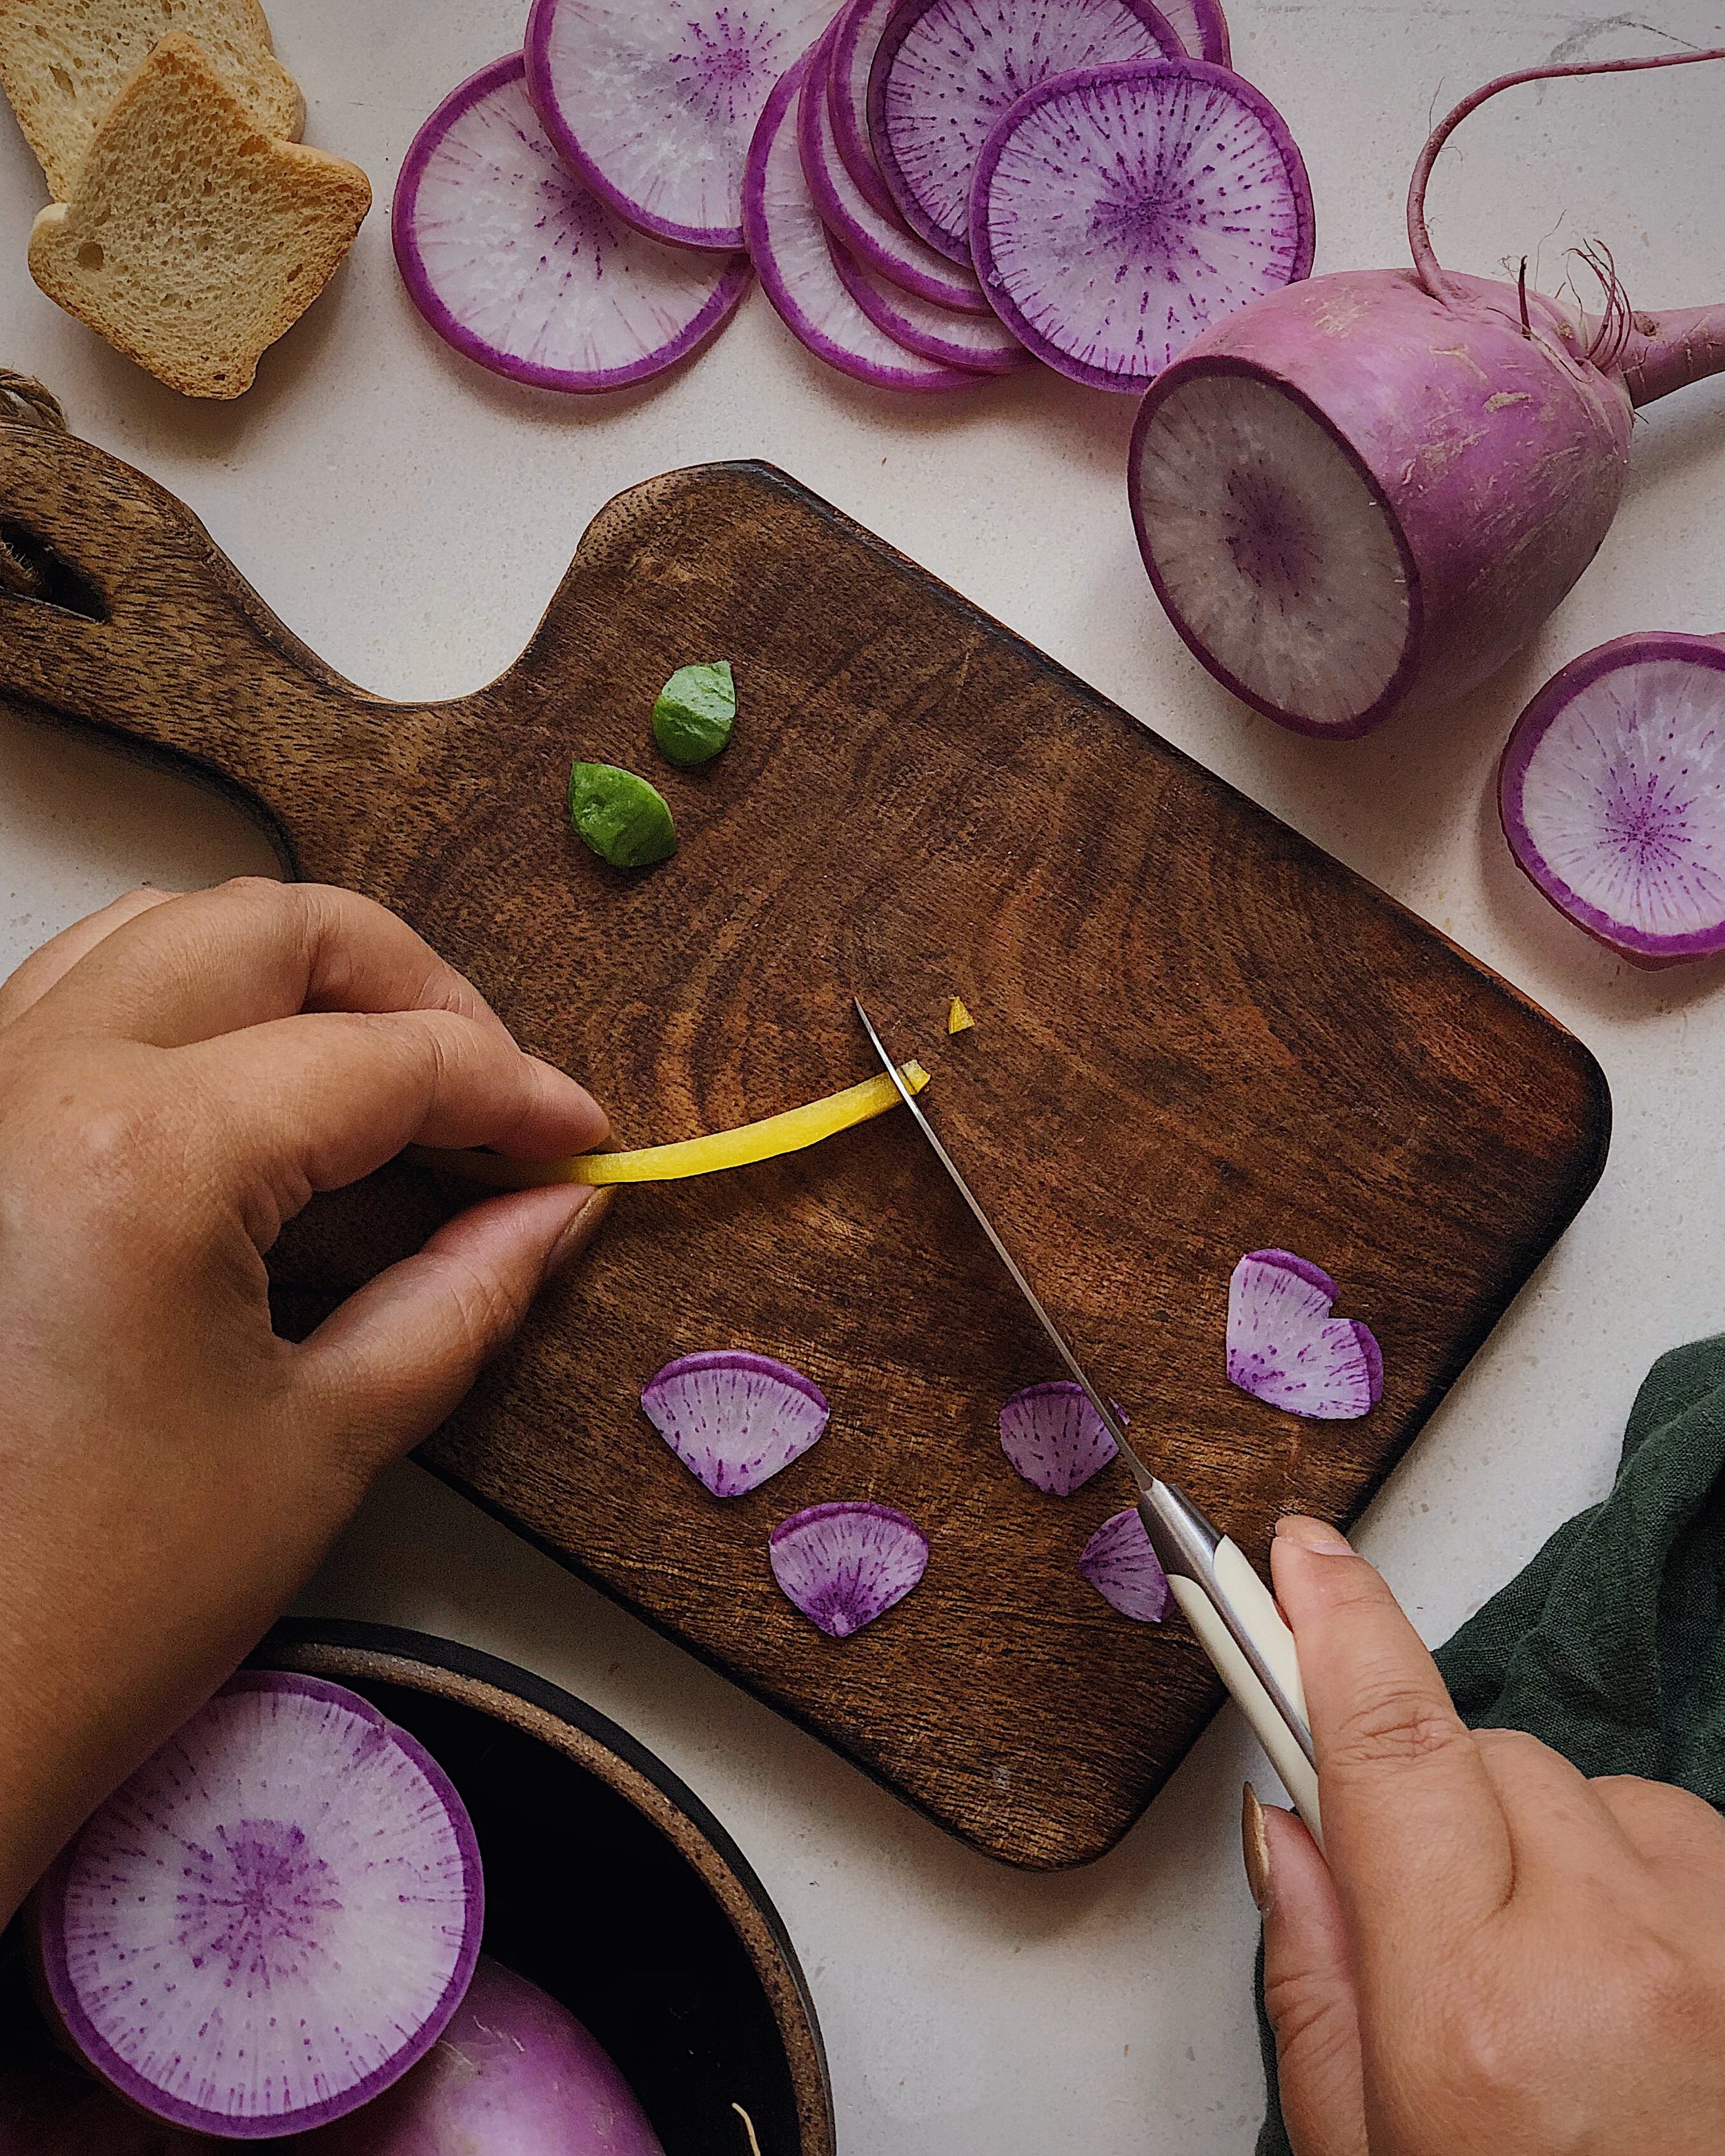
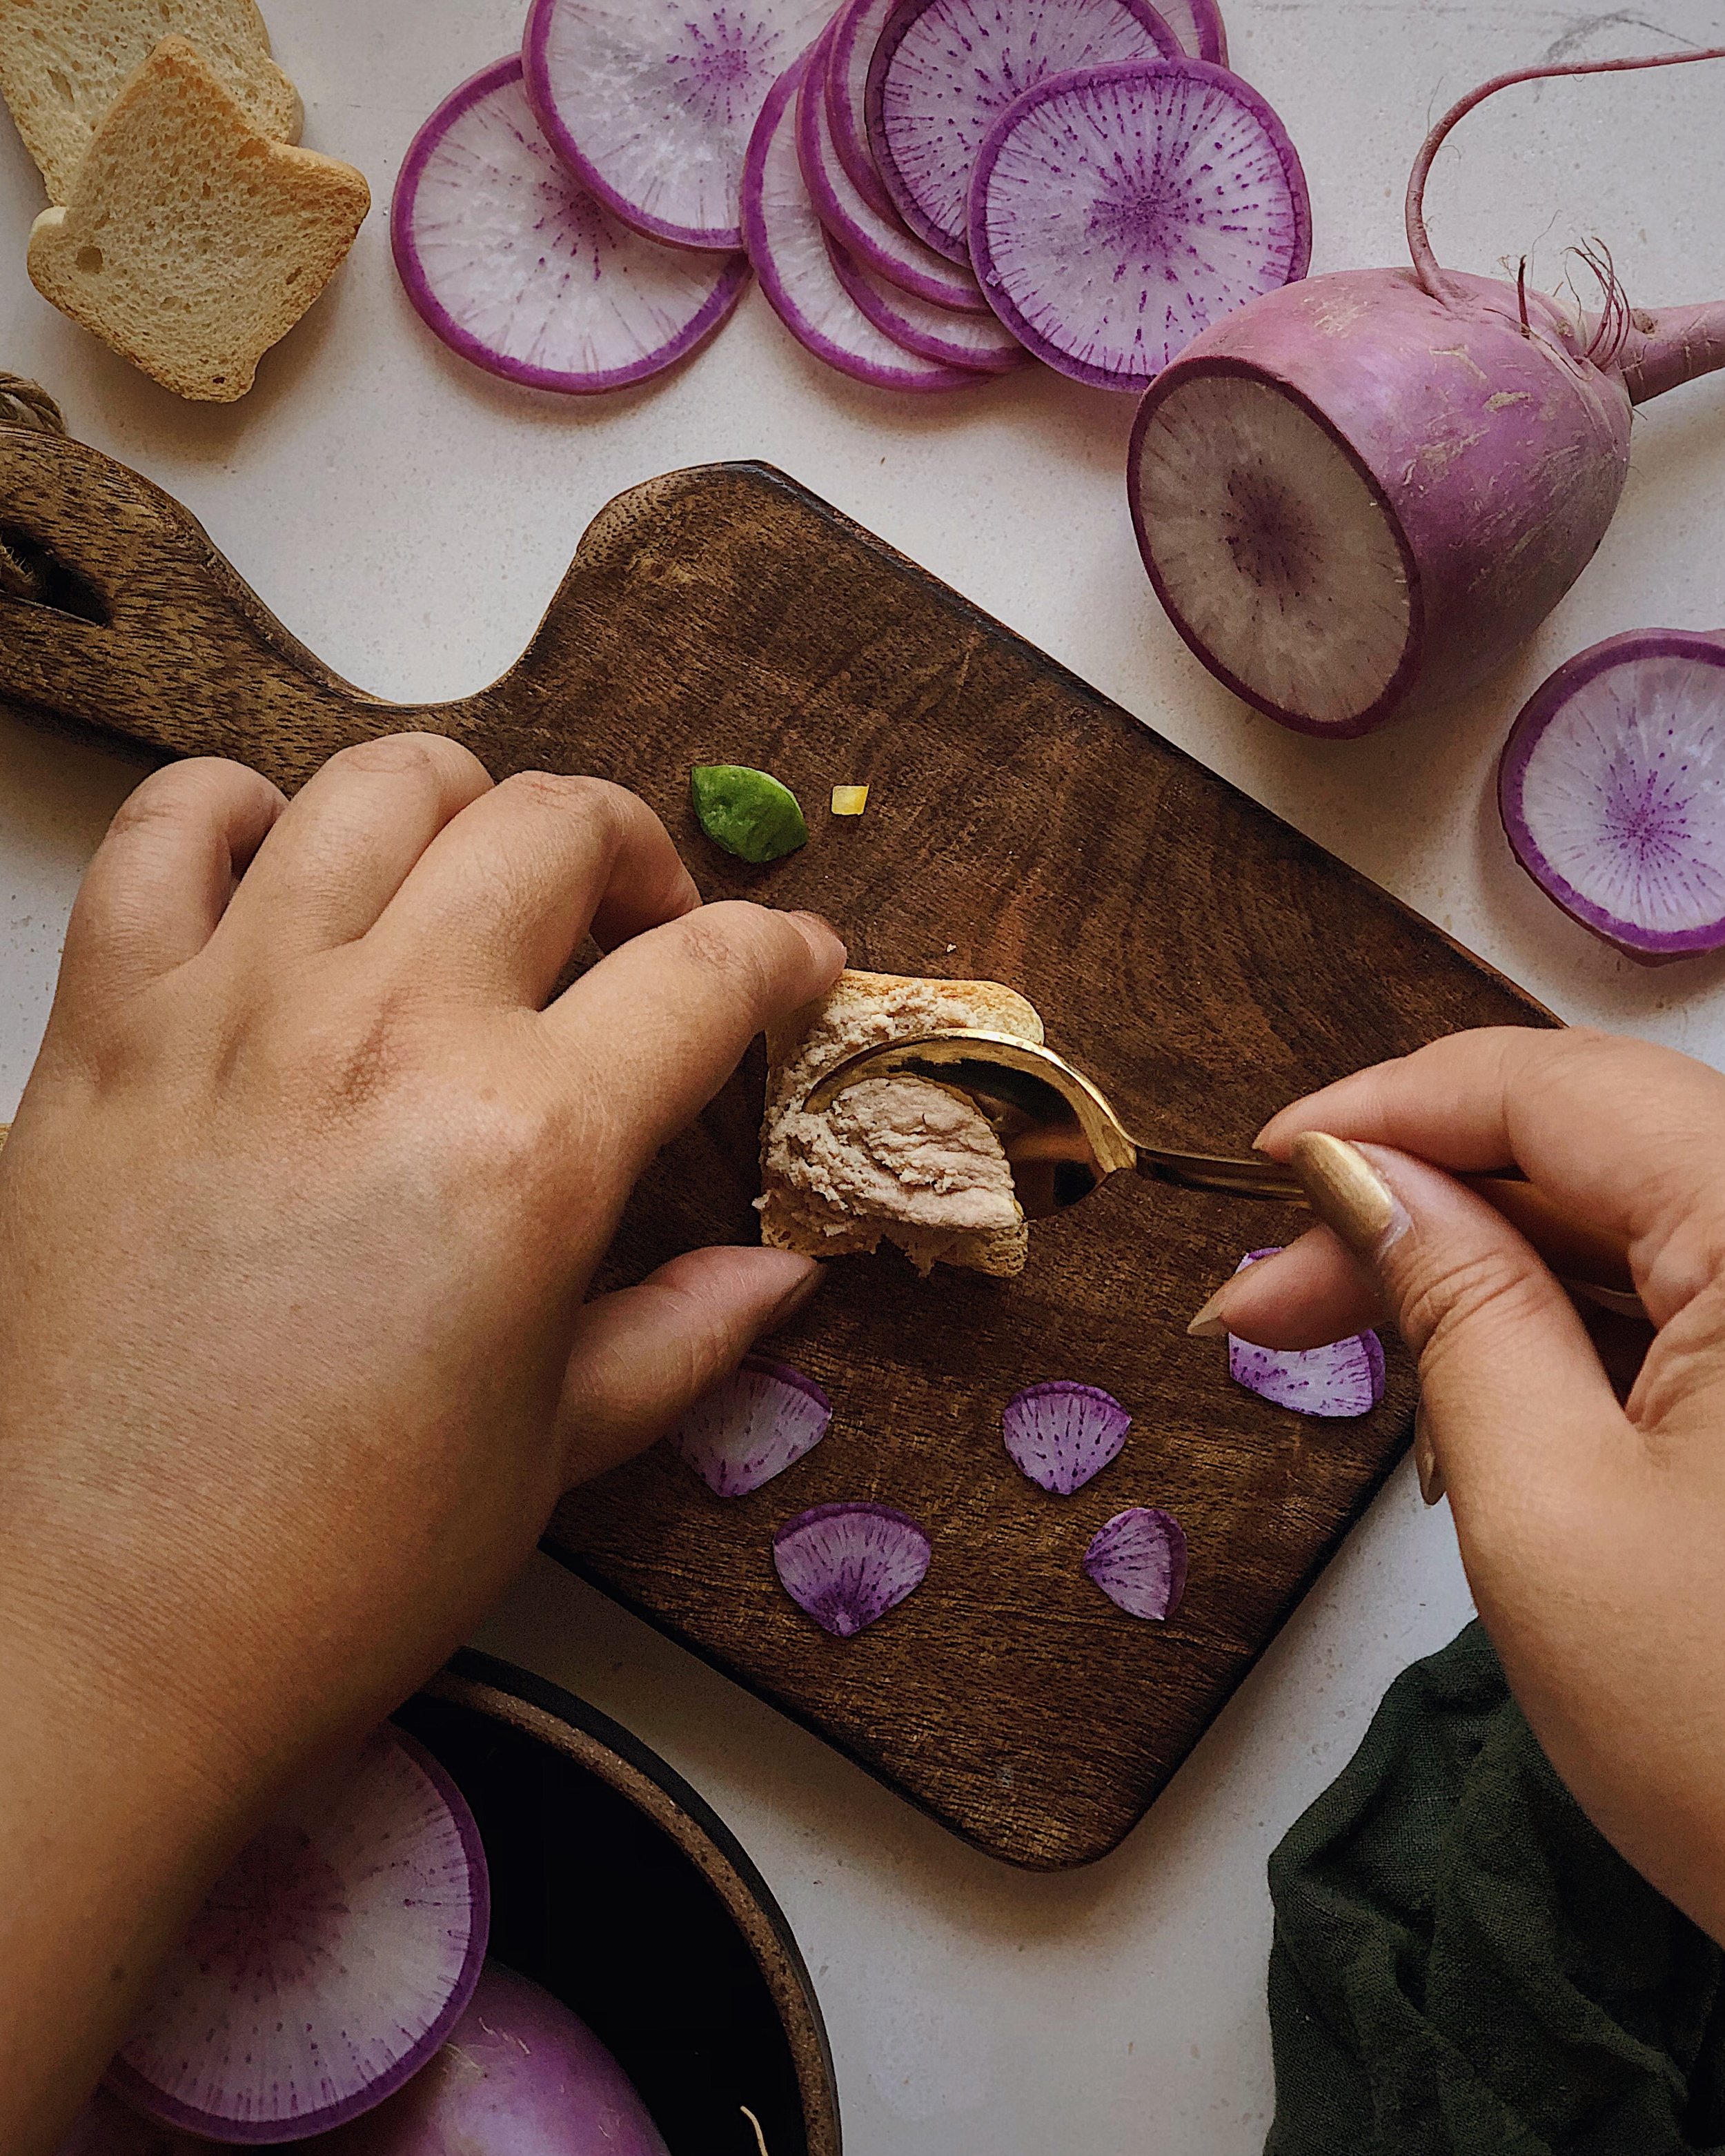
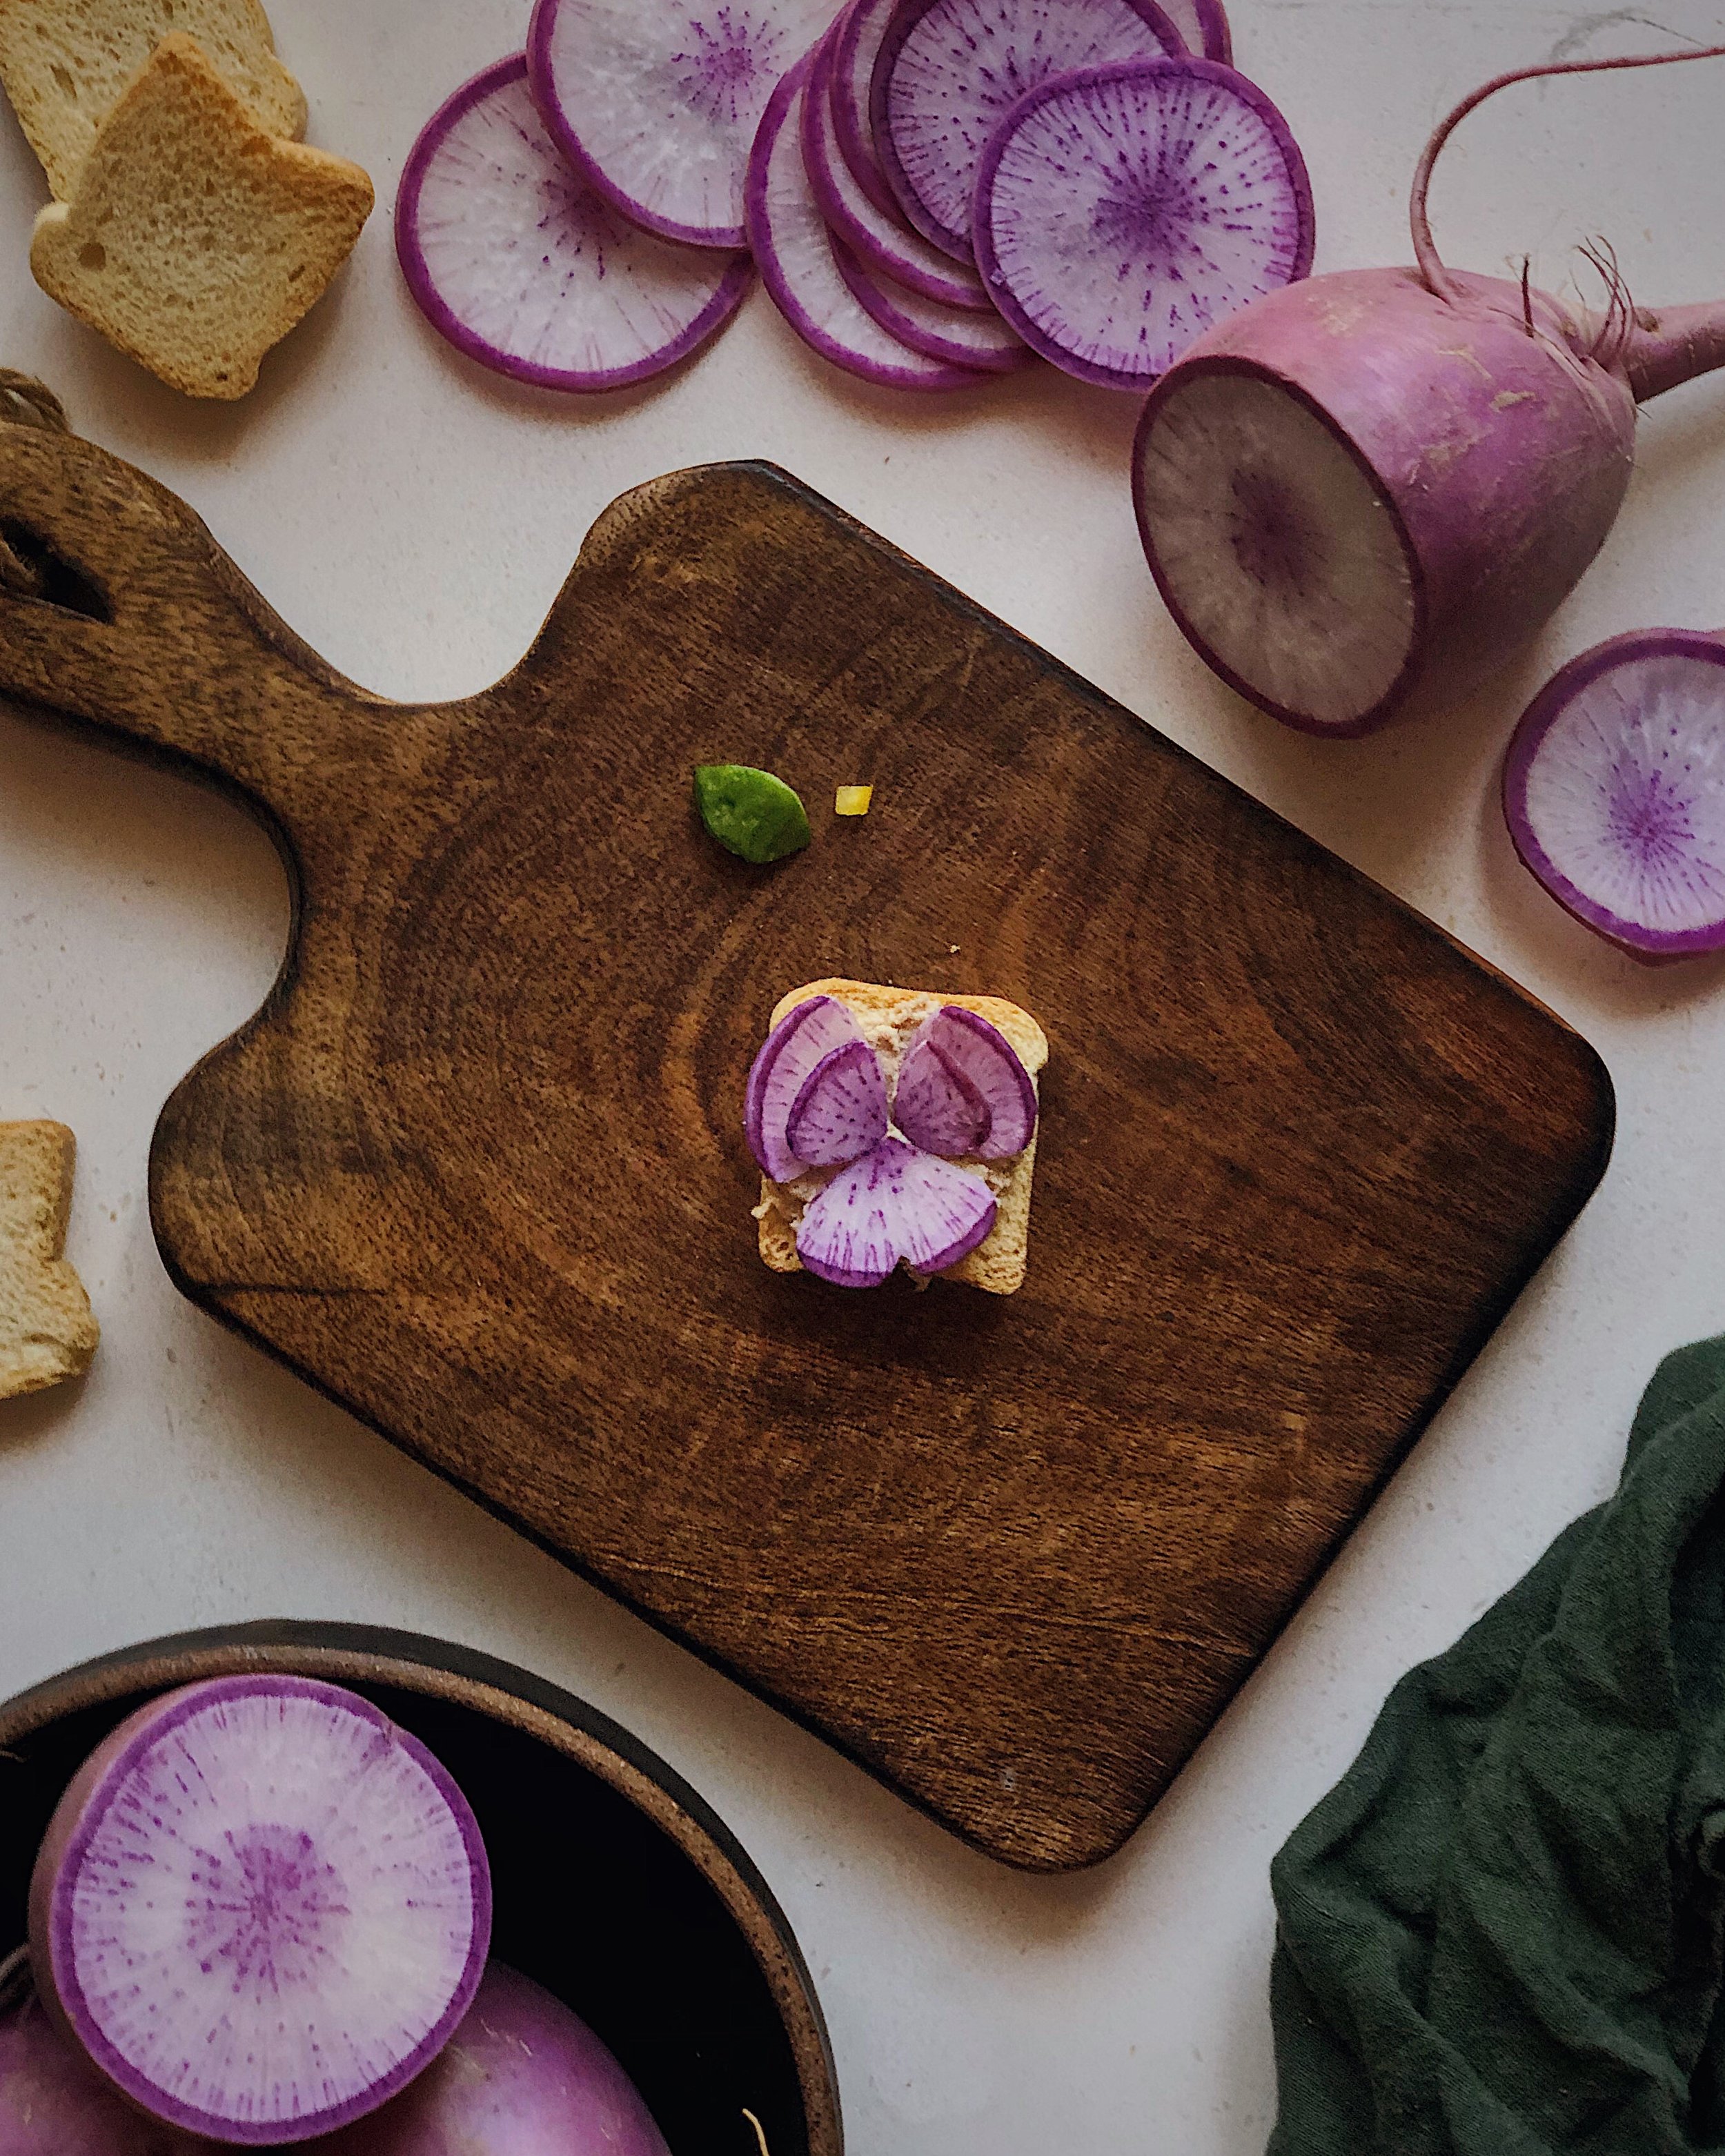
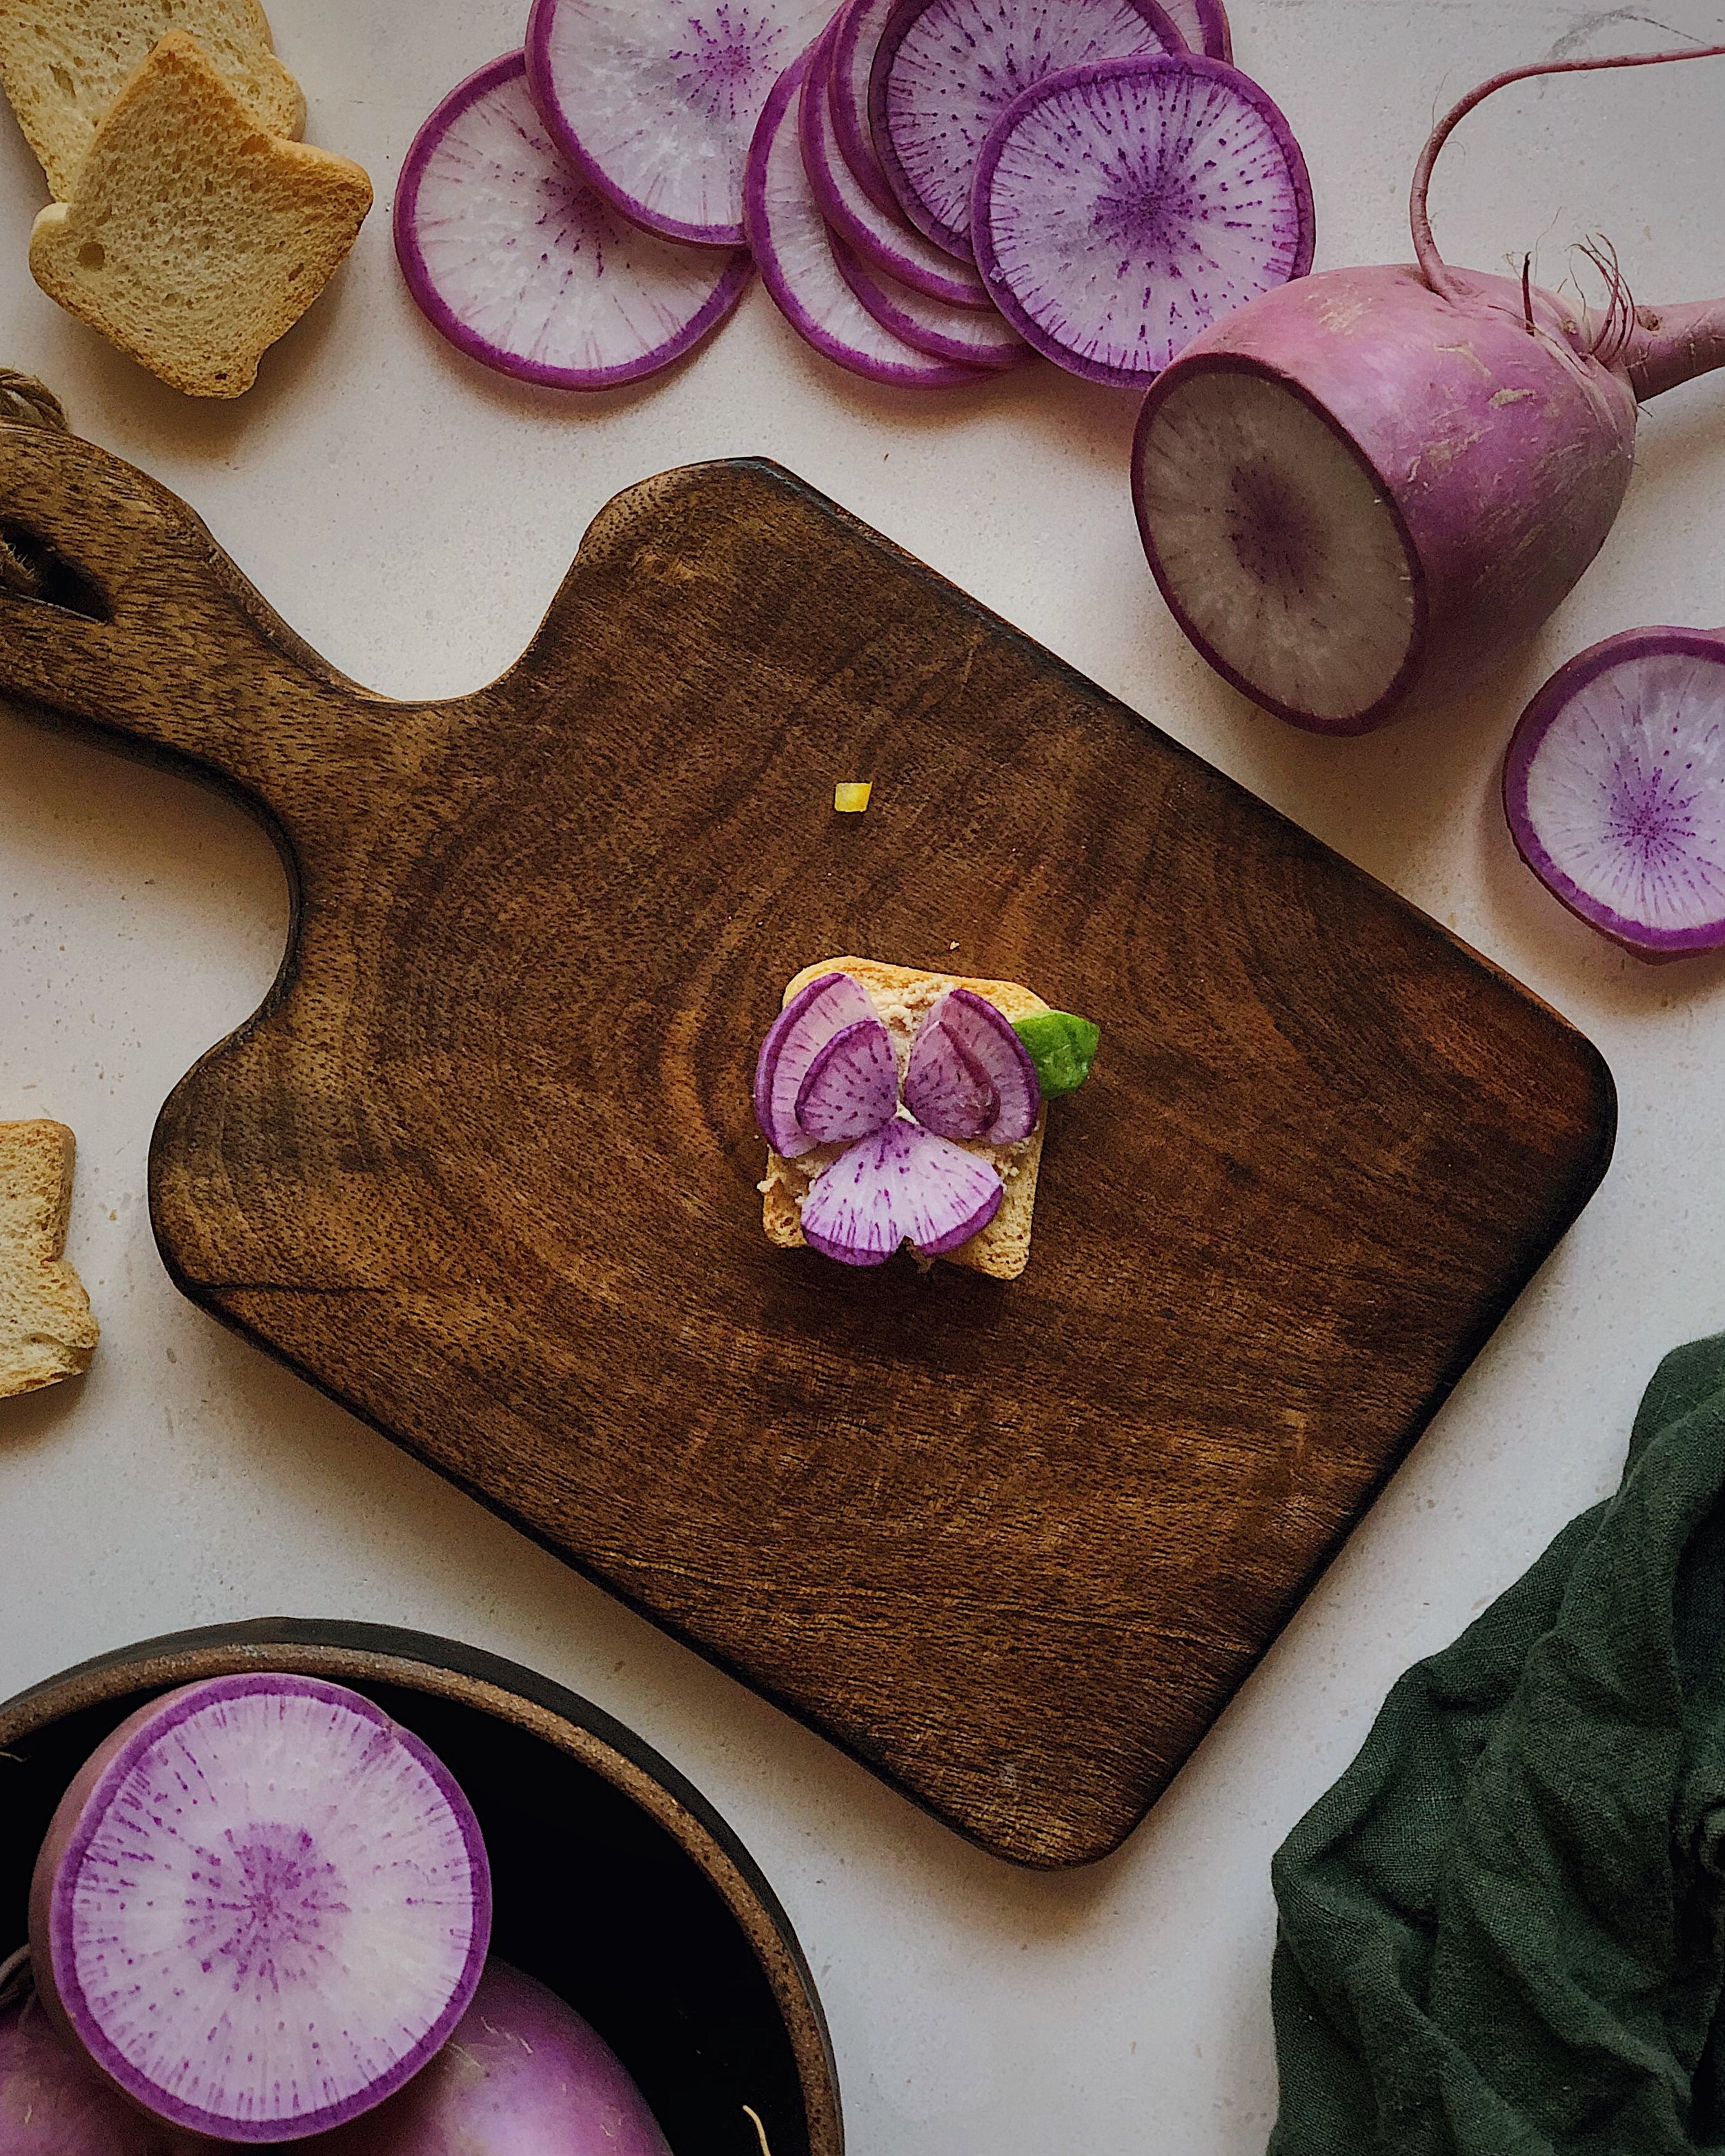
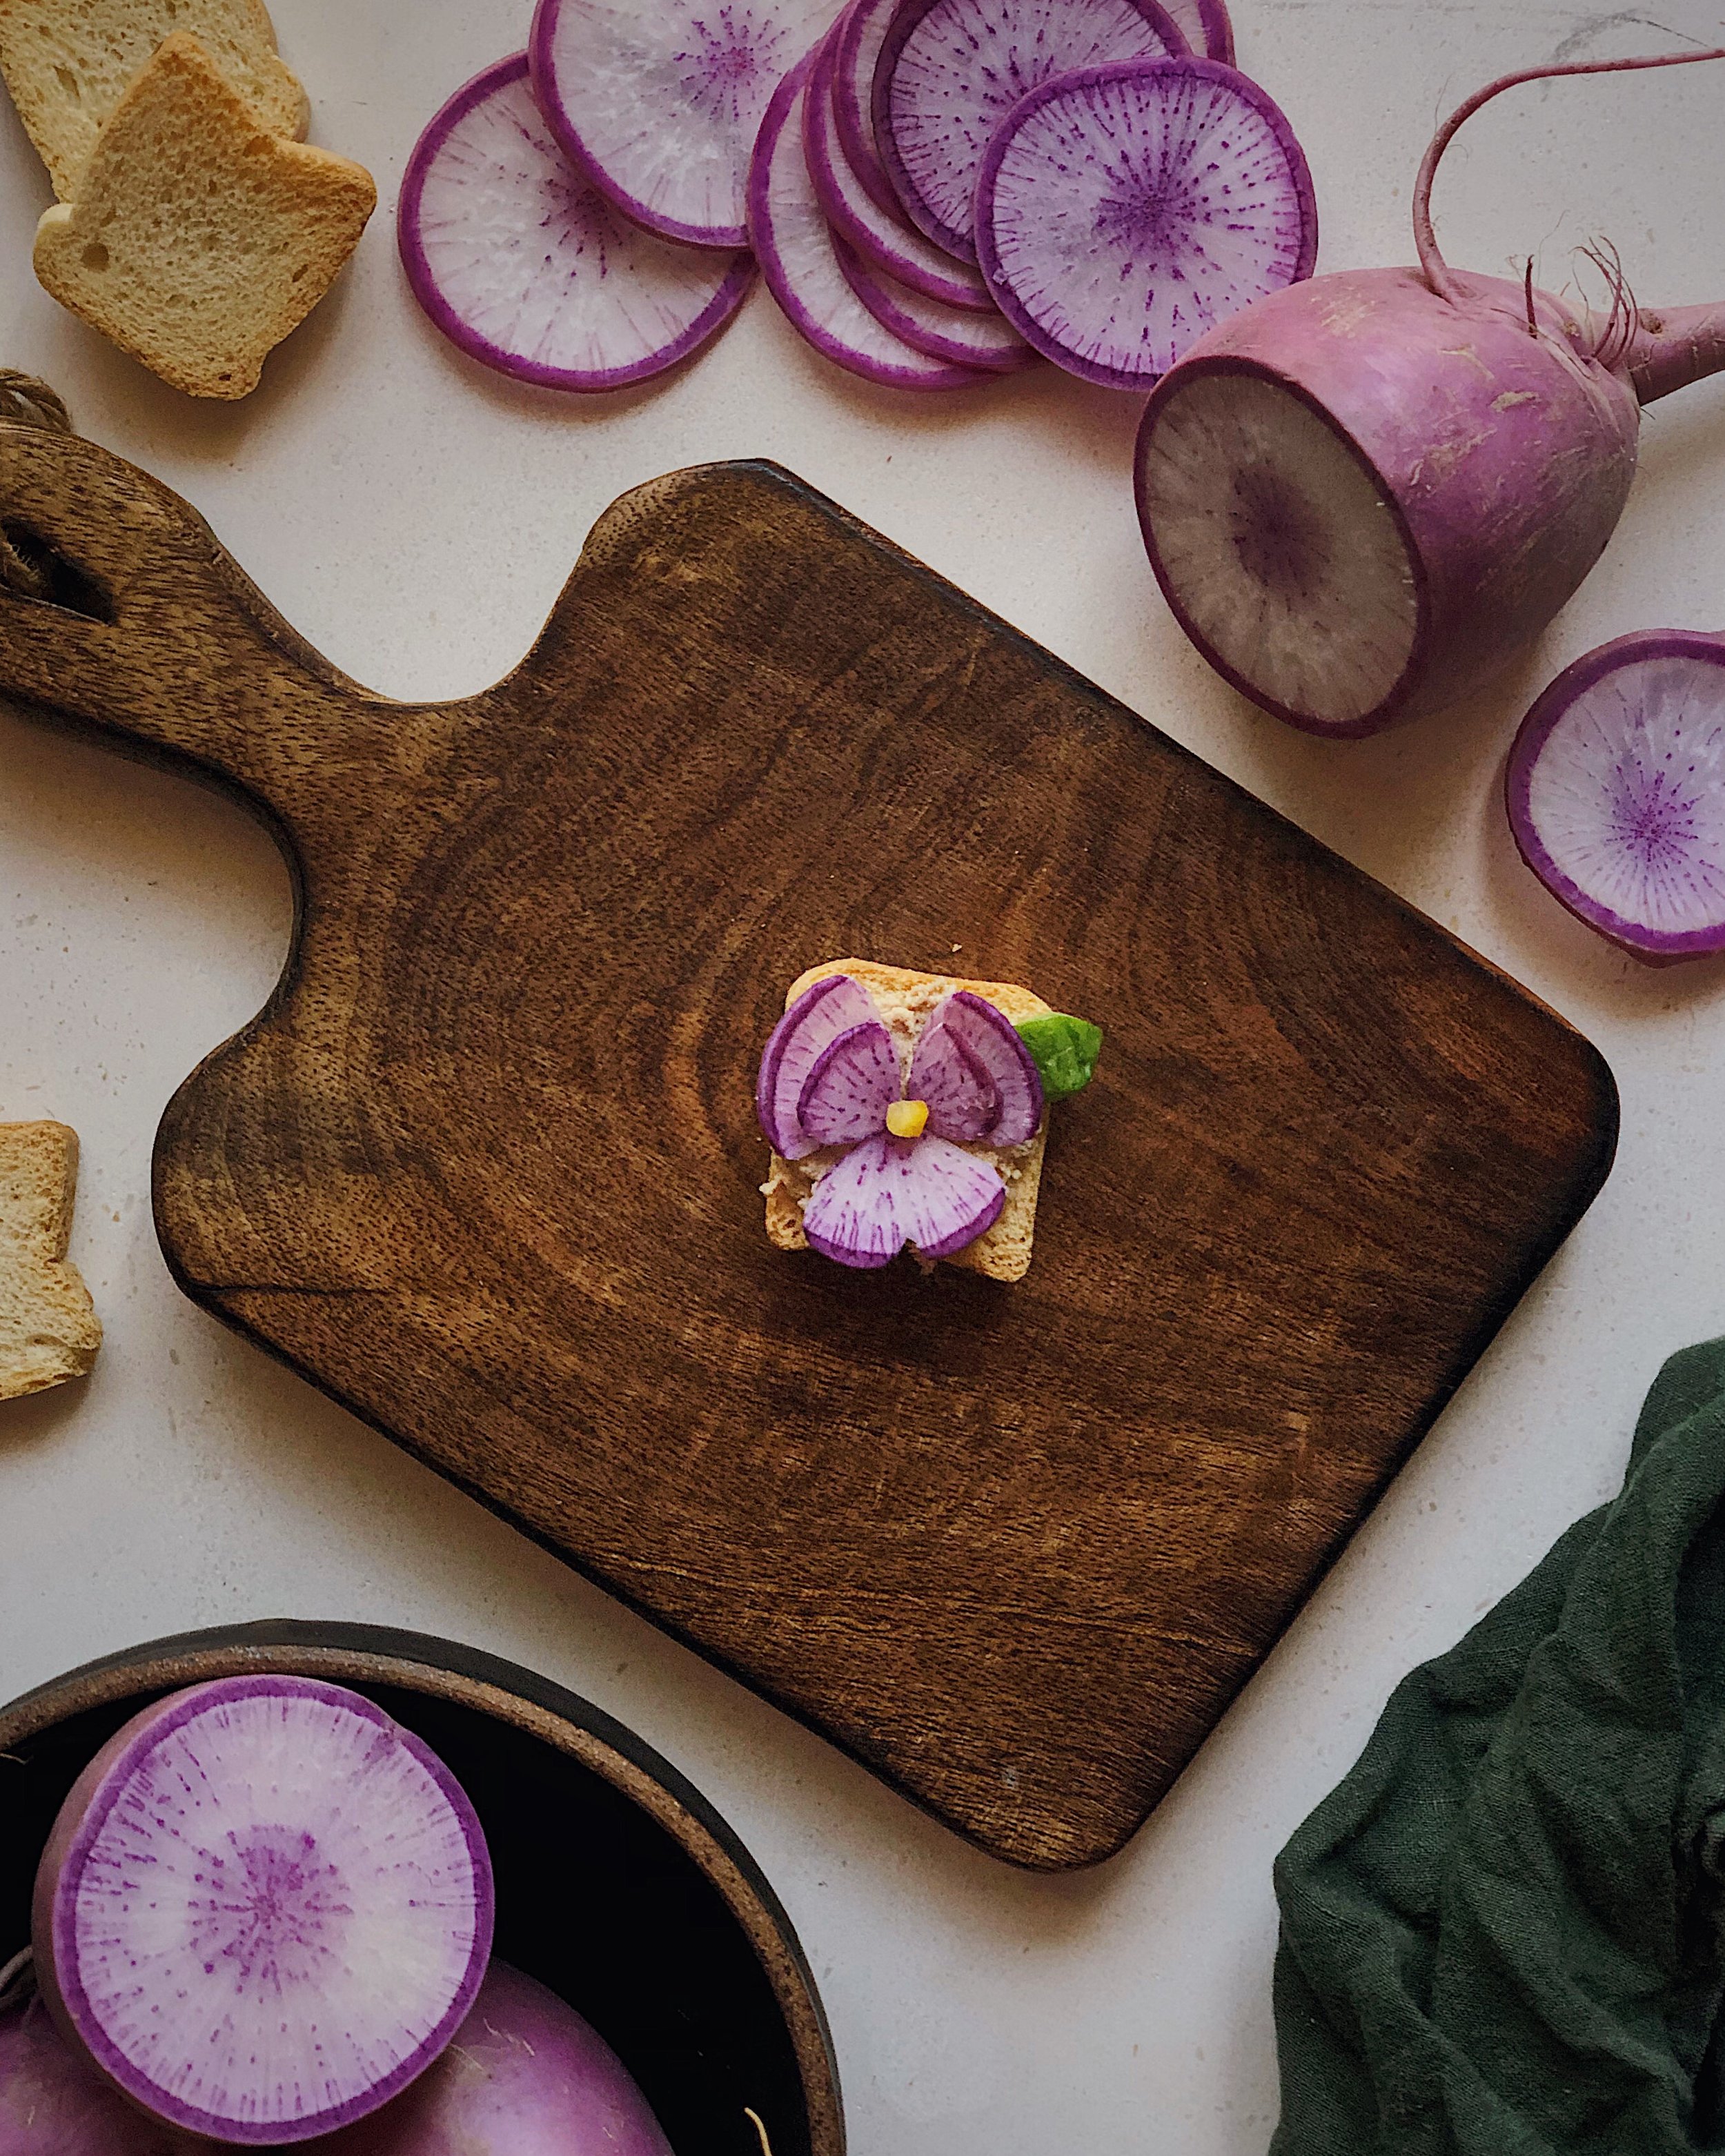
For an alternative color option, soak the purple daikon slices in something acidic like lemon juice and they will turn hot pink! You could also use white daikon and soak them in some beet juice to make pink flowers if you can’t find purple daikon.

Sweet Potato Roses on Cheddar-Stuffed Focaccia

Unlike actual flowers, baking can often improve the appearance of flowers that are made out of veggies, curling their “petals’ and making them look more natural. I think that is very true when making roses out of sweet potato and baking them into the surface of an easy from-scratch focaccia. You can find the full recipe for this mushroom, sweet potato, and cheddar stuffed focaccia here on my blog.
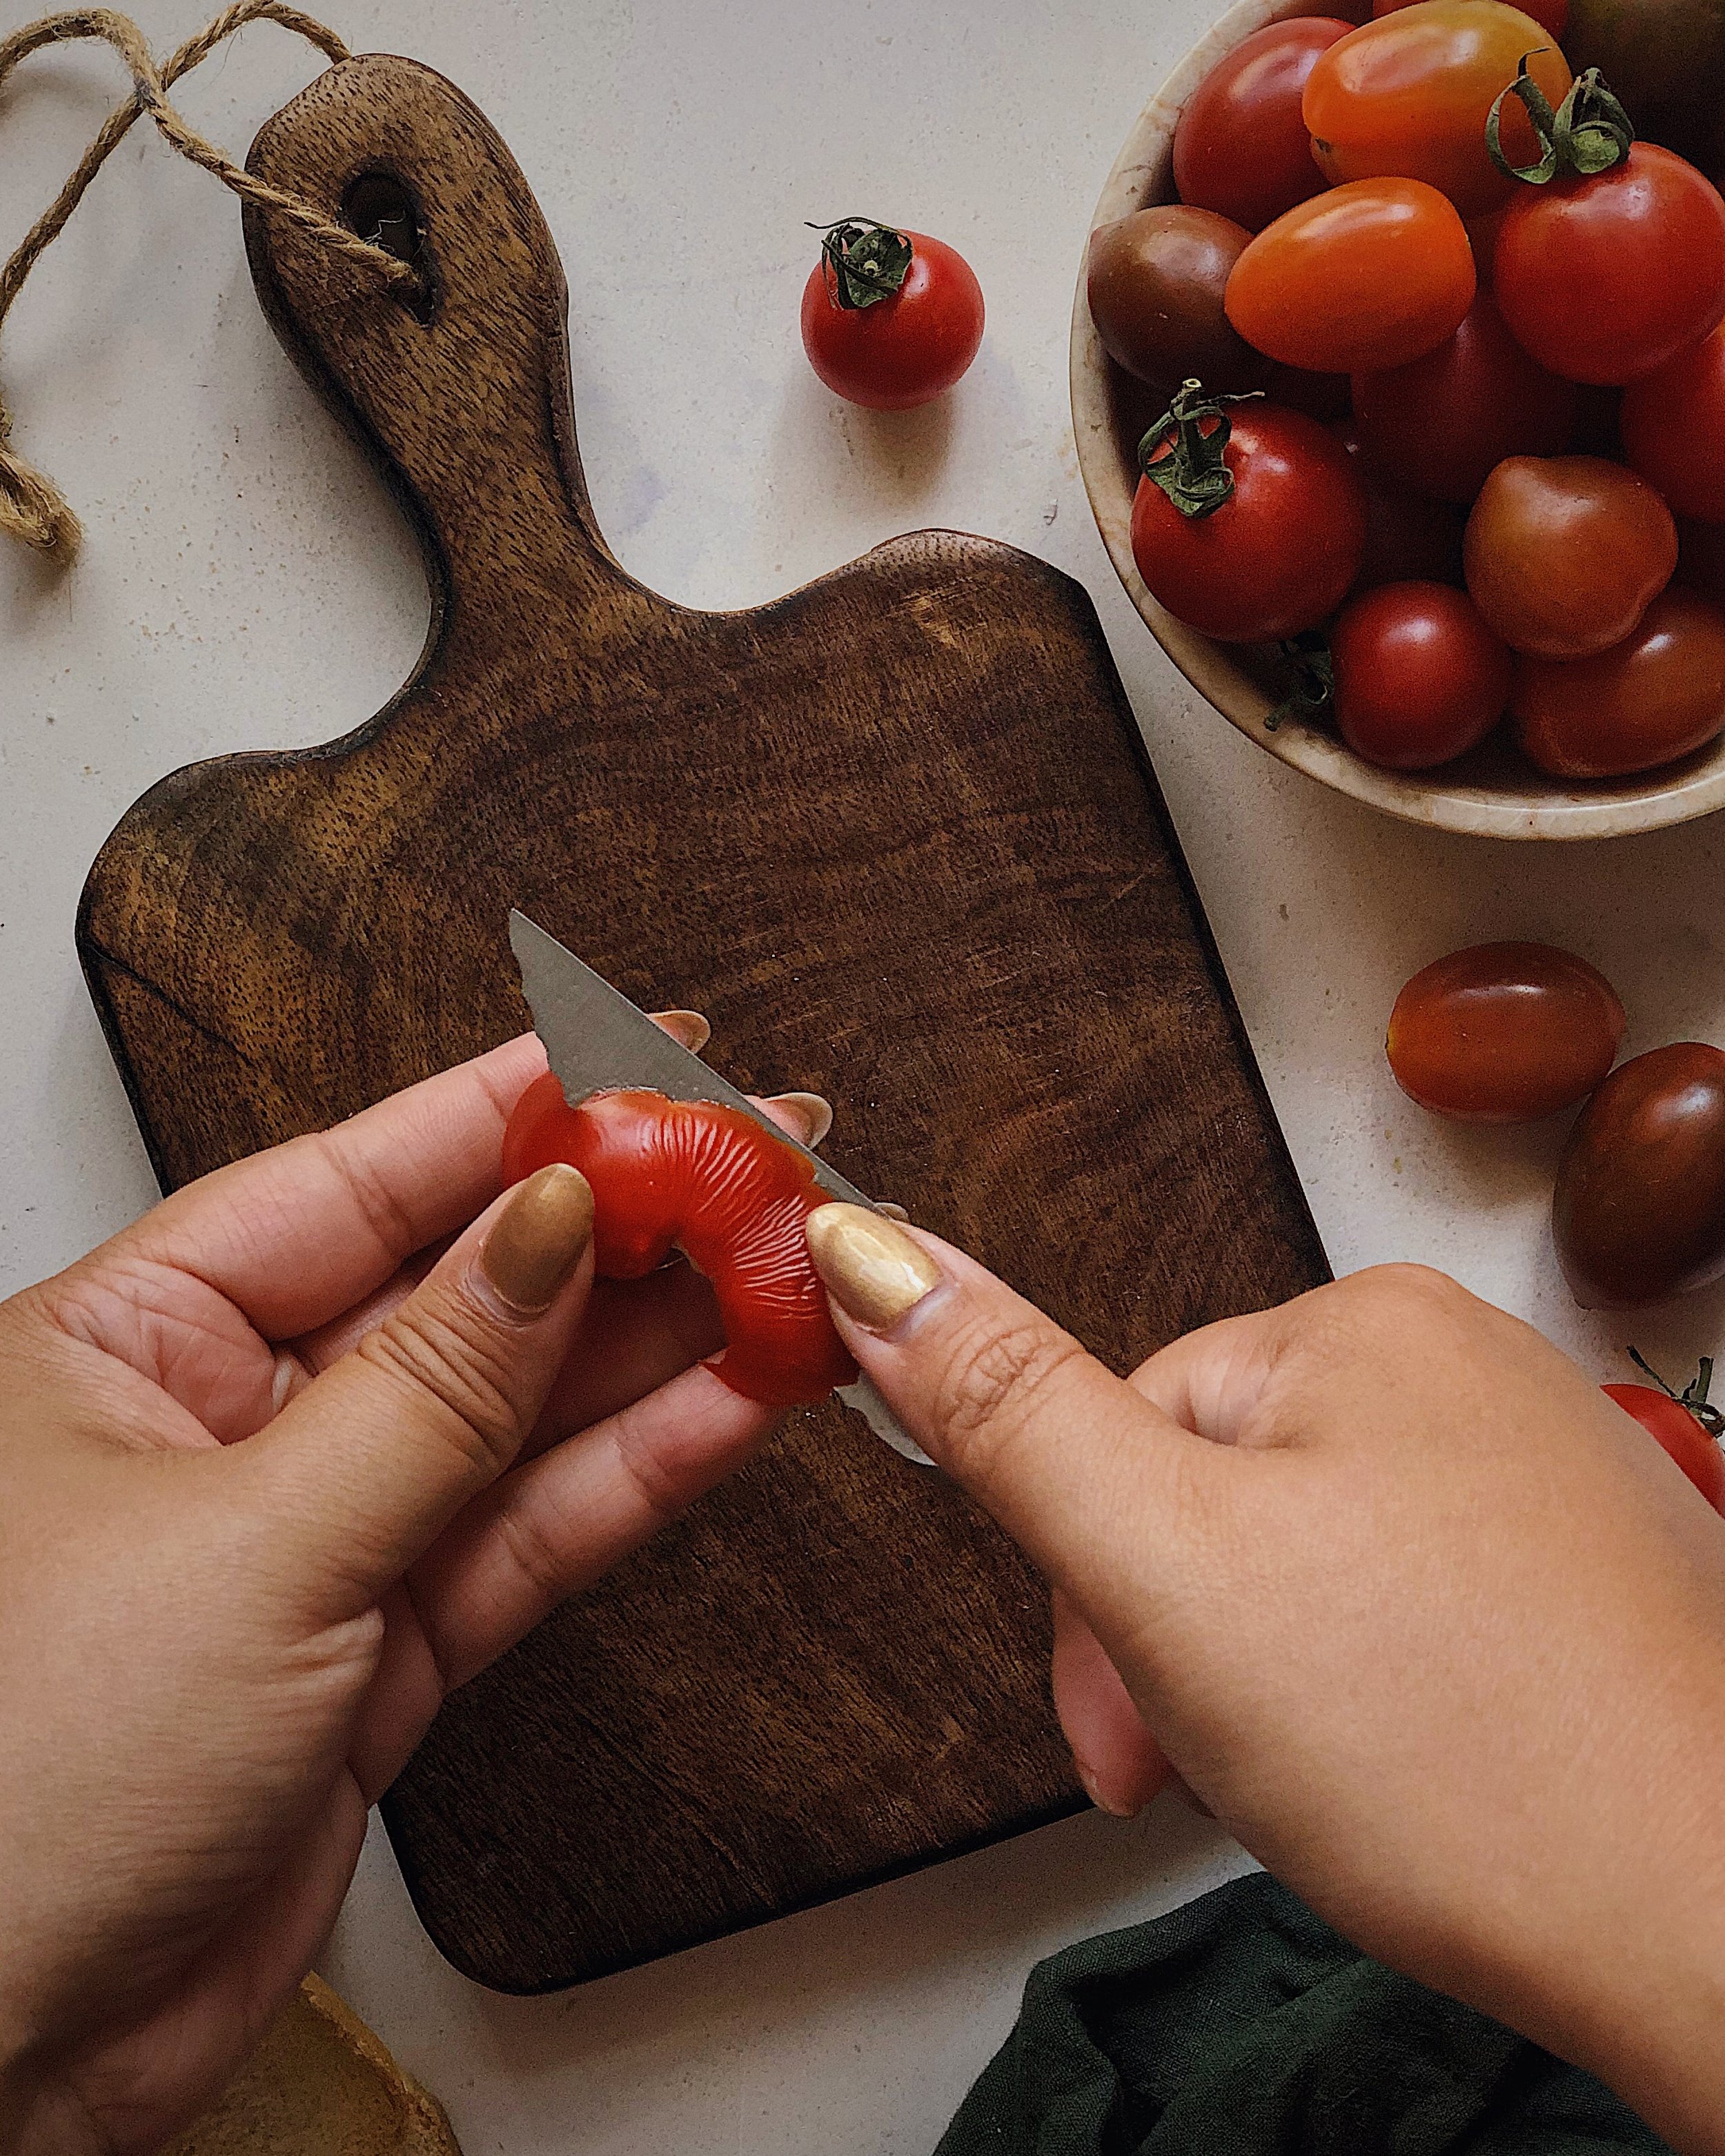
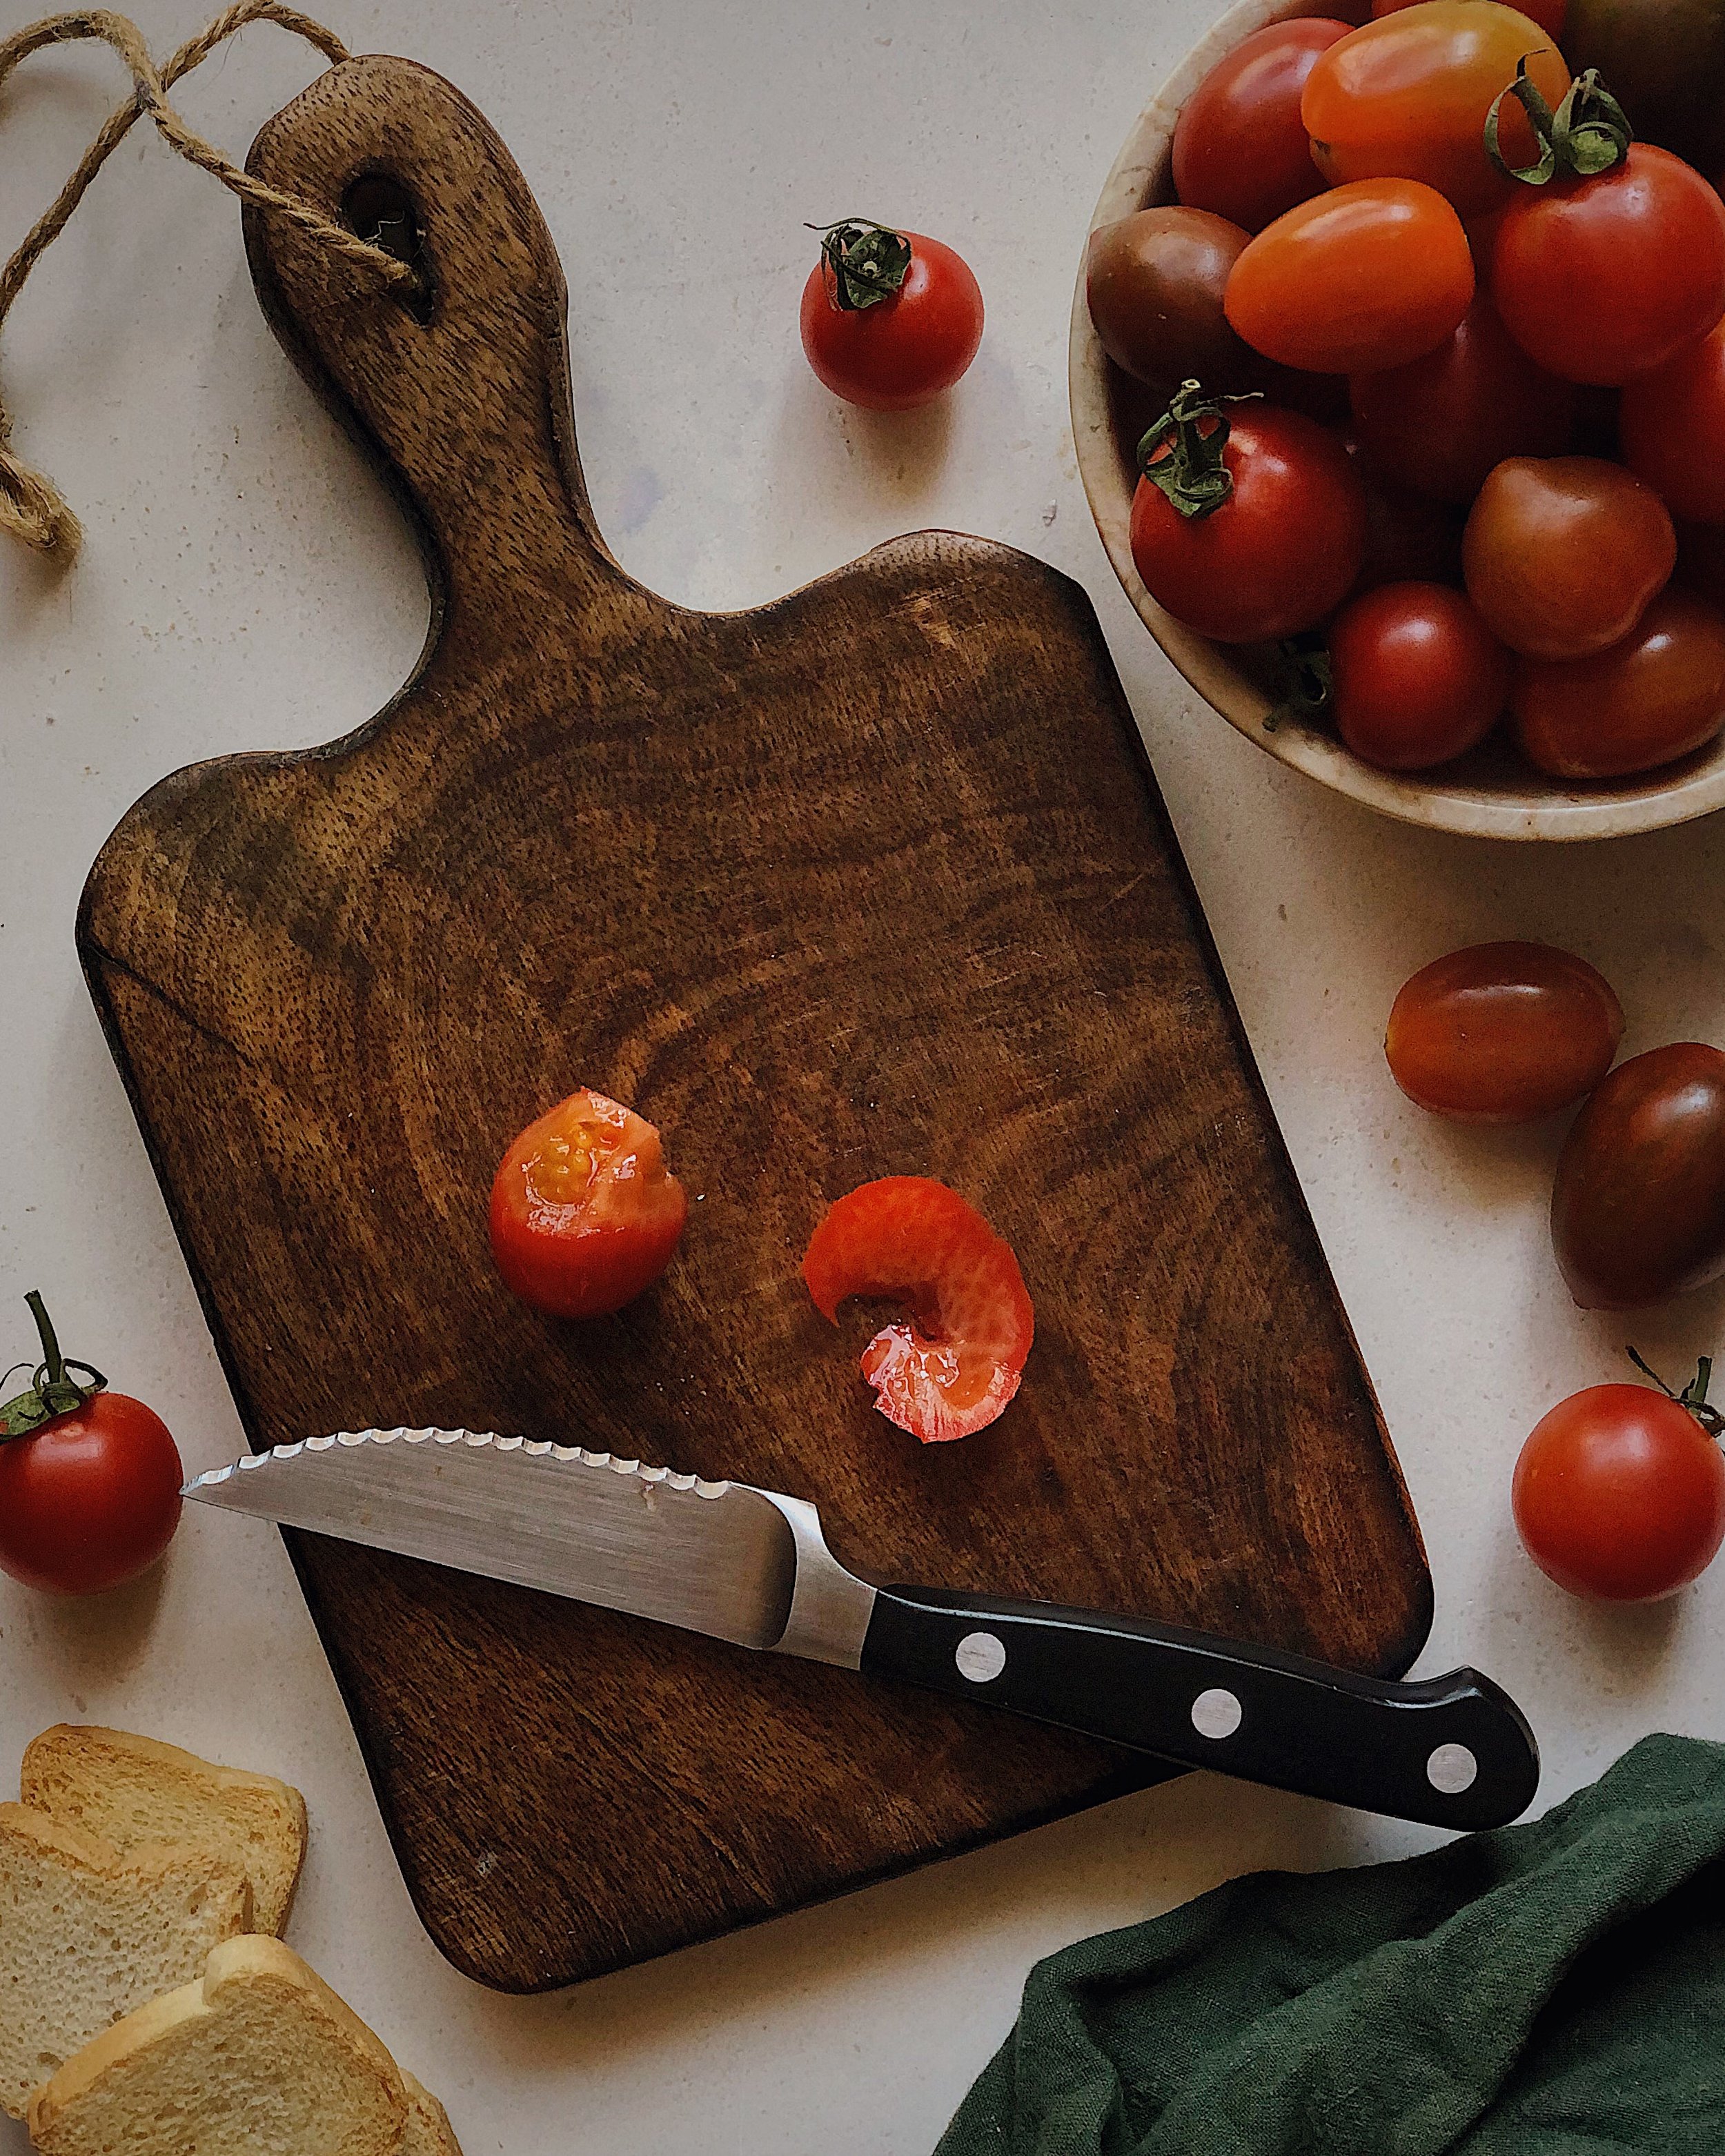
Tomato Rose Caprese

I love making these tomato roses in the summertime when I can get all sorts of fun varieties of cherry tomatoes from the farmers market. But you can still make them with regular ol’ store-bought cherry or grape tomatoes; I actually find that it is easier to work with tomatoes when they are firmer, and adding a little sprinkle of salt at the end can really help improve the flavor.

Here are photos that show how I made these.

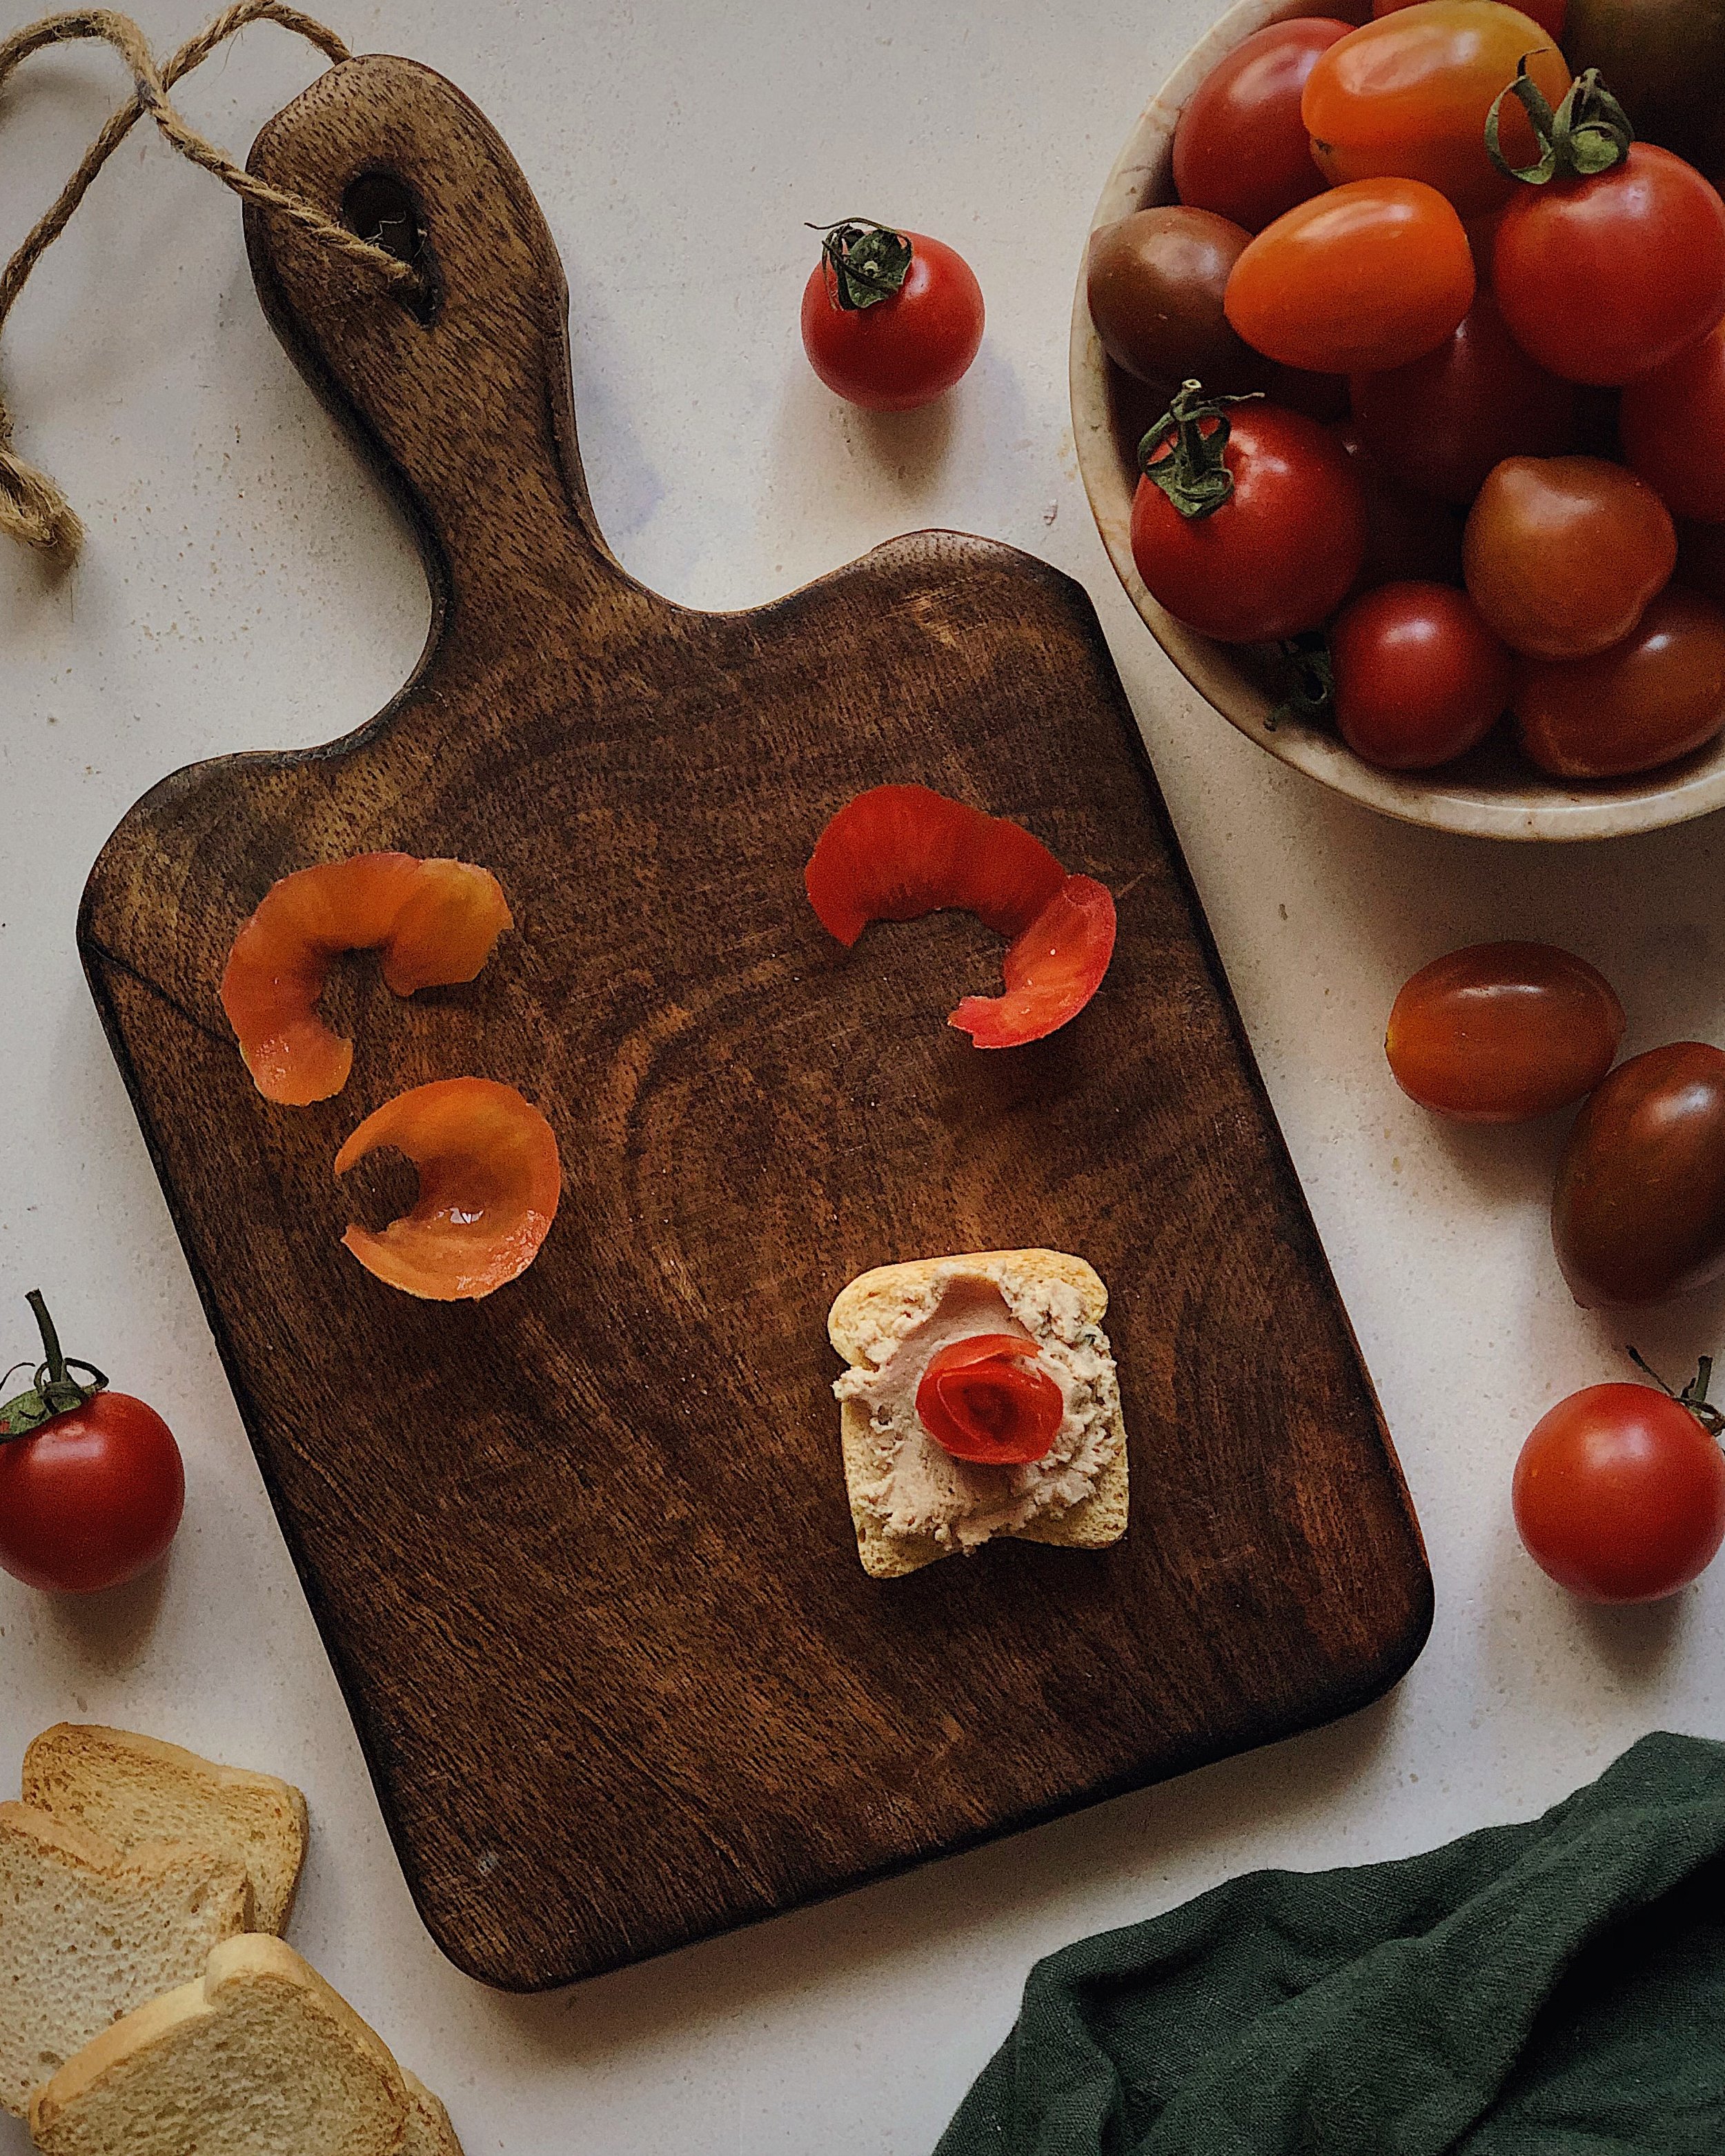
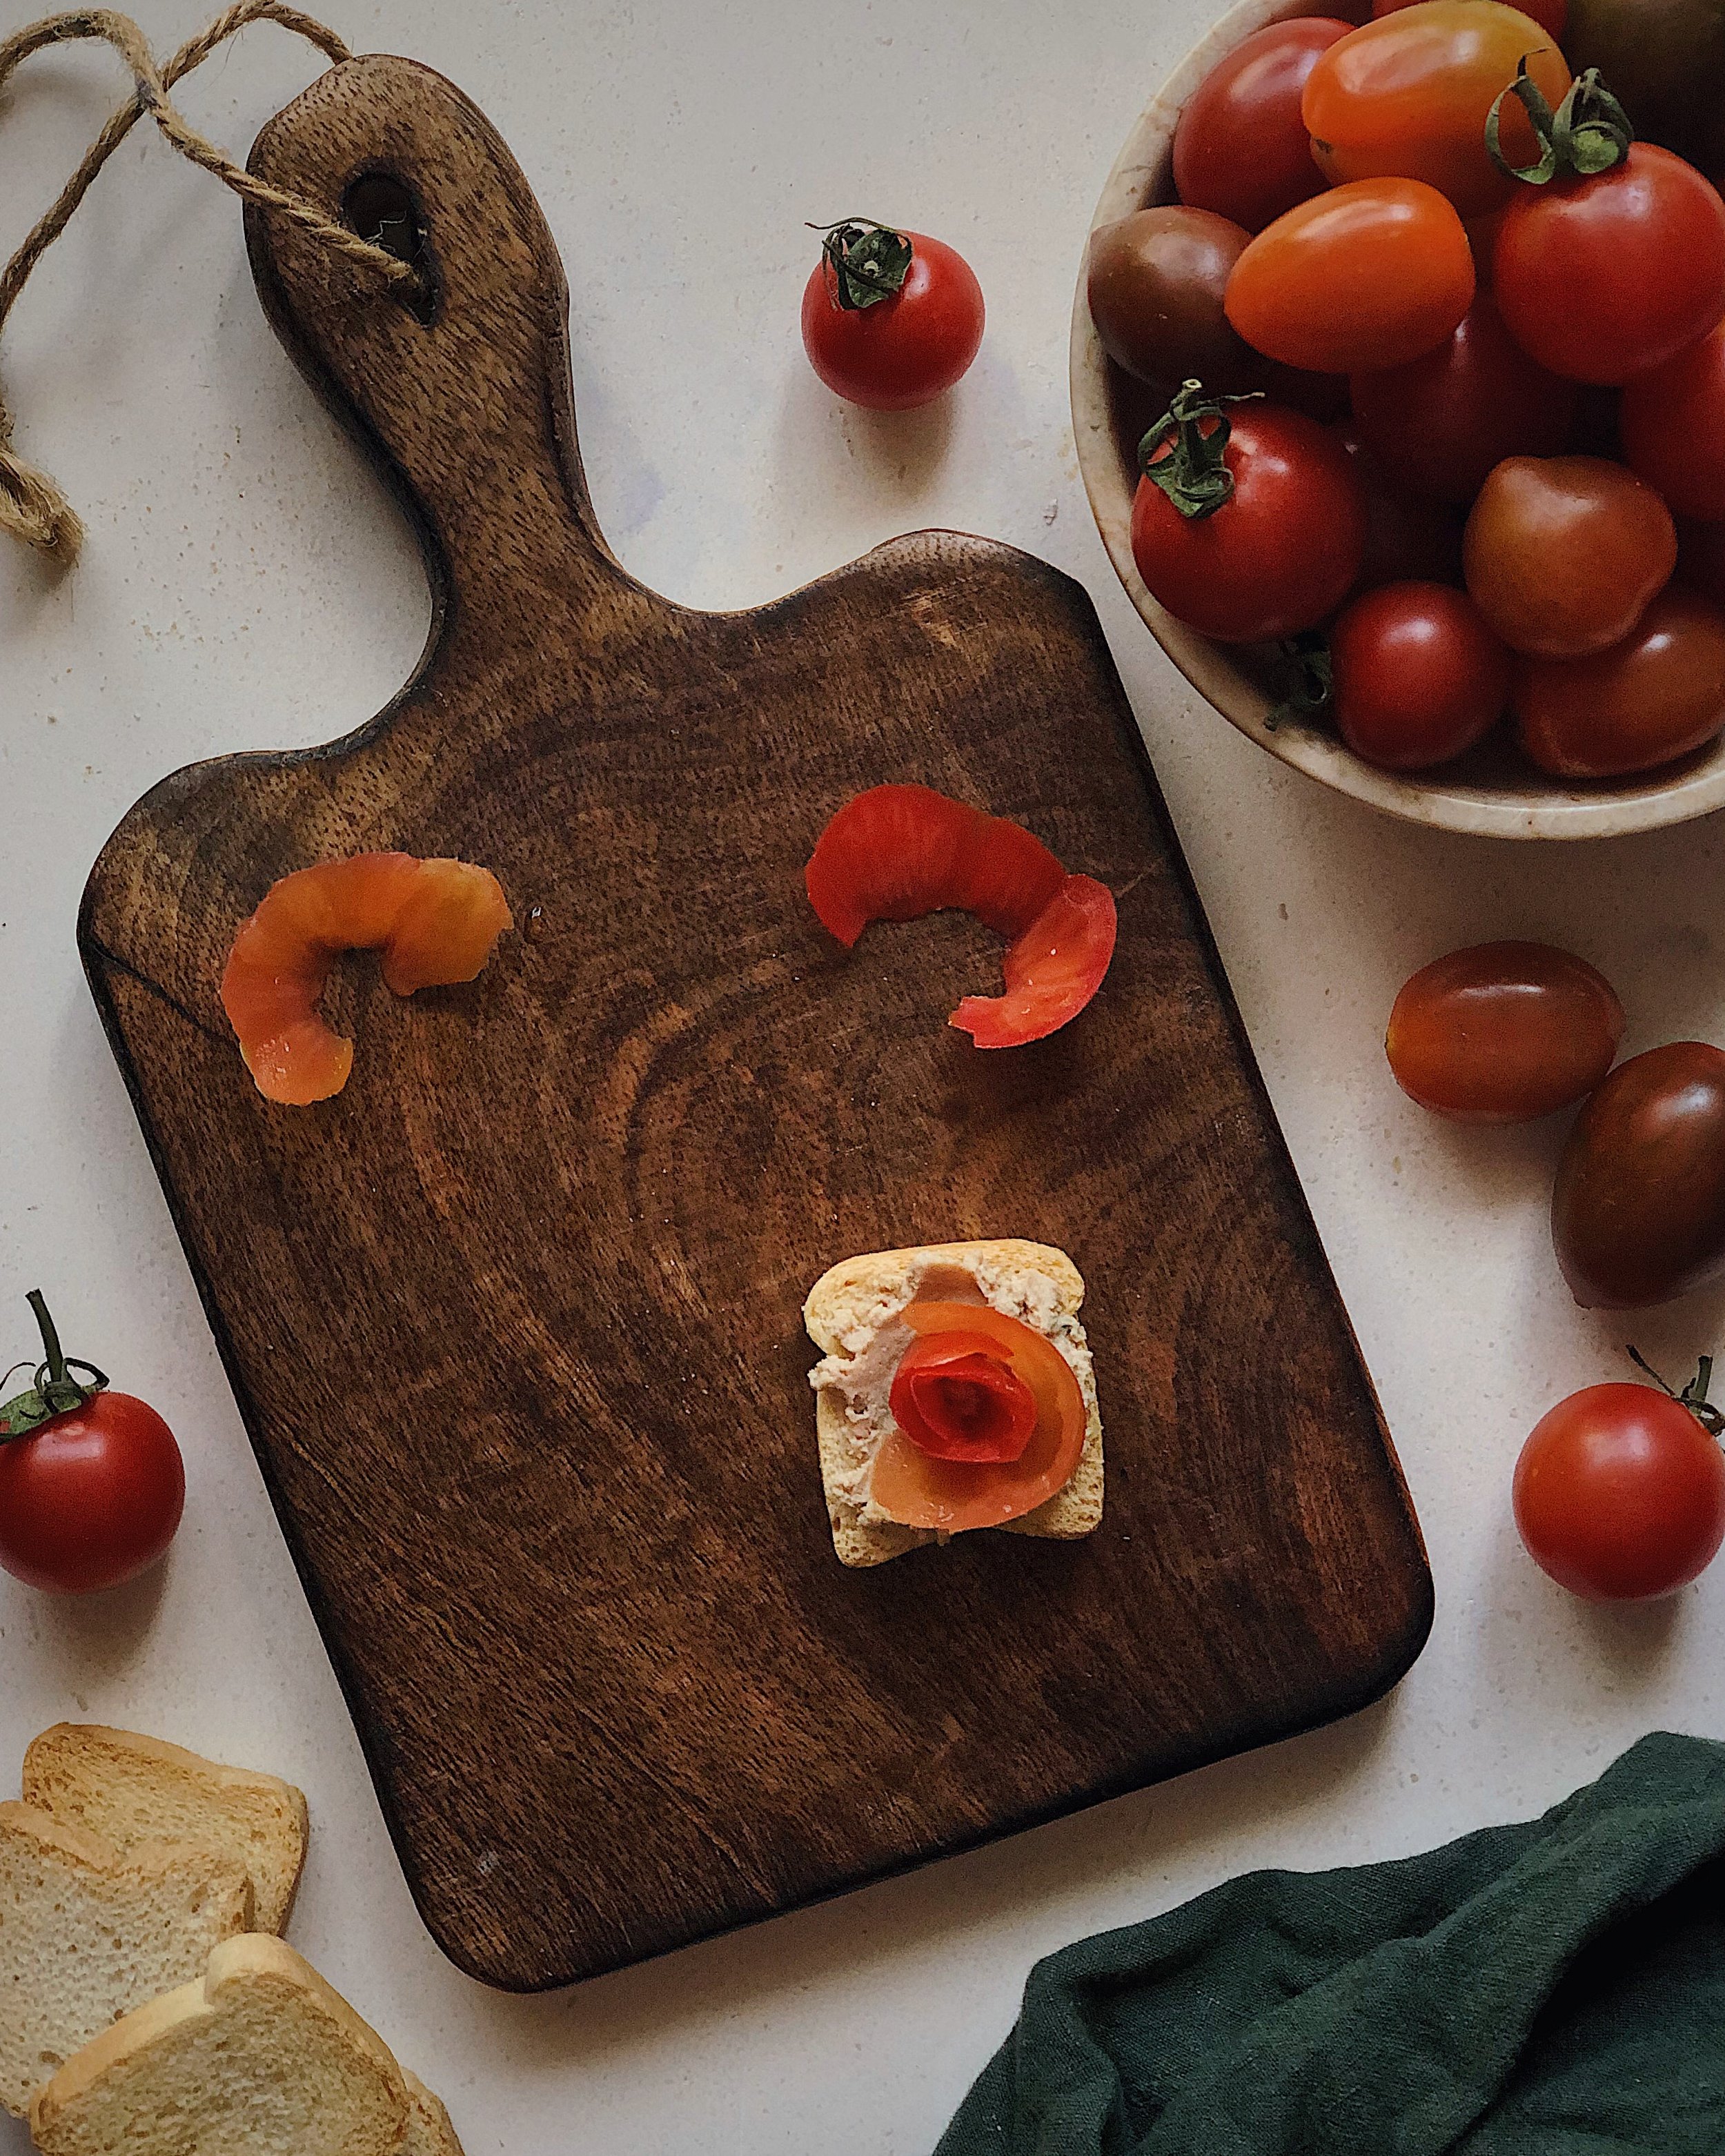
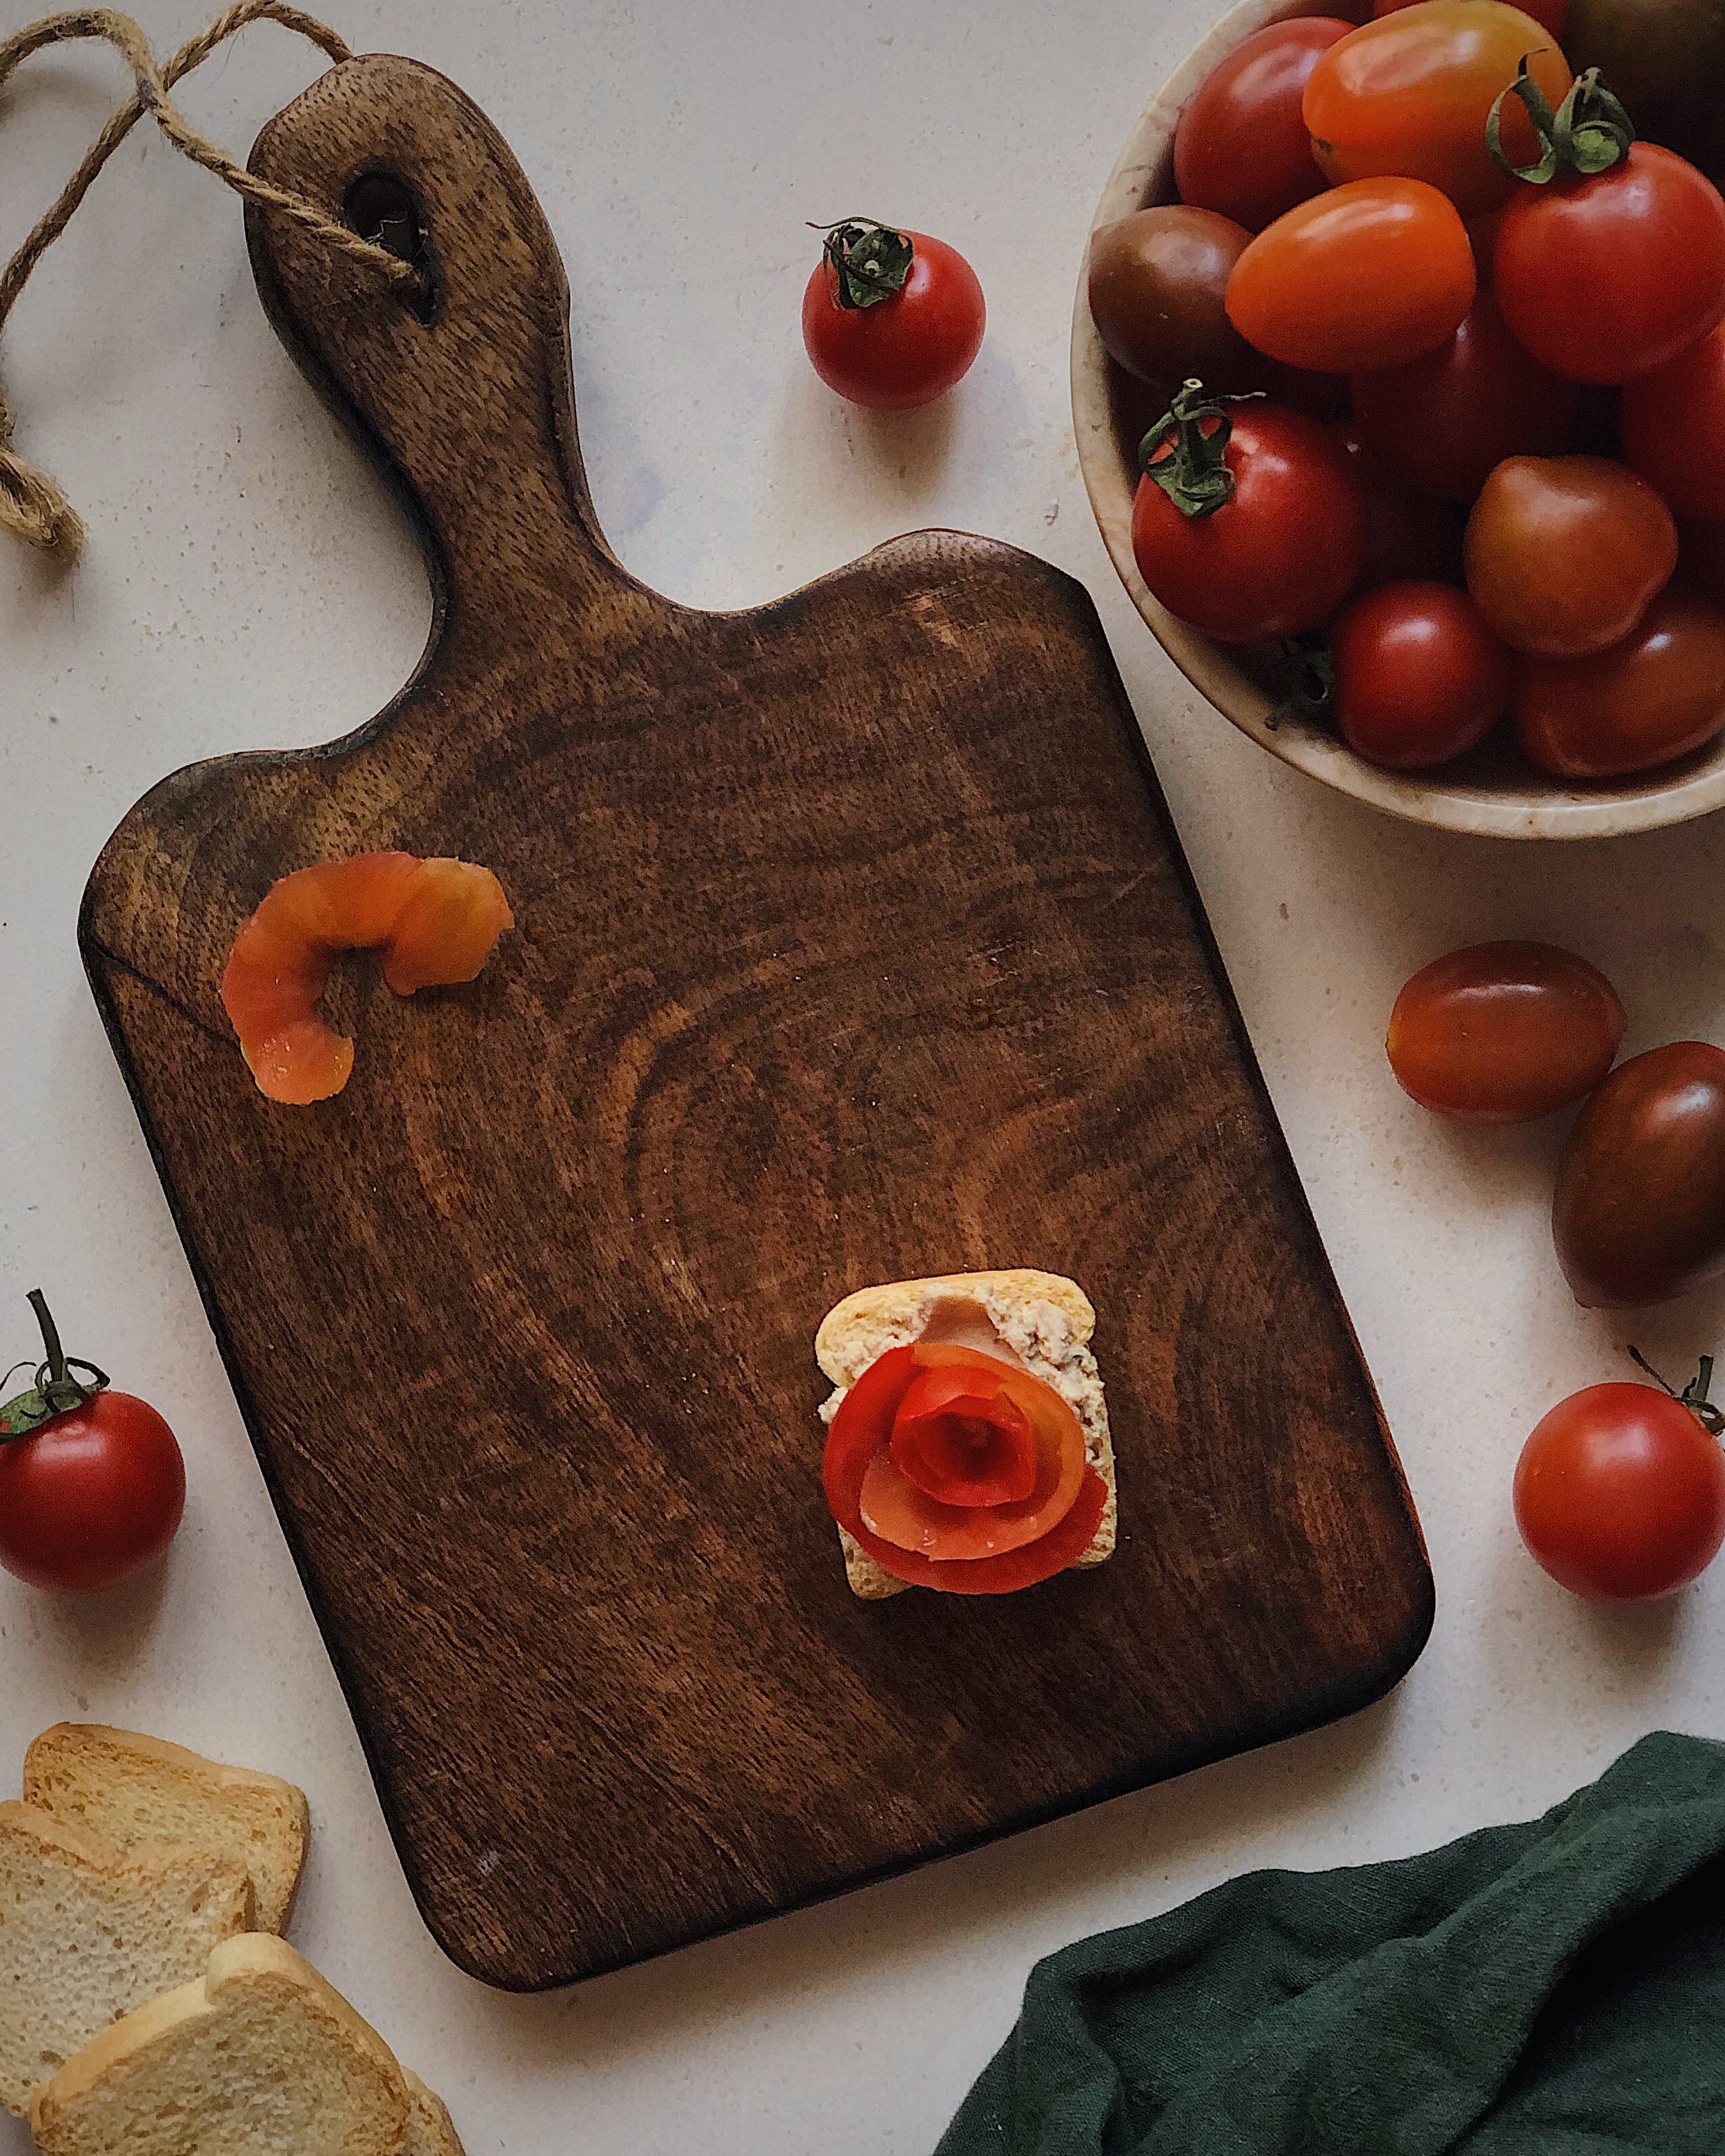
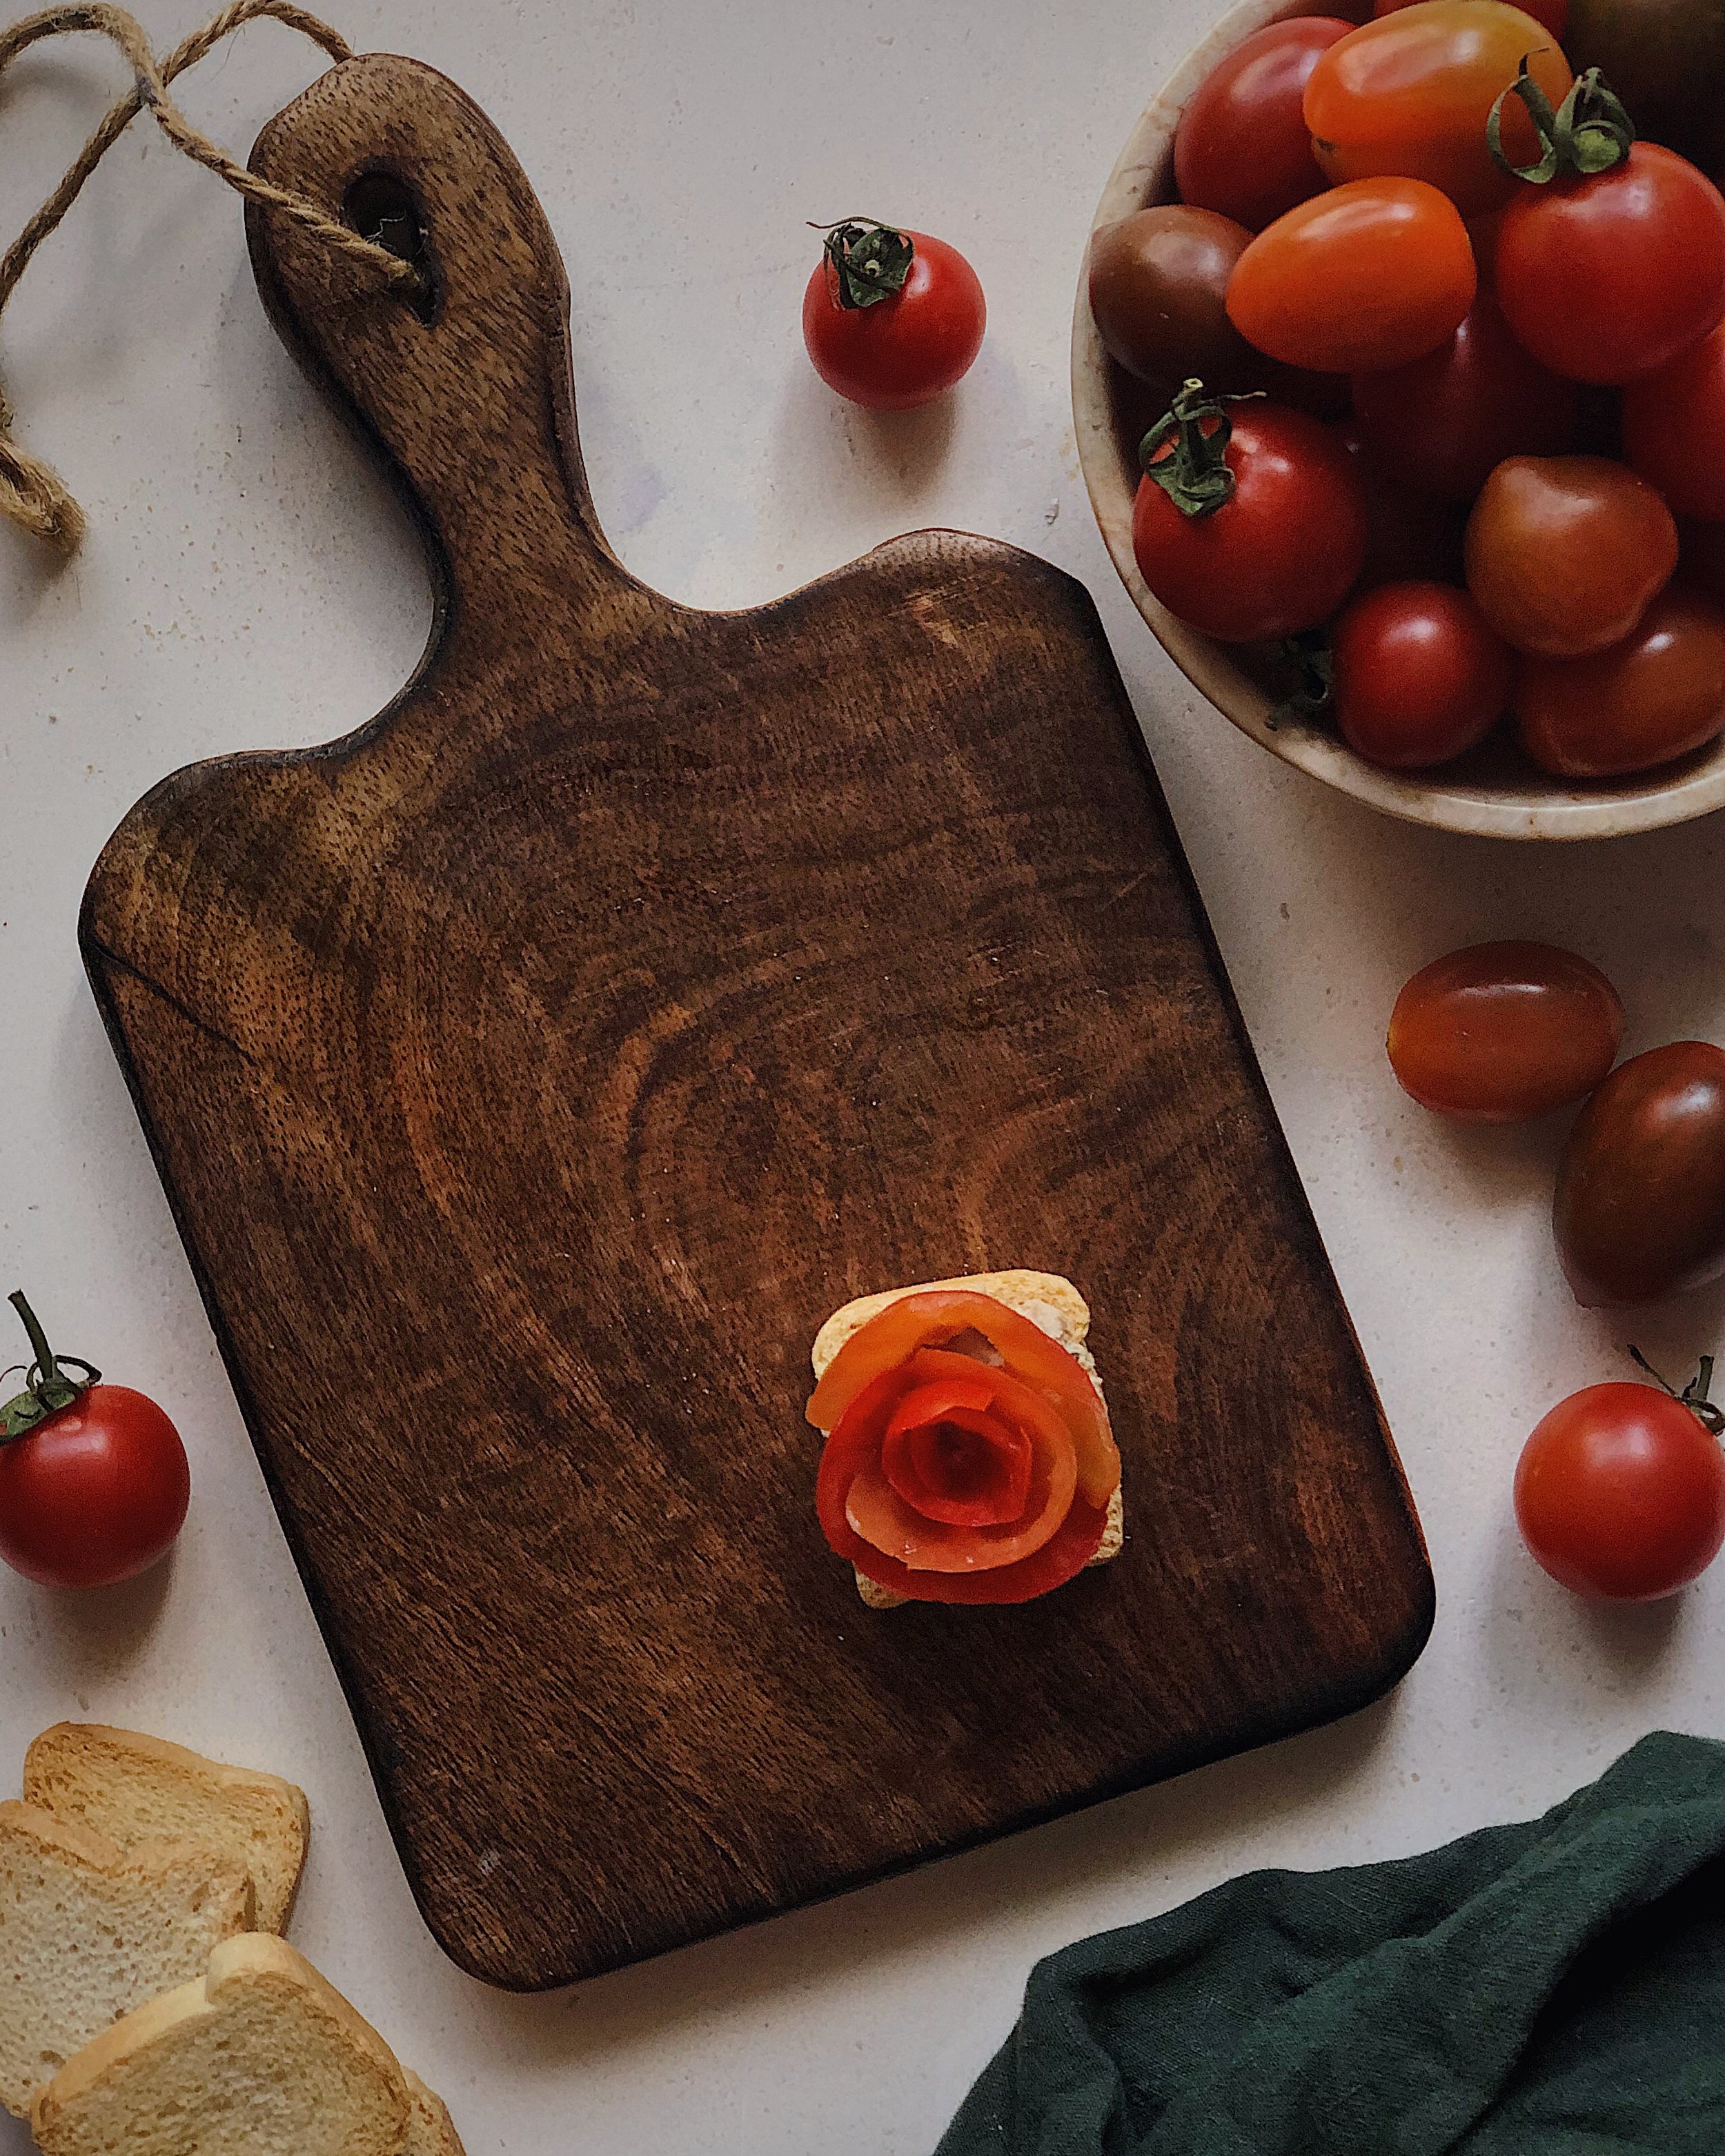
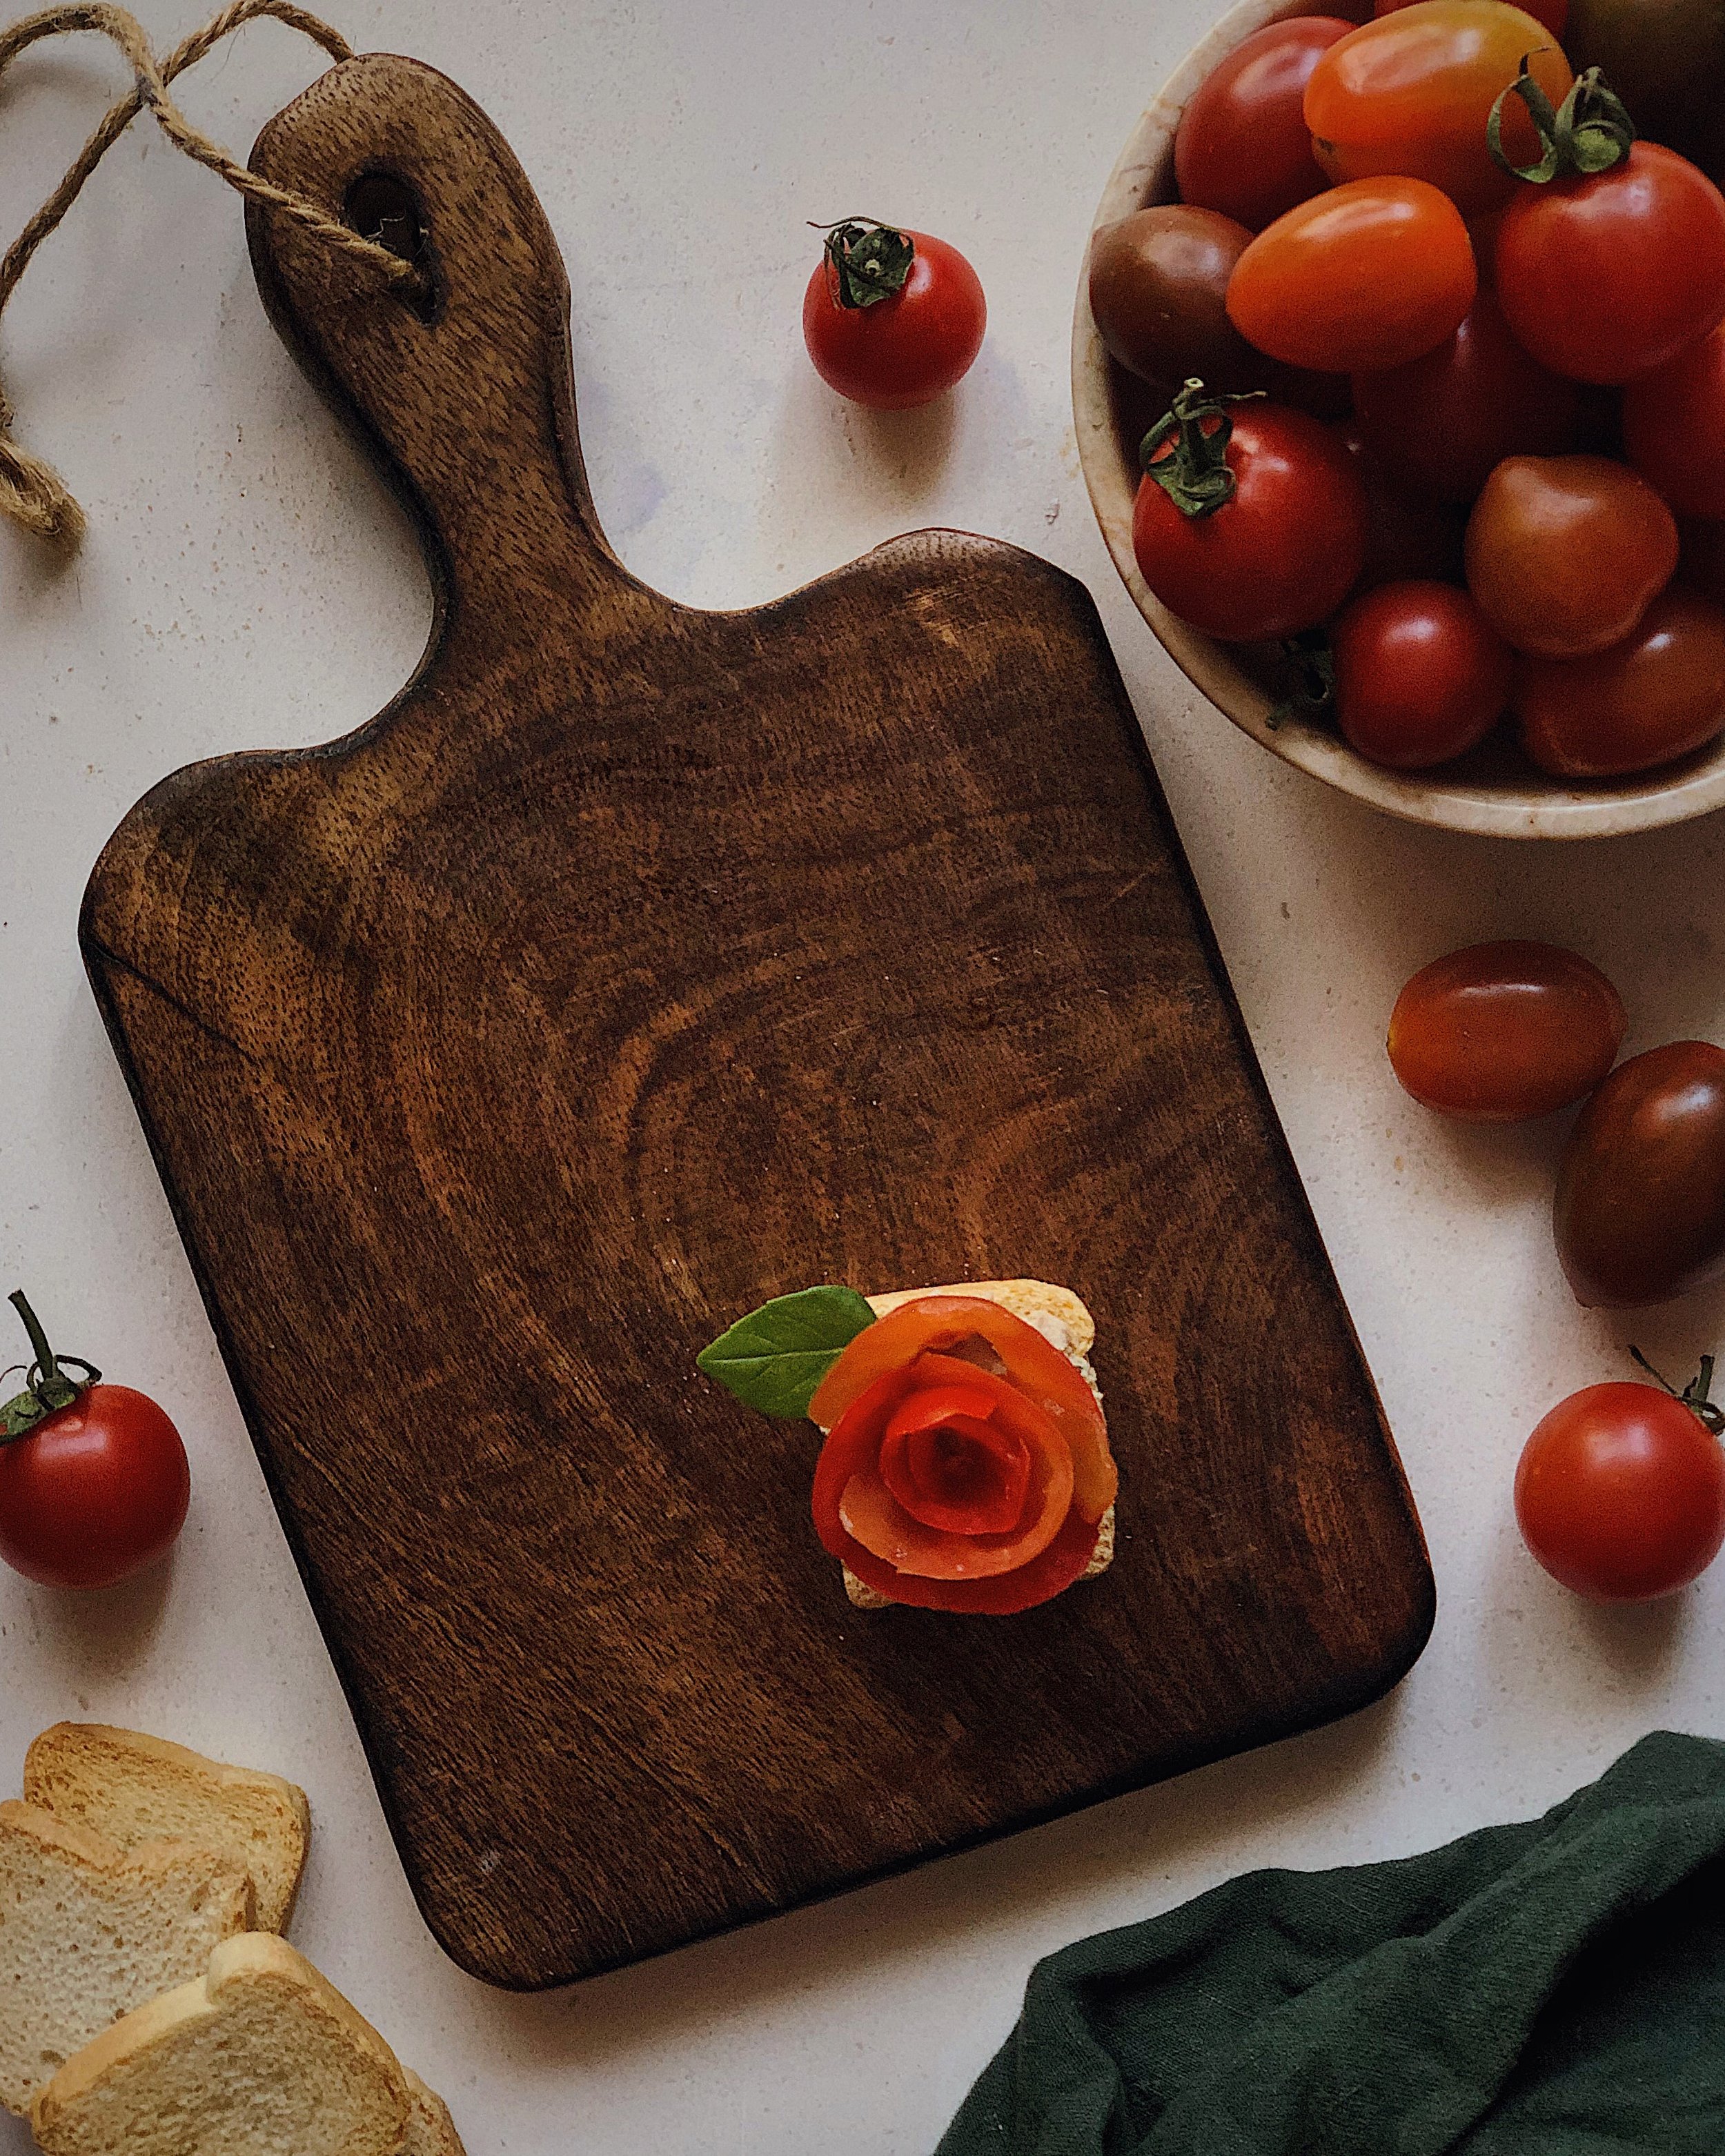
Use these beautiful raw tomato roses to make caprese, serving them with mozzarella (or burrata) and basil or a drizzle of pesto. Or, make an easy caprese-inspired tart by baking up a store-bought puff pastry for the crust, topping with something mild and creamy for a spread, and filling your canvas with these tomato roses before finishing off with some fresh herbs.

Labneh Painted Toast

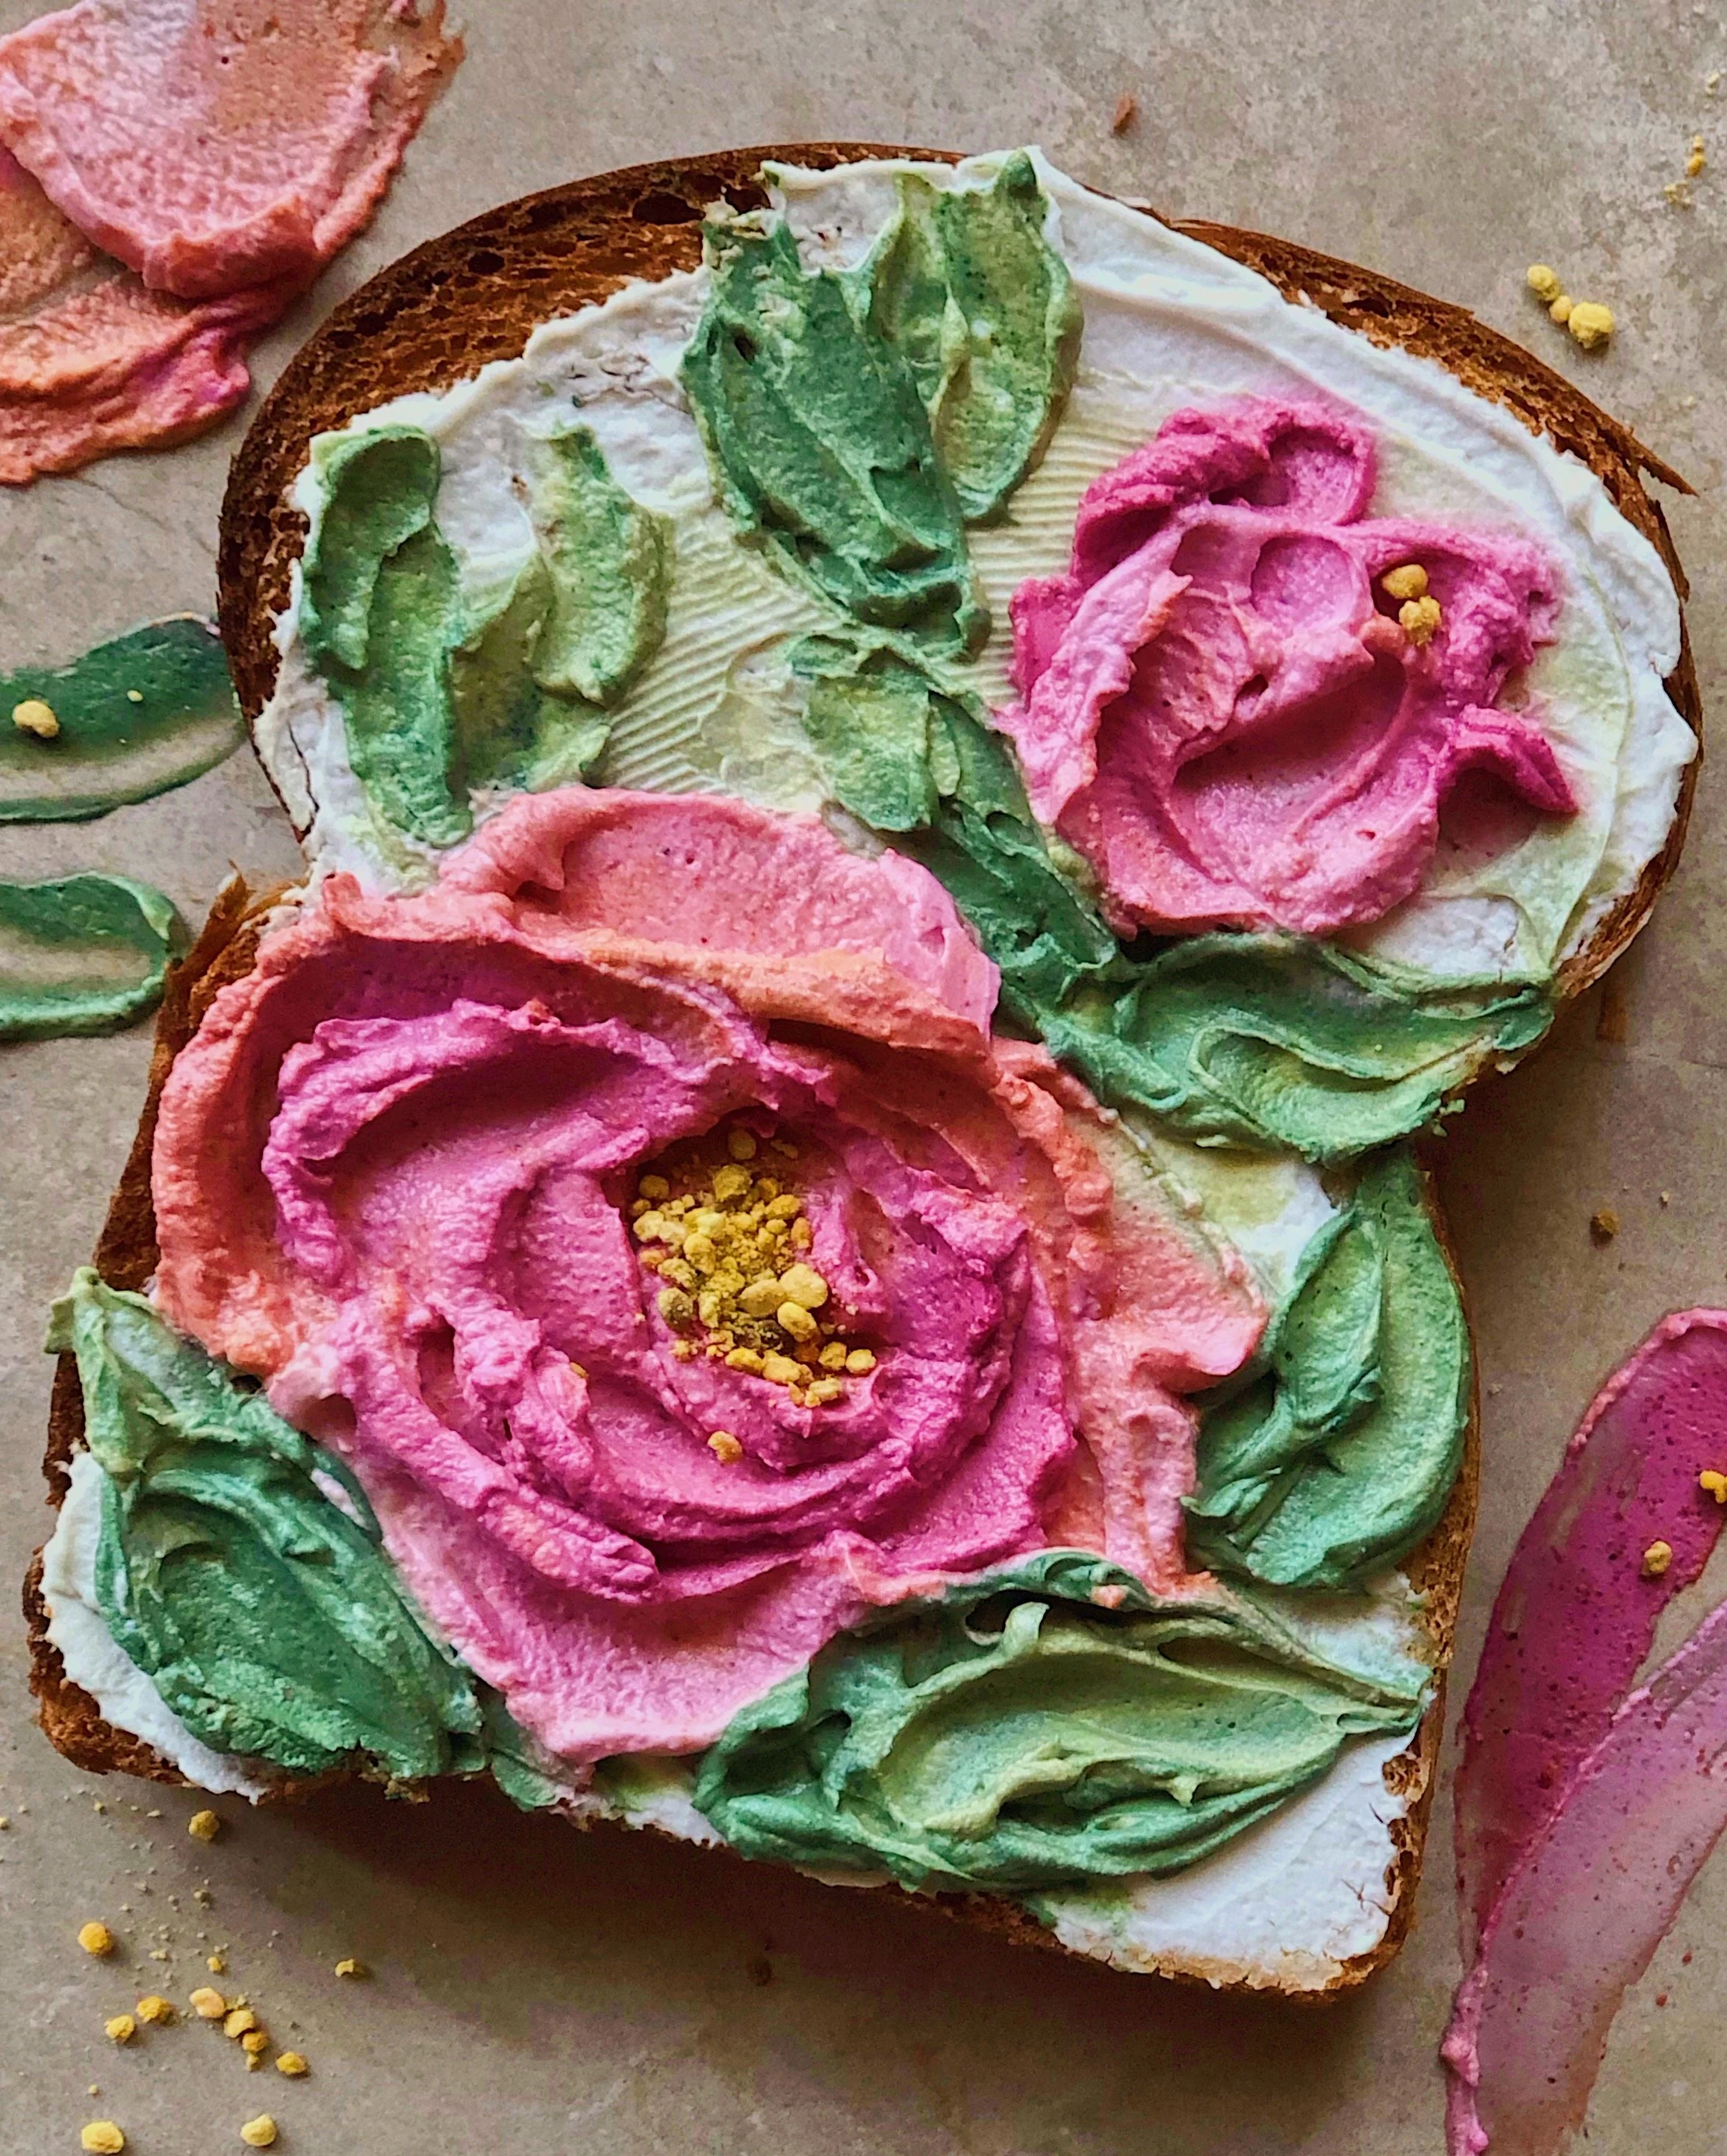
I always say that toast makes a wonderful edible canvas. And I have found that thick, creamy labneh works great as an edible paint when it is combined with any number of natural powers to make different colors. You can make your own powders by blending dried herbs and freeze-dried fruits in a spice blender until very fine, and then mix that in with the labneh to get your desired shade. Here are some colors I have successfully made:

  • red: chili powder, paprika

  • orange: paprika + curry powder

  • yellow: ground turmeric, curry powder

  • green: matcha, moringa powder, spirulina powder

  • blue: butterfly pea flower

  • purple: elderberry powder, beet powder + butterfly pea

  • pink: beet powder

  • peach: hibiscus powder

I like to use a mini offset spatula to spread my edible “paints” onto my toast. And I sometimes use bee pollen or sesame seeds as finishing touches.

Savory Custard Tart with Veggie Flowers

This savory cheesy tart is more custardy than a quiche or frittata, but any of these eggy tart options are a great vessel for holding together a veggie bouquet. Simply make your egg mixture as you normally would, arrange your vegetable pieces, and then bake according to your recipe. I made these roses out of orange bell peppers; I used a sharp knife to cut off the exterior, keeping it intact as one long strip. Then I rolled the strip into a spiral to form a rose. I cut leaves out of zucchini using the same method that I used for the cucumber in the sashimi bowls above.

Root Vegetable Rose Bouquet Tart

Pretty much any veggie ingredient that can be thinly-sliced and made soft can be turned into edible roses. I love making them with beets and fall squash because of the beautiful rich color that the beets bring to the edible bouquet.

My general formula that I have used for the many bouquet tarts I’ve made like this is to make a flavorful short crust and bake it all the way in the tart pan. Then, fill it with a cheesy spreadable filling that does not require baking. Then fill it up with a whole bunch of edible roses! For this specific version that I made a couple of autumns ago, you can find the full recipe here on my blog.

Pickled Pattypan Squash Toast

The cross-section of pattypan squash already looks like the shape of a flower to me so that’s how this idea came to be. Slicing the squash thin with a mandolin and then quick-pickling them allows the slices to become softer and more pliable for shaping them into flowers!

Bell Pepper Poppy Focaccia

I think I have saved the easiest idea for last! Inspired by the beautiful California poppies that grow in my neighborhood, I made this focaccia bouquet design using orange bell peppers to resemble poppies. I just cut the bottoms off of the bell peppers and did a tiny bit of shaping to define the petal shapes a little better. Any tender green stems and herbs would work great for leaves, including even the carrot fronds that I used here.

I hope this list will inspired to make your own edible bouquets at home! If you try one of these ideas and share it on Instagram, please tag me so I can admire how it turned out!

Recipe: Heart-Shaped Garlic Butter Parm Pretzels

These cuties are the texture of a soft American mall pretzel with the extra garlicky goodness of a garlic knot. When you typically make pretzels, you would cut slashes in the dough before baking to allow the dough to expand without cracking the dark brown malty exterior you get from boiling in an alkaline solution. However, I did not do that here. The result was this unusual crackled texture, which gave the garlic butter something to stick on to!

These are such a fun treat for your valentine, friend, or galentine, or anyone in your life who appreciates some freshly-baked carbs. And they are also great for when you are looking for a special baking project to do just for you!

Soft pretzel dough recipe adapted from Sally’s Baking Addiction.

How to Make Heart-Shaped Garlic Butter Parm Pretzels

Ingredients

3/4 cup warm water
1 tsp (slightly heaped) active dry yeast
1 tbsp honey
1 tbsp butter, melted and cooled
2 tsp brown sugar
1/2 tsp salt
2 cups AP flour, plus more for dusting
nonstick cooking spray
3/8 tbsp salted butter
2 garlic cloves, minced
garlic salt, to taste
finely grated parmesan, to taste
1–2 tsp parsley leaves, finely chopped

For the Water Bath

9 cups water
1/2 cup baking soda

Procedure

Combine warm water, yeast, and honey in the bowl of your stand mixer and stir gently. Allow yeast to bloom and foam up for 5 minutes.

Add butter, brown sugar, and salt, and stir together. Fit stand mixer with the dough hook and turn on to the lowest setting. Begin adding flour, 1/2 cup at a time, until a dough starts to come together. Use a rubber spatula to scrape everything together. If the dough is sticky, add a little bit more flour.

Turn the mixer to medium high and knead the dough for about 5 minutes until it feels smooth and bouncy. Turn the dough onto a clean worksurface and roll into a smooth ball. Grease the inside of the mixing bowl, and place the ball of dough back inside. Cover with a damp towel and allow to rest in a warm place for 20 minutes.

On a lightly floured worksurface, divide the rested dough into 8 equal pieces and roll each piece into a rope, about 16 inches long.

In a large pot, combine water and baking soda for water bath and bring to a boil. Preheat oven to 425°F.

While waiting for the water to boil, twist and pinch together the ends of each rope and shape into a heart.

Use a pancake turner/spatula to gently place one pretzel at a time in boiling water bath for 10 seconds on each side, then place on a parchment-lined baking tray with plenty of clearance around each. Adjust the shapes as needed. Make a small cut into the inner bottom tip of the heart shape, to help define the point better.

Combine butter, garlic, and garlic salt in a small bowl and heat for about 30 seconds in the microwave. Brush some of the mixture on to the pretzels. Sprinkle parmesan cheese on top. Bake for about 15 minutes, or until they are puffed and a rich golden brown.

While pretzels are baking, add parsley to the remaining garlic butter mixture. Brush more of this mixture on the pretzels when they come out of oven.

Recipe: The Easiest Strawberry Galette

strawberry-galette.JPG

This is for sure the easiest strawberry galette recipe because the very first time I made it was under pretty stressful circumstances, and I still managed to pull it off on the fly; it turned out so well despite my totally just winging it that I decided to make it again to write the recipe down and share it with you guys.

The first time I made this strawberry galette was for my friend’s big 30th birthday bash in Palm Springs. His husband had gone all out organizing a gorgeous multi-casita private resort rental for our group of 10 for a long weekend and it was everyone’s first post-vaccination group outing so we were all a little giddy with the culture shock of spending time with other humans again. Prior to the event, all the planning was coordinated through a group chat on Instagram and during our first meal all together, I learned that most of the party had already checked out (stalked) each other’s Instagram accounts, and were very intrigued as to why one of the party members (ME) had thousands of followers. Everyone was incredibly kind and curious to learn about my career as a food blogger, but of course in my mind the pressure was on for the brunch that I had planned to contribute to a couple days later. THEN, I learned that the plan for the entire group to contribute to said brunch was scrapped and that there was no backup plan other than my enthusiasm (which, thankfully, was shared by one other party-goer who wanted to cook too). My original plan has been to make my Everything But the Bagel Galette for the group cookout, but since no one but myself and one other person would be cooking, I knew I had to make another dish, and I tried to come up with something as easy as possible that would still look beautiful on a brunch table. And this is what I came up with!

Despite the ease with which I can describe myself cooking, I get pretty dang nervous cooking for anyone but my spouse and my family. So when I found myself in an AirBnB kitchen I had never used before, cooking for more people than I had ever cooked for before at any one time, and with a reputation to uphold—can you see why I said the circumstances were stressful? And yet, I was still really happy with how the galette turned out! If I could pull it off then, I think you can pull it off now.

strawberry-galette-unbaked1.JPG
strawberry-galette-unbaked2.JPG

This recipe is also super riffable (I hate that word) in that you can follow the same steps but switch up the fruit or the cheese for completely different flavors. You can change up the toppings for the crust, or add nothing at all if you want it keep things the absolute simplest. Strawberries are in season now and that is something I get very excited about, but I am eager to try this out with other fruits too.

Here are the simple steps to fruit and cheese galette glory:

  • Prep the ingredients: Move a ready-made frozen pie dough sheet to the fridge the night before to thaw, and then leave it on the kitchen counter to warm up for 30 minutes before rolling it out. (Or, if you didn’t plan ahead, leave the frozen pie crust out for 1–2 hours until it’s malleable.) You’ll also want to macerate the strawberries for that same amount of time. Macerating means adding sugar to the berries to draw out some of the liquid and sort of marinate in the sugar at the same time.

  • Roll out the dough: I use the frozen pie dough from Trader Joe’s and they crack 100% of the time when I unroll them. But this is no big deal! I just ball it all up together and roll it out again.

  • Spread the cheese: This tart is such a crowd pleaser because it’s a little sweet and a little savory at the same time. But on a practical level, the cheese layer helps protect the pastry, preventing the juices of the strawberries from making the crust soggy. I recommend chèvre (young goat cheese) for this, and you can even get a flavored one if you want to add another note to the galette—here I used this black truffle chèvre and it was soooo good! Other spreadable cheeses could work here too, like a well-strained ricotta or some feta. Whatever you use, you can pop it in the microwave for a few seconds first to get it to spread easily.

  • Add the fruit: Strain out the excess liquid that you don’t want to make the crust soggy, then pile the fruit in the middle.

  • Fold the crust: Galettes are meant to be rustic as far as I can tell, so don’t worry about making a perfect circle or anything. Just fold up little sections of dough all the way around.

  • Add finishing touches to the crust: You will want to eggwash the crust to get it to look golden brown but it’s not even close to the end of the world if you don’t have an egg and want to skip that. I think it is always nice to add a little something to the crust of a galette for more flavor and texture too, but it will still taste good if you choose not to add the sliced almonds and extra sugar like I did.

  • Bake: The pastry is so thin that it doesn’t take long but you will want to look out for it being golden brown on the top and crispy on the bottom.

Since the dough is meant for pies and the fruit is packed in there, don’t plan on being able to toss this gal like a frisbee, but other than that, I think it is a pretty unfussy recipe. The next time I find myself spontaneously having to cook brunch for a crowd, I know I’ll be making this again.

strawberry-galette.JPG

How to Make a Strawberry & Cheese Galette

Ingredients for the Galette

1 sheet ready-made pie dough, thawed in the fridge overnight*
1 pint strawberries, stems and leaves removed
2 tbsp granulated sugar (white or raw turbinado)
1/2 tsp flour, plus extra for dusting
5+ oz goat cheese, at room temp
1 egg, beaten

InGredients for the Optional Parts

a few sprigs of thyme, leaves picked
1/3 cup sliced almonds
1 1/2 tsp turbinado sugar
1 tbsp honey
1/2 tsp water

* If unable to plan the night before, leave the frozen crust out on the counter until malleable, about 1–2 hours

Procedure

Remove the pie dough from the fridge and allow to come to room temperature for about 30–40 minutes.

In the meantime, slice the strawberries—halve small ones and cut larger ones into slices so that everything is about equal thickness. Combine the sliced strawberries and granulated sugar in a bowl and toss gently to combine. Allow the strawberries to macerate until the sugar is completely dissolved and a noticeable amount of liquid has been released, about 30 minutes.

Preheat oven to 450°F.

Form a round disk with the pie dough. On a floured surface, roll out the dough to a 12-inch circle. Transfer the dough circle to a piece of parchment paper.

If needed, microwave the cheese in a small bowl for 10 seconds to get a spreadable consistency. Spread the cheese in the middle, leaving an empty 1-inch border all the way around. Optionally, sprinkle thyme leaves over the cheese.

Drain the excess liquid from the strawberries. Add the flour and toss to coat. Pile the strawberries in the middle of the cheese layer, leaving an empty 1-inch border of cheese all the way around (see image above).

Brush the dough border with beaten egg and fold small sections over the filling to form a galette-style crust. Brush the pleated crust thoroughly with egg, making sure to get it in all the folds and crannies.

Optional step: Combined sliced almonds with about 1 tbsp of the remaining beaten egg (or more as needed for all the almond slices to be very thinly coated in egg). Gently pat the almonds onto the crust. Then, sprinkle the turbinado sugar evenly over the crust.

Slide parchment paper onto an inverted baking tray and bake the galette on the middle rack for 20–25 minutes, rotating once halfway.

Optional step: Combine honey and water in a small bowl and microwave for 10 seconds. Stir together to make a glaze, and brush the glaze over the fruit when the galette comes out of the oven.

Allow the galette to rest for 10 minutes before cutting and serving.