


How to Turn Your Favorite Dinner Roll Recipe into Pumpkin-Shaped Buns
/
Cozy sweaters, the crunch of colorful leaves under your boots, and pumpkin spice everything—admit it, fall is a season that has a special place in your heart. Why else would you be reading this blog post? But if you are a lover of both hygge vibes and savory flavors, perhaps you don’t wish for every fall baking project to be flavored with sweet cinnamon and clove. Perhaps you’re looking for another way to create something yummy and pumpkin themed, that satisfies your savory cravings too?
In this blog post, I am going to walk you through how to turn your favorite dinner roll recipe into pumpkin-shaped buns that are perfect for hamburgers or decadent breakfast sandwiches.

These instructions should work with any gluten-based dinner roll recipe that typically makes 12 rolls in a 9”x13” baking dish (I have not tried it with alternative/gluten-free flours). We are instead going to divide that dough recipe up into 8 equal parts to make 8 pumpkin-shaped buns that are sized like a fluffy hamburger bun. For mine, I used @arjolee’s cheesy everything bun recipe, which is my go-to recipe for making the tastiest savory buns that are plenty full of flavor to eat just on their own. (You could also follow the same shaping steps with an existing favorite hamburger bun recipe.)
Most dinner roll recipes have you first allow the dough to rise until doubled in size, and then undergo a second proof in the baking dish after the individual rolls have been divided and shaped. However, in this case, it will realistically take a bit of time for you to do all the tying of twine that is needed to create those pumpkin shapes, so the dough effectively undergos that second proof in that time.
If you love pretzels and you’re looking for something to snack on with a little more chew while satisfying your autumnal obsession with all things pumpkin shaped, then I have a more precise recipe for pumpkin-shaped pretzel buns too, which you can check out here.
Here’s how to turn your favorite dinner roll recipe into pumpkin-shaped buns:
Start by making your batch of dough as you normally would. You can use whatever gluten-based 9”x13” bun/roll recipe you’d like and it should work, but I recommend using my pal Ariel Lee’s recipe, which is the one I used in the photos. Allow the dough to undergo the first proof.
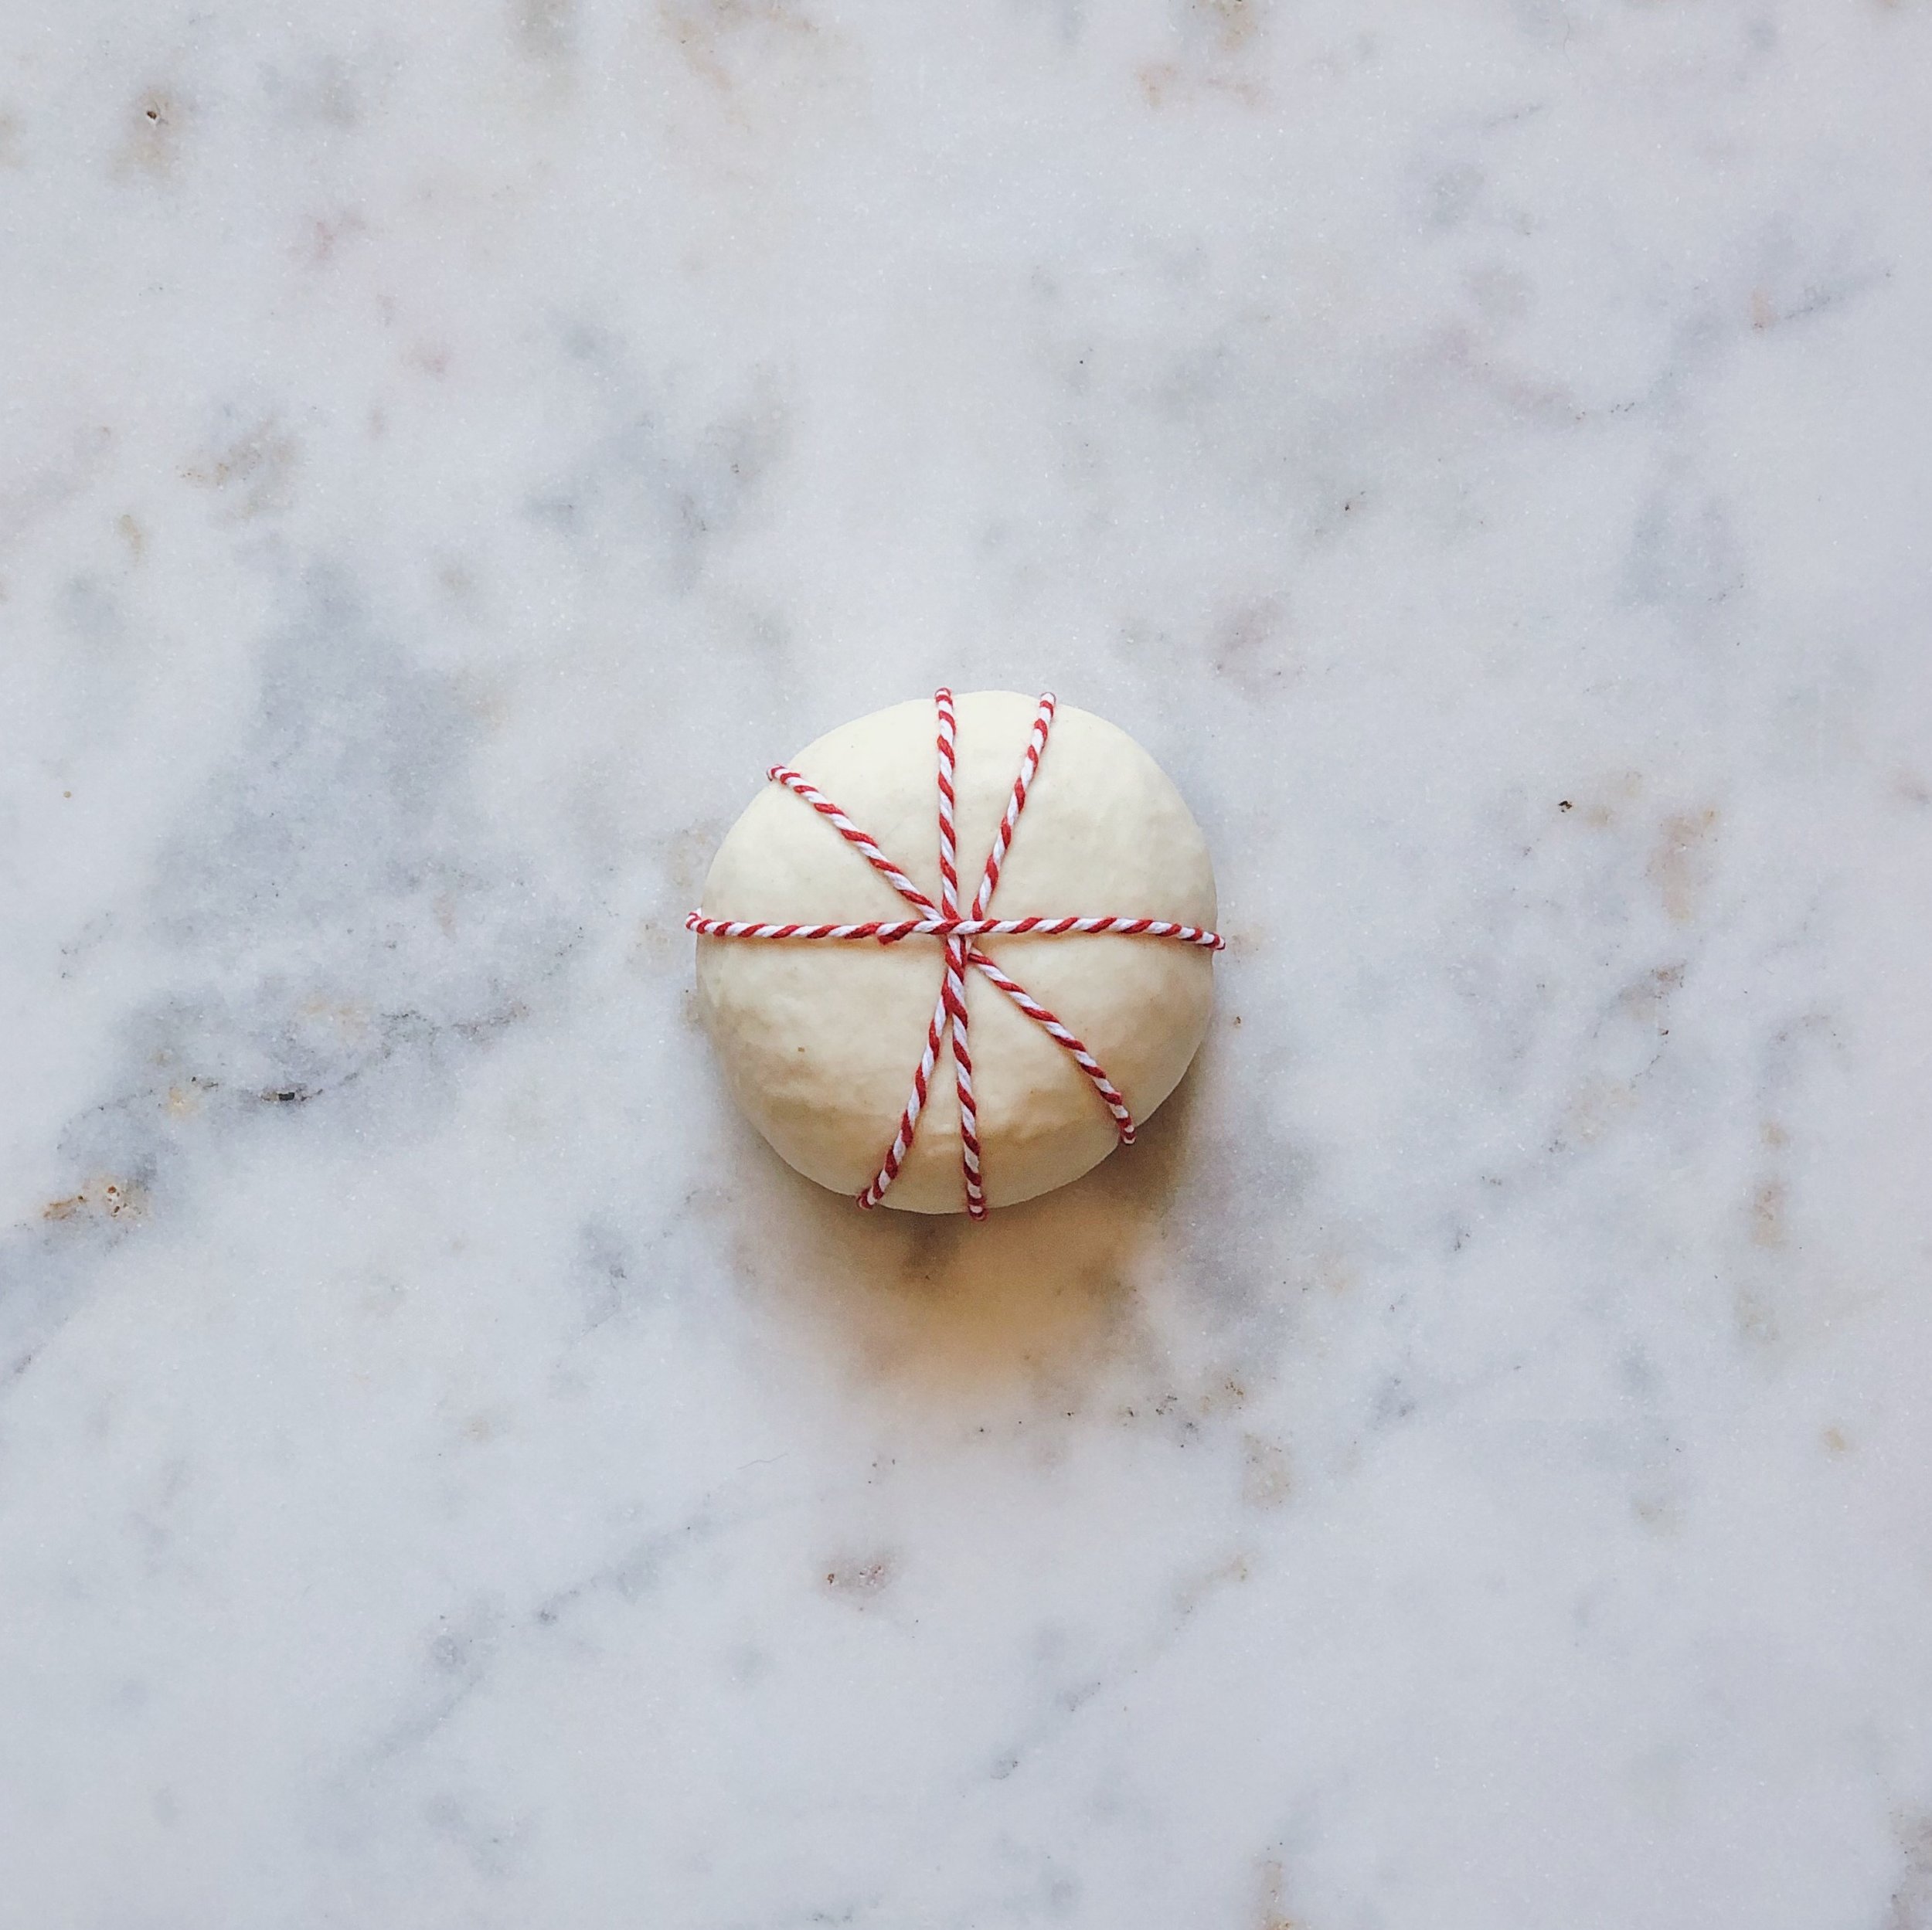
While the dough is proofing, prep your twine so you can do all the shaping efficiently when the dough is ready. Tying twine around the balls of dough is what creates those indentations of the pumpkin shape as the dough expands in the oven. Cut thin, food-safe baker’s twine into about 10-inch pieces. You will need 4 pieces of twine per bun and we’re making 8 buns, so you’ll need to prep 32 pieces of twine.
Preheat the oven according to your recipe.
After the first proof, divide the dough evenly into 8 portions. As you work with each portion, leave the others covered under a damp tea towel. Dust your hands lightly with bench flour but don’t use too much on your work surface as you’ll need a bit of surface tension.
Roll each portion of dough into a ball gently using the method used for shaping a boule: Flip the ball over and pull all of the edges into the middle to form a little pouch. Then flip it over again. Cup your palm and fingers gently around the ball to form a cage and roll the dough in a circular motion, using the tension with the work surface to seal the seams on the bottom and create an even ball shape. This will result in a nice domed surface on top while gently handling the dough to keep it light and airy. Repeat with all 8 pieces of dough.
For each portion of dough, lay out 4 pieces of twine to form an asterisk. They don’t have to be perfectly symmetrical; if you wish for your pumpkins to be a little more wonky because that is part of their charm, go ahead. However, I tried both irregular criss-crossing of the twine and others where I tried to make them as neat as possible and I found that the ones where I tried to keep them even are the ones that turned out looking the most pumpkin-like. The uneven shapes were more reminiscent to me of heirloom tomatoes.

After laying out the twine on your work surface, place a ball of dough face-down in the middle and tie both ends of each individual length of twine into a double knot. Take care to have them just gently curving around the ball of dough; do not make a tight loop around the dough. The dough will expand significantly by the time it is done baking, so you don’t want the twine to be cutting in too deeply into the final shape.


When all 4 knots are tied, trim off the excess twine and flip the ball over. Make any adjustments needed.

Place your trussed dough baby on a parchment-lined tray and cover with a damp towel.
As you repeat the process with the other dough balls, give the buns at least 3 inches of space around them on the tray because they will expand! By the time I was done tying up all the dough, the earlier ones had already started to rise quite significantly, starting to form that pumpkin shape. Unless you’re working in a very cold place—or you’re exceptionally fast at typing knots—you probably won’t need much of a second proof.
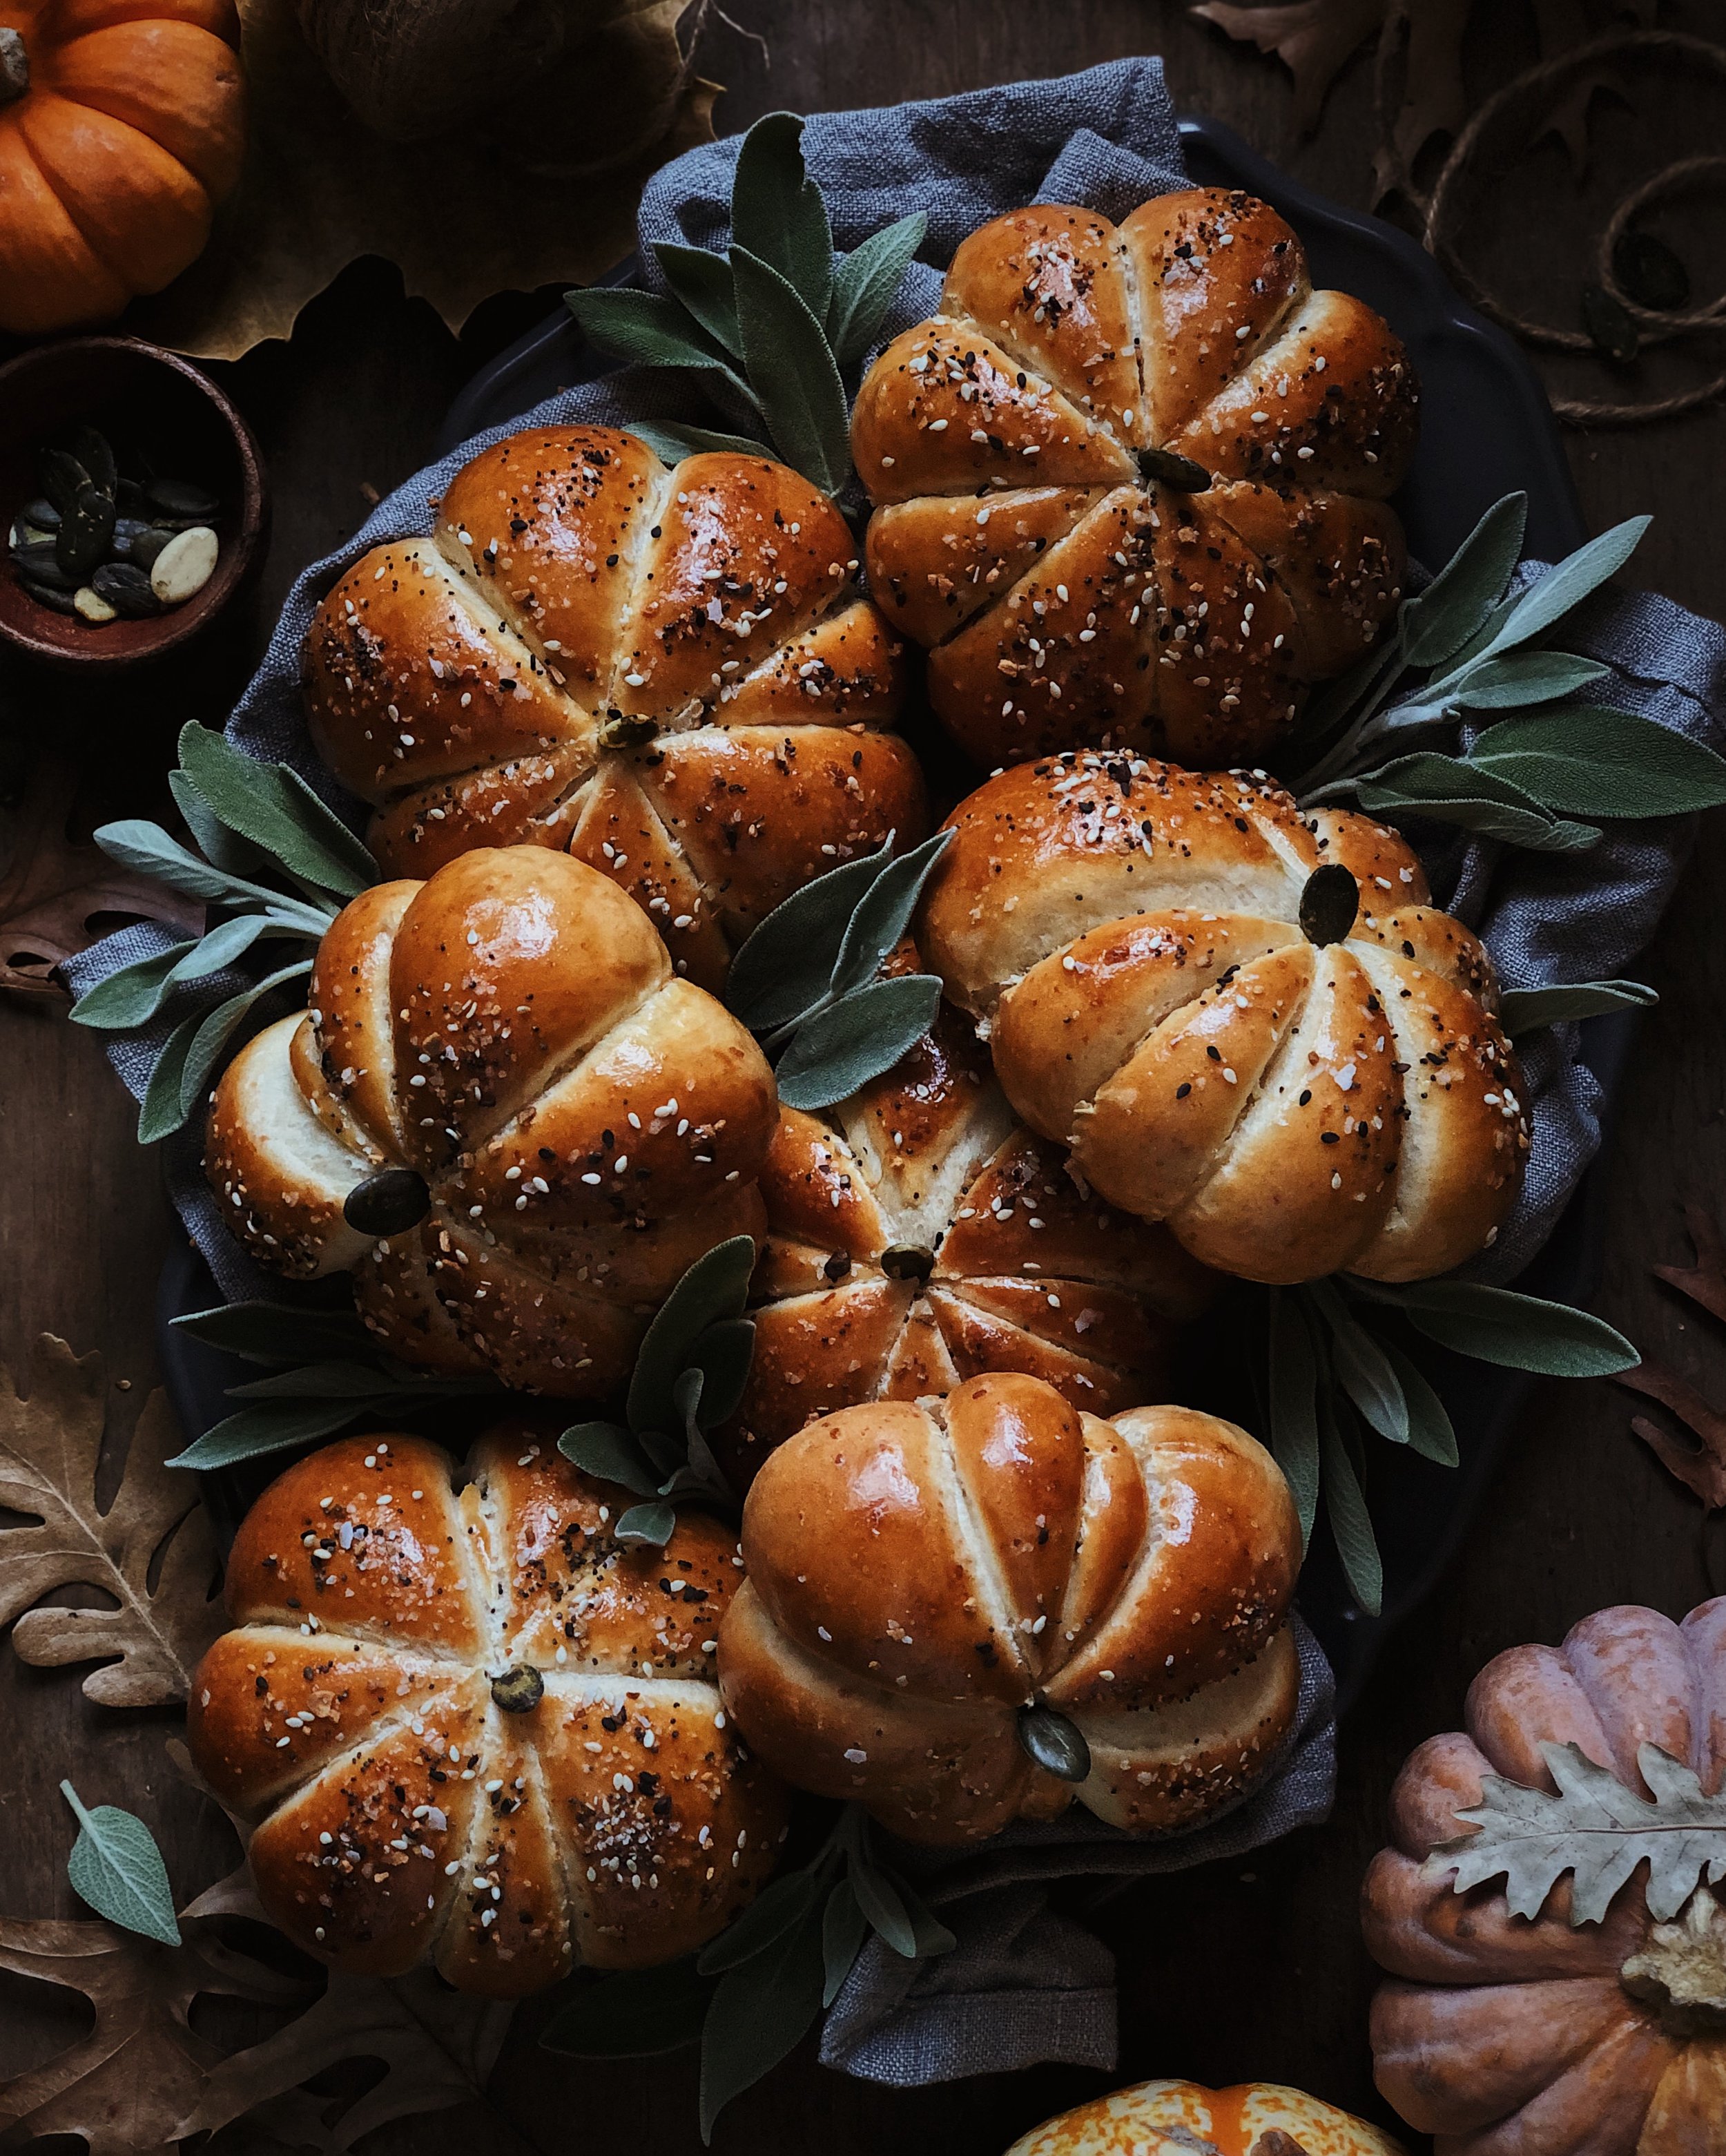
Here’s what mine looked like by the time I was done tying them all and getting my eggwash ready. Let yours proof until they are starting to puff beyond the loops of twine, like you see below; it should just take a few minutes unless it’s super cold! (Note that after taking this photo, I divided them onto two trays so that there could be more space between them. Don’t overcrowd your trays!)

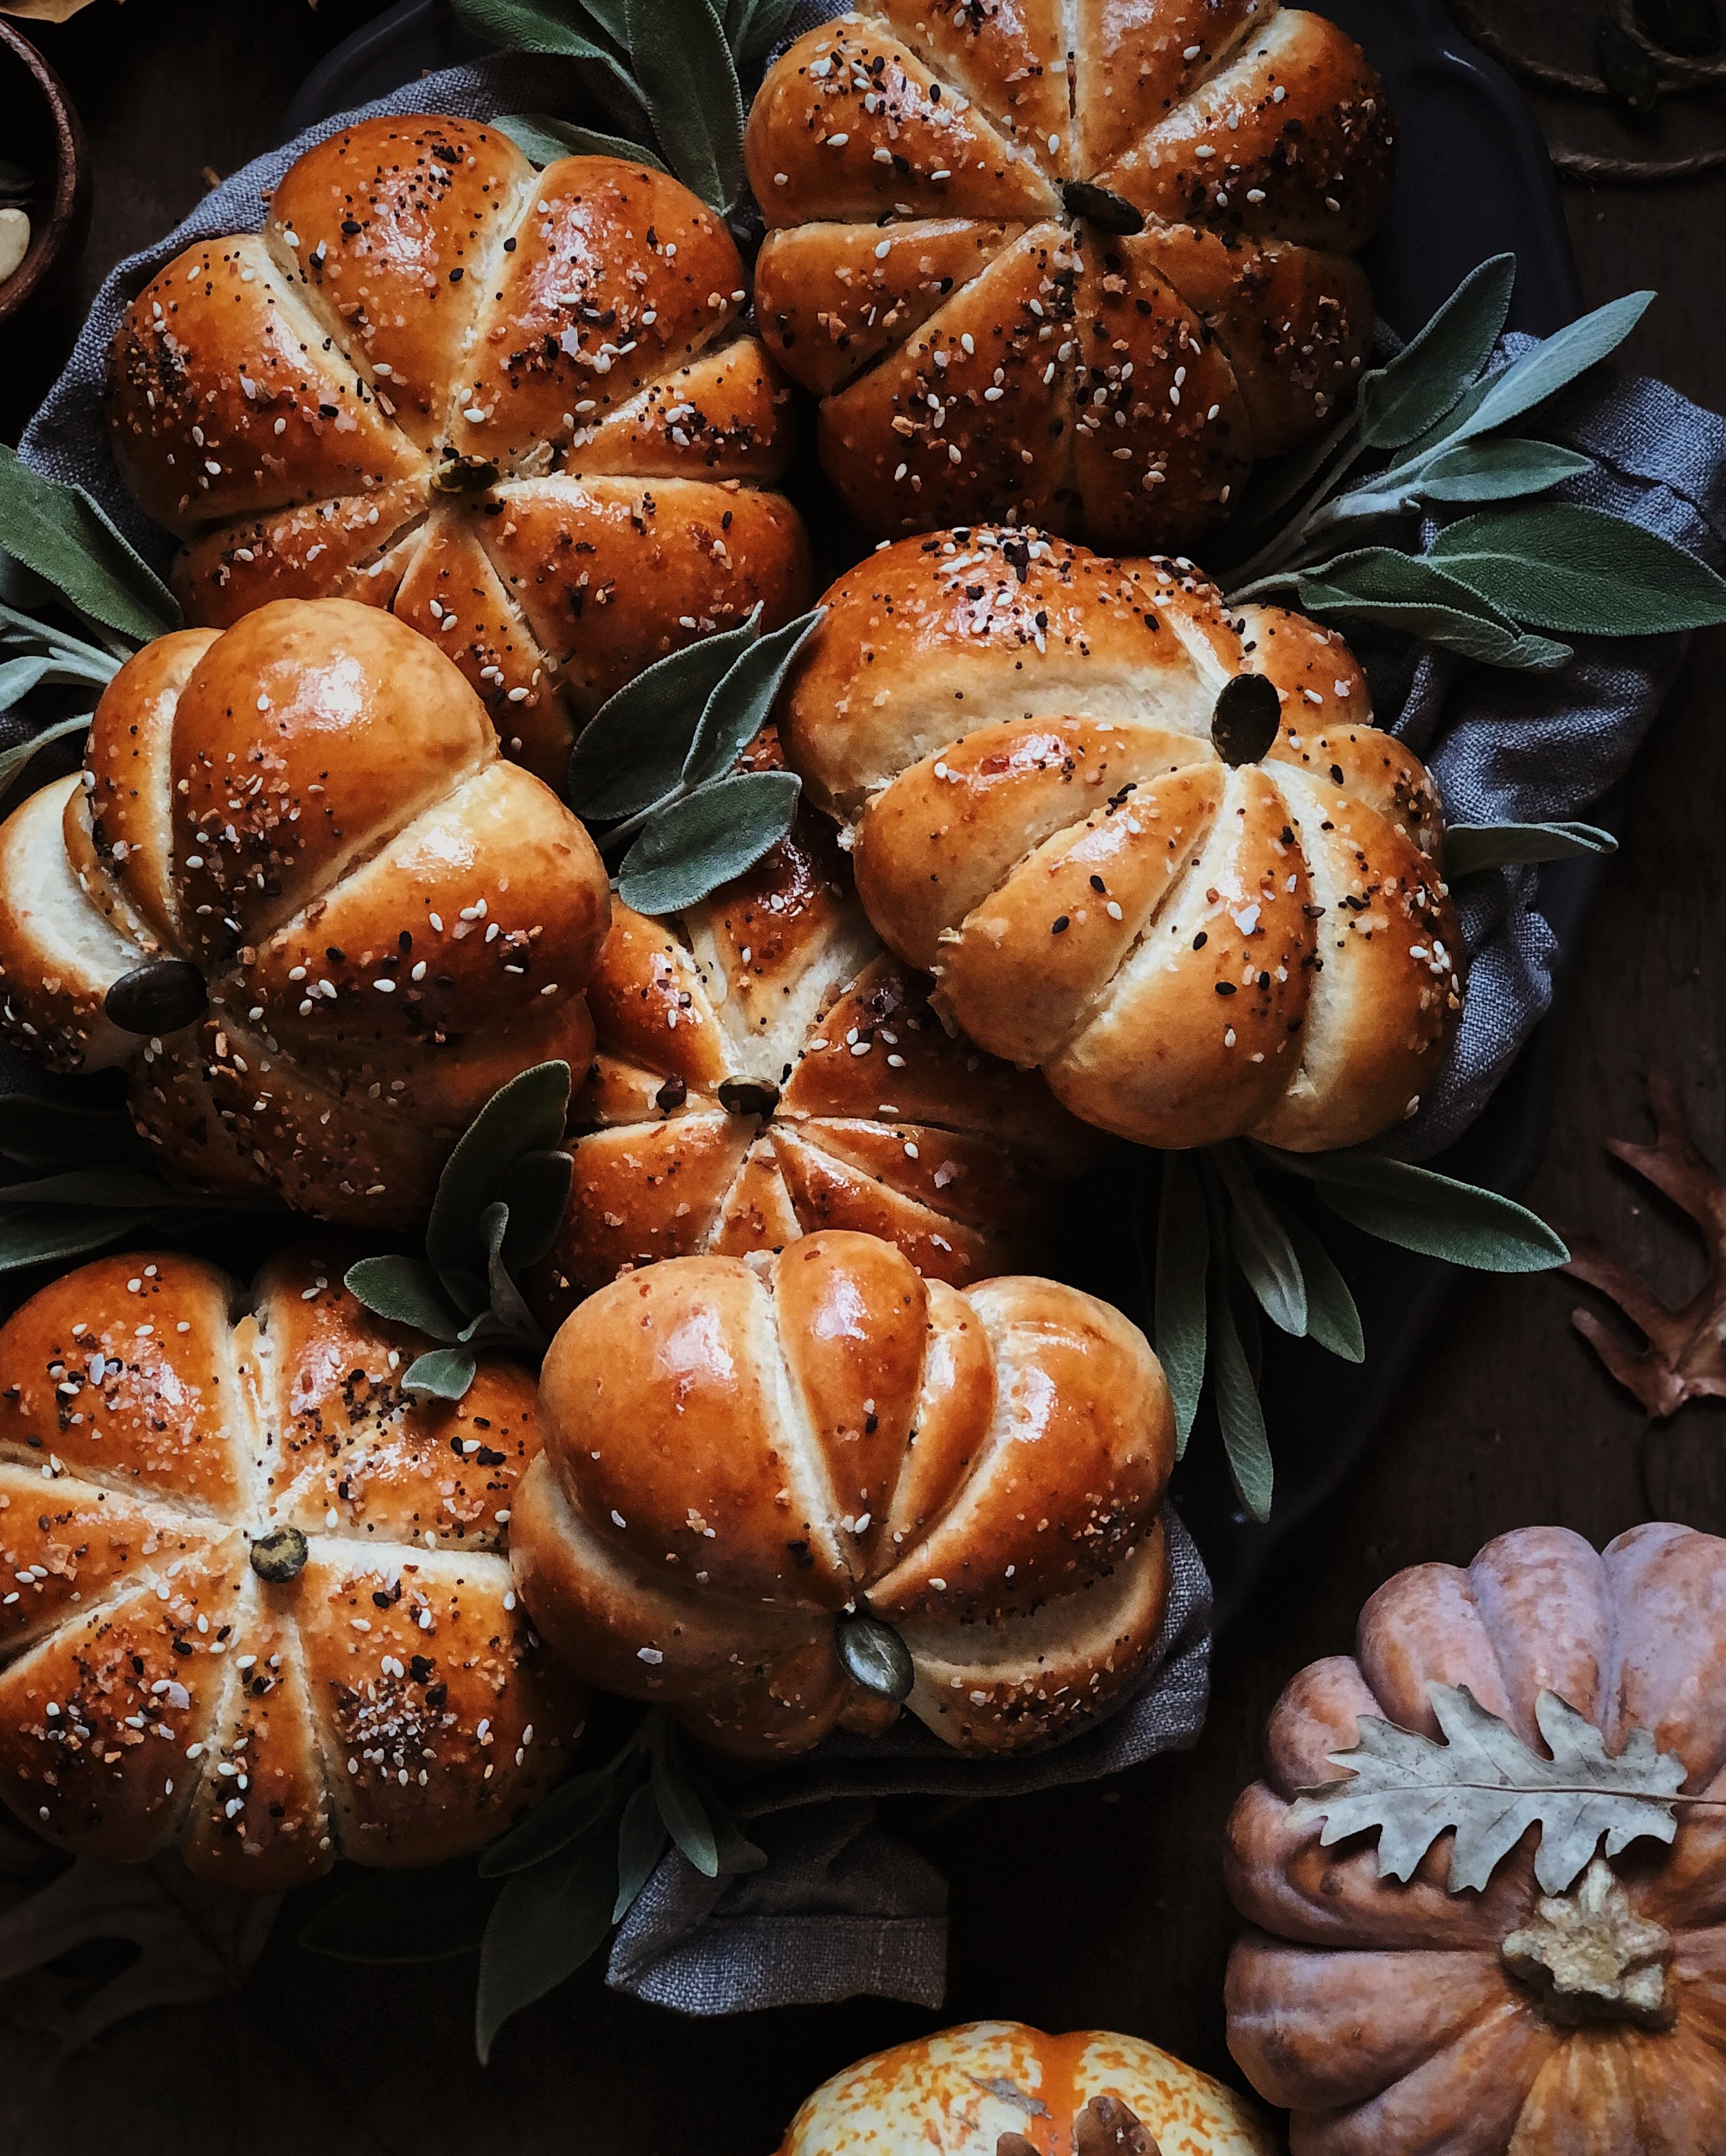
At this point I brushed a beaten egg yolk over the surfaces of the buns. Using just the egg yolk for the eggwash is what gave them their rich brown color and glossy finish so I definitely recommend it! The everything seasoning is optional, but tasty!
After brushing on the eggwash, bake the buns according to your recipe’s instructions. I found the baking time to be the same for these 8 larger buns as for making 12 smaller buns packed together in a baking dish.

When the buns have baked, allow them to cool a bit for safe handling. You’ll find that the twine is now embedded into the buns and they’ve baked up around it, and you of course need to remove all the twine before serving/eating. I do not own a bread lame, but that would be very useful here. Instead, I used a faux lame in the form of a stainless steel razor blade. I gently cut into the surface of the buns along the lines created by the twine, in order to free the twine cleanly without the bread getting torn up. Be sure to remove all the twine before eating!
To finish things off, I added a little pepita/pumpkin seed into each bun to resemble the pumpkin stem.

I hope these step-by-step instructions help guide you to making the pumpkin-shaped buns of your cozy fall baking dreams. If you found these instructions helpful in making your own, please be sure to tag me, @lilybubbletea, on Instagram so I can see your creations!