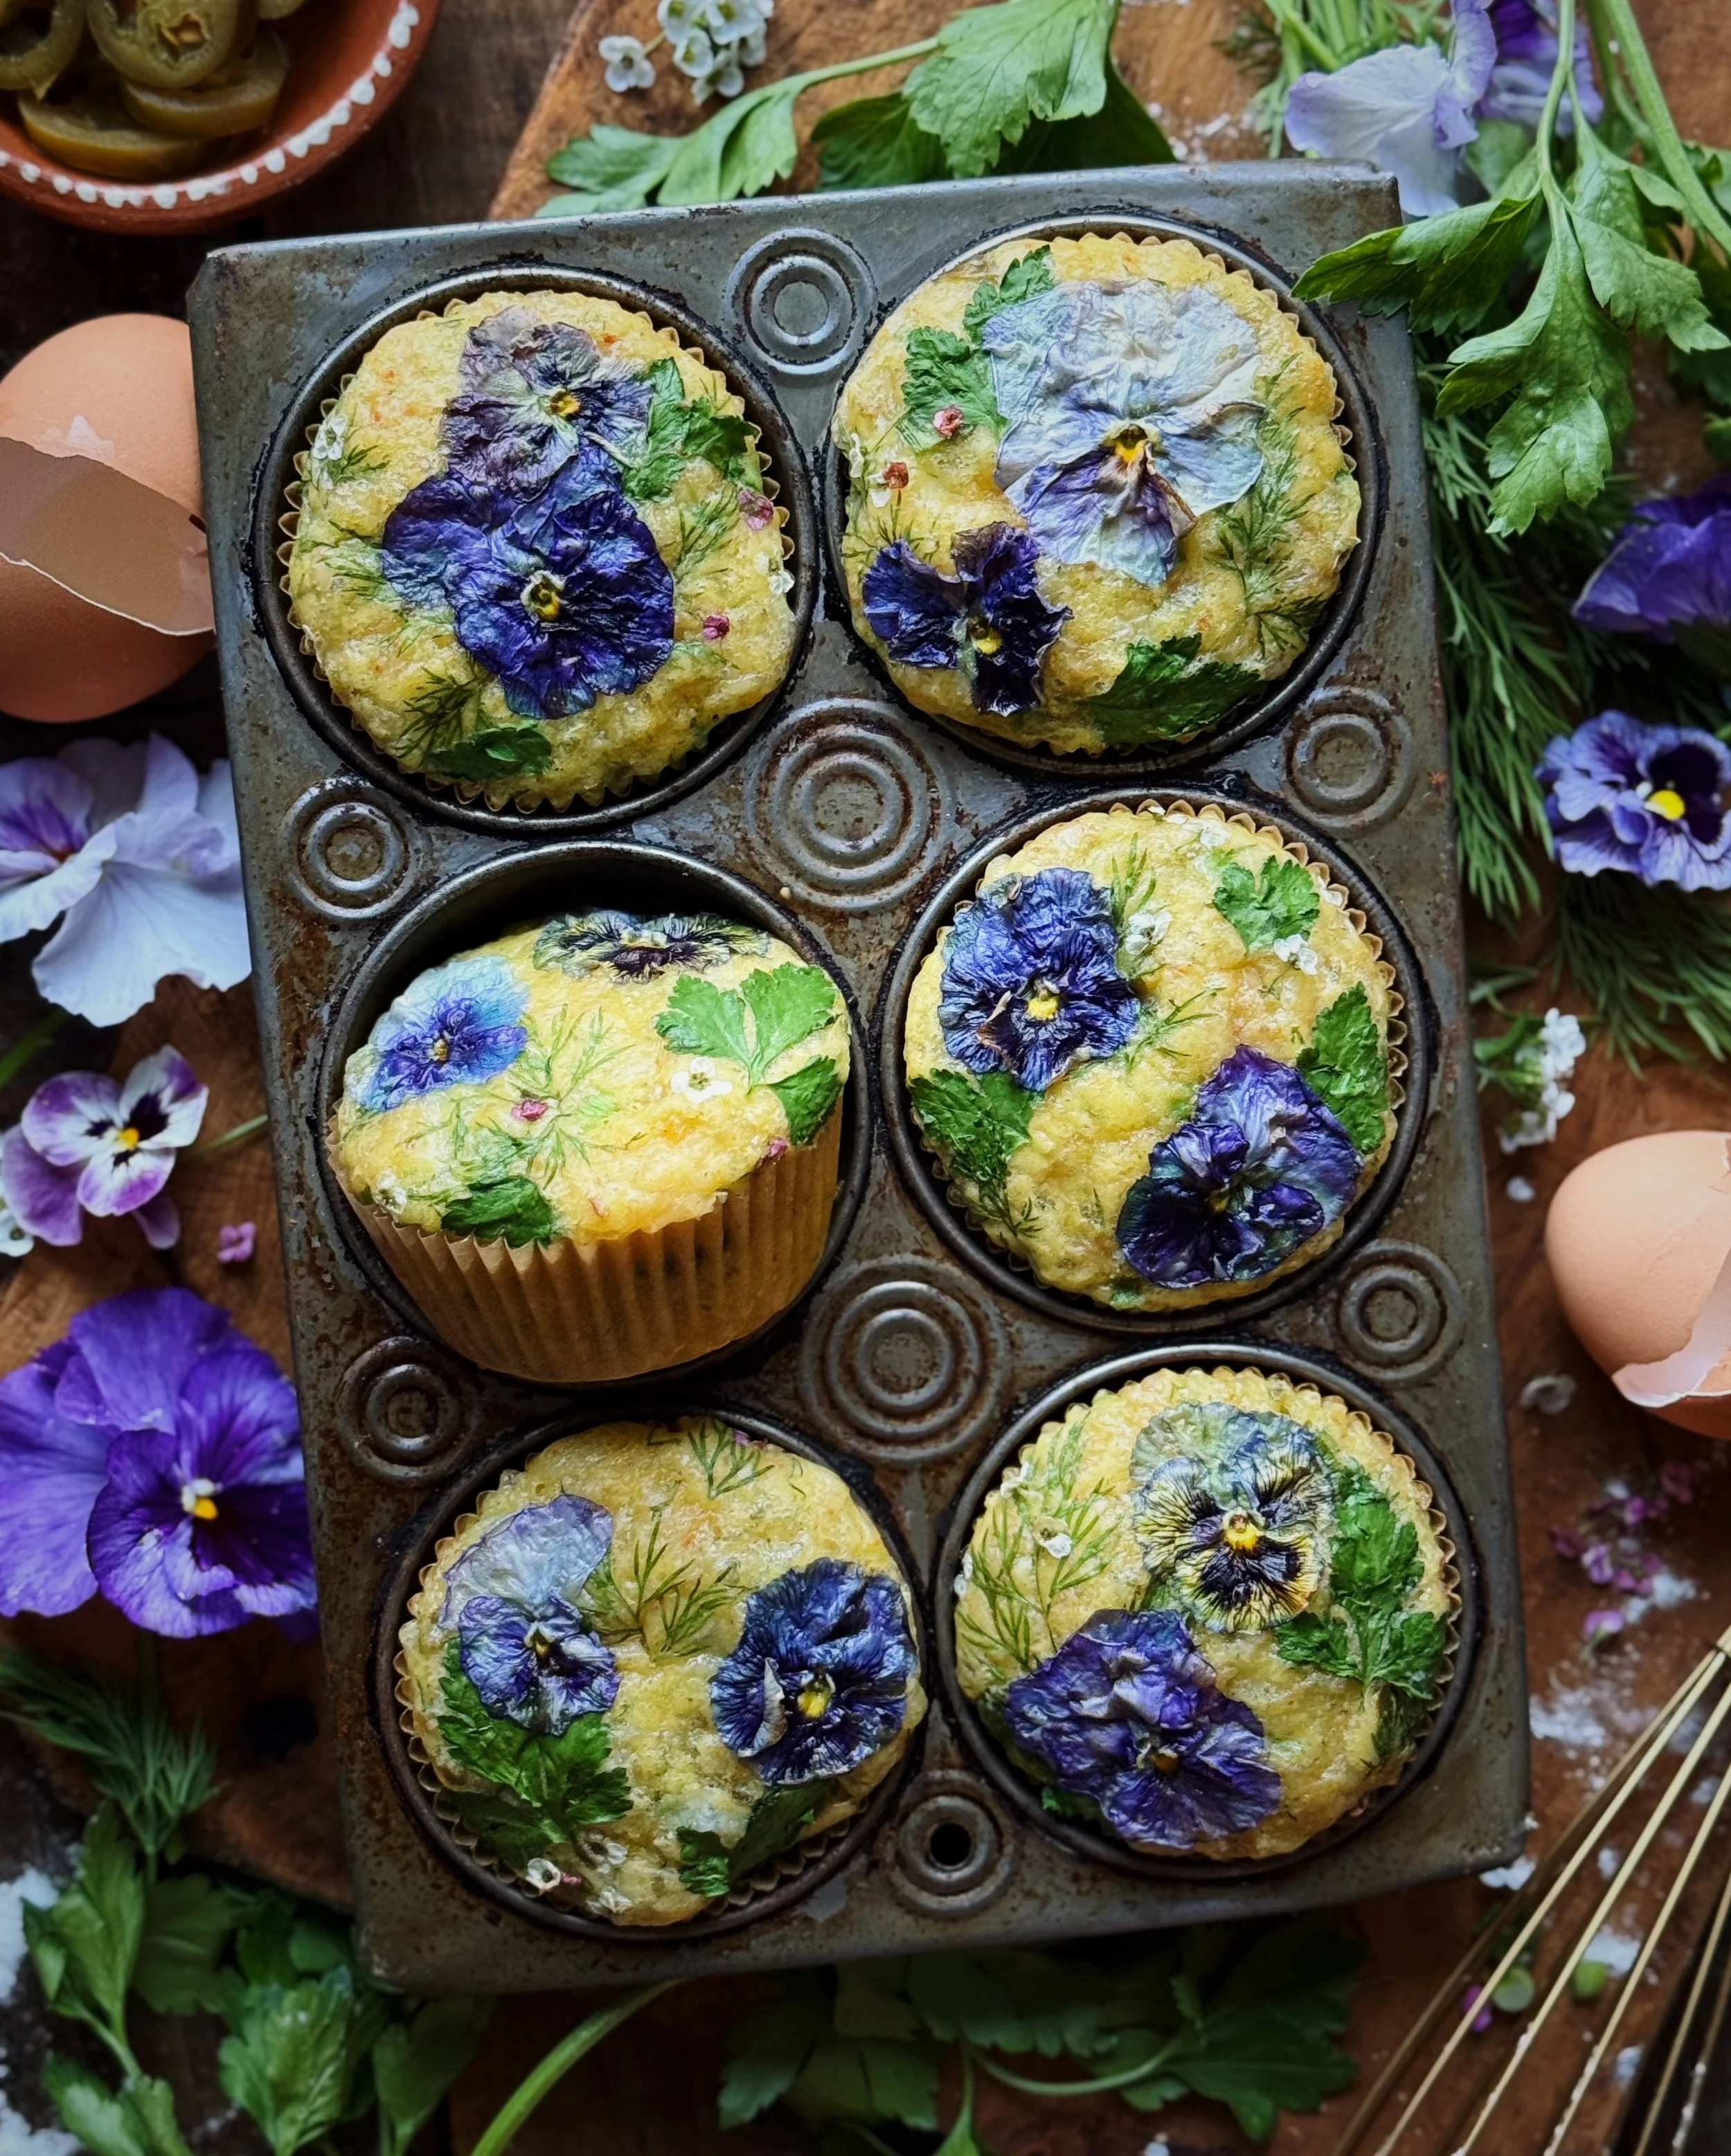
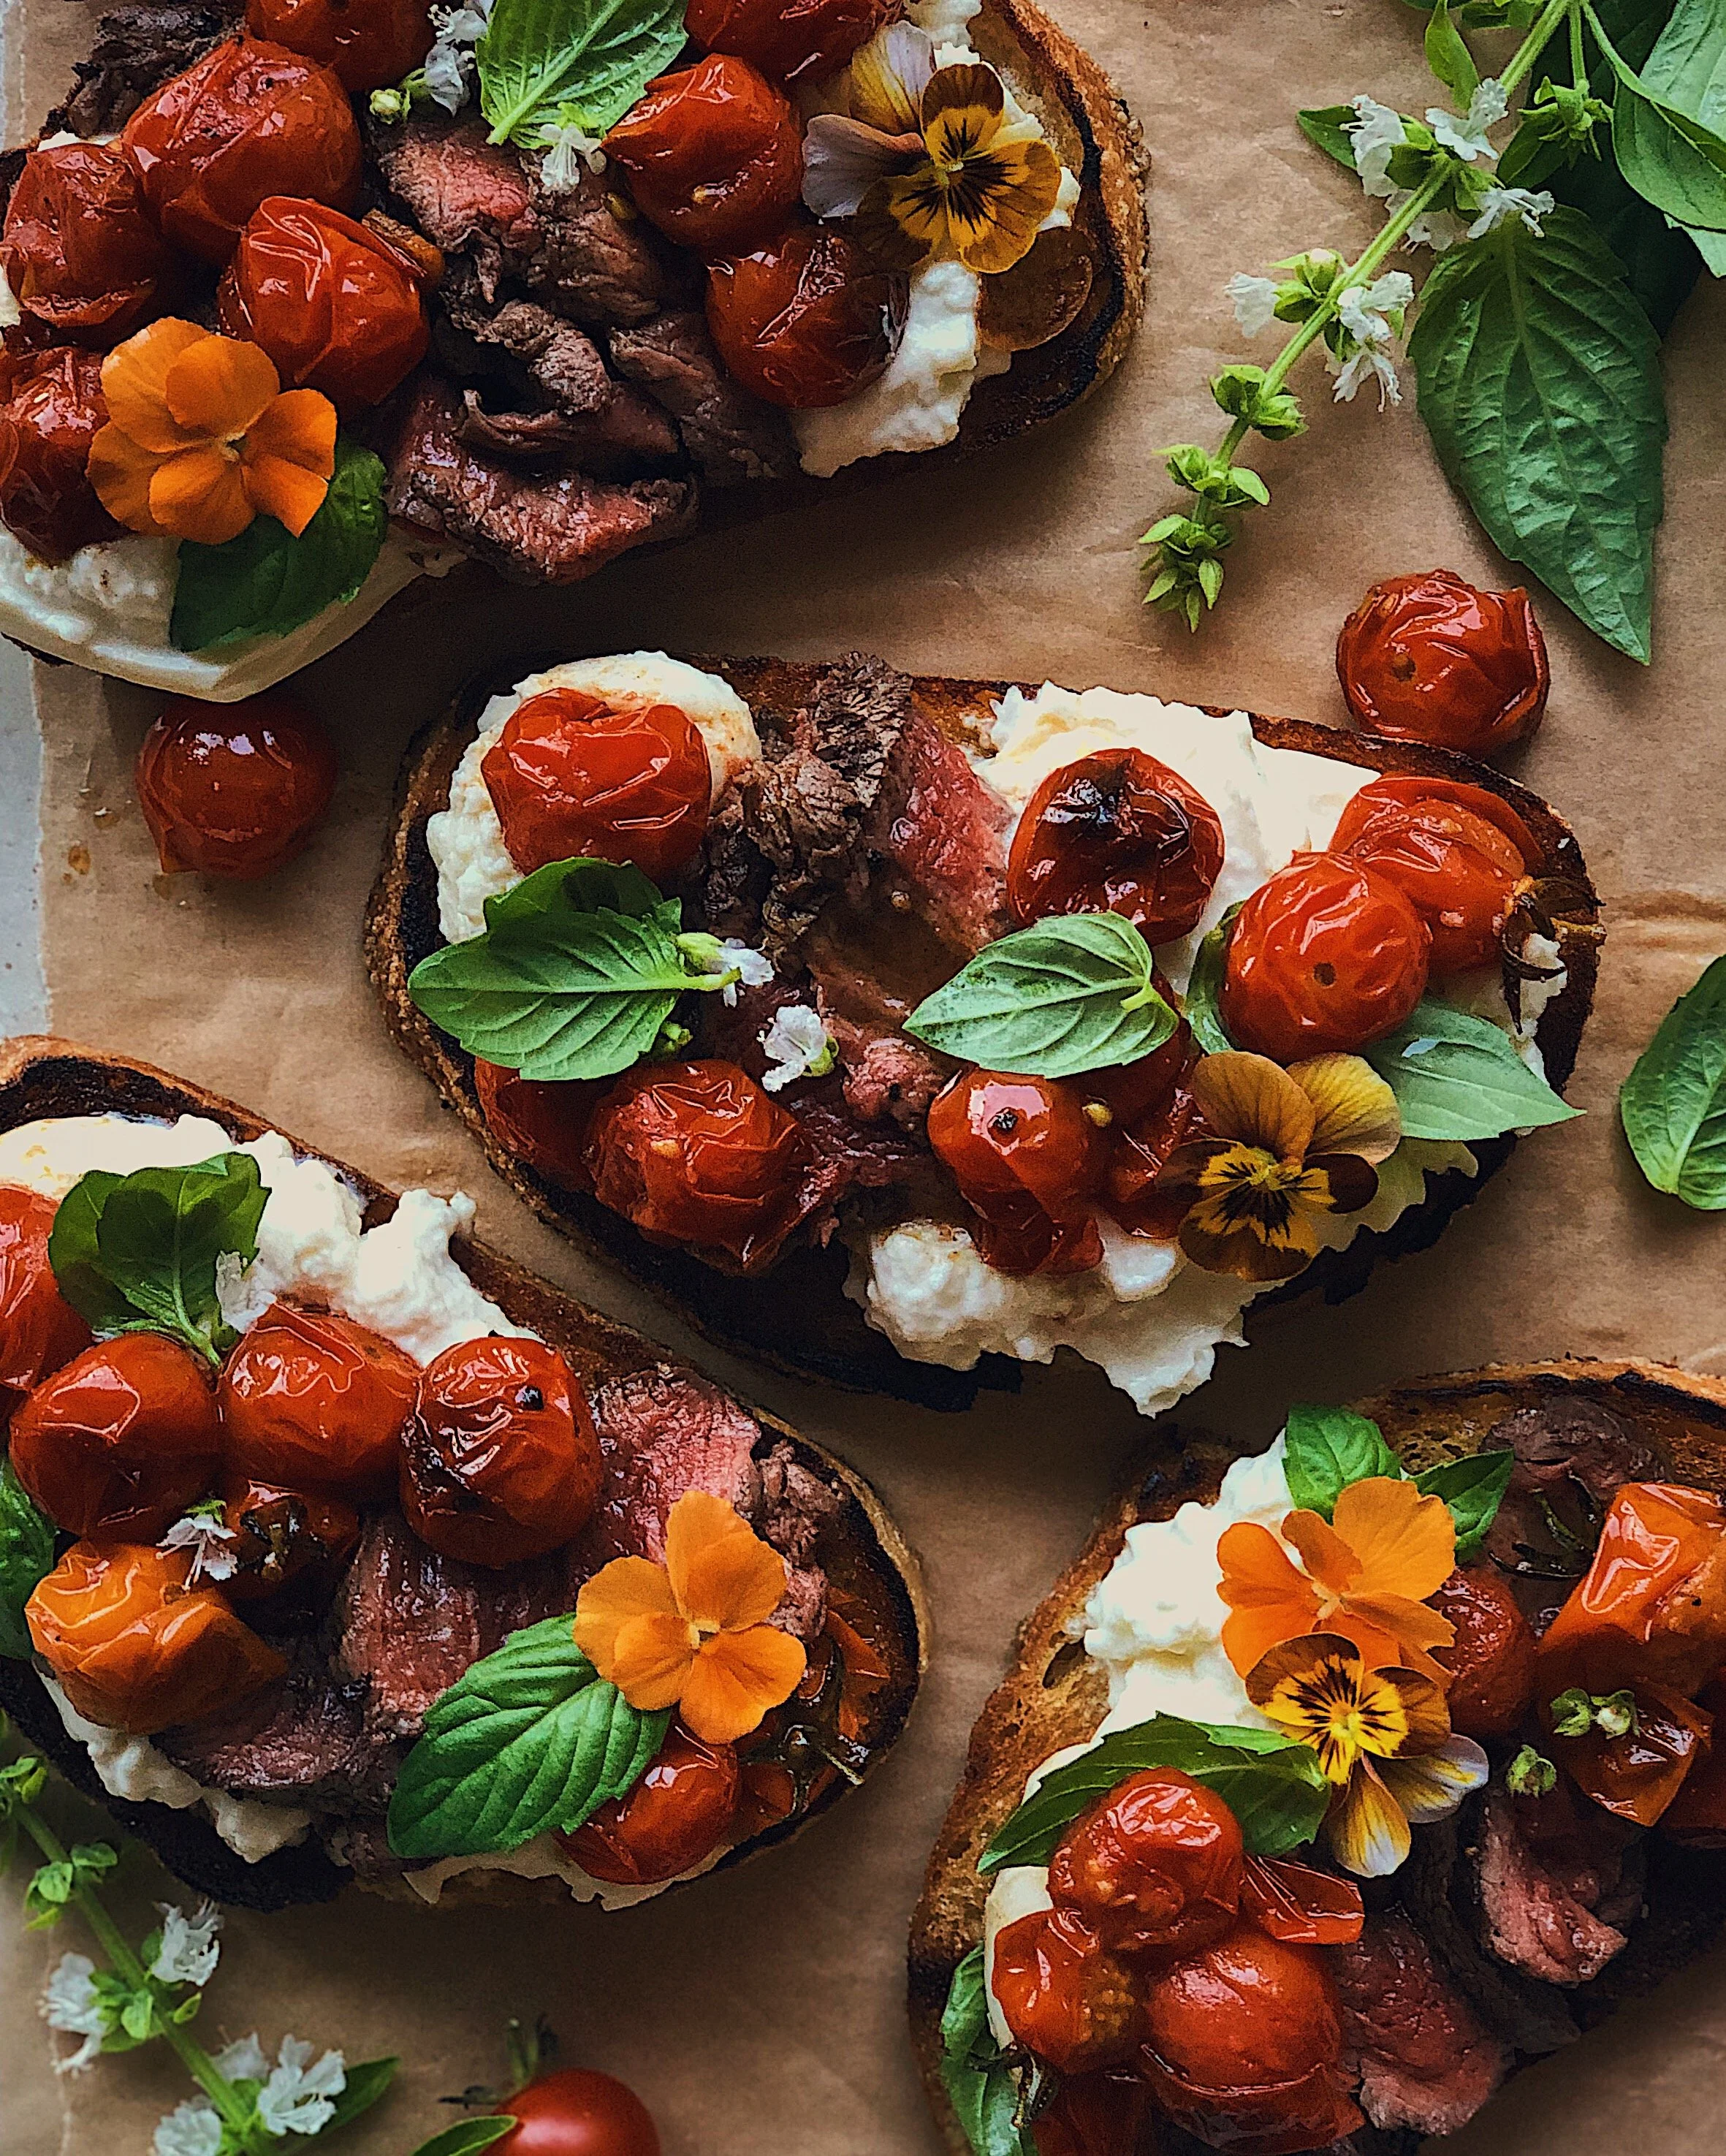
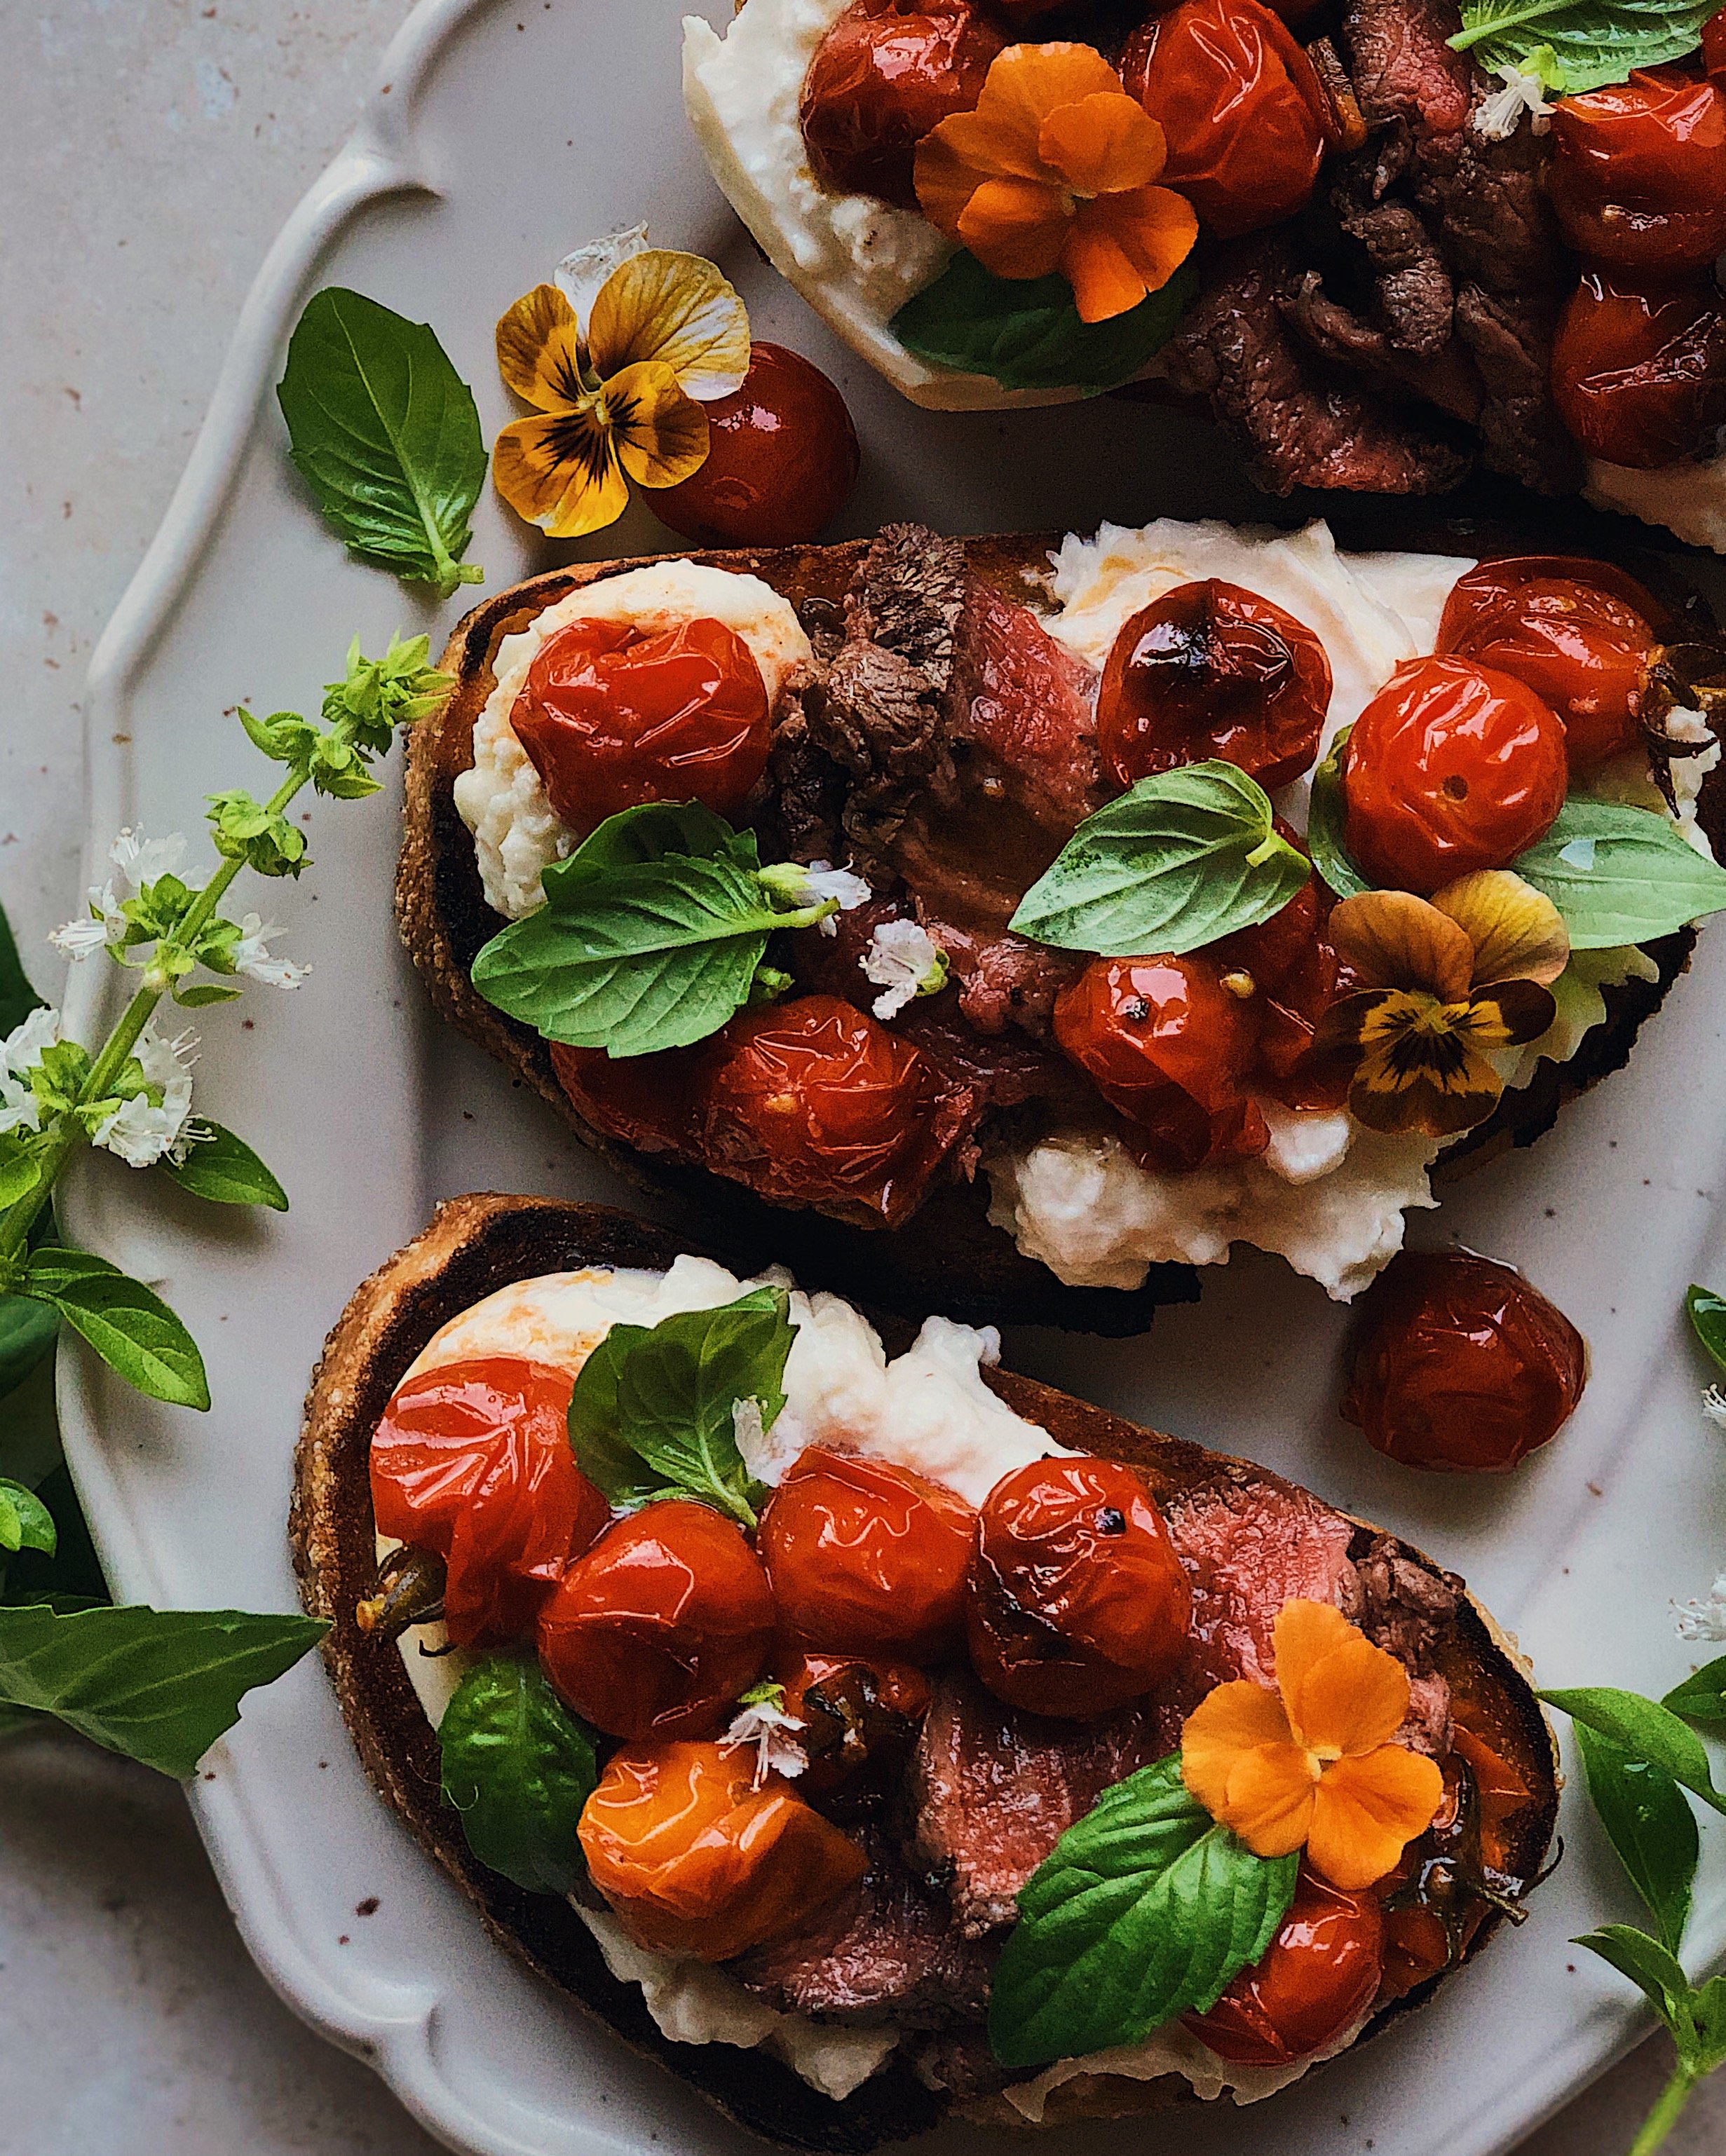
Recipe: Spring Veggie Crostini with Green Chili Cheese Spread

For this recipe, I partnered with Cabot Creamery to come up with something that is deliciously cheesy and also celebrates the beautiful produce that the spring season has to offer. One of the things I love about spring is that everything is so green! Here in Northern California, everything from the rolling hills with grazing farm animals to the heaps of fresh offerings at the farmers markets is lush shades of green right now. All of this inspired me to make this Cabot cheddar-based cheese spread with roasted green chilies and green garlic. It’s my take on pimento cheese with a spring green twist, and I hope you find it as addictive as I do!

I wasn’t sure if I could call it “green pimento cheese” because there aren’t actually any pimento peppers in this, but that’s the easiest way to describe what I was going for and I am so pleased with how it turned out in the end. Pimento cheese is a cheese spread associated with cuisine of the American South and it is named for the red pimento peppers (also known as pimiento peppers or cherry peppers) that are mixed throughout. My version combines roasted Anaheim green chilies, green garlic (more on this later), some dry spices, and Cabot Vermont Sharp Cheddar—the one in the green plaid wrapper! I chose this cheddar because it’s a great everyday sharp cheddar that my friends at Cabot recommend for sauces and dips; it brought a nice tang that held up to the flavors from the produce.

This cheesy spread can be used in so many ways. It is great as a dip for seasonal crudité, spread on crackers, slathered into burgers, and so much more. But I thought I’d show it off in the way that I personally best know how—on some pretty spring-themed mini toasts! These crostini are an extension of that spring farmers market theme; I went to the market planning to just grab a baguette and some green garlic if I could find it and then next thing I knew I was bumping elbows with the other aunties picking out the plumpest looking snap peas and the prettiest pea shoots. When I think of what’s in season in the spring, I definitely think of peas, so it felt fitting to feature them on top of my spring crostini, along with sunflower sprouts, little bits of radish, and edible flowers, all with my green chili cheese spread to hold them down onto the slices of toasted baguette.

Notes on the key ingredients, prep, and substitutions for the Green Chili Cheese Spread

  • Anaheim Chili Peppers: I chose to feature these chili peppers in my green chili cheese spread because they are very mild, have a nice fresh vegetal flavor, and tend to have a flattened shape which makes them easier to roast evenly. For this recipe, you will be completely charring them until the skins are black and papery and easily sloughed off. My preferred way to do this is directly on my gas stove as this allows me to keep moving them around until they are blackened all over. If you do not have a gas cooktop, you could do this over an open grill or under a broiler; just be sure to keep moving and rotating the peppers as needed to get an even char.

  • Green Garlic: Green garlic is a result of farmers thinning out their garlic crop; these get pulled out of the ground in the spring while other garlic plants stay in the ground until the bulbs develop into the mature form that gets dried and becomes what we think of when we think of garlic. It is milder in flavor than mature garlic and can be found only in the springtime, at farmers markets or some local grocery stores that tend to source more directly from farmers. To prepare the green garlic for this recipe, you will only be using the white immature bulb with the roots trimmed off and up to the tender light green stalk, below the tough dark green leaves. Similar to how you prepare an onion, you’ll want to peel away the tougher outer layer of the stalk (usually the pretty purple part). You’ll be briefly soaking the chopped green garlic to take away some of the raw sharpness. If you can’t find green garlic, substitute 1–2 small cloves of peeled garlic and use boiling hot water for the soaking step.

  • Japanese Mayo: I used Japanese-style mayonnaise because it’s the only kind I buy and I like creaminess and slight sweetness in the flavor. You can definitely sub in with whatever mayo you have.

  • Dried Spices: Ground cumin and coriander add depth of flavor to the spread, and make it smell so good. While it is always best to toast whole dried seeds and grind them right before use, I opted to go with store bought ground cumin and ground coriander when I was testing this recipe and they still brought a lot of complexity to the spread. 

  • Sharp Cheddar: This recipe uses a whole dairy bar of Cabot Vermont Sharp Cheddar so you’ll have more than enough cheese spread for the crostini portion of the recipe and you can use the rest as a dip, on sandwiches, and more. This cheese has a creamy texture and a nice buttery tang, and just the right amount of sharpness for making a versatile spread/dip. As a bonus, all Cabot Cheddars contain zero grams of lactose per serving so you can whip this up for a party even if you have lots of lactose-sensitive friends like I do.

Green Chili Cheese Spread Variations

Because I was making the spread mainly to use on crostini, I processed the ingredients well in the food processor to produce a more homogeneous consistency. But don’t expect something silky smooth when you are blending the ingredients together since you are working with a block cheddar here; instead, look for a texture similar to baba ganoush.

If you are planning on using this as a dip for crudité or for a burger spread, you could choose to keep the texture a bit more chunky if you prefer. Withhold one of the roasted peppers from the food processor and finely chop it with a knife. When adding the cheddar, process half of the amount first and then lightly pulse in the rest. Then fold in that chopped roasted pepper manually.

Notes on Making the Crostini

The written recipe below will show you what you need to make the crostini in the photos. But don’t feel like you need to precisely measure anything for that portion of the recipe! This green chili cheese spread will work perfectly with so many veggies and if you are able to visit a local farmers market before making your crostini, I encourage you to get what speaks to you. 

Here’s a full list of what I used:

  • Snap Peas: To make these more Insta-worthy, I cut off one half of each pea pod (and snacked on the discarded pieces while I worked). You can definitely skip this step, but if you want to achieve this look, use a sharp paring knife and run the tip just to the side of the natural seam that holds the pod together, and it will come right off.

  • Pea Shoots and Tendrils: These are the leaves and tendrils of a pea plant; other than at farmers markets, I see them at Asian supermarkets since we often cook them for a simple veggie dish. Usually pea shoots are sold with three segments attached together: the tendril, a thin stem with small-ish symmetrically shaped leaves, and then a thicker hollow stem part with bigger leaves. I used only the first two parts for my crostini. 

  • Frozen Peas: I supplemented the pea pods with some frozen peas to fill in some of the gaps as I was decorating the crostini. This ingredient can definitely be skipped if you want to keep to all fresh toppings.

  • Radish Slices: The tiny little flower shapes you see sprinkled over the crostini are made from French breakfast radishes and purple daikon! I sliced them thinly and then used a tiny flower-shaped fondant cutter to punch out the flower shape. If you do not have a tool like this, simply slicing French breakfast radishes into thin disks would still look so pretty.

  • Sunflower Sprouts: Another young green that brings a springtime vibe to the crostini, the succulent leaves of sunflower sprouts hold up much better on an appetizer table than most microgreens. These come with long, crisp stems attached but I only used the leaves to decorate my crostini.

  • Edible Flowers: I grew these pansies myself and love decorating my toasts with them but they do not contribute much to the taste of the crostini, so you can omit them if you don’t have them. Remember that not all flowers are safe to eat; be very certain about what you have before incorporating flowers into your food. Alternatively, I actually have a tutorial for how to make very edible pansies/violas cut out of purple daikon, which would be perfect for these crostini; you can check that out here.

Because I found myself snacking on whatever veggie scraps I had as I was testing this cheese spread recipe, the idea of crudités really stuck in my mind. So, in a way, my crostini are like mini self-contained edible crudité platters. Whether you opt for this approach or choose to layer something different over your green chili cheese spread, I hope your spring crostini bring you joy to admire and then promptly devour!

How to Make Spring Veggie Crostini with Green Chili Cheese Spread

Ingredients for the Cheese Spread

4 large Anaheim chili peppers
2 stalks (about 6–8 inches each) green garlic, trimmed and coarsely chopped
1 lemon
1/4 cup Japanese-style mayonnaise
1/4 tsp kosher salt
1 tsp ground cumin
1 1/2 tsp ground coriander seed
8 oz (1 dairy bar) Cabot Vermont Sharp Cheddar, grated

Ingredients for the Crostini

1 baguette
4–6 tsp extra virgin olive oil
1 1/2–2 cups Green Chili Cheese Spread
pea shoots and tendrils
48 snap peas
1/4 cup frozen peas, thawed
4 french breakfast radishes, thinly sliced
2 oz purple daikon, thinly sliced
16+ edible flowers, such as pansies (optional)


Procedure

To make the cheese spread: Char chili peppers directly on a gas stove (or a grill or under a broiler) rotating and moving often until the skins are completely black and papery. Transfer charred peppers immediately to a brown paper bag (set over a plate to catch the moisture) or a container with a lid (a bowl and plastic wrap works). Seal in the peppers to trap the steam and allow to rest until cool enough to handle.

In the meantime, zest and juice the lemon. Set aside the zest plus 2 teaspoons of the juice. In a bowl, combine the remaining lemon juice, the chopped green garlic, and 1/4 cup lukewarm water. Allow to soak for at least 3 minutes to remove some of the raw bite of the green garlic (or longer if you are sensitive to this flavor). Then drain away the liquid and set green garlic aside.

When the chili peppers are safe to handle, slough off and rinse away all the charred skin. Discard the tops, the seeds, and any pith. Pat dry thoroughly and roughly chop.

In a food processor, combine the chopped roasted peppers, drained green garlic, mayonnaise, seasonings, and the reserved lemon juice and zest. Process until a puree-like texture is formed. Add half the cheddar and process until homogenous. Add the remaining cheddar and pulse to the desired consistency, or process until homogenous. 

The cheese spread can be stored in a clean jar in the fridge for up to 1 week. For making the crostini on another day, allow the spread to come to room temperature for smoother handling.

To make the crostini: Prepare the pea pods and radishes as desired for food styling (see notes in above blog post for details on food styling).

Preheat oven to 475°F.

Trim away the end parts of the baguette and slice the rest on a bias into about 16 slices. Brush each slice on one side with olive oil and place on a baking tray. Bake/toast in the oven for 4–7 minutes, depending on how dark and crunchy you want your crostini.

For each slice, spread on about 2 tablespoons of the prepared cheese spread. Start decorating with the pea shoots, then about 3 snap pea pods, then the edible flowers to establish the general layout. Then fill gaps with the frozen peas, sunflower sprouts, and the radish/daikon slices. Add extra pea tendrils for extra flair. Repeat for the remaining baguette slices and have fun decorating pretty spring toasts!

Thank you so much to Cabot Creamery for sponsoring this recipe! Visit their website to find out where you can get their excellent cheeses, such as their naturally-aged cheddars, near you!
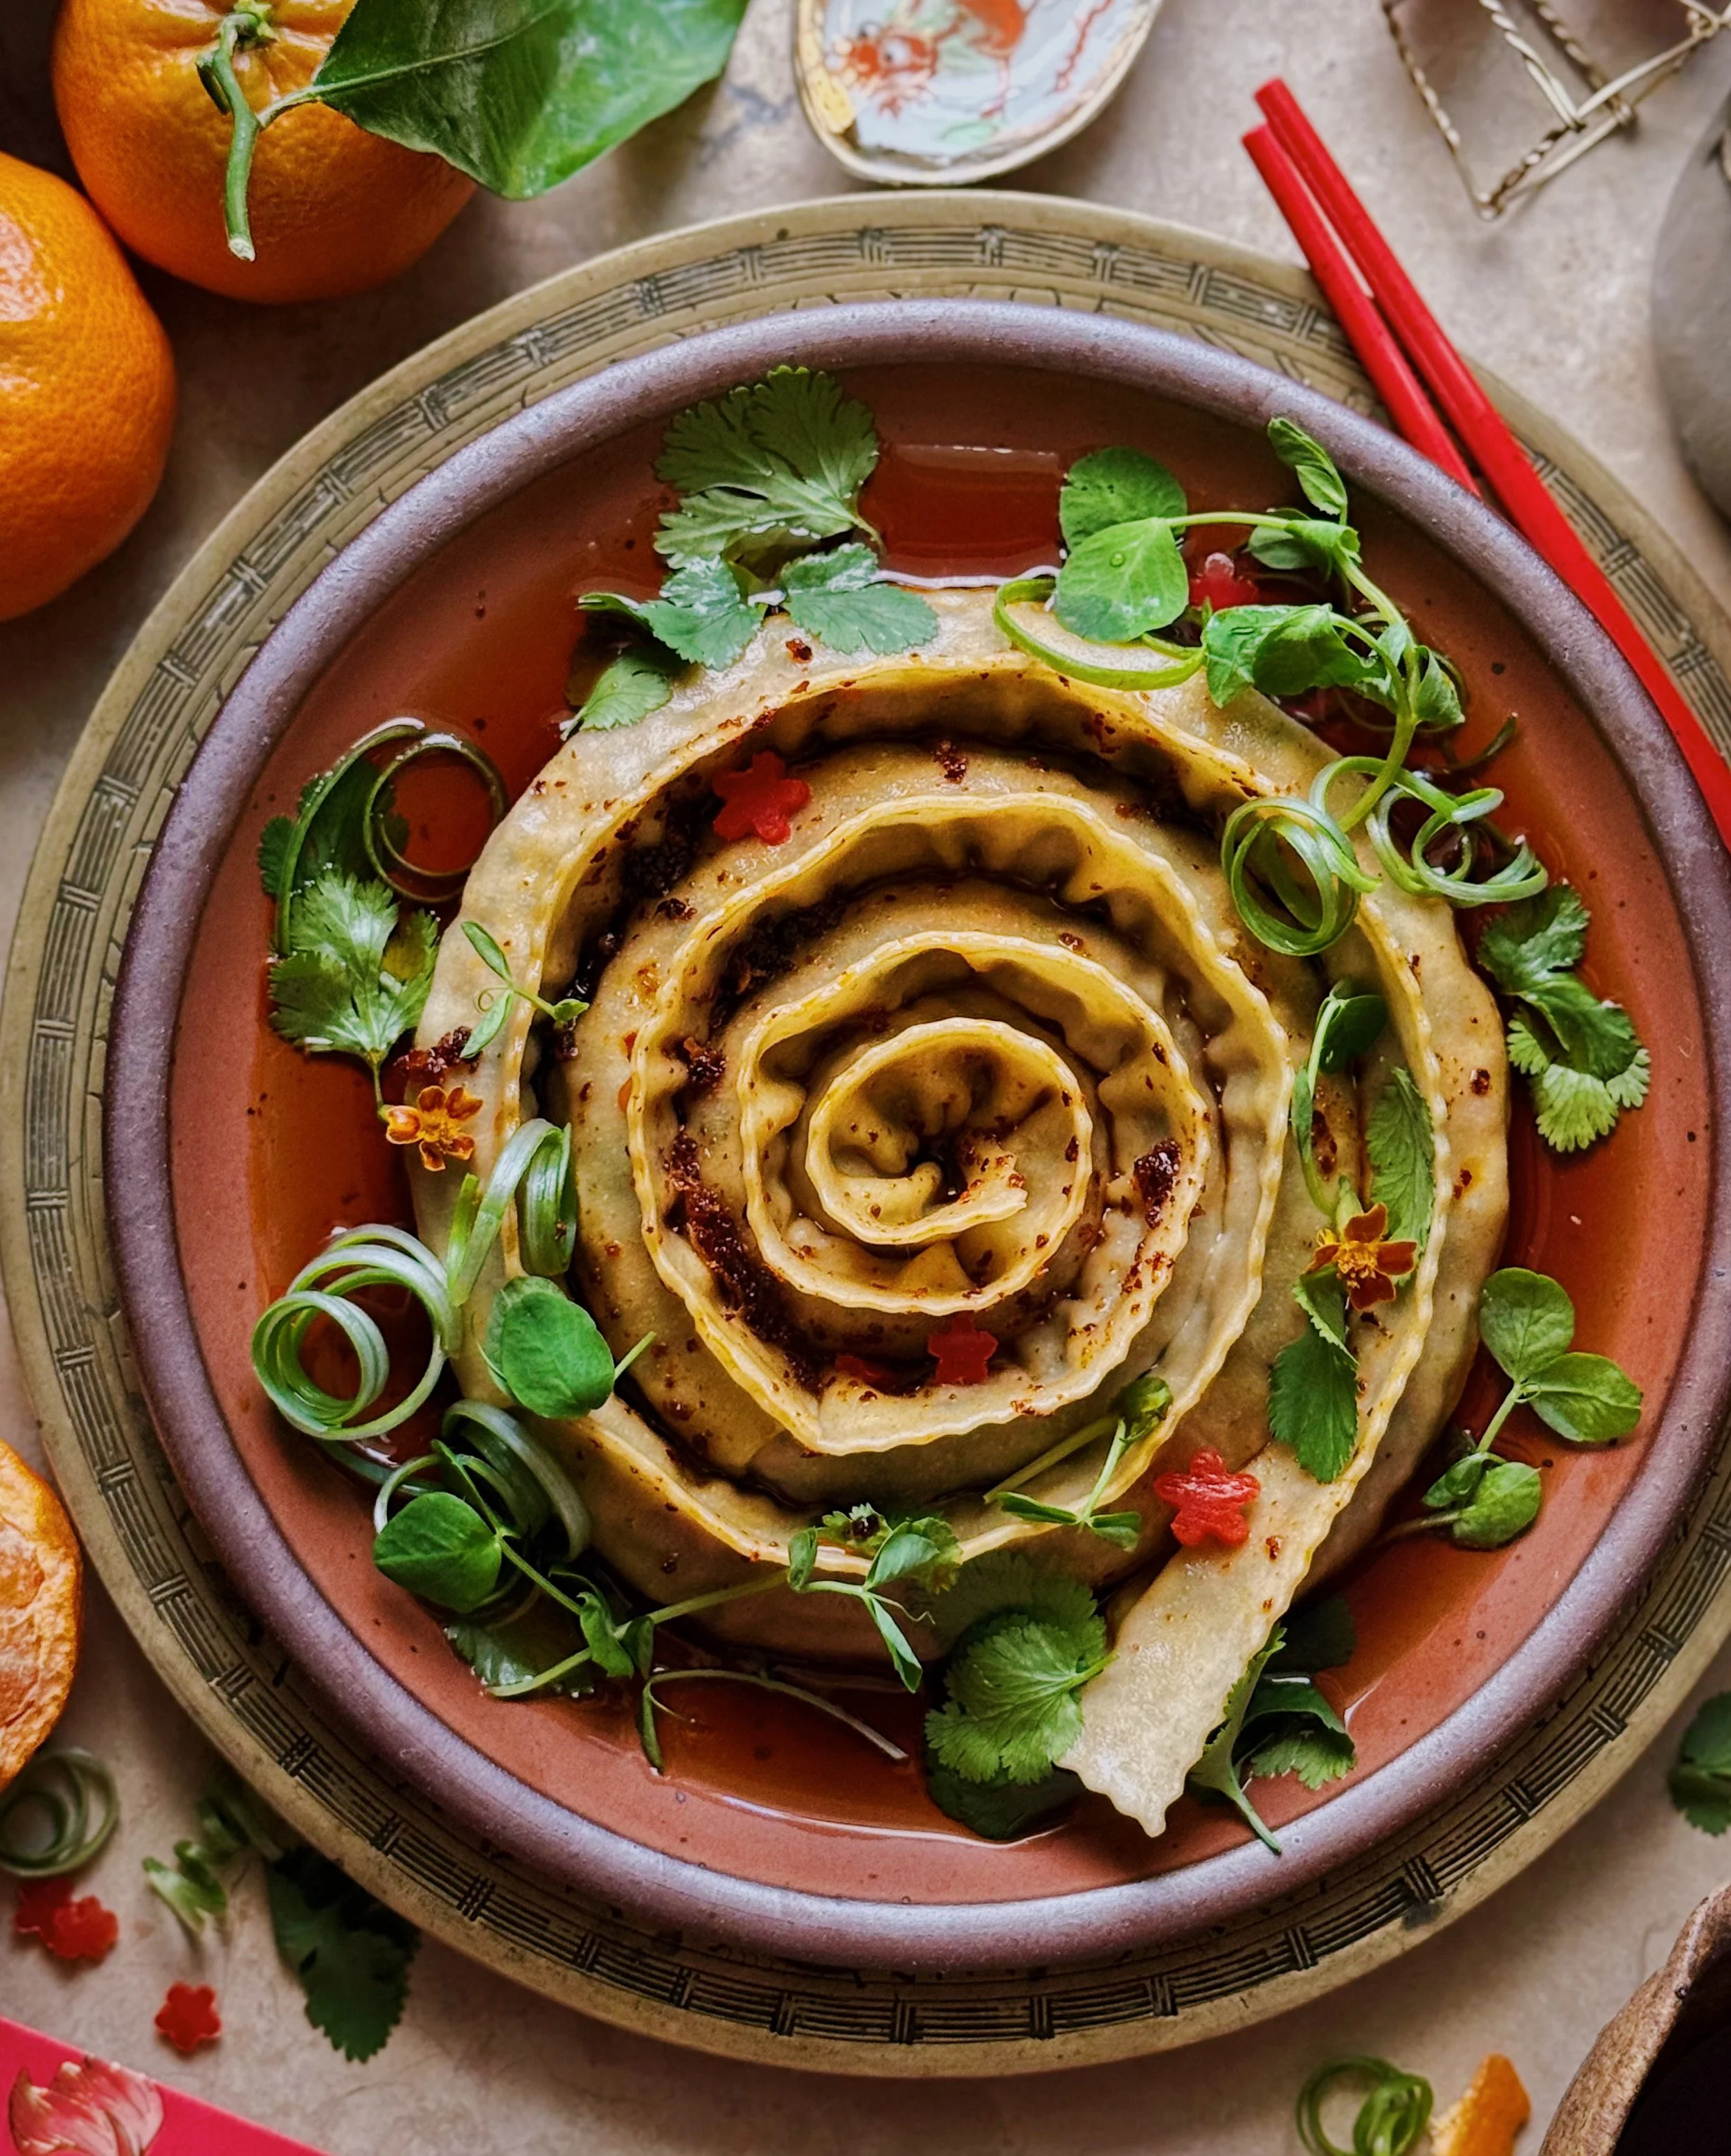
Steak and Caprese Toasts

For when all you want to eat during the summer is caprese made from fresh garden grown tomatoes, but you need some protein too.

I don’t normally serve toast for dinner. I try to cook up a “real” meal for Spouse and I in the evenings but I must say that this toast recipe is definitely dinner status. Maybe it was a little overkill to use such a nice cut of steak for toast, but it tasted really good so I have no regrets. I also didn’t want the risk of us biting into the toasts, and having fatty bits dragging too much steak along with the bite because we couldn’t cut through cleanly with our teeth.

There are a few phases to making these but the good news is that it all gets done in the same cast iron pan. And in the end, you’ll have a world of flavor—tender steak with richness from the butter it was seared in, crunch and carbs from the toast, creaminess from burrata, fresh herbaceousness from basil, and brightness from burst tomatoes tossed in a quick vinaigrette. ⁣

How to Make Steak and Caprese Toast

Ingredients

8 oz tenderloin or filet mignon steak, at room temp
kosher salt
freshly ground black pepper
4 slices of good bread
lots of olive oil
1 tbsp salted butter
10 oz cherry tomatoes
1 clove garlic, thinly sliced
1/2 tsp honey
2 tsp white wine vinegar
8 oz burrata
fresh basil leaves

Procedure

Generously season steak with salt and pepper.

Heat a cast iron skillet on medium high. Generously drizzle olive oil. Fry bread in the olive oil on both sides until golden, then remove and set aside.

Add butter to the skillet and then add the steak. For medium rare, cook steak undisturbed for ~3 minutes on each side. Transfer steak to a grooved cutting board to rest for at least 10 minutes.

Reduce heat to medium. Add 2 tablespoons of olive oil, followed by the cherry tomatoes, 1/4 teaspoon salt, and garlic. Let tomatoes char on one side before turning. Cook tomatoes until they start to burst, about 4–5 minutes total. Shut off heat.

Combine honey and vinegar in a small bowl. Spoon in the charred tomatoes and mix gently to combine.

Slice the steak thinly.

Assemble the toasts. First, divide the burrata among them, then the steak. Then spoon some of the tomato mixture over each. Garnish with the basil leaves.

For more toast inspiration, check out all the posts with the “toast post” tag here.

Baguette au Brie with Roasted Tomatoes

In Berkeley, California, my college town, there is the cutest little Provençal restaurant called La Note where baguette au brie is on the menu. I have many fond memories of eating at La Note, one of those places choc-a-bloc with mismatched wood chairs and vintage French mixing bowls, mugs, and salt and pepper shakers that you would expect to find in some grandma’s country cottage. It was too expensive for us to eat there as poor college students so I never went while I was in school at UC Berkeley. And it is one of those places that draws crowds and over an hour’s long waitlist for their weekend brunch. So, there was only a very specific window of my life when I could have eaten at La Note—one where I was old enough to afford a cute brunch treat but young enough to have the patience to wait that long for a table—and sadly, that window has now passed, in favor of my current curmudgeonly state.

But when I did eat there for brunch, my go-to choice was the baguette au brie and I would never skimp on the buy-up to add roasted tomatoes. I remember the tomatoes being very simply done, maybe not even the most flavorful and just a quick blister with a little sprinkle of herbes de provence. But somehow that combo of the crusty baguette, that rich creamy brie, and the juicy tomatoes translated to perfection in its simplicity when all chewed together in my mouth.

A sad early attempt at food photography, circa late 2013.

What’s nice about such a simple yet perfect combination is that it can easily be replicated at home! I’ve been doing as much for years but now I finally have some nice photos to show for it. I’m also sharing one of my earliest attempts at taking food photography seriously, above, and I hope you can see some improvement has been made since then. Incidentally, that old photo from 2013 was taken with a real DSLR camera, whereas the hero photo on this post was taken with my iPhone (as is my modus operandi these days)—proof, I hope, that it’s not about the equipment when it comes to taking a good food photo. (If you are interested in hearing more about how I shoot professionally on an iPhone now, check out my interview on the My Food Lens podcast here.)

Anyway, about this recipe. Obviously not a “recipe” recipe because toasty bread based meals like these are, I believe, so much more about what feels like the right amounts (or the amounts that fit) verses exact measurements. Just use a good French baguette, the creamiest European style butter, and your favorite brie. For the roasted tomatoes, mine are probably much more time consuming that what they did at La Note, but it shows in the amount of flavor that they will bring if you use my technique—found here.

How to Make Baguette au Brie with Roasted Tomatoes

Ingredients

1 French baguette, halved lengthwise
brie, sliced somewhat thinly
European style salted butter, softened
roasted tomatoes (see recipe here)
fresh herbs, such as thyme or oregano (optional)
cracked black pepper (optional)

Procedure

Slice baguette halves into desired lengths. Generously spread butter over the cut surfaces. Arrange an even layer of brie slices on top. Place on a baking sheet and put under the broiler; watch carefully and broil until the brie just begins to melt.

Immediately place slices of roasted tomato on top of the melted brie. If desired, garnish with fresh herbs and finish off with pepper.

For more toast inspiration, check out all the posts with the “toast post” tag here.

Green Tomato and Chili Cheese Toast

greentomatotoast.JPG

Green tomatoes are not easy to come by in my part of the country but I think they have such a great tart flavor. When I saw one in the pile of mixed tomatoes at the store, I snatched it up, but then it sat in my fridge for a while. It didn’t seem worth heating up a bunch of oil to make just one fried green tomato. I googled what else to do with a green tomato and saw lots of examples which pair pimento cheese with them. Apparently this combination is a common thing where fried green tomatoes are popular—I had no idea, but I can see why! They are delicious together!

What made things even more perfect is that I happened to have a cornmeal-crusted jalapeño and garlic loaf from my favorite local-ish bakery, Wild Flour Bread on hand. It was the perfect bread for this toast combo, but a nice slice of crusty sourdough or rye would taste amazing too.

I topped off the otherwise Southern-inspired combo with a chili oil fried egg because I couldn’t resist bringing some extra spice to the toast. You can learn how I made this fried egg in more detail here.

greentomatopimentoast.JPG

How to Make Green Tomato & Chili Cheese Toast

Ingredients

1 slice of bread, toasted
1/2 green tomato, thinly sliced
~1/4 cup pimento cheese
1 chili oil fried egg
red pepper flakes, to taste
dill, for garnish

Procedure

Generously spread pimento cheese over the toast (I used the one from Trader Joe’s). Top with a few thin slices of green tomato, and then with the fried egg. Sprinkle red pepper flakes over everything and garnish with fresh dill and/or dill flowers.

For more toast inspiration, check out all the posts with the “toast post” tag here.

Toasts with Labneh and Burst Tomatoes in Paprika Butter

tomatotoast.JPG

Making these quick burst tomatoes in some sort of flavored butter is one of my favorite things to do with my homegrown cherry tomatoes at this time of year. There is no denying that a tomato grown at home tastes better than one from the store, so there is no need to do much to them in terms of cooking; I prefer to enjoy that natural sweet flavor without much fuss or distraction. So I throw them in hot melted butter and just wait for them to barely blister and burst and that is pretty much good to go for me.

Lately, though, I have been loving mixing summer fruit with smoked paprika; the sweetness of the fruit seems to go so well with it. I have been using the smoked Spanish paprika that I received from Spice Tribe and it is so so good—while I do other sponsored content in partnership with them, this post is not sponsored and this is truly one of my favorite products of theirs that I use in regular life. Allowing the spice to bloom just a little bit in the hot butter adds an incredible depth of flavor to this otherwise simple and simple to make toast combo.

How to Make Toasts with Labneh and Burst Tomatoes in Paprika Butter

Ingredients

1 cup cherry tomatoes
2 tbsp salted butter
1/2 tsp smoked paprika (or to taste)
2–3 slices of toast
labneh
fresh basil leaves (I used Thai basil)
flaky salt

Procedure

In a skillet on medium high heat, add the butter. Once melted, add the cherry tomatoes and allow them to sit in the skillet until they start to burst (could get a bit messy). Roll them around a bit to heat through, then put them to the side of the pan and add the paprika to the excess melted butter. Once the paprika and butter become very fragrant, gently fold everything together and turn off the heat.

Swirl labneh on top of the toast, forming areas for the melted butter to pool. Spoon the tomatoes and melted butter on top. Finish with a few fresh basil leaves and some flaky salt.

For more toast inspiration, check out all the posts with the “toast post” tag here.

Inside-Out Pizza Toasts

pizzatoast.JPG

The last time I shared a photo of pizza toast on Instagram, I got a surprising number of people asking me for a recipe. Though I am always filled with gratitude when someone tells me they feel inspired to recreate something I shared, in this case I was also slightly disheartened, if I am being completely honest; pizza toast, or at least some rudimentary version of it, was one of the very first foods I made for myself as a child, so to me, it should always be something borne of imagination and improvisation, and one should never feel beholden to following a recipe for it.

One kind soul clarified, however, that they wanted the recipe for my garlicky tomato sauce. Okay, that’s fair! So this time around, I really wanted to make the sauce the star of the pizza toasts, and I kind of have a recipe to share for them now. I was inspired by Detroit style pizza (which I’ve been really into lately) to use the sauce as a topping. The sauce in this recipe is going to be thicker than what you would normally find on pizza, because the time in the oven is going to be much less and you want the flavor to have a big impact. As such, the sauce also features my special ingredient for any tomato-based recipe: fish sauce! Trust me, the fish sauce is a game changer when added to tomato sauce.

Beyond the sauce, however, feel free to add your choice of toppings. I kept it very simple: a very very thin layer of sauce on the bread, gobs of mozzarella melted on, and slices of homemade pickled Fresno chilies. Then, dollops of more thick sauce and basil added after the oven. But do not allow yourself to be confined by this recipe—pizza toast is only limited by the boundaries of your pizza toast eating desires.

How to Make Inside-Out Pizza Toast

Ingredients for the sauce

4 cloves garlic, chopped
1 tsp good olive oil
8 oz canned tomato sauce
a splash of water
2 tbsp tomato paste
2 tsp harissa paste
1 1/2 tsp sugar
1 tsp fish sauce
2 pinches dried oregano

Ingredients for the Toasts

4 slices of good bread
~ 8 oz fresh mozzarella, sliced or torn
sweet pickled chilies
fresh basil leaves

Procedure

Preheat oven to 400°F.

Sauté the garlic in olive oil until fragrant.

Add tomato sauce, a splash of water to rinse out the can, and all the other sauce ingredients. Simmer on low, stirring occasionally, until the sauce thickens; when dragging a spoon along the bottom of the pot, it should close up very slowly.

Spread the thinnest layer possible of sauce on each slice of bread. Place bread on an unlined baking tray* and dot with mozzarella, then top with pickled chilies (or whatever toppings you want).

Bake the toasts at 400°F for 3–4 minutes, or until the bottom of the bread is lightly toasted, then broil the toasts until the cheese is bubbly. Top with dollops of the remaining prepared sauce, and then with basil leaves.

* Seriously, do not line your tray with parchment paper! I tried this before with visions of easy clean-up dancing in my head, and quickly learned that parchment paper + open flame broiler does not make a successful toast!

For more toast inspiration, check out all the posts with the “toast post” tag here.

Citrus and Prosciutto Toast

avocadotoast.JPG

Welcome to another installment of my Toast Post series where I try to provide you vague guidelines for how I made a toast. For the record, I do not believe that toast requires a recipe, so I am only sharing these for those who could benefit from some added guidance. Fell free to make changes, use what you have, and treat toast as your own blank canvas for culinary expression and love for your tastebuds.

About this Toast

I made these toasts to commemorate the 3-year anniversary of my Instagram account. The color palette was strongly influenced by the colors of the flowers that were growing in my backyard at the time, and I actually chose the other ingredients for the toast based on the sunset color scheme I wanted to capture. Here are some shoutouts to some of the foods I used and love to use:

  • Sourdough: Country Bread by Josey Baker Bread

  • Chèvre: I LOVE the truffle chèvre by Laura Chenel; it has converted Spouse into a chèvre enthusiast

  • Burrata: I have tried various brands and BelGioioso is my favorite.

  • Prosciutto: If you like what is available at your local deli, get that by all means. But lately I have been loving the packaged version by Creminelli Fine Meats. It’s often on sale at Whole Foods and I like how nicely the slices stay intact as I pull them apart. You can tell they are paper thin yet structurally sound in the photo.

How to Make Citrus & Proscuitto Toast

Ingredients

3 slices of country sourdough
extra virgin olive oil for toasting
~ 3 oz truffle chèvre, room temp
1 cara cara orange
1 blood orange
2 oz sliced prosciutto
1 ball of burrata
purple radish microgreens
sumac
bee pollen
everything seasoning
edible flowers

Procedure

Slice the peels off of the oranges and slice them into cross-sections or segments.

Toast the bread to your preference. I heated olive oil in a skillet, toasted one side in the oil and then flipped over and turned off the heat. This allows the toasted side to withstand the toppings and provide crunch, but prevents the bread from becoming a gum-cutter.

Spread the goat cheese over the toast. Arrange the prosciutto and orange pieces on top however you like, then fill any empty spaces with burrata.

Top with the remaining ingredients as desired.

For more toast inspiration, check out all the posts with the “toast post” tag here.

Avocado and Burrata Toast with Pickled Carrot Ribbons

avocadotoast.JPG

The toast series: An Introduction

I never set out to be a toast account on Instagram but people seem to like the toasts I make. And I get asked all the time for recipes for my toasts. Personally, I do not think that toasts should require a recipe. Toasted bread is like a tasty blank canvas. Put whatever the hell you want on it, you don’t need me to tell you what to do. I am the kind of person that would find a toast recipe incredibly stifling, and I urge you to get to a point where feel confident enough in your abilities in the kitchen to feel the same way.

My spouse always is there to lend a different perspective, though. He can’t do anything in the kitchen without a recipe, and even then, I think he doesn’t have enough cooking experience to grasp the nuance of things; how time sensitive something cooking on the stove can be and that sort of thing. He reminds me that just because I have that confidence and intuition to cobble things together and make it taste good, doesn’t mean everyone does, and maybe that confidence can be built over time but it needs to start with the practice that comes from following a recipe first.

So, okay, I hear you. I’m gonna try to capture “recipes” for my favorite toasts, but I urge you not to depend on measurements (which won’t always be there) and rather use this as an ingredient list or a starting point. And don’t let getting caught up in precise details prevent you from enjoying the process of assembling your own toasts! Now, let’s get that bread, literally.

About this Toast

I made this toast as a celebratory post on the 2-year anniversary of my Instagram account. I think the curly scallions and the carrot ribbon swirls resemble party streamers. The flowers all came from my backyard garden (violas, marigolds, and chive blossoms) and the pea leaves and tendrils came from seeds that a neighbor planted in the communal area right outside my house.

How to Make Avocado & Burrata Toast with Pickled Carrot Ribbons

Ingredients for the Pickled Carrot Ribbons

1 carrot
4 tsp sugar
1/4 cup rice vinegar
1/4 cup hot water
salt

other ingredients for this toast

2 slices of sourdough
butter, for toasting
1 avocado
1 ball of burrata
1 scallion
everything seasoning
pea tendrils
edible flowers

Procedure

Prepare quick-pickled carrot ribbons. Using a vegetable peeler, remove rough outer skin of carrot and discard. Continue using the vegetable peeler to shave thin “ribbons” of carrot. Rotate as necessary until reaching the core of the carrot. (Feel free to snack on the carrot core!) In a small bowl, combine 1/4 cup hot water (does not need to be boiling; hot tap water is fine) and sugar; mix until sugar is dissolved. Mix in rice vinegar and a pinch of salt. Add carrot ribbons and allow to marinade for 15 minutes to (in the fridge) overnight. Note: You will have more than you need for this recipe.

Slice scallion lengthwise into thin strips. Place in a bowl with ice water, and place bowl in the fridge to allow them to curl up. This can also be done in advance of making the toasts.

Toast the bread to your preference. I like to melt some butter in a skillet, toast one side in the butter, and then flip over and turn off the heat. This allows the toasted side to withstand the toppings and provide crunch, but prevents the bread from becoming a gum-cutter.

Cut the avocado in half, remove the pit, and carefully peel off the skin. Thinly slice crosswise, and fan out one half over each of the pieces of toast. Grab small globs of burrata and arrange them over the avocado. Top with the remaining ingredients as desired.

For more toast inspiration, check out all the posts with the “toast post” tag here.