


6 Easy RV Camping Meals to Make in a Tiny Kitchen that Still Feel Fancy
/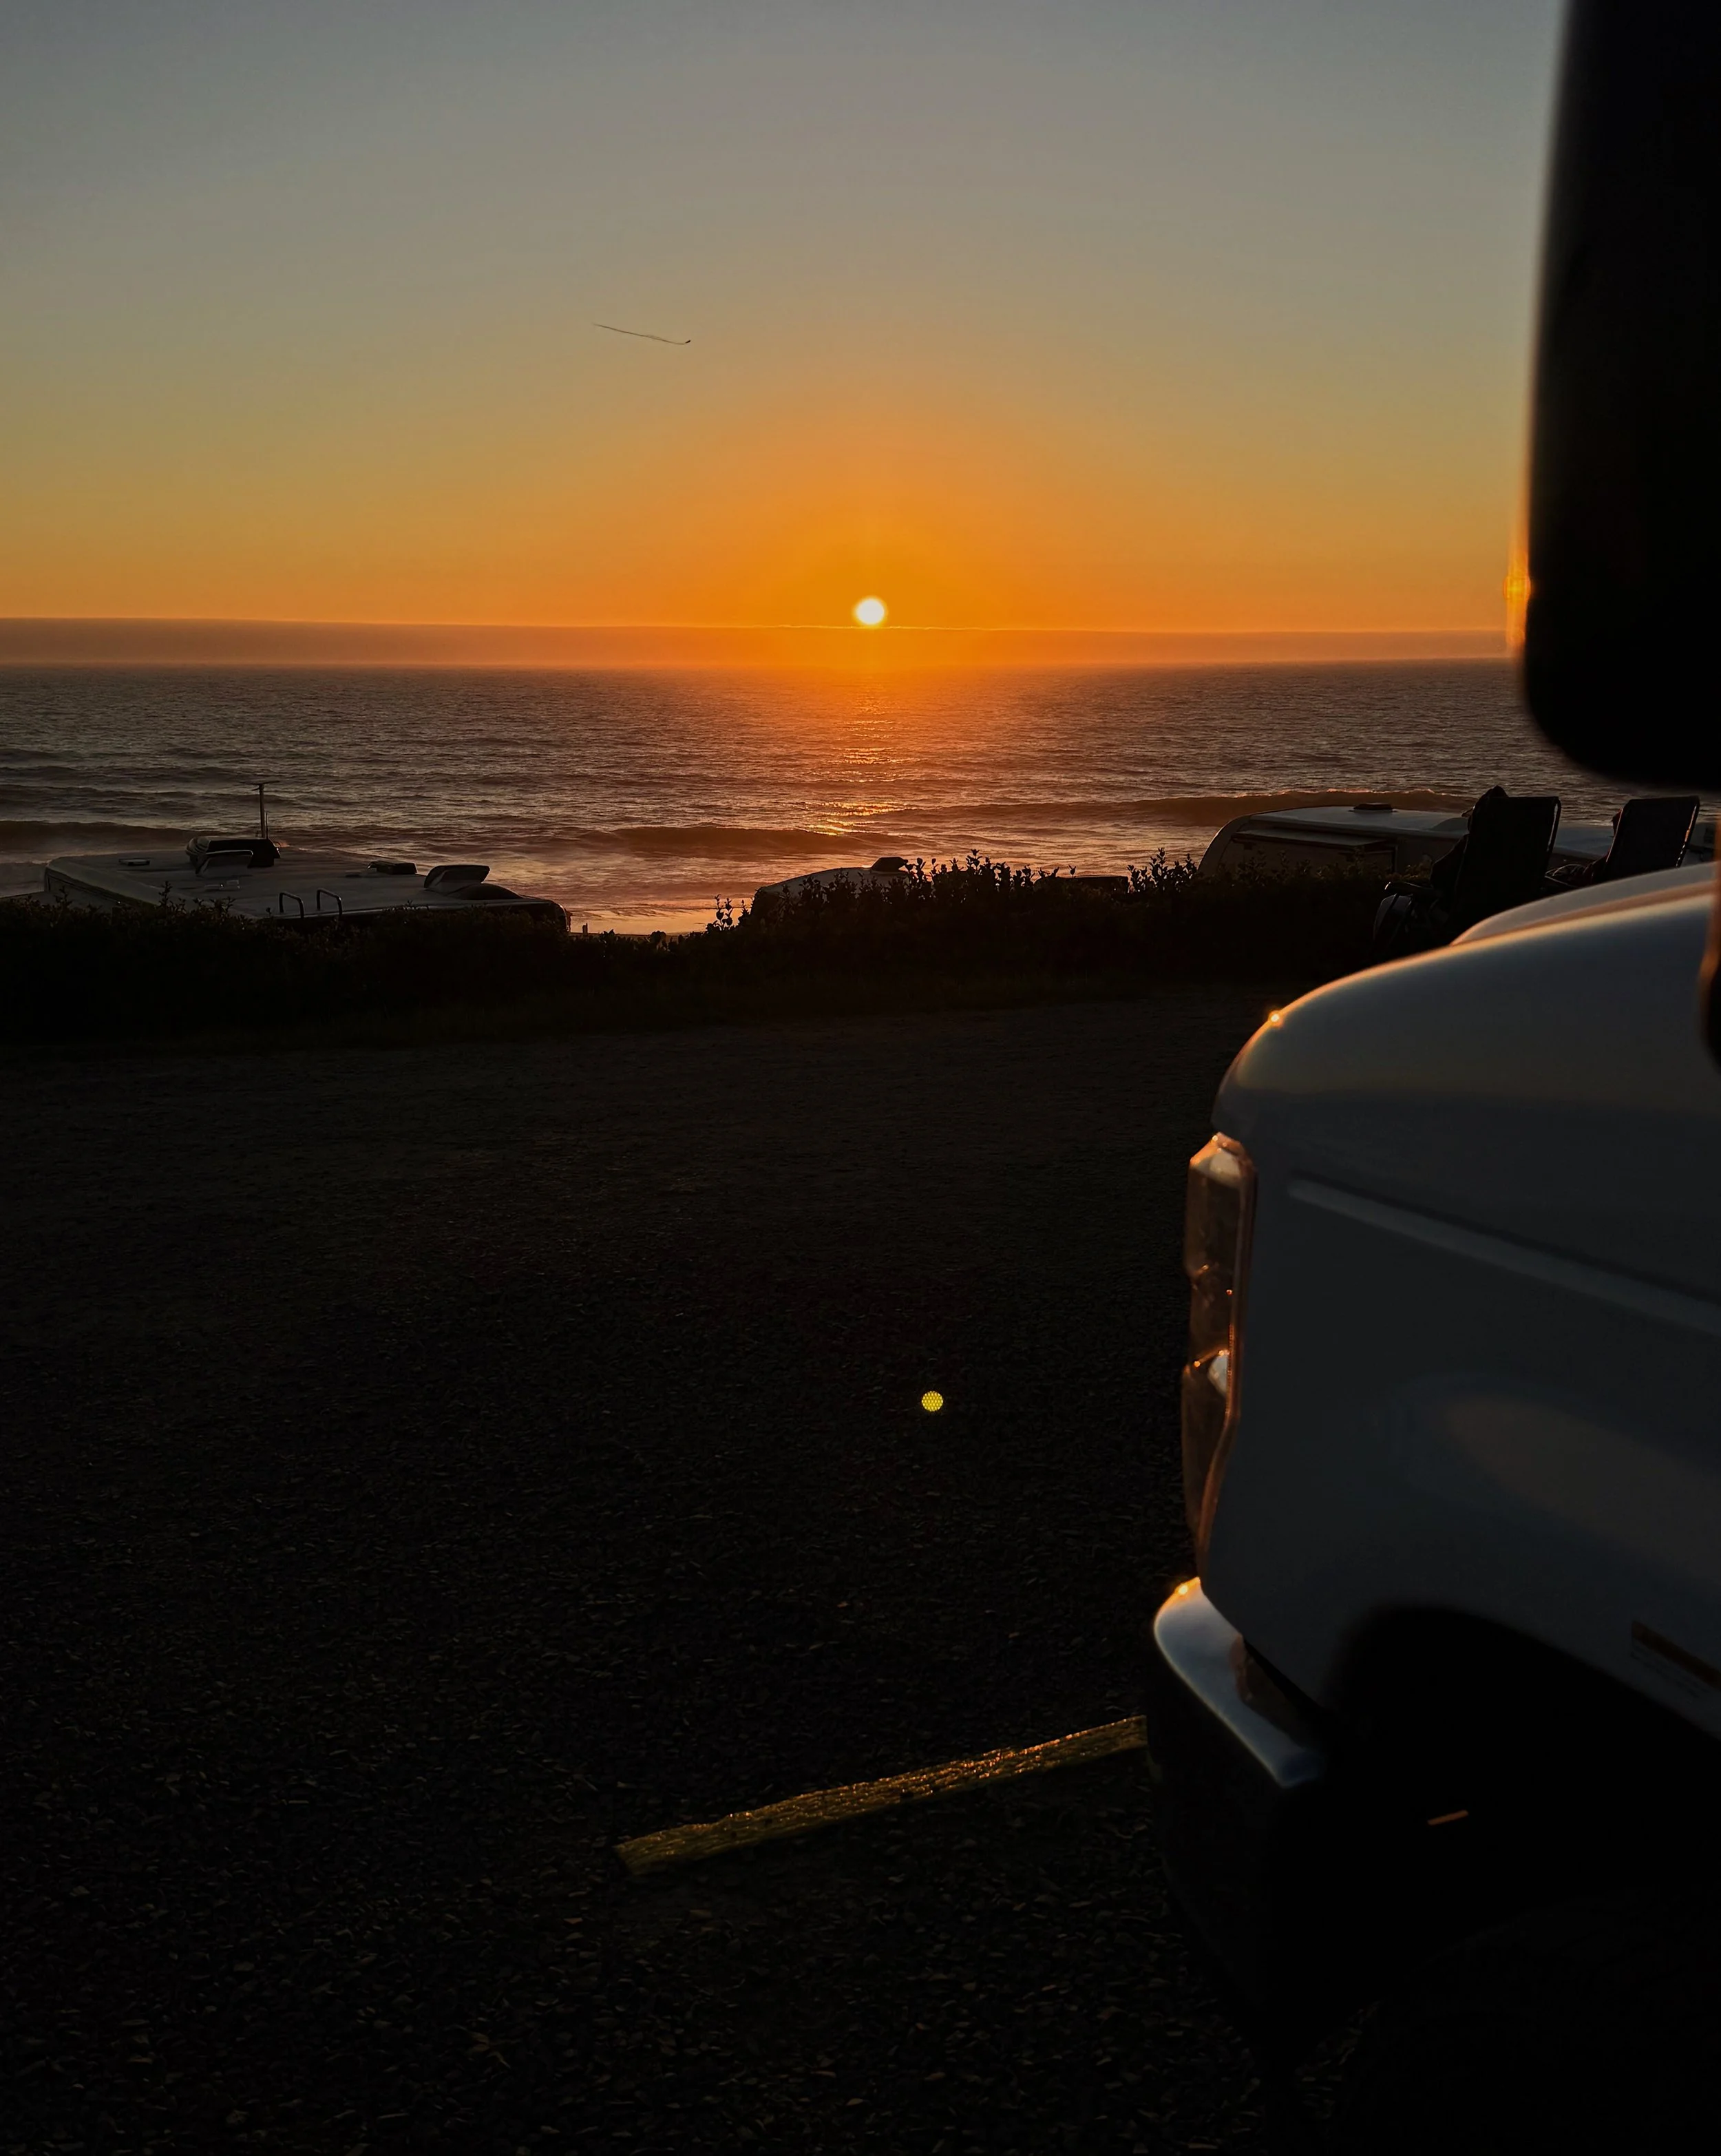
I just got back from a 2-week RV camping trip in the Pacific Northwest—my favorite region for camping! When camping in a recreational vehicle (RV, caravan, or motorhome) you are traveling with a home on wheels and the ones that we’ve rented come with a small, but complete, kitchen. I will stock up my fridge and pantry at the beginning of the trip and then we are pretty much free to travel wherever we are allowed to park. For this trip, we flew into Portland and rented an RV before traveling along the coast, making our way up to Olympic National Park in Washington before heading back. Although the rental company offers kitchen and houseware kits for rent, I always pack all my kitchenware and cozy bedding for a comfy glamping experience where I still have the right utensils and dishes to make some tasty meals. Cooking in this tiny kitchen on wheels is such a fun challenge for me.
Below are some of the best meals from the trip. Since packing too much cookware is a pain, all my camping meals are made with my trusty camping pan (an older version of this one) and occasionally a small sauce pot. Even if you aren’t into camping, these are easy, mostly one-pan meals made with little hacks and shortcuts that can also be useful for busy evenings at home. While I’m not traveling with measuring cups, I tried to provide enough info to inspire you to try some of these easy (but still seemingly a bit fancy) concepts yourself.
(Note: all “recipes” below worked as 2 servings for meals I shared with Spouse.)
one-pan Pork Belly Silog
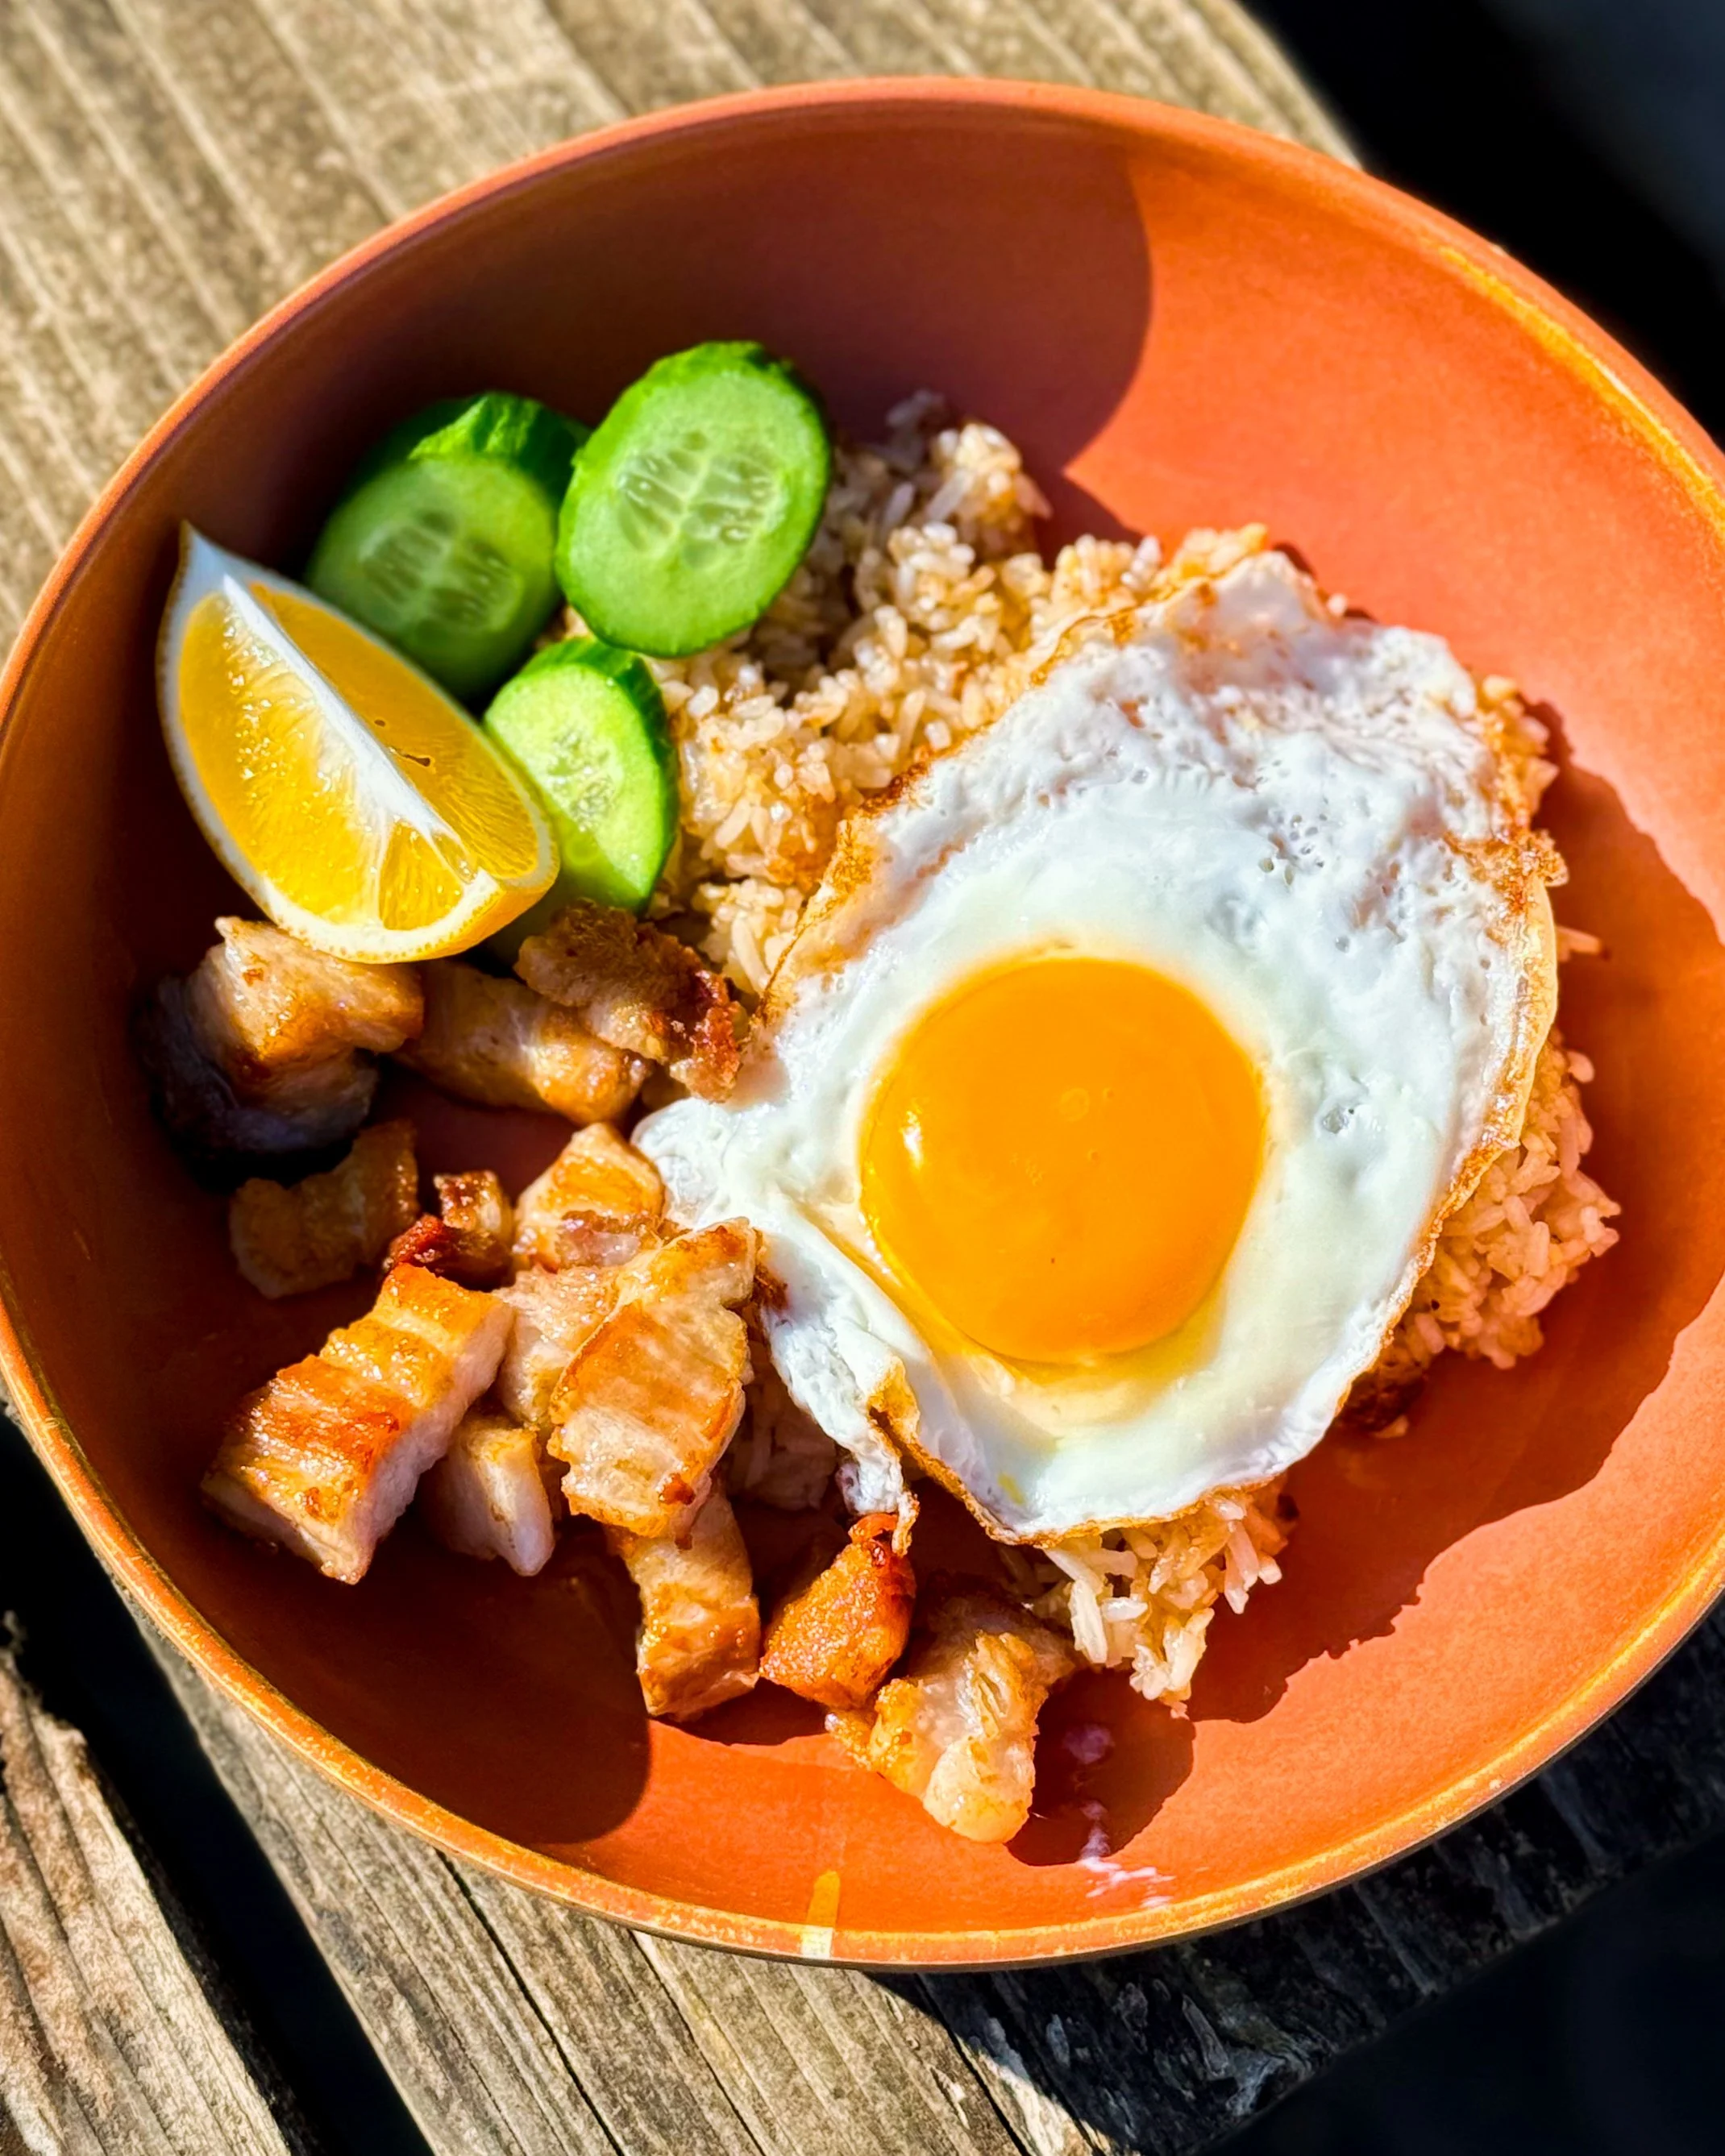
Silog is a category of Filipino breakfast dishes that comprise of some kind of meat + garlic fried rice + a fried egg. This lardon style of pork belly is not a traditional meat to have as part of a silog (deep fried lechon is the more typical version) but I feel like this easy camping hack version still keeps to the spirit of a lechonsilog and works well as an easy one-pan breakfast or lunch.
Ingredients
1 package Trader Joe’s Fully Cooked Pork Belly
2 portions of microwavable jasmine rice
Maggi sauce
Garliki fermented garlic paste (or chopped garlic, to taste)
2 eggs
1 lemon, quartered
sliced cucumber (optional)
Procedure
Remove the pork belly from the packaging and remove the top layer of fat. (You can render this and use it in place of oil/butter in another meal, but I feel like it is too fatty to include in this dish.) I like to rinse the excess salt from the pork belly as I find it too salty otherwise; this step is optional. Once the piece of pork belly is prepped, cut it into small pieces.
Heat the camping pan on medium-high heat and fry the pieces of pork belly until they are a nice crisp golden brown on all sides. Use tongs to remove the pork belly and distribute to two plates/bowls. Add the rice to the pan (no need to microwave the rice beforehand). Fry the rice in the rendered pork fat and season with Maggi sauce, to taste. When the rice starts to get crisp in some areas, push it to the side and add a generous amount of garlic to the pan. Saute the garlic until fragrant and then mix it together with the rice. Distribute the garlic fried rice to the two plates/bowls. Squeeze a quarter of a lemon over each plate.
Fry the eggs in the residual pork fat. Distribute the eggs and the cucumber, if using. Serve with the remaining lemon wedges.
Smoked Fish Tacos with Cabbage Slaw
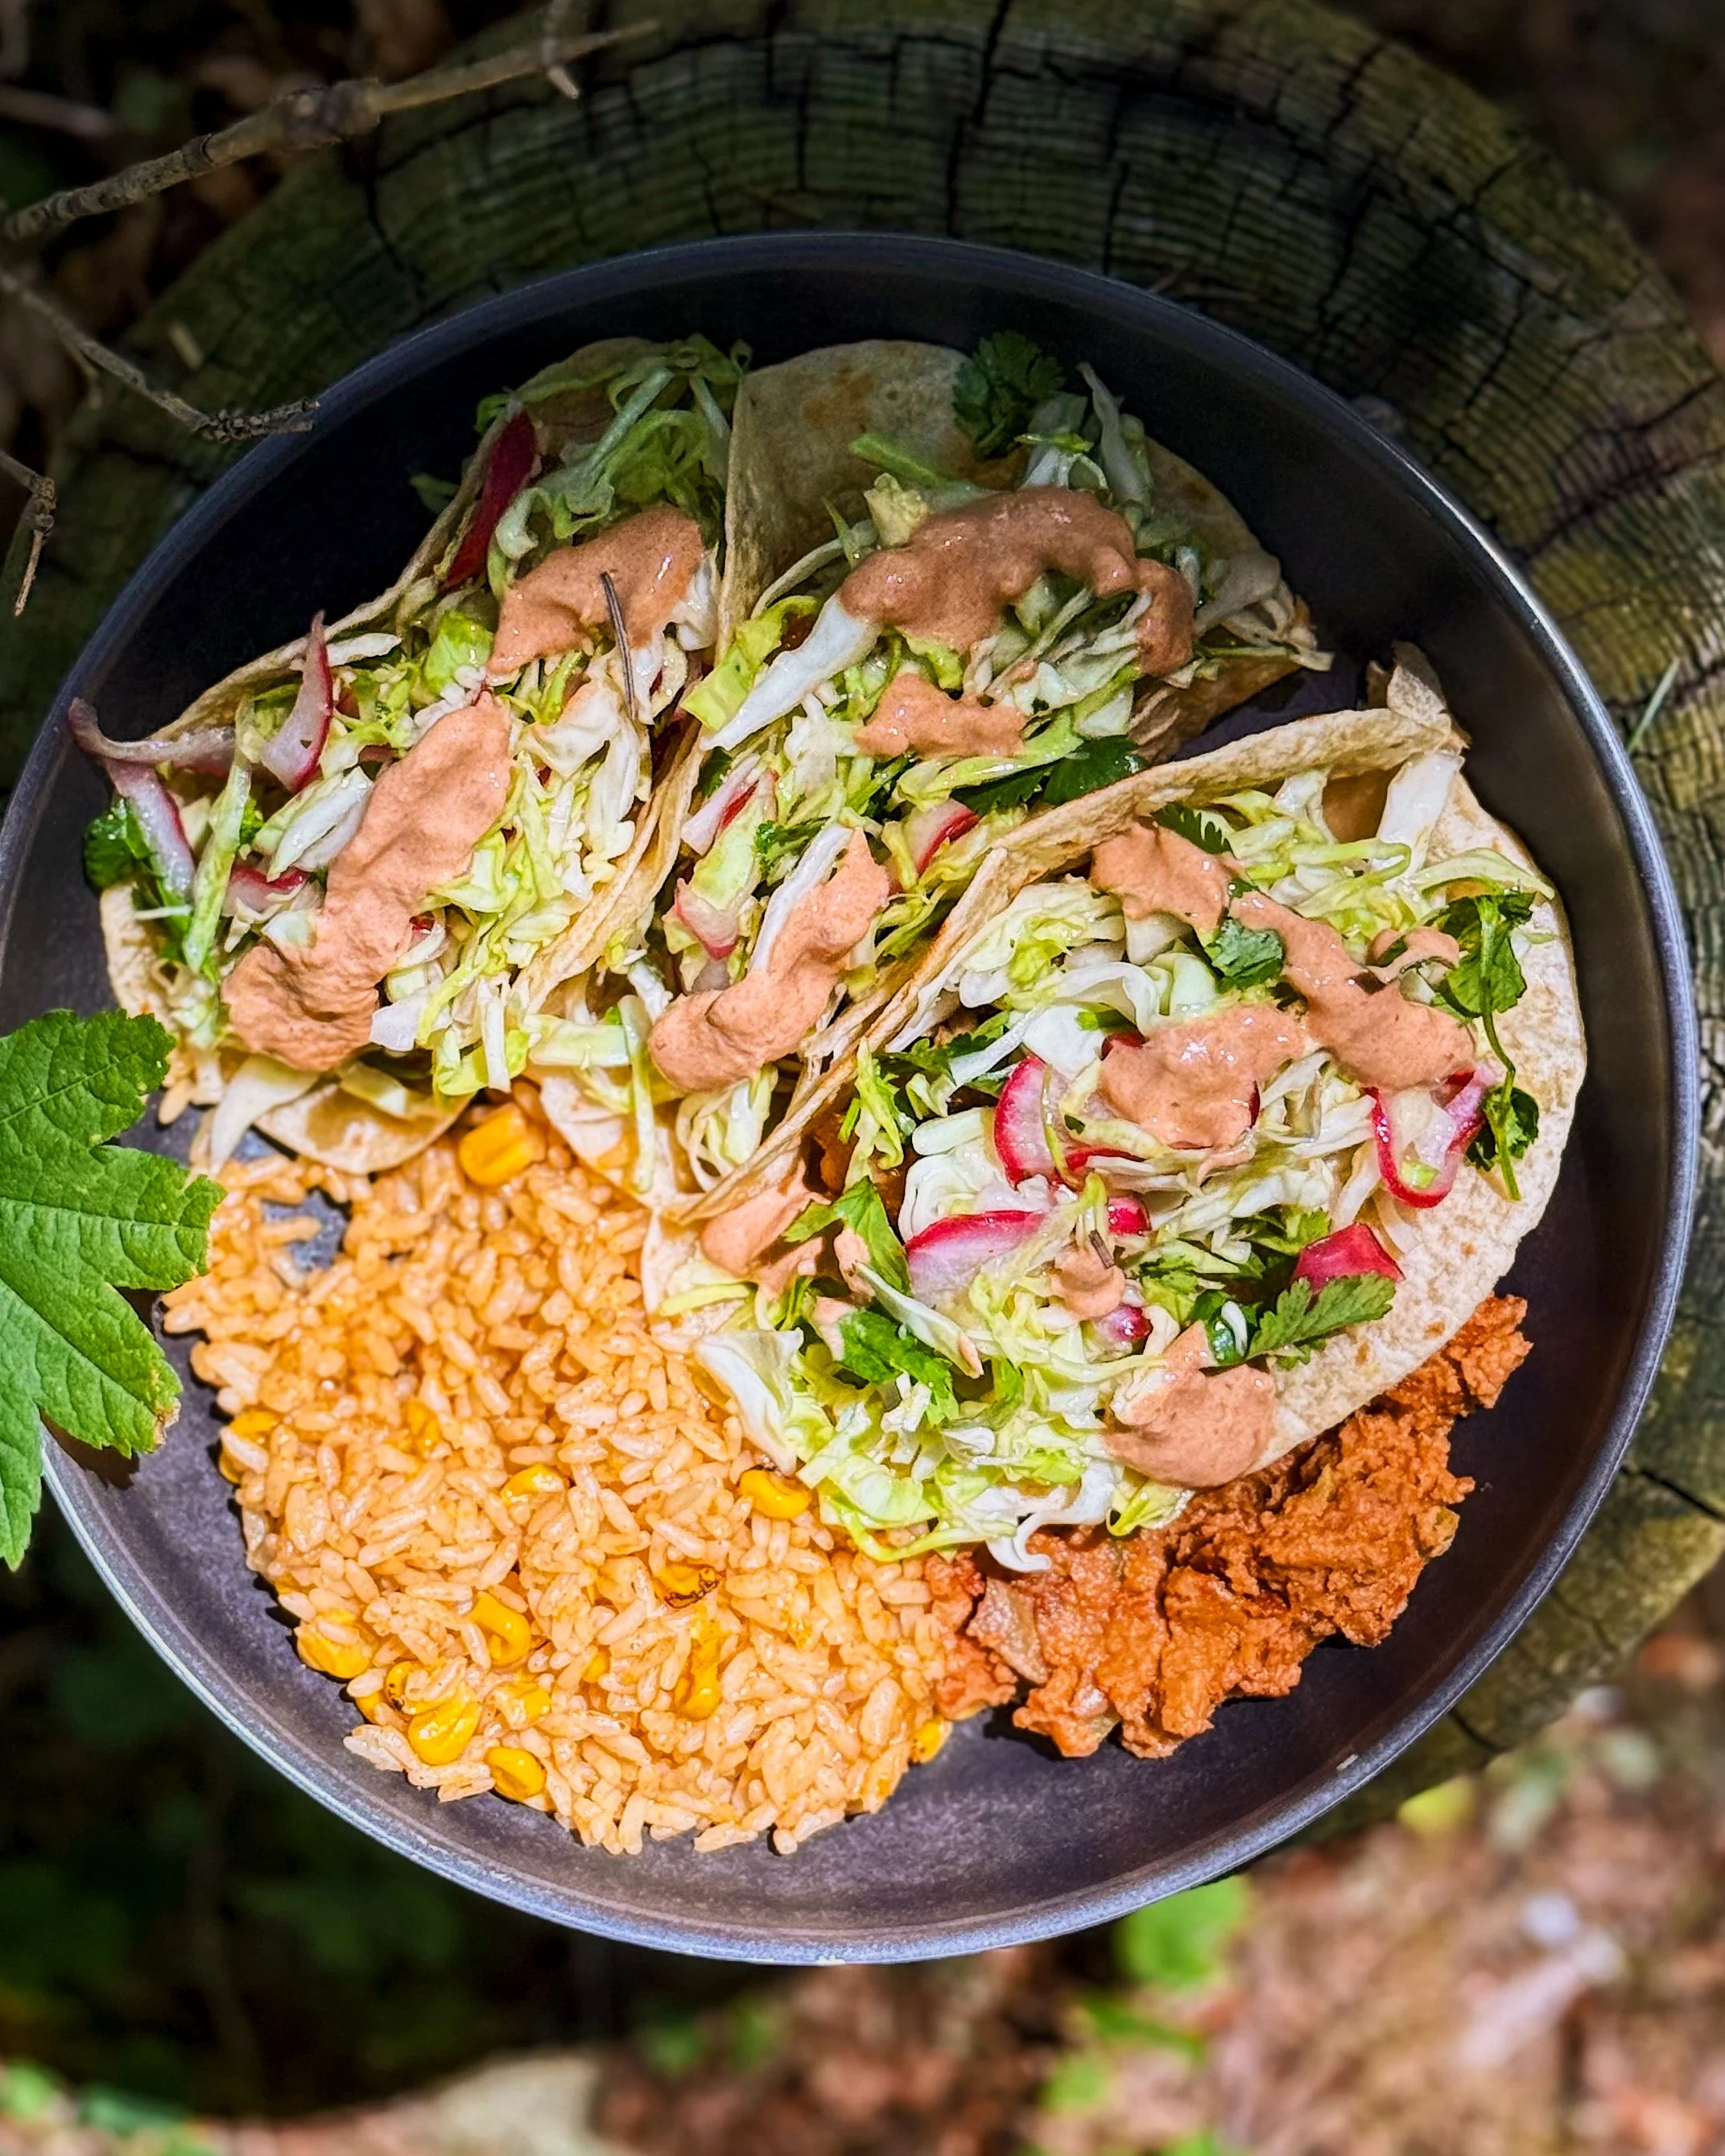
This idea is a perfect way to use your favorite smoked tinned fish or, if you are traveling in an area known for seafood, you can likely pick up some vacuum-sealed smoked fish from a local fish market. This trip, I picked up some smoked black cod/sablefish from an historical multi-generational family-owned smokehouse in Astoria, Oregon but unfortunately, it was too salty for my taste. At least my slaw helped to balance it out a little! If you find yourself RV camping through Seward, Alaska, though, the smoked black cod at Saltwood Smokehouse is absolutely delicious and works fantastically with this recipe concept. This recipe is better if you can plan ahead to give the slaw a little time to marinade, but it is not a deal breaker if you don’t. I served these fish tacos with a packet of this microwaveable street corn rice and half a can of refried beans.
Ingredients
8–12 oz smoked fish, drained
4–6 tortillas
about 2 cups cabbage, finely chopped
red onion, thinly sliced
cilantro
1 lime, juiced
honey
salt
sesame oil (optional)
hot sauce
yogurt/labneh/sour cream/crema
Procedure
In your slaw bowl, start by making the dressing: combine the lime juice, honey, and salt to taste. Once combined, add the cabbage and onion and toss to coat. If possible, allow to marinate in the fridge for 30 minutes to 2 hours.
Make the “crema” by combining whatever hot sauce you have with whatever creamy component you have until you get a drizzling consistency.
If desired, heat your smoked fish. Heat the tortillas (over the gas burners, in a dry pan, over the campfire, or in the microwave—whichever method is convenient for you). Just before serving, finish off the slaw by tossing with some cilantro and sesame oil, if using.
Distribute the fish among the tortillas and top each with a portion of slaw then a drizzle of the hot sauce crema. Serve with the easy rice and bean sides of your choosing!
one-pan creamy sun-dried tomato gnocchi
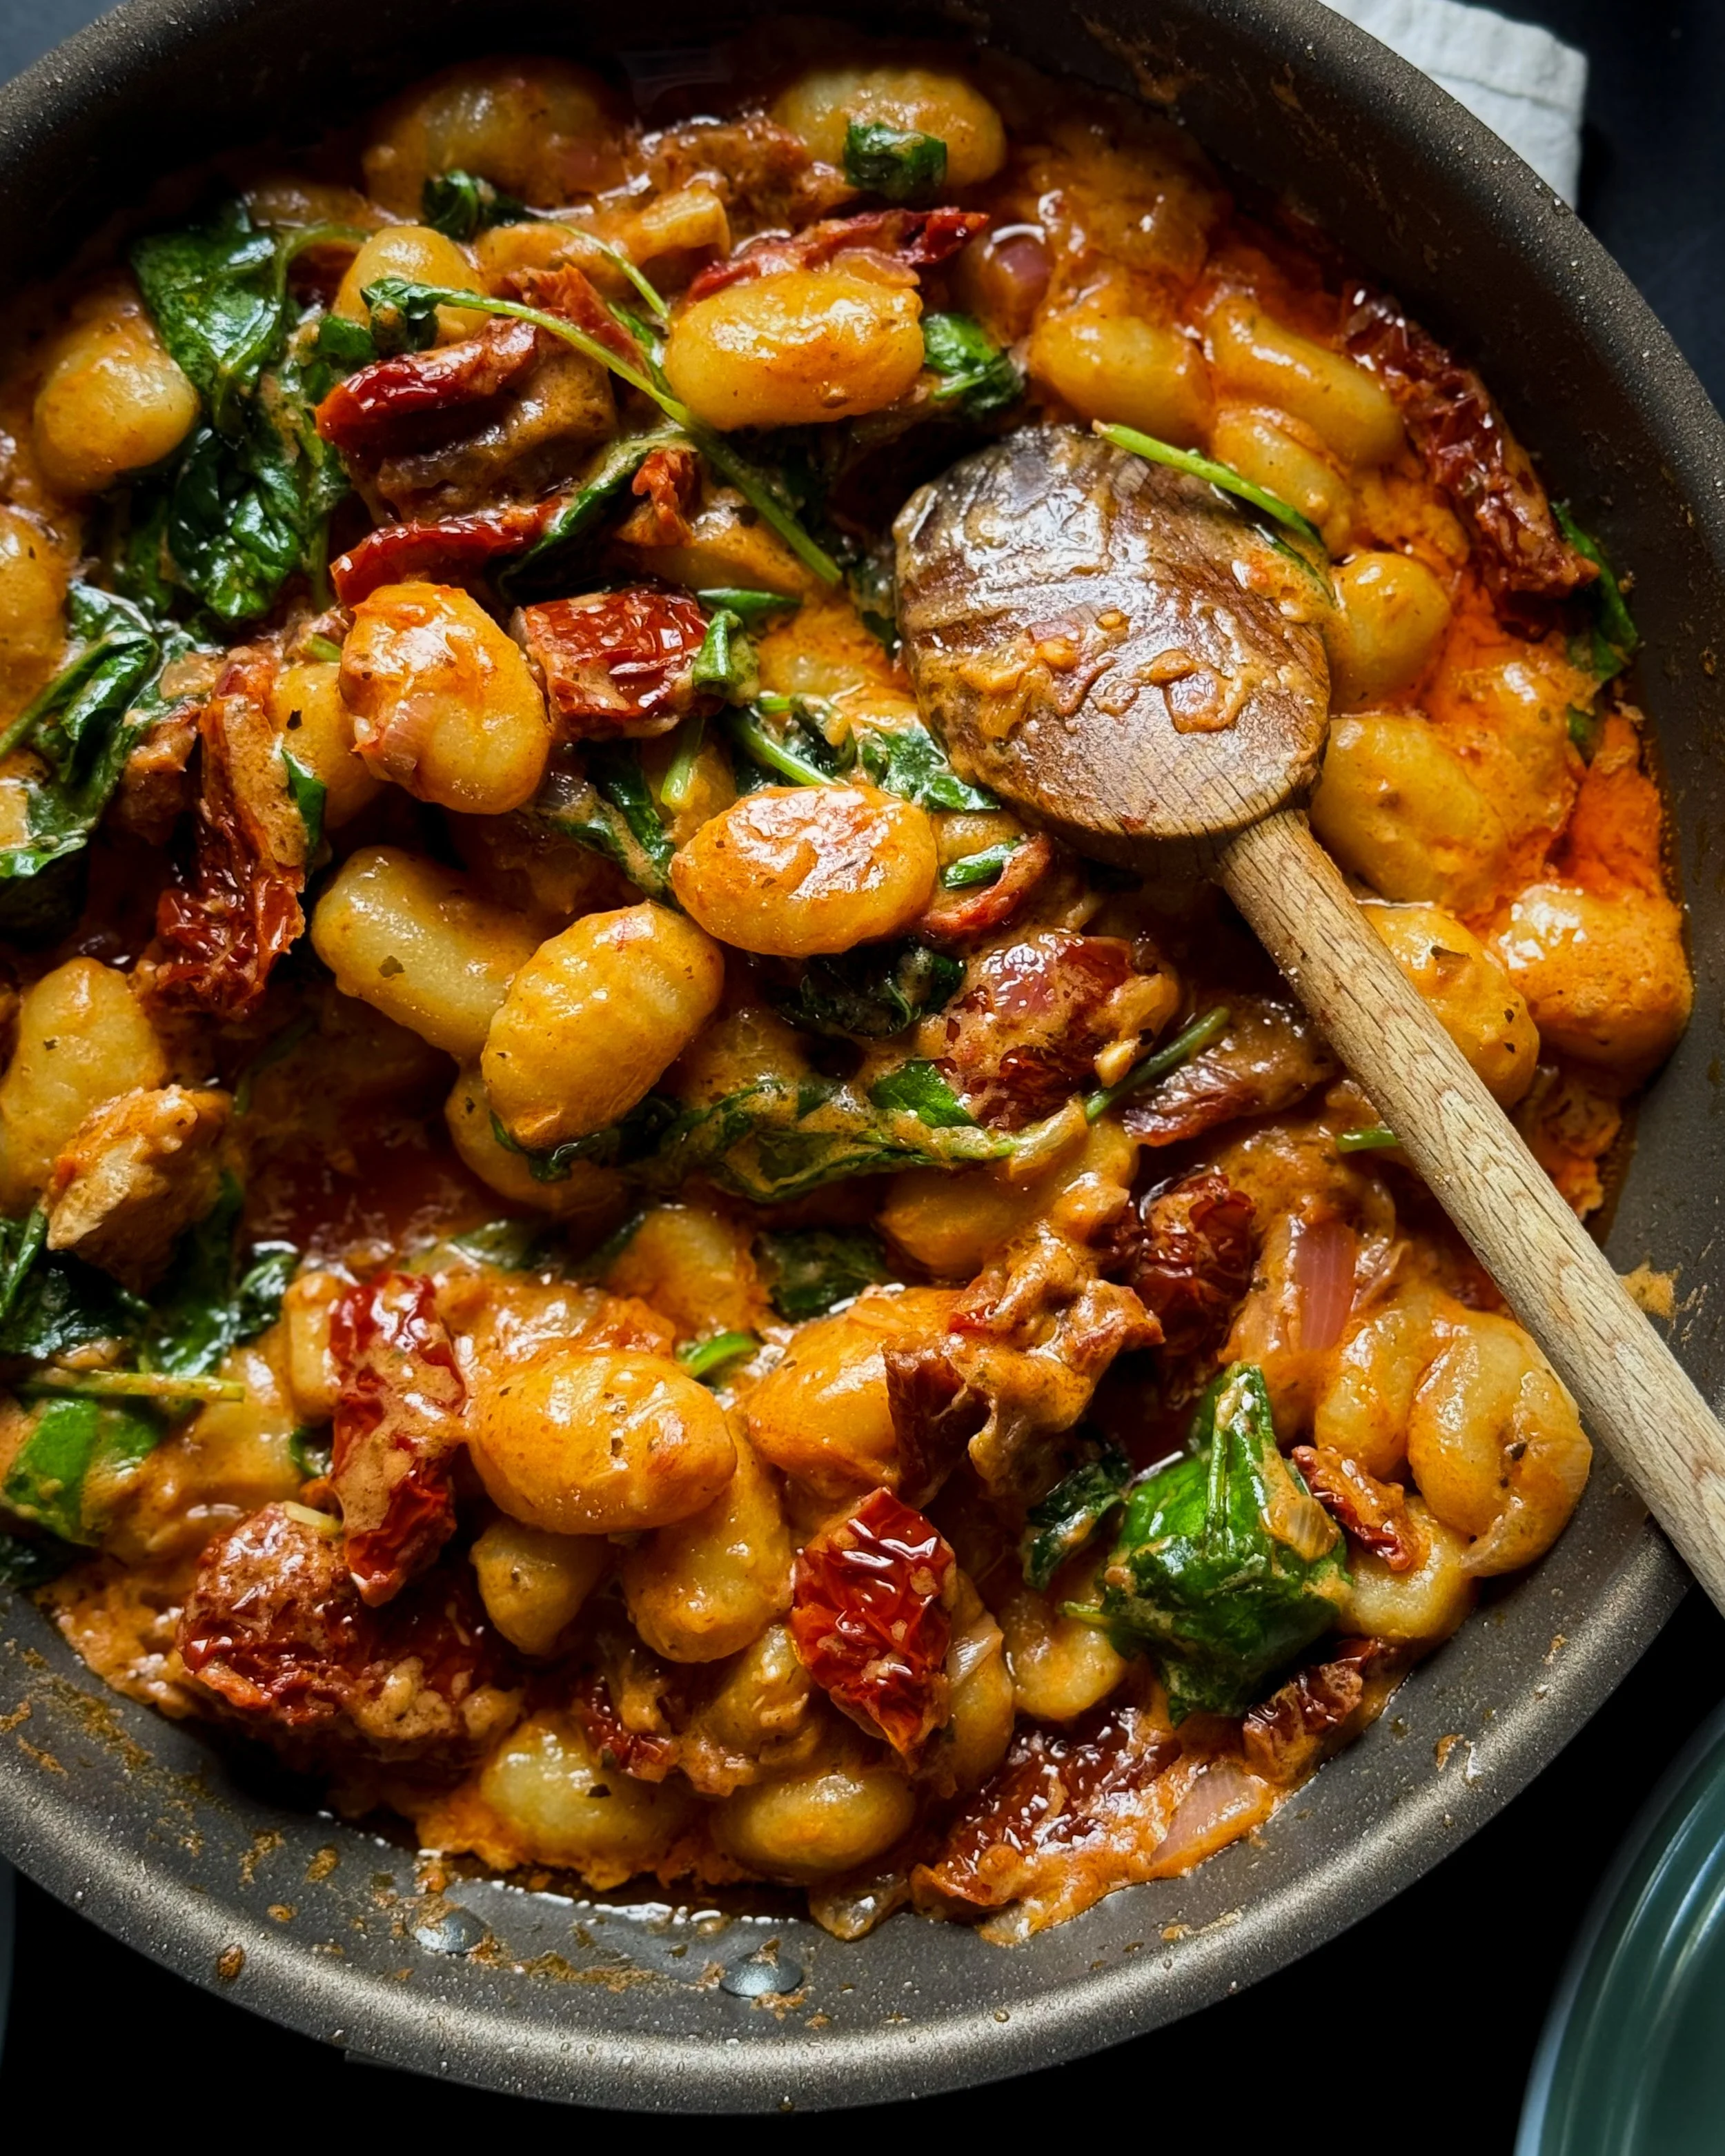
This dish is perfect for the end of the trip when you have some odds and ends in the fridge that need to be used up. I had some baby kale that I was able to throw in for health and I also used up the rest of an onion. A few scraps of aromatics and some greens will certainly enhance the experience, but the base ingredients are also flavorful enough on their own that if you don’t have the other ingredients to spare, you’ll still be able to make a hearty, cozy, cheesy carb dish to fuel yourself after a day of exploring. (This recipe makes good use of jarred sun-dried tomatoes that are packed in oil but I sometimes find these preserved tomatoes to be a tad too salty; give yours a taste before you start cooking to determine if you’ll need to salt this dish.)
Ingredients
onion, chopped (optional)
Garliki fermented garlic paste or chopped garlic (optional)
1 small jar sun-dried tomatoes in oil
1/2 package Boursin cheese of any flavor
2 tbsp tomato paste
filtered water
1 package gnocchi
salt, to taste
fresh greens such as baby kale or spinach (optional)
grated parmesan cheese packets (optional)
Procedure
Heat the camping pan on medium heat and pour some oil from the tomato jar into the pan. Use this oil to saute the onions and garlic, if using. Use kitchen shears to cut the tomatoes into bite-sized pieces while in the jar.
Add the cheese and tomato paste to the pan, as well as about 1/2 cup water. Stir to melt the cheese and combine everything into a sauce. Add the gnocchi directly from the package and once all the gnocchi are separated, add enough water to barely submerge the gnocchi. Cook, stirring occasionally, until the gnocchi are soft and the sauce is thickened and coating the gnocchi. Add greens, if using, and cook until just wilted.
Serve with sprinklings of the parm packets if you have them.
Steak Lettuce wrap bowls with summer tomato nectarine salsa/salad
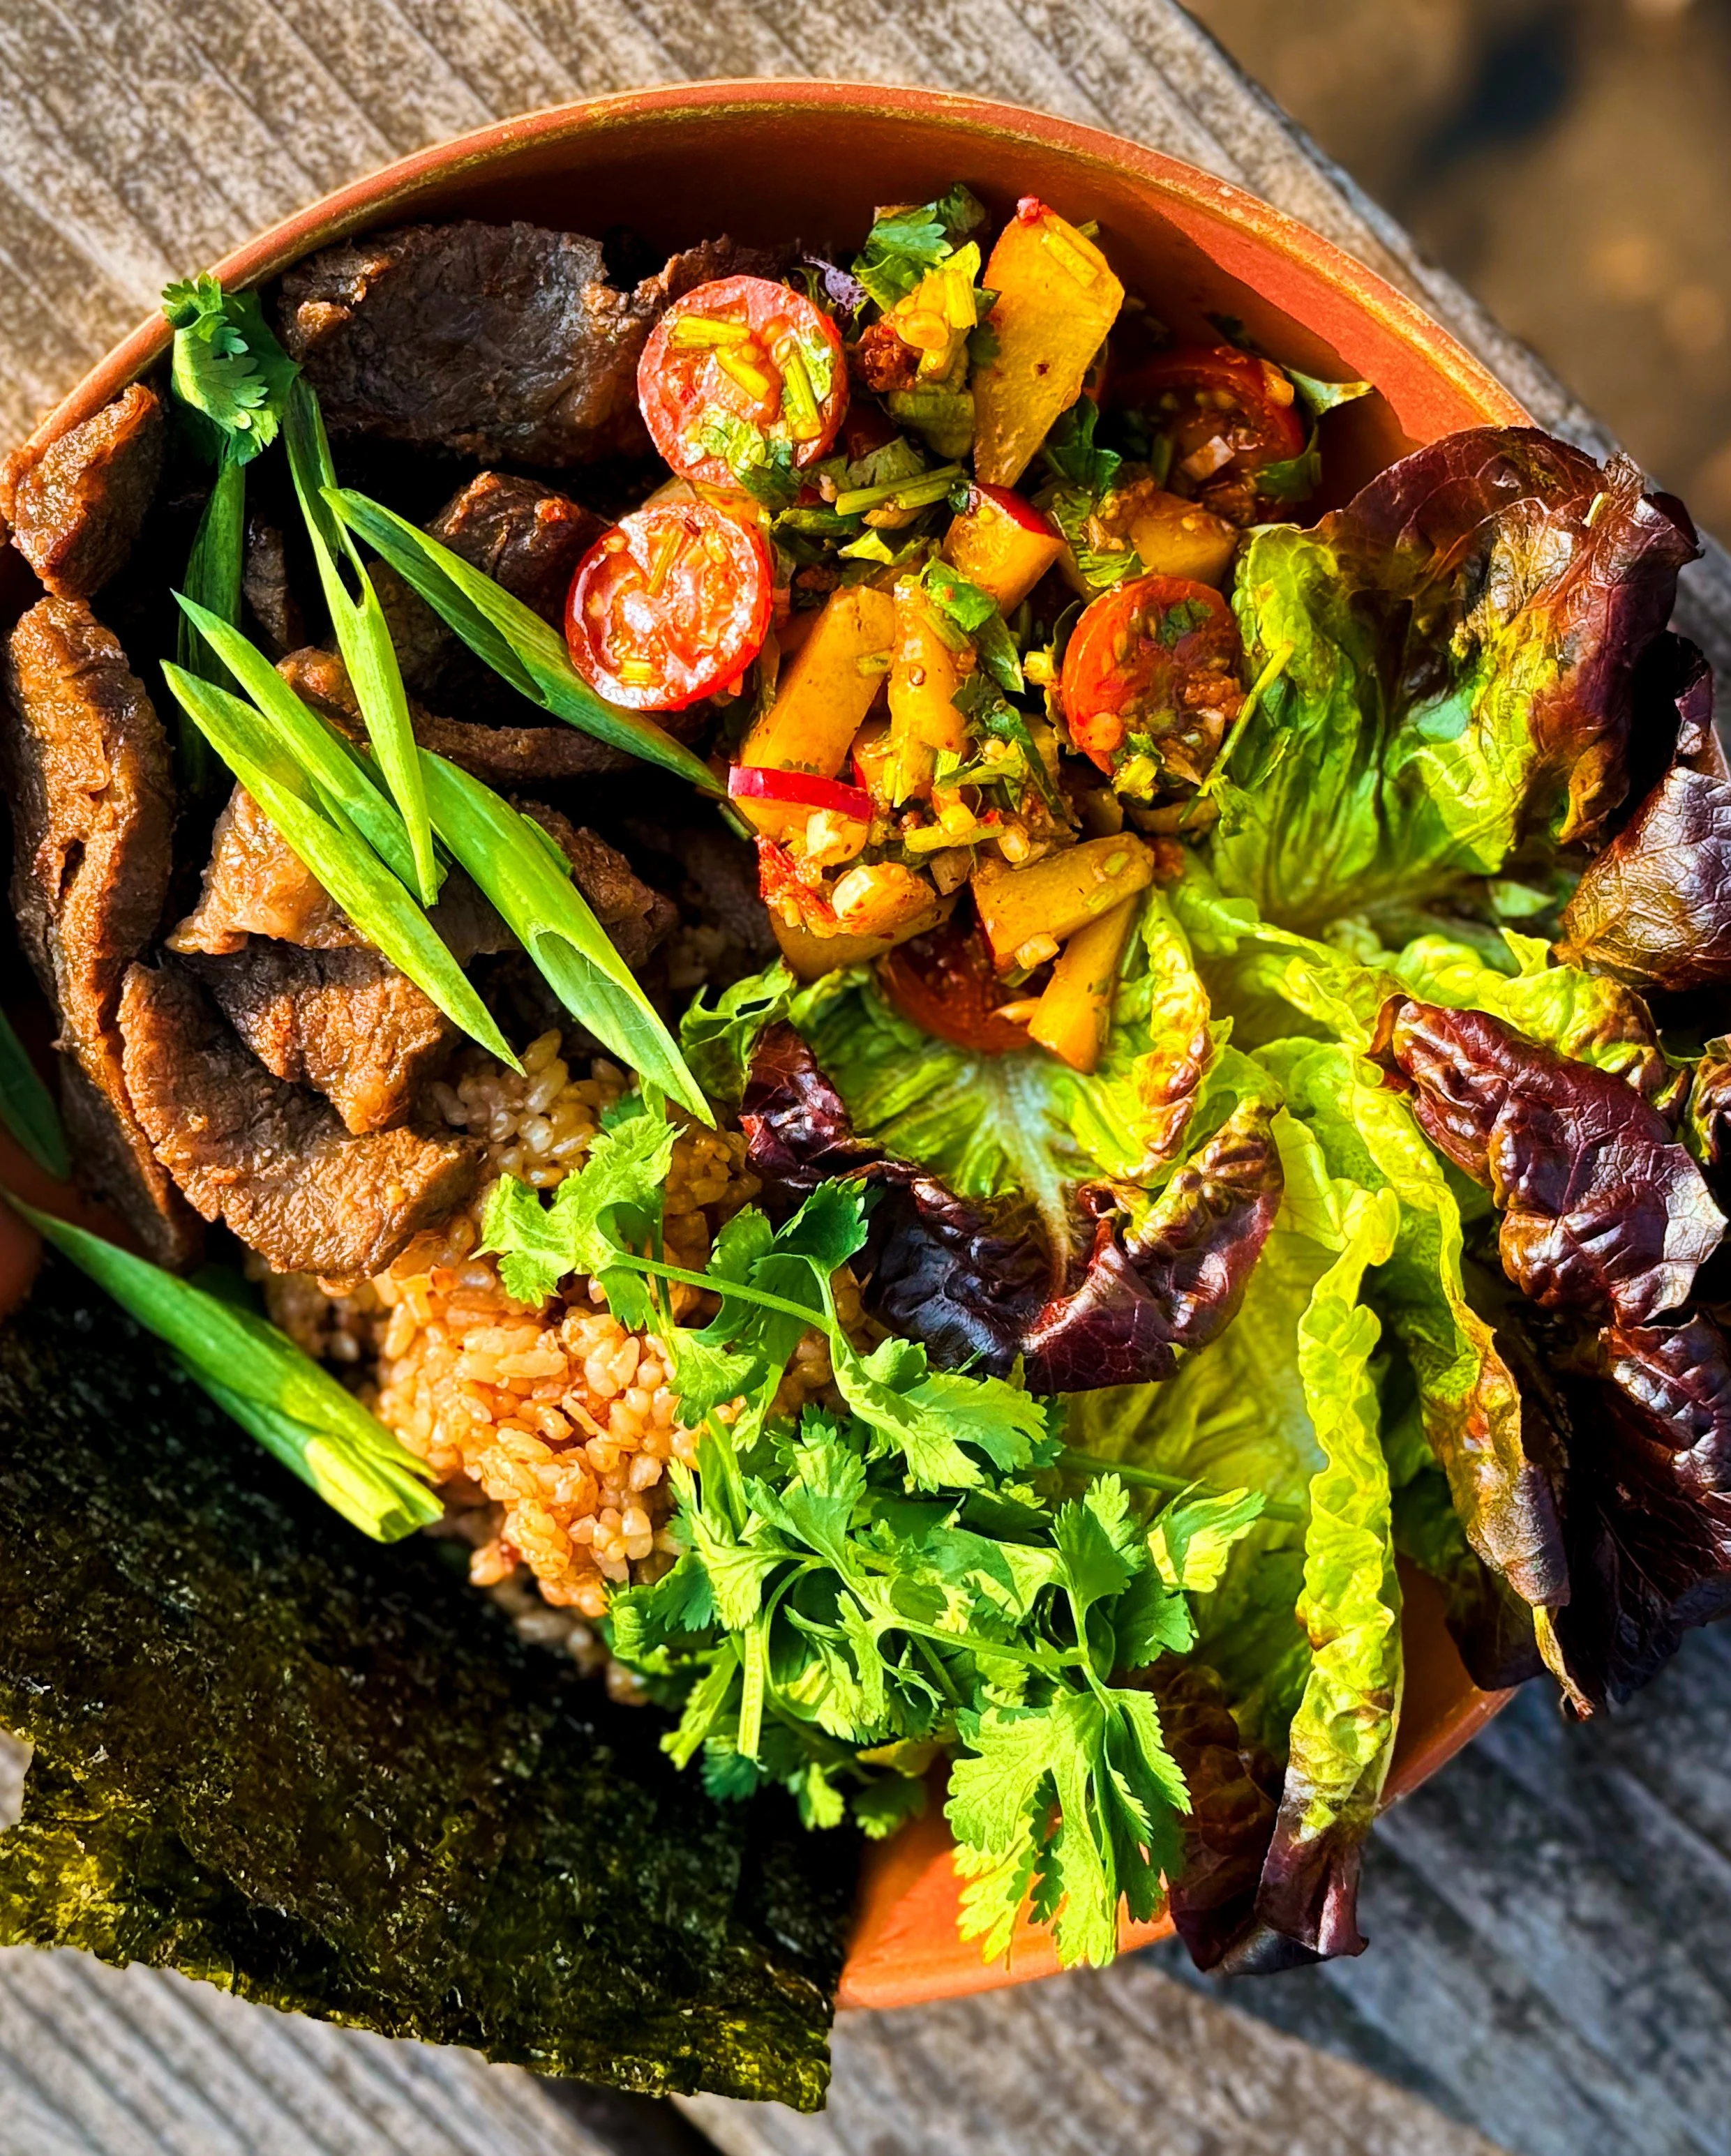
These bowls allow each camper to enjoy a little DIY ssam or wrap making experience with the lettuce and seaweed sheets, or they can choose to eat everything together like a grain bowl. For the steak, I used chuck tail flap and the bottled sauce from Nong’s Khao Man Gai that I picked up in Portland as a very versatile condiment for the trip. I have found it is handy to pack one type of sauce that can be used a marinade, dipping sauce, dressing, condiment and more in one bottle; whatever version you have of that can be used to marinade the steak for this dish. For the rice component, a sticky style Japanese or Korean rice would work best here; I used a multigrain blend that I bought in Japan specifically to use as a special treat for a camping trip.
Ingredients
3/4–1 lb steak, thinly sliced
your choice of marinade
1 handful cherry tomatoes, halved
1 nectarine or peach, cut into small pieces
1/2 lemon or lime, juiced
salt, to taste
chili crisp, to taste
cilantro
2 portions microwaveable sticky rice
baby gem lettuce
1 package seaweed/nori sheet snack
1 scallion, sliced (optional)
Procedure
Add steak to a zip-top bag and pour in enough marinade to thoroughly coat. Seal the bag, massage together, and marinate overnight.
To make the summer salsa/salad, combine the tomatoes and nectarine pieces with citrus juice, salt, and chili crisp to your taste. Allow to sit and marinade while preparing the rest of the meal.
Microwave the rice according to package instructions. Plate the rice, little gems, and nori sheets.
When ready to cook, thoroughly drain and wring out the excess moisture from the steak. Heat your camping pan on high and sear the steak. Distribute to the serving bowls. Finely chop some cilantro and mix that into the salsa/salad before distributing it to the serving bowls. Finish off the bowls with more cilantro and the scallion.
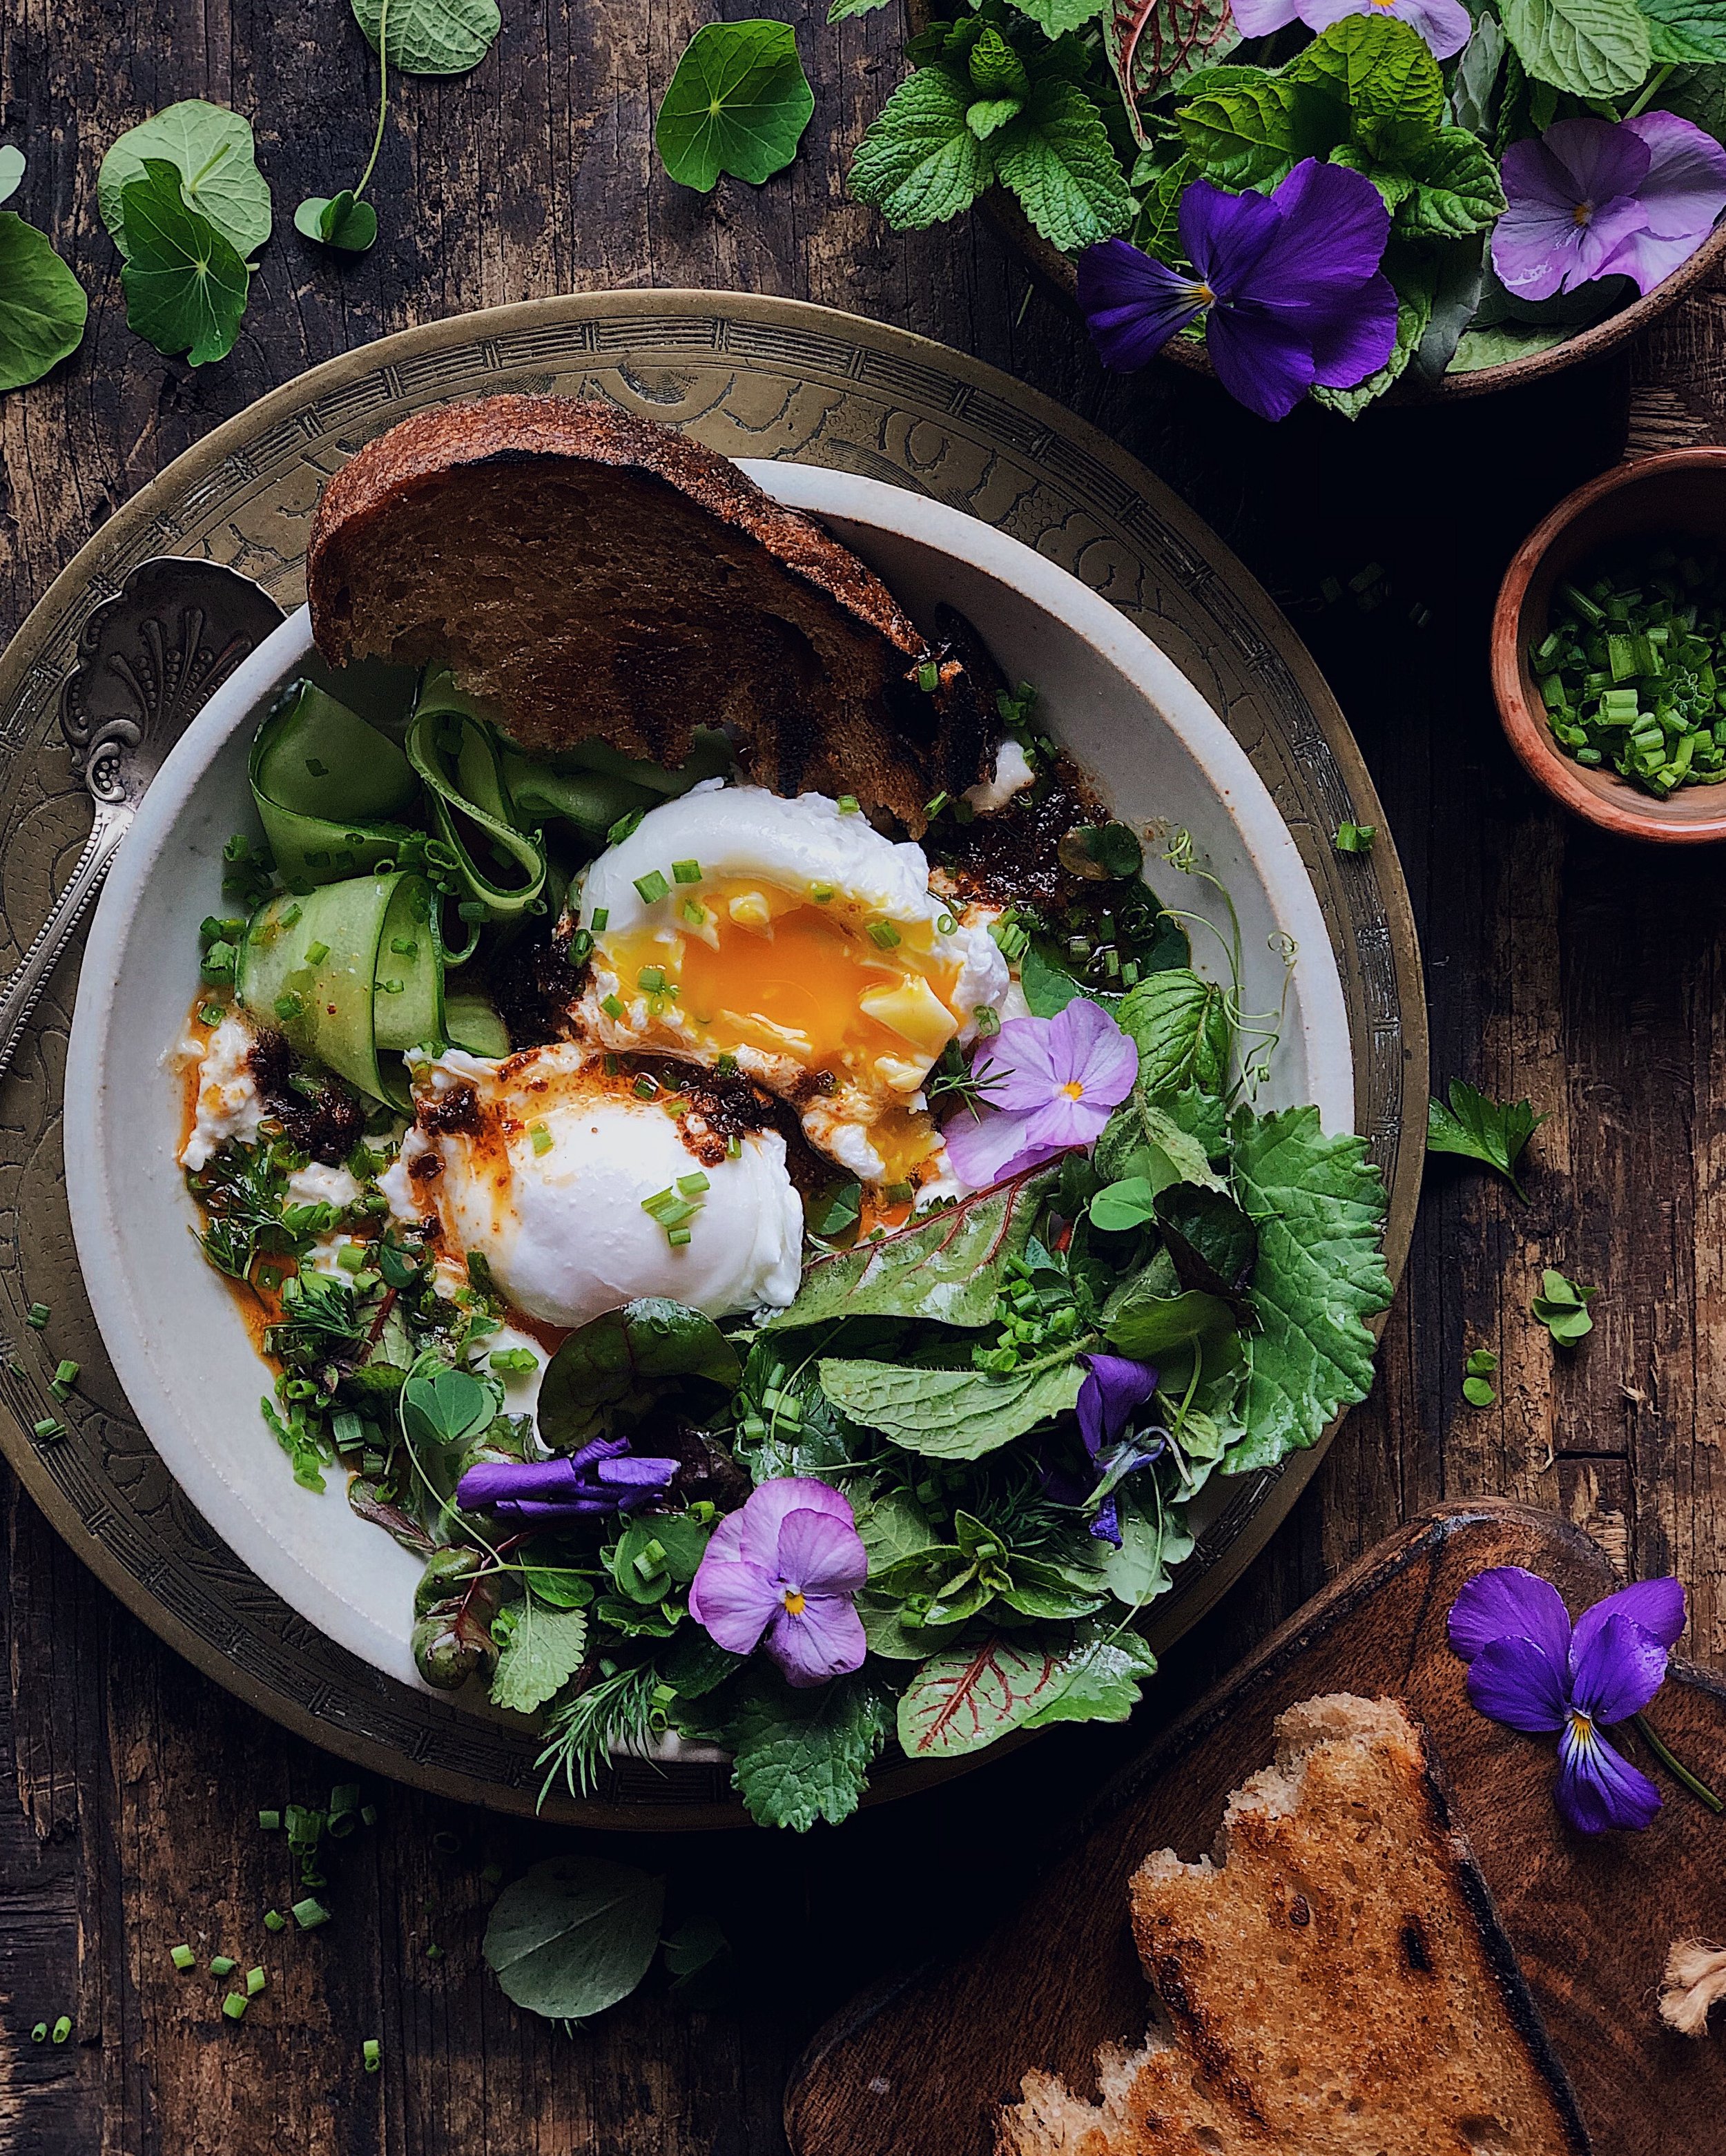
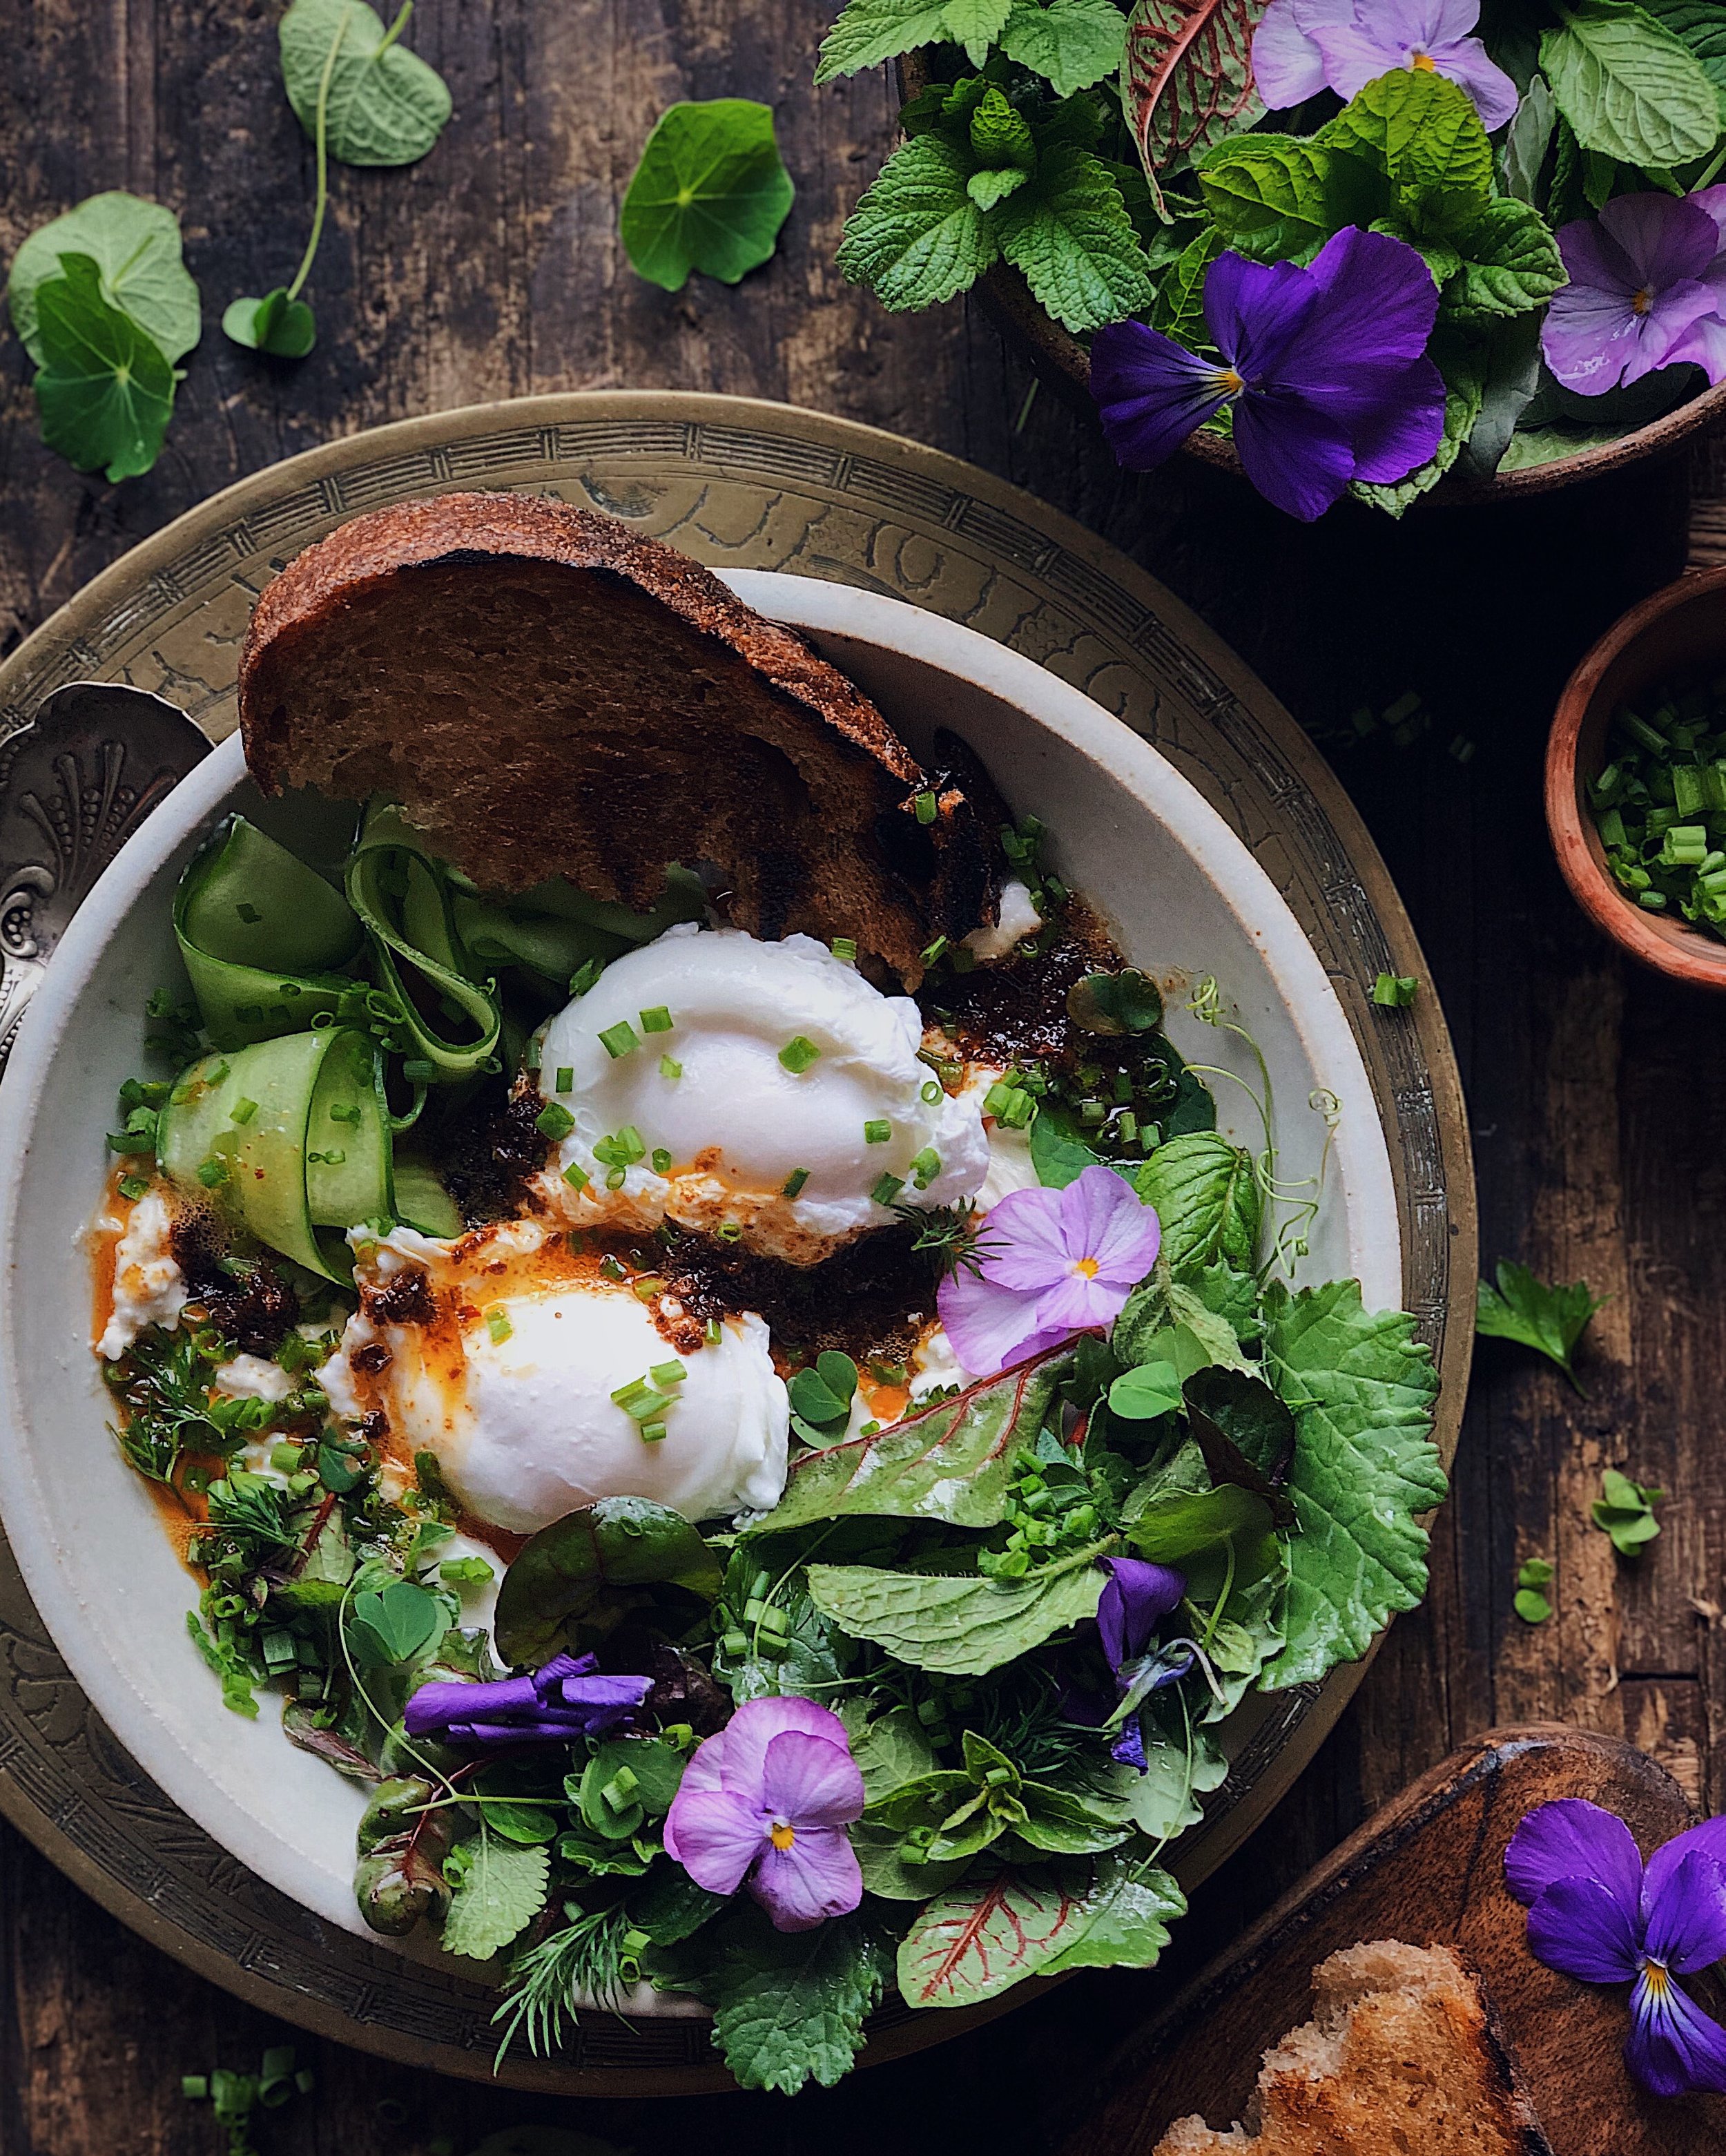
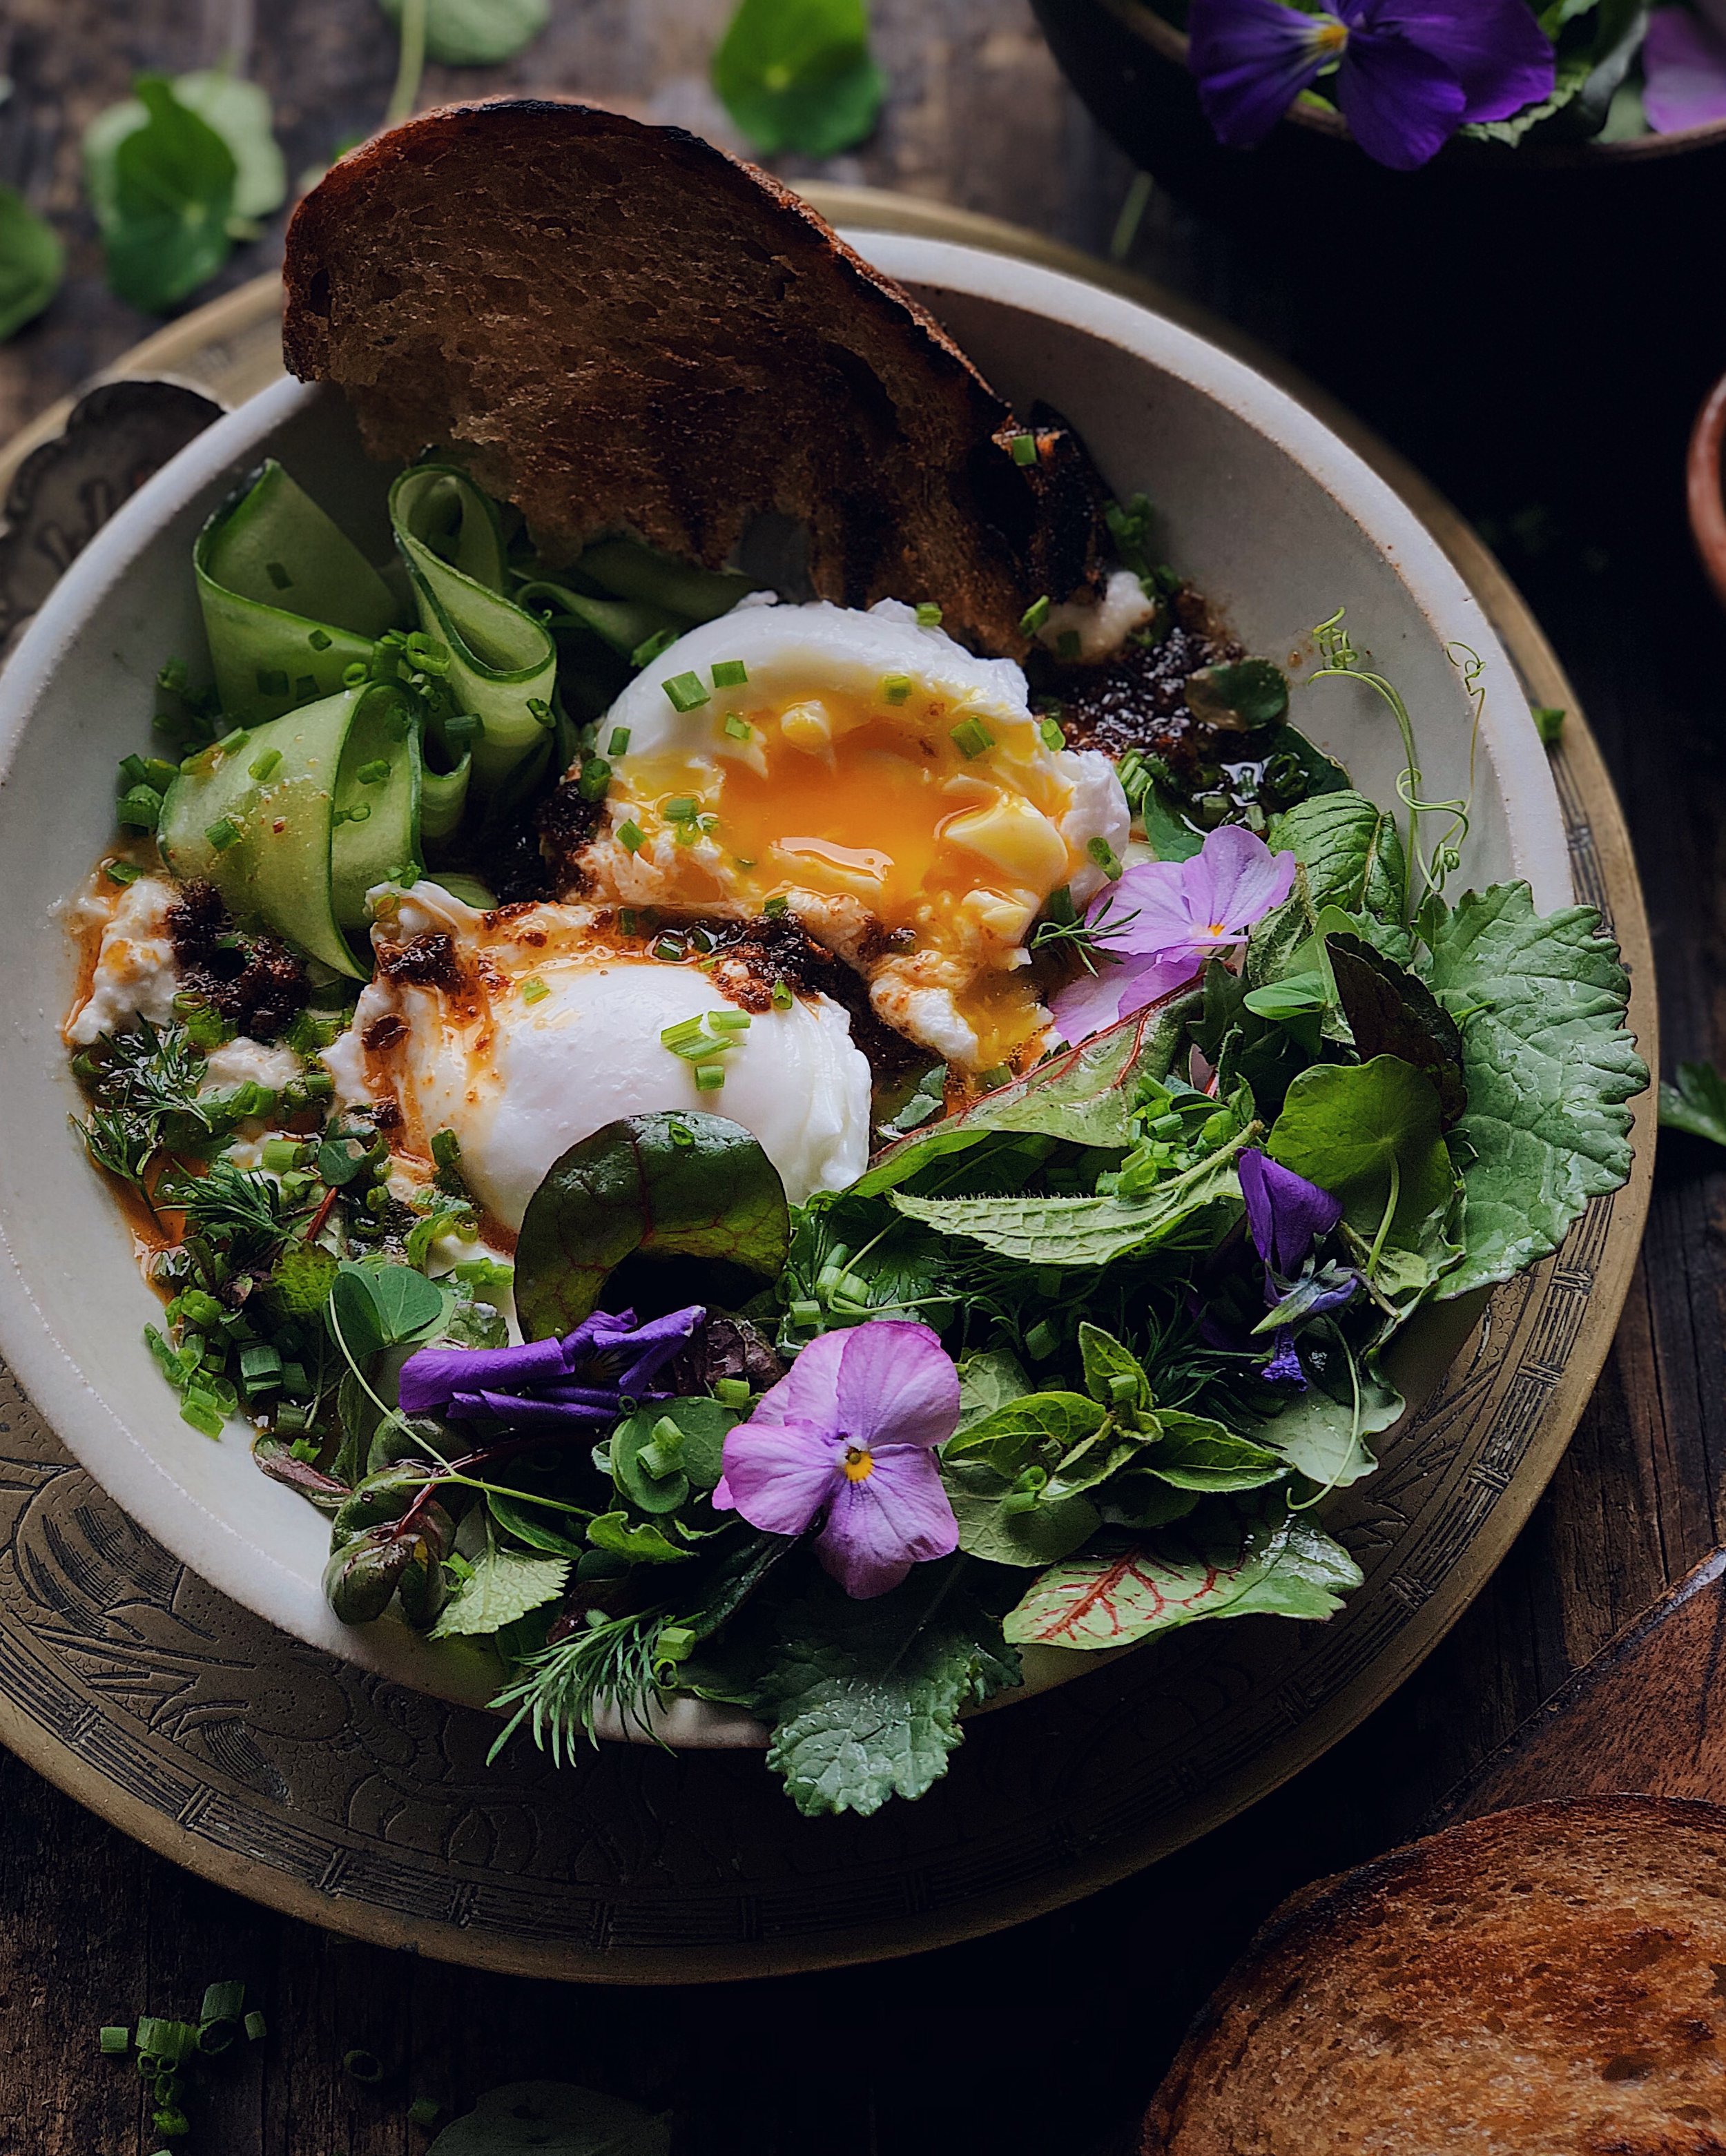
Miso-Glazed Salmon and Soba Noodles
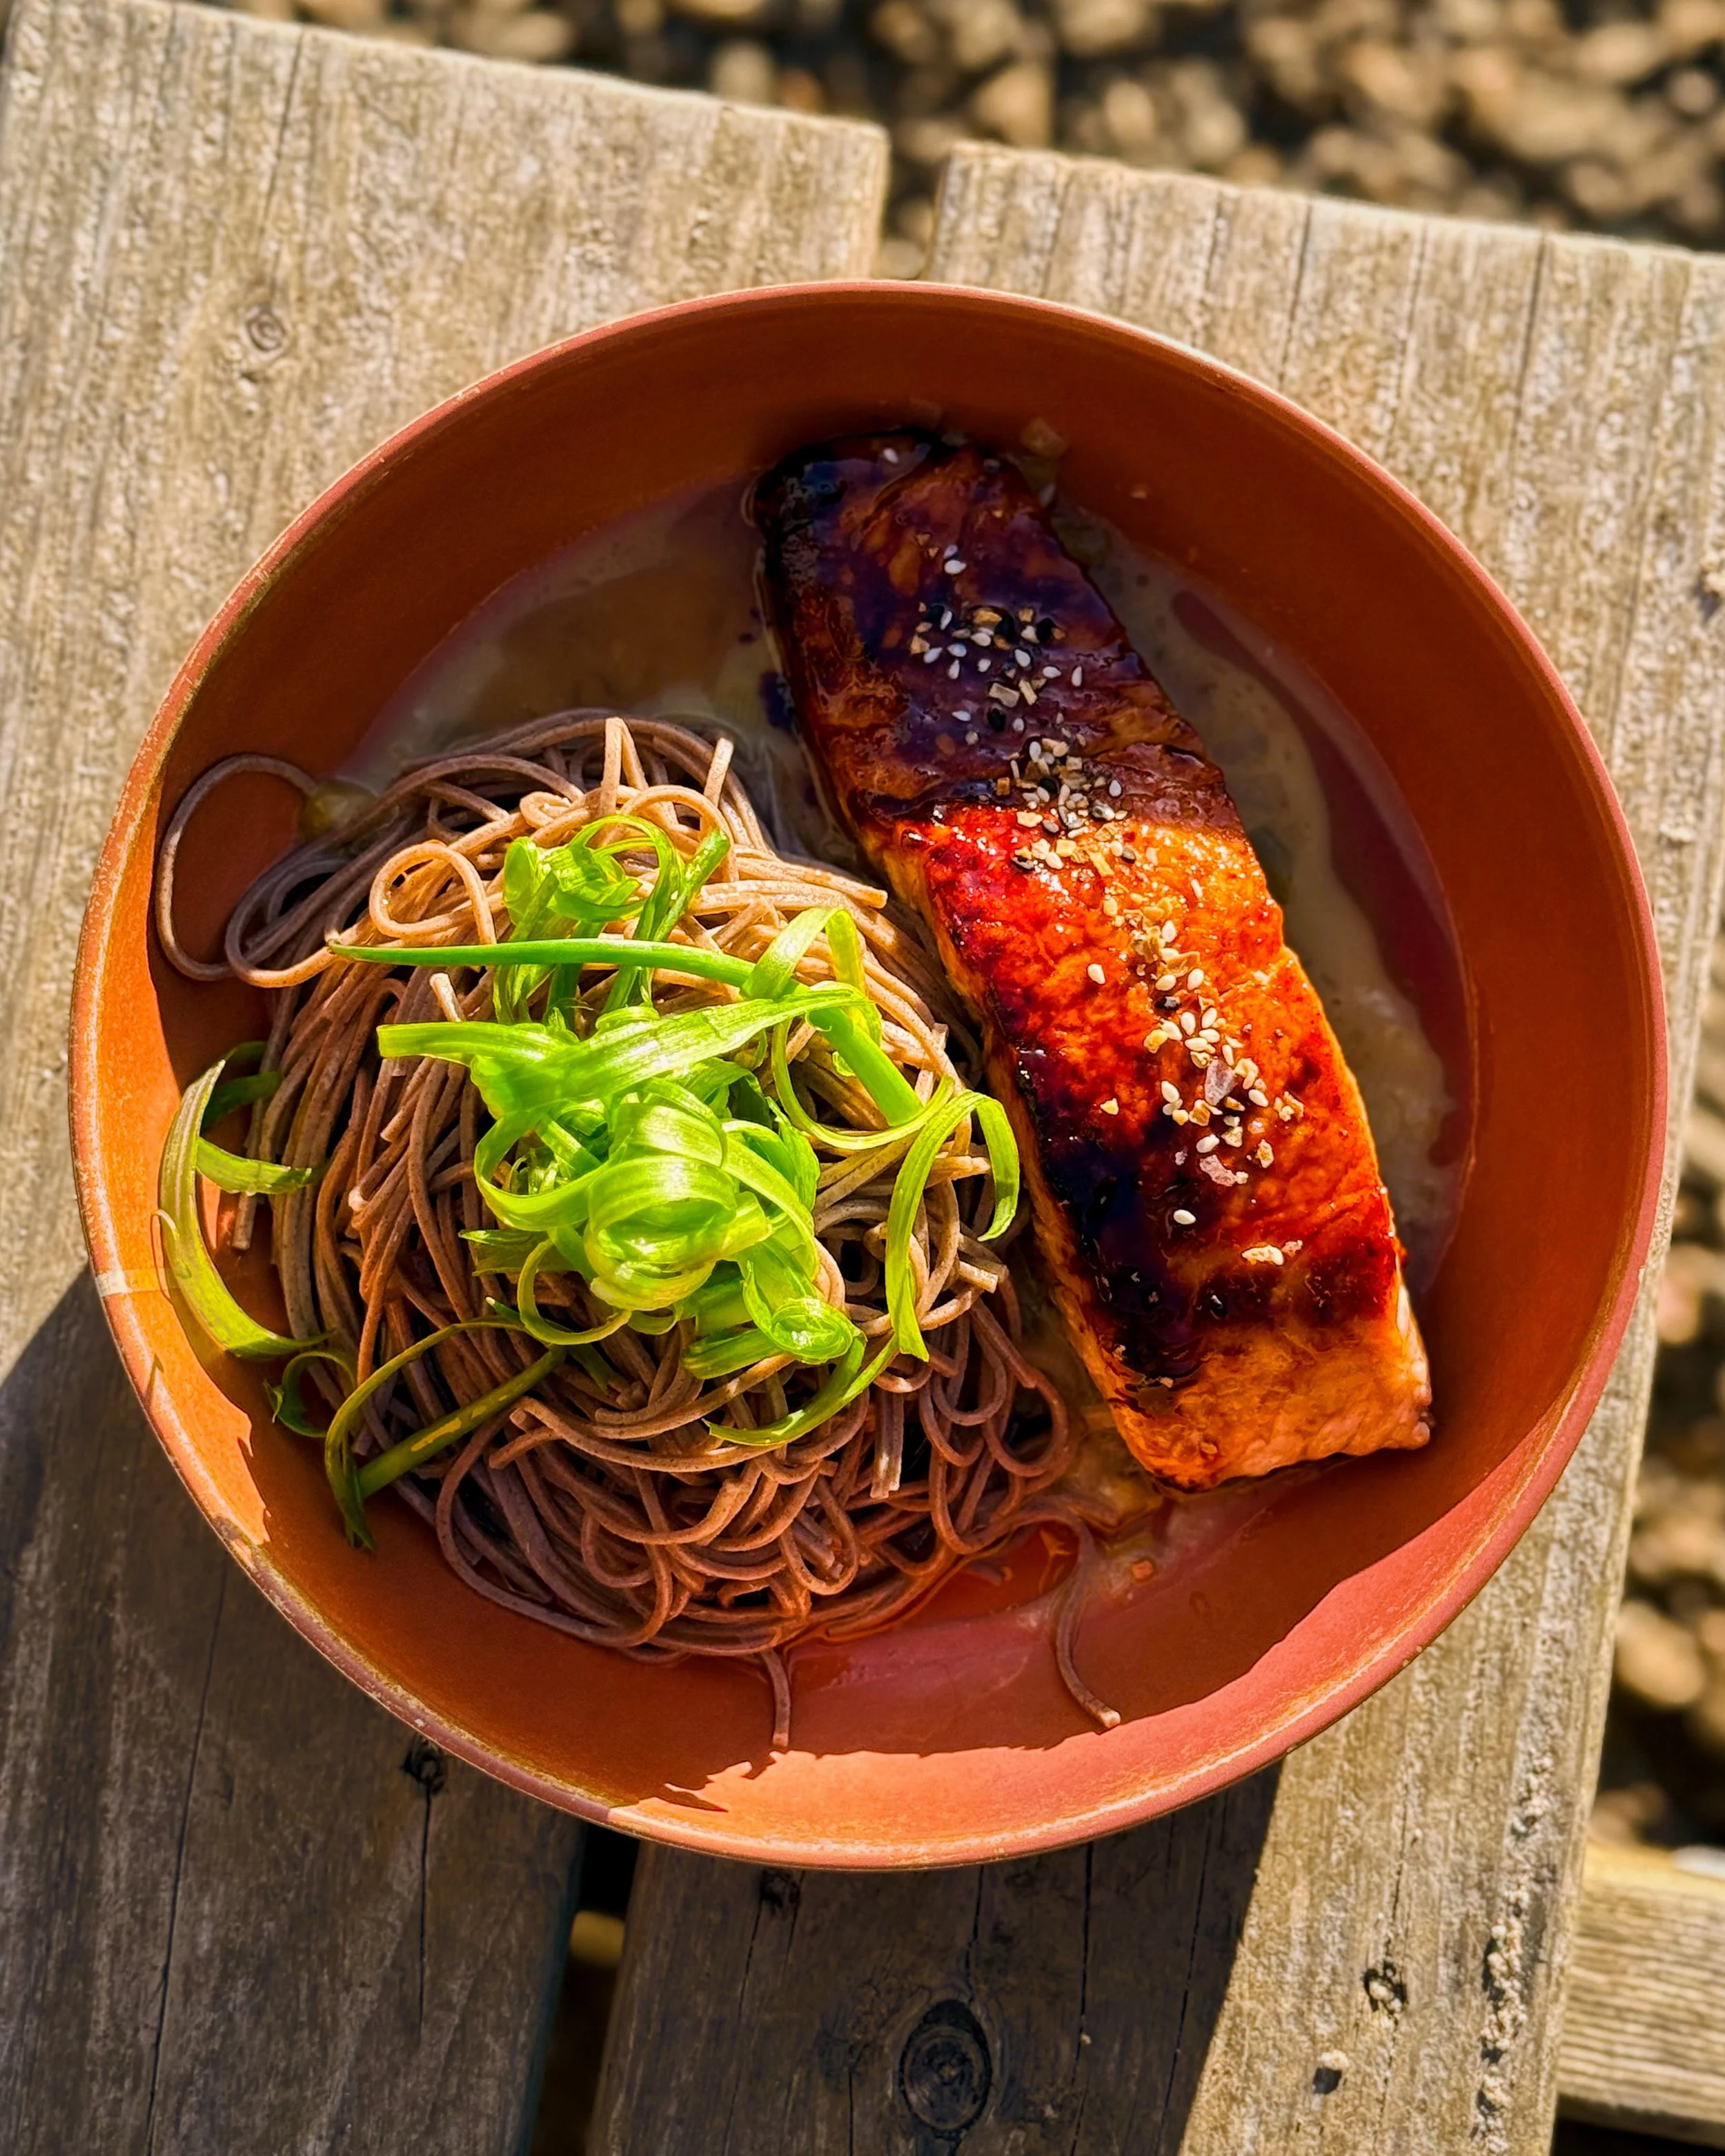
This recipe for miso-glazed salmon with Asian beurre blanc and soba noodles by Lucy Rosenberg has become a go-to recipe for me and it is even easy enough to make in an RV kitchen. I made a few small swaps since I was working with a more limited ingredient list and it still turned out delicious! Please be aware that any substitute you make of your own fruition means that you are no longer making the tested recipe and cannot blame the recipe developer if it goes wrong!!! But I was able to make this recipe concept very successfully with the following alterations and without measuring anything.
Did not have vinegar so subbed in meyer lemon juice
Used honey instead of maple syrup
Omitted pepper and red pepper flakes
Used Trader Joe’s Everything seasoning in place of plain sesame seeds
Added a drizzle of sesame oil as a finishing touch after plating which is why the sauce looks split but that is actually just a separate drizzle of sesame
I boiled the soba noodles in my camping pan then drained and chilled them while making the rest of the recipe. I then dried off the pan to cook the salmon. I used my small sauce pot to make the beurre blanc sauce.
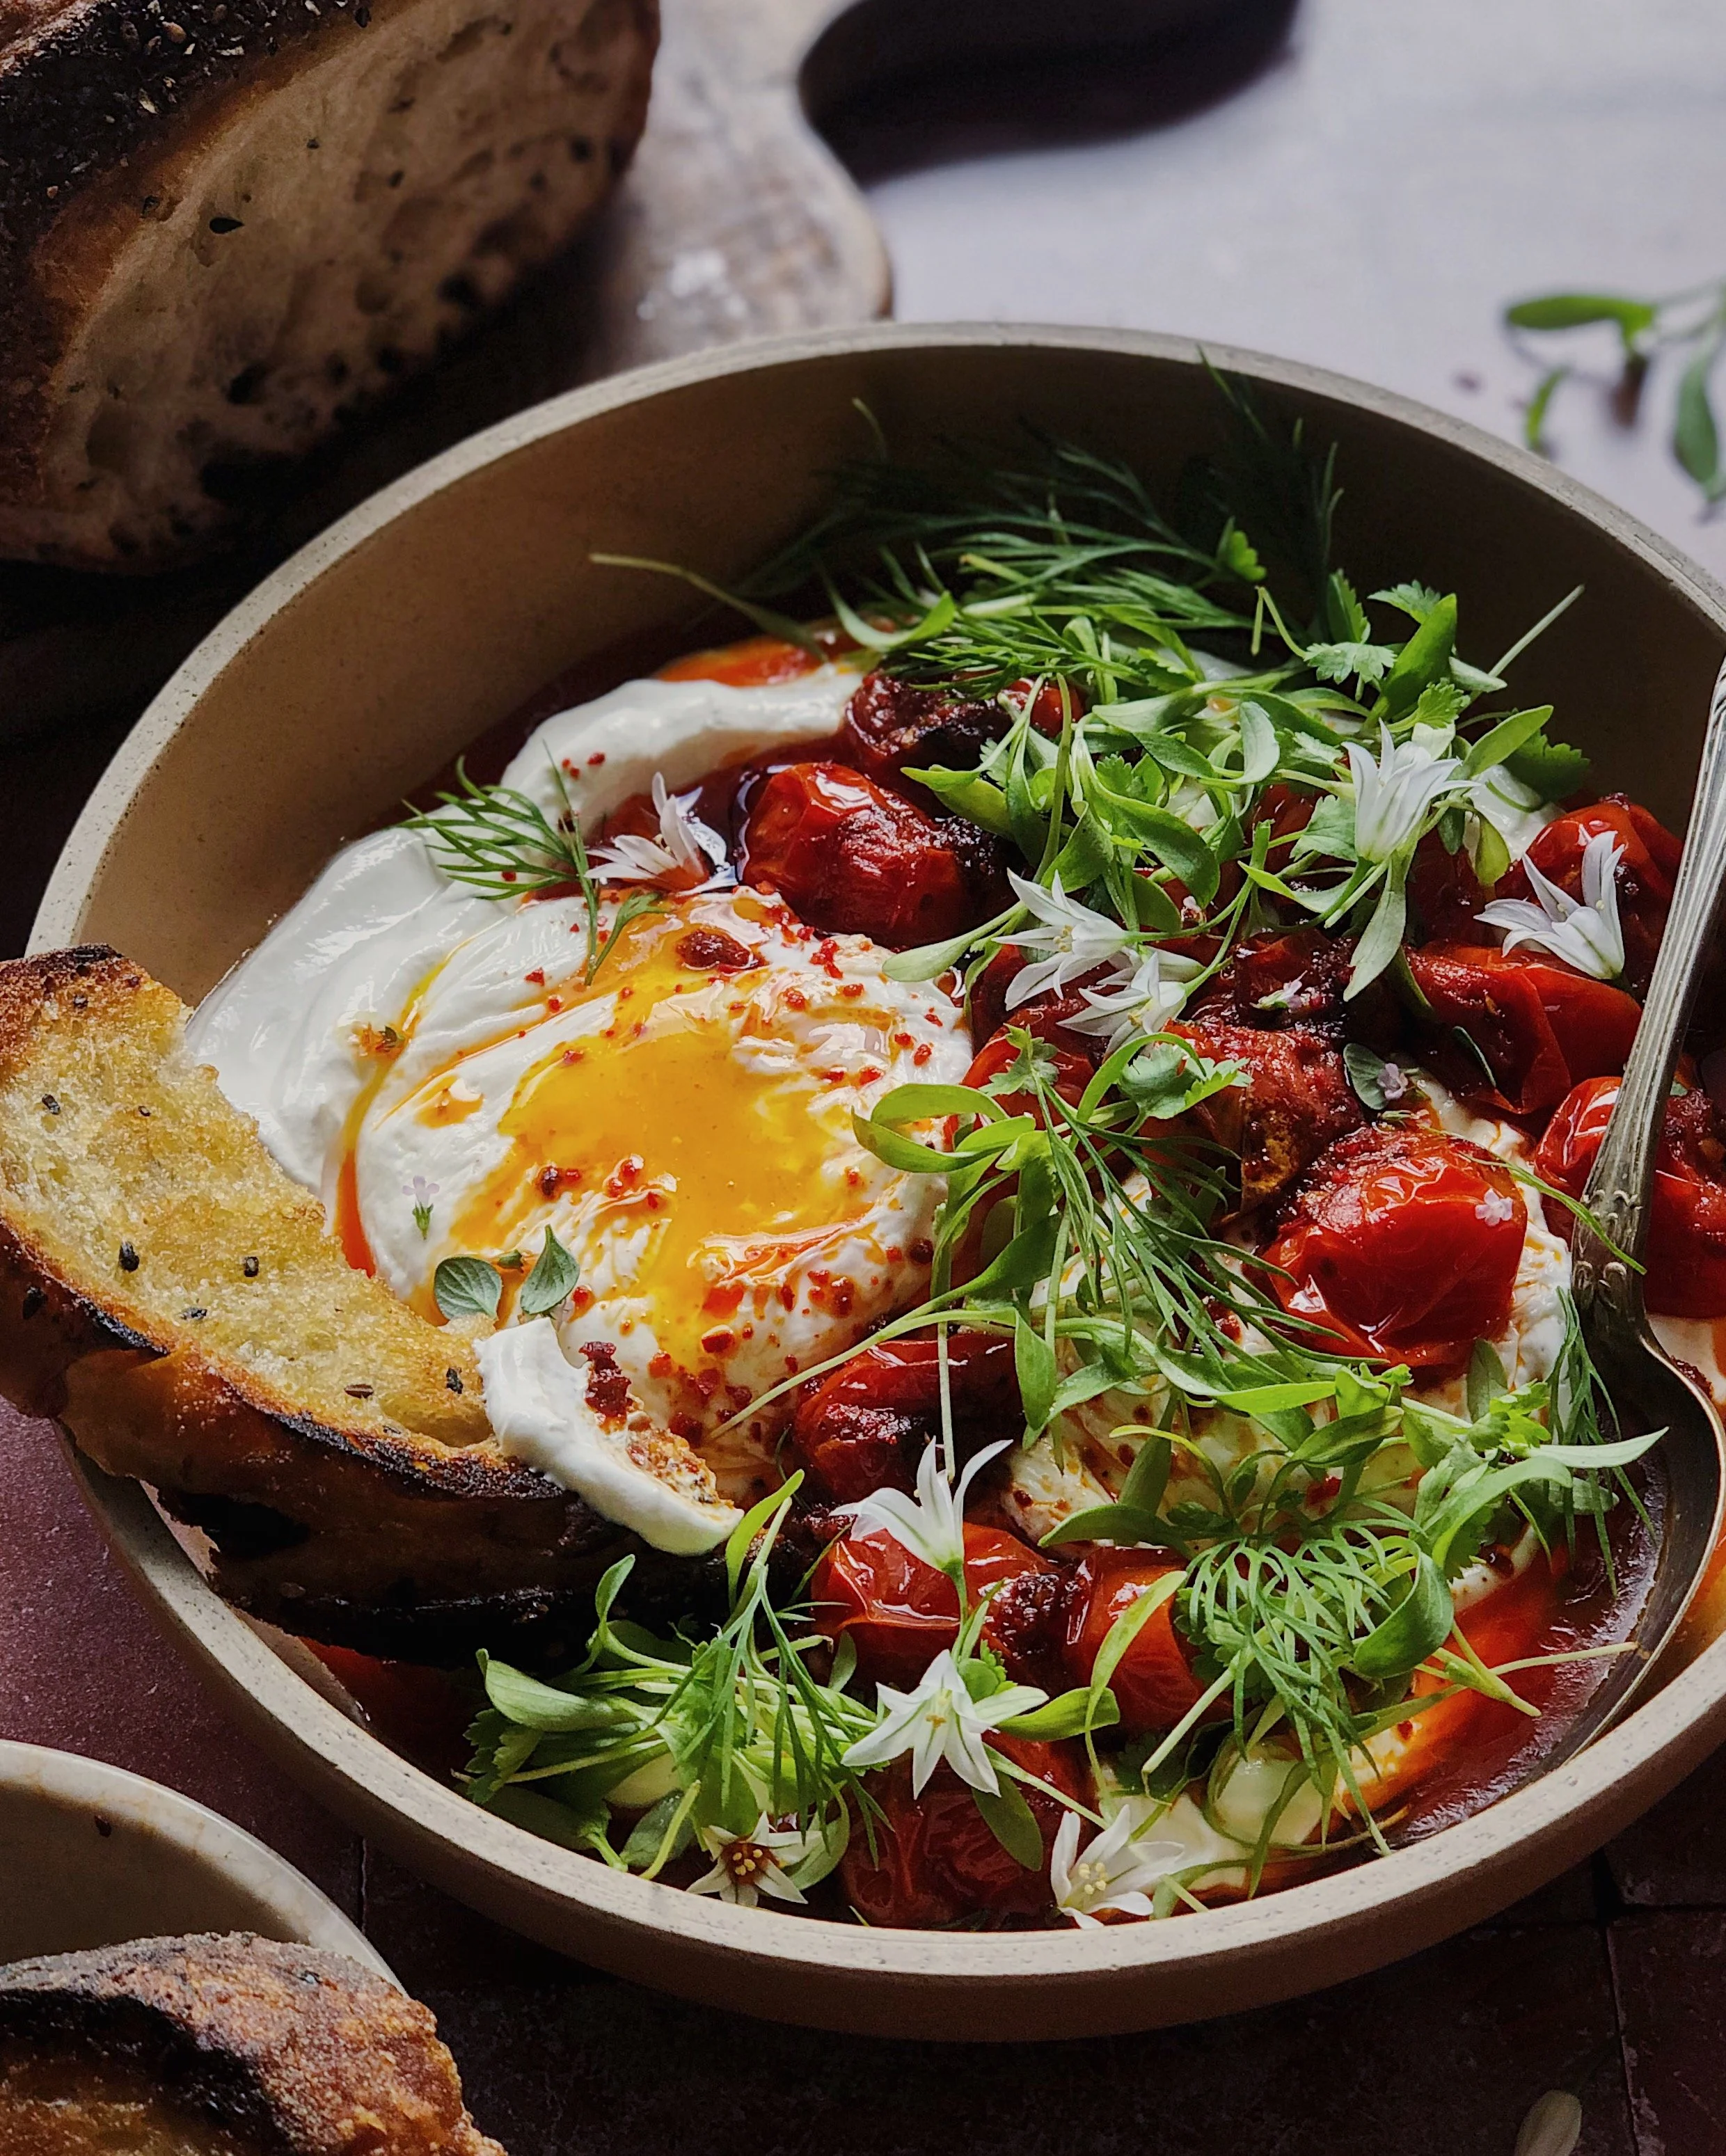
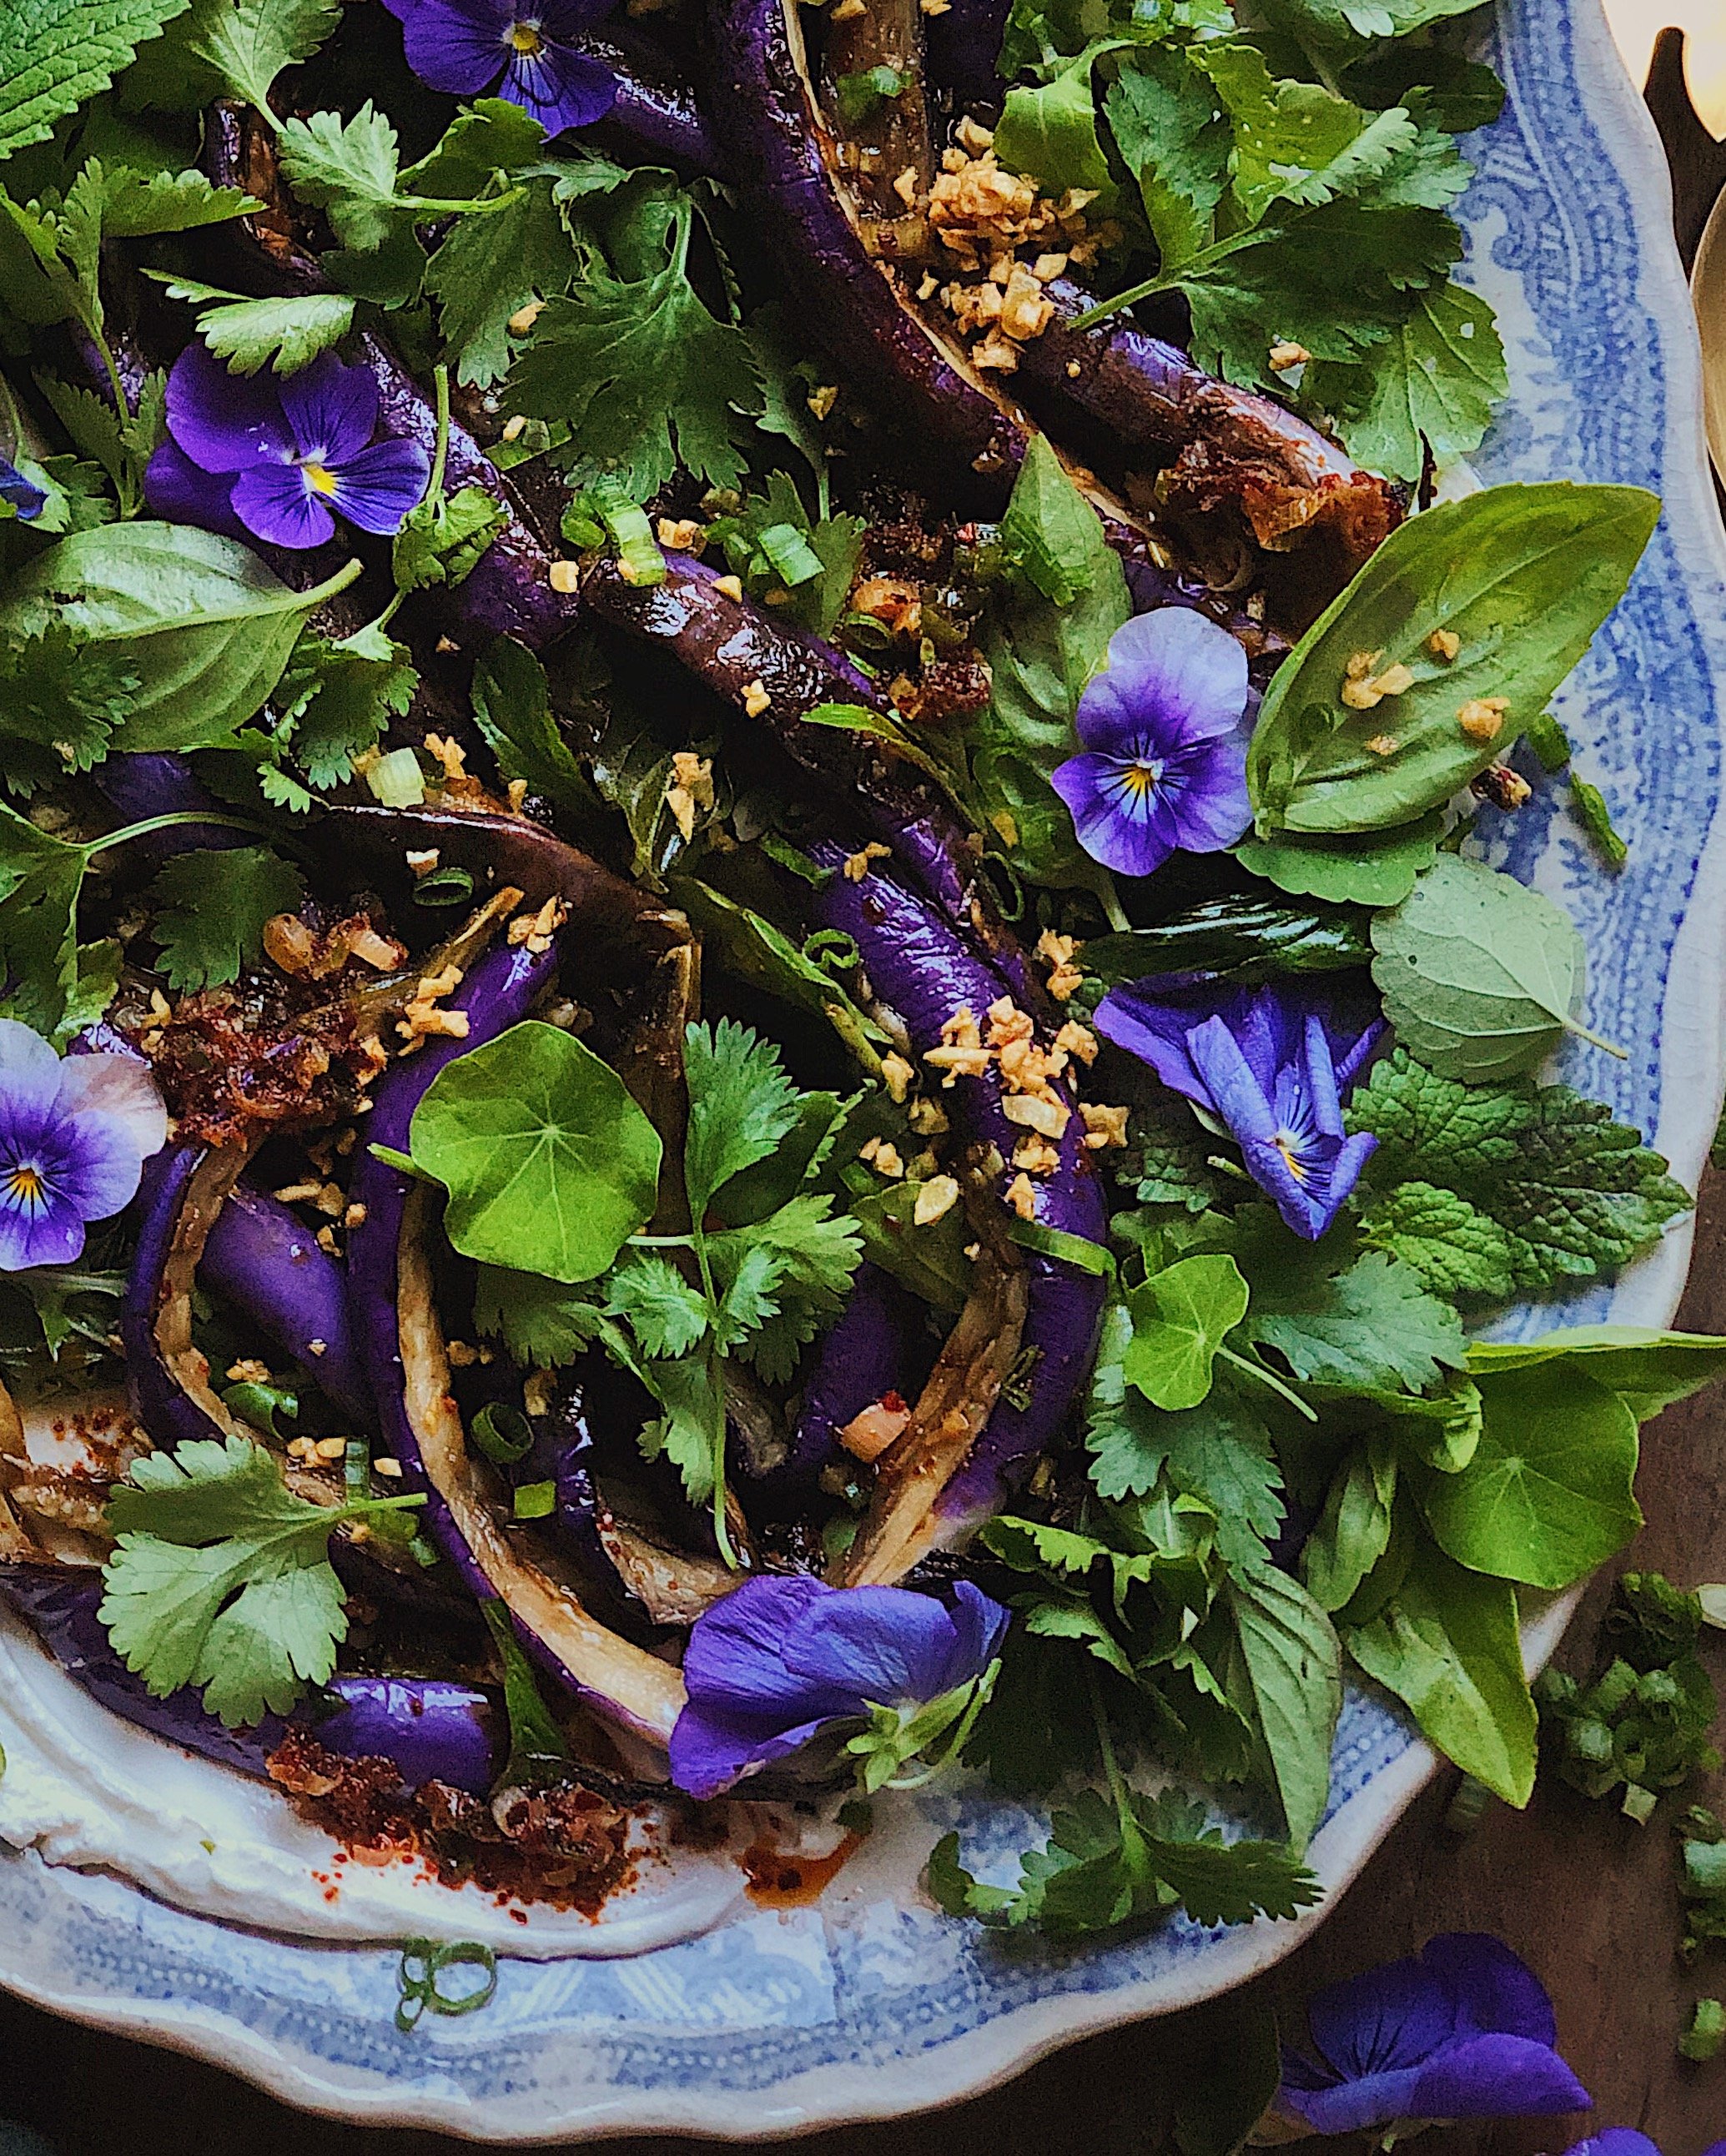
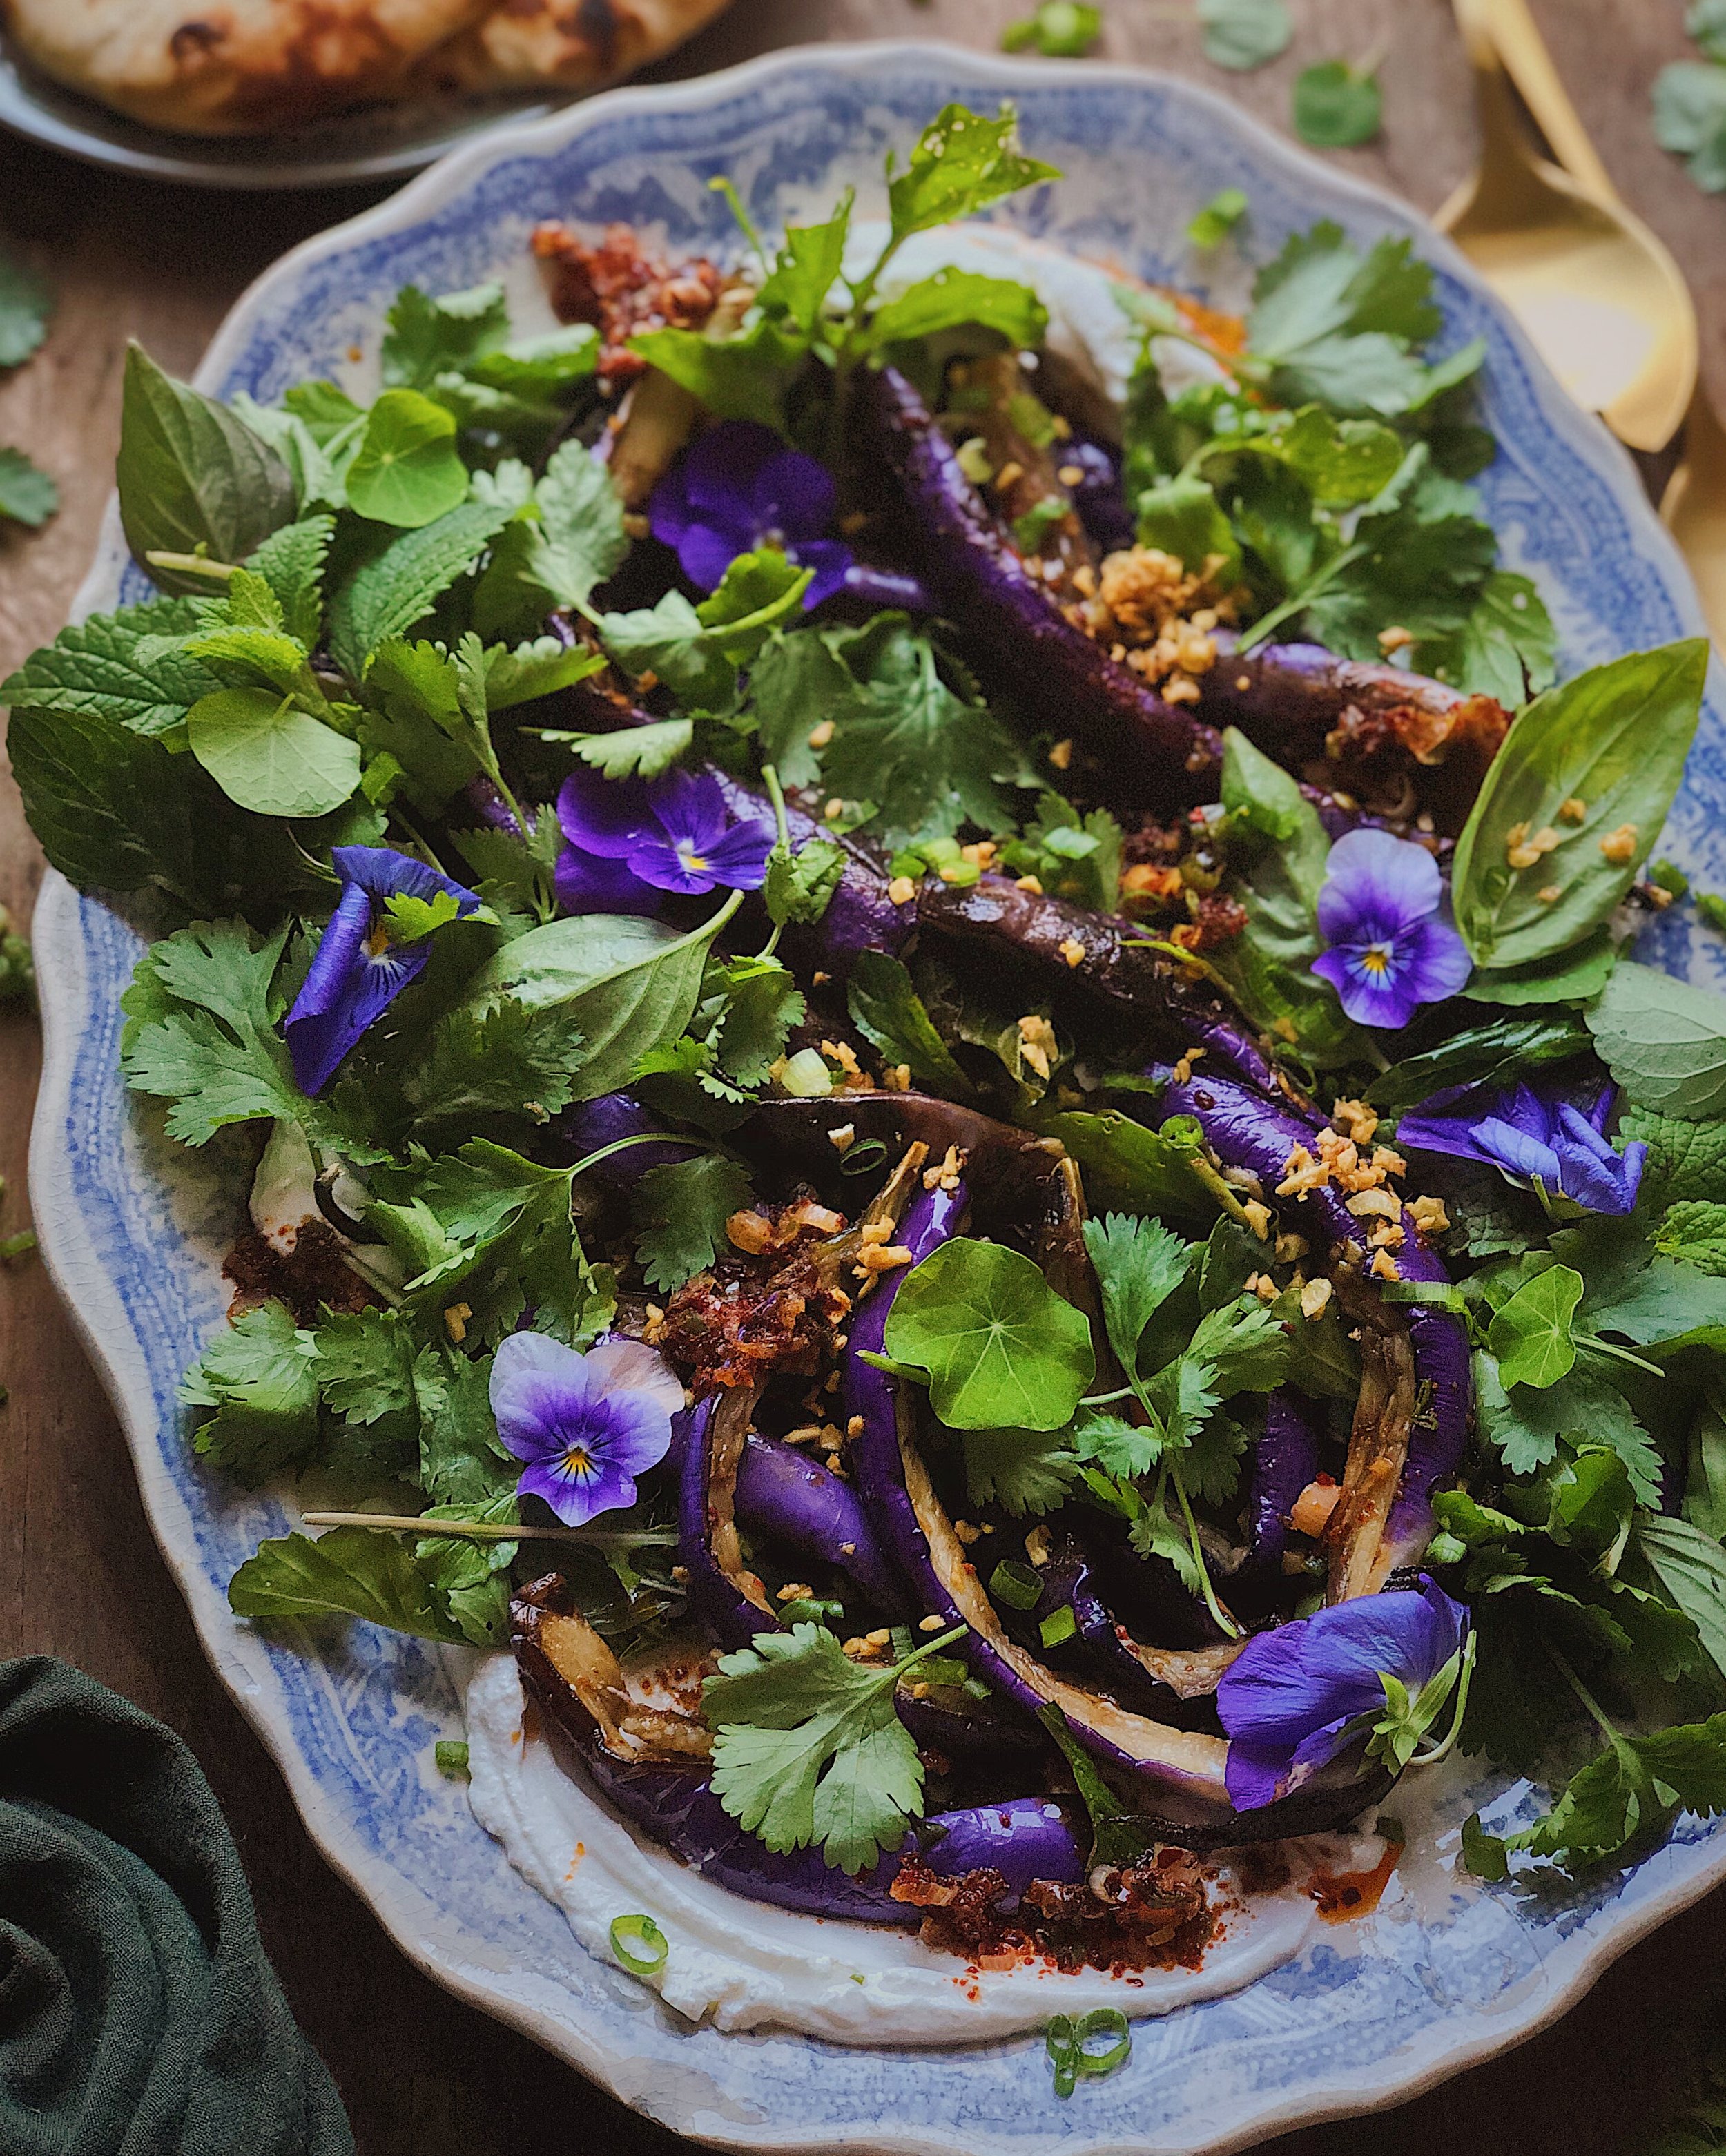
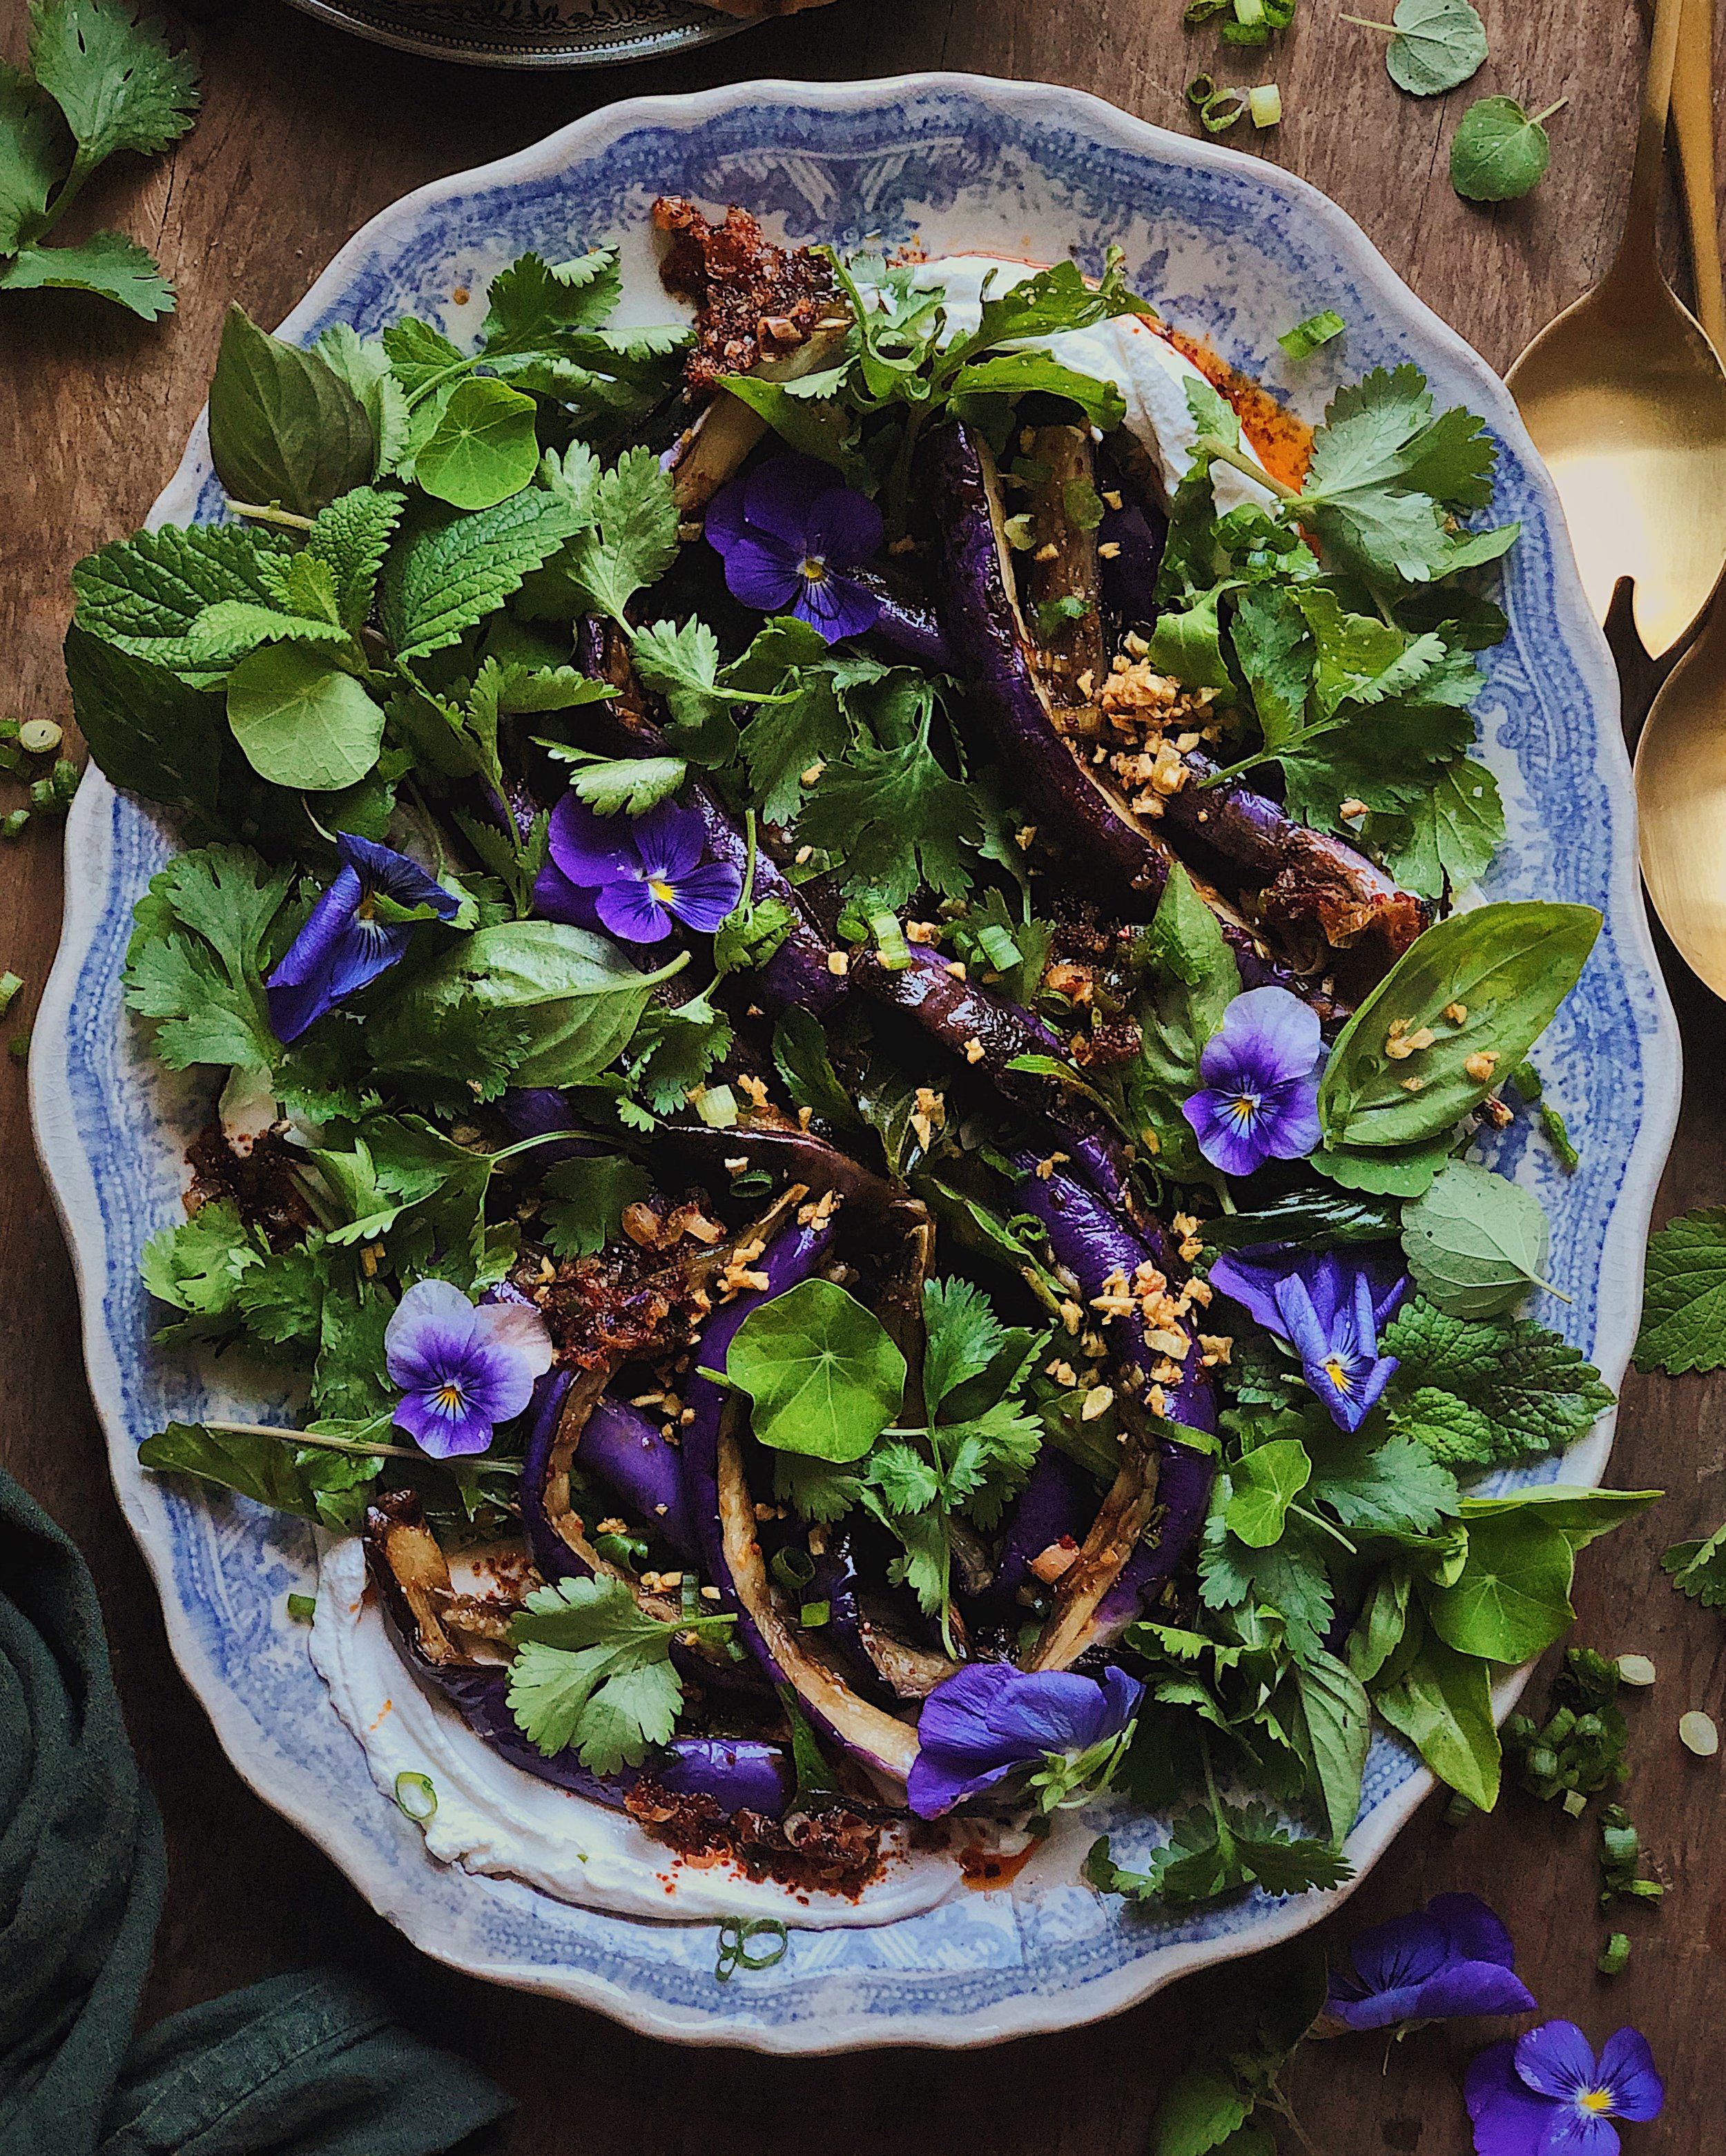
Kofte and Chickpeas in Harissa
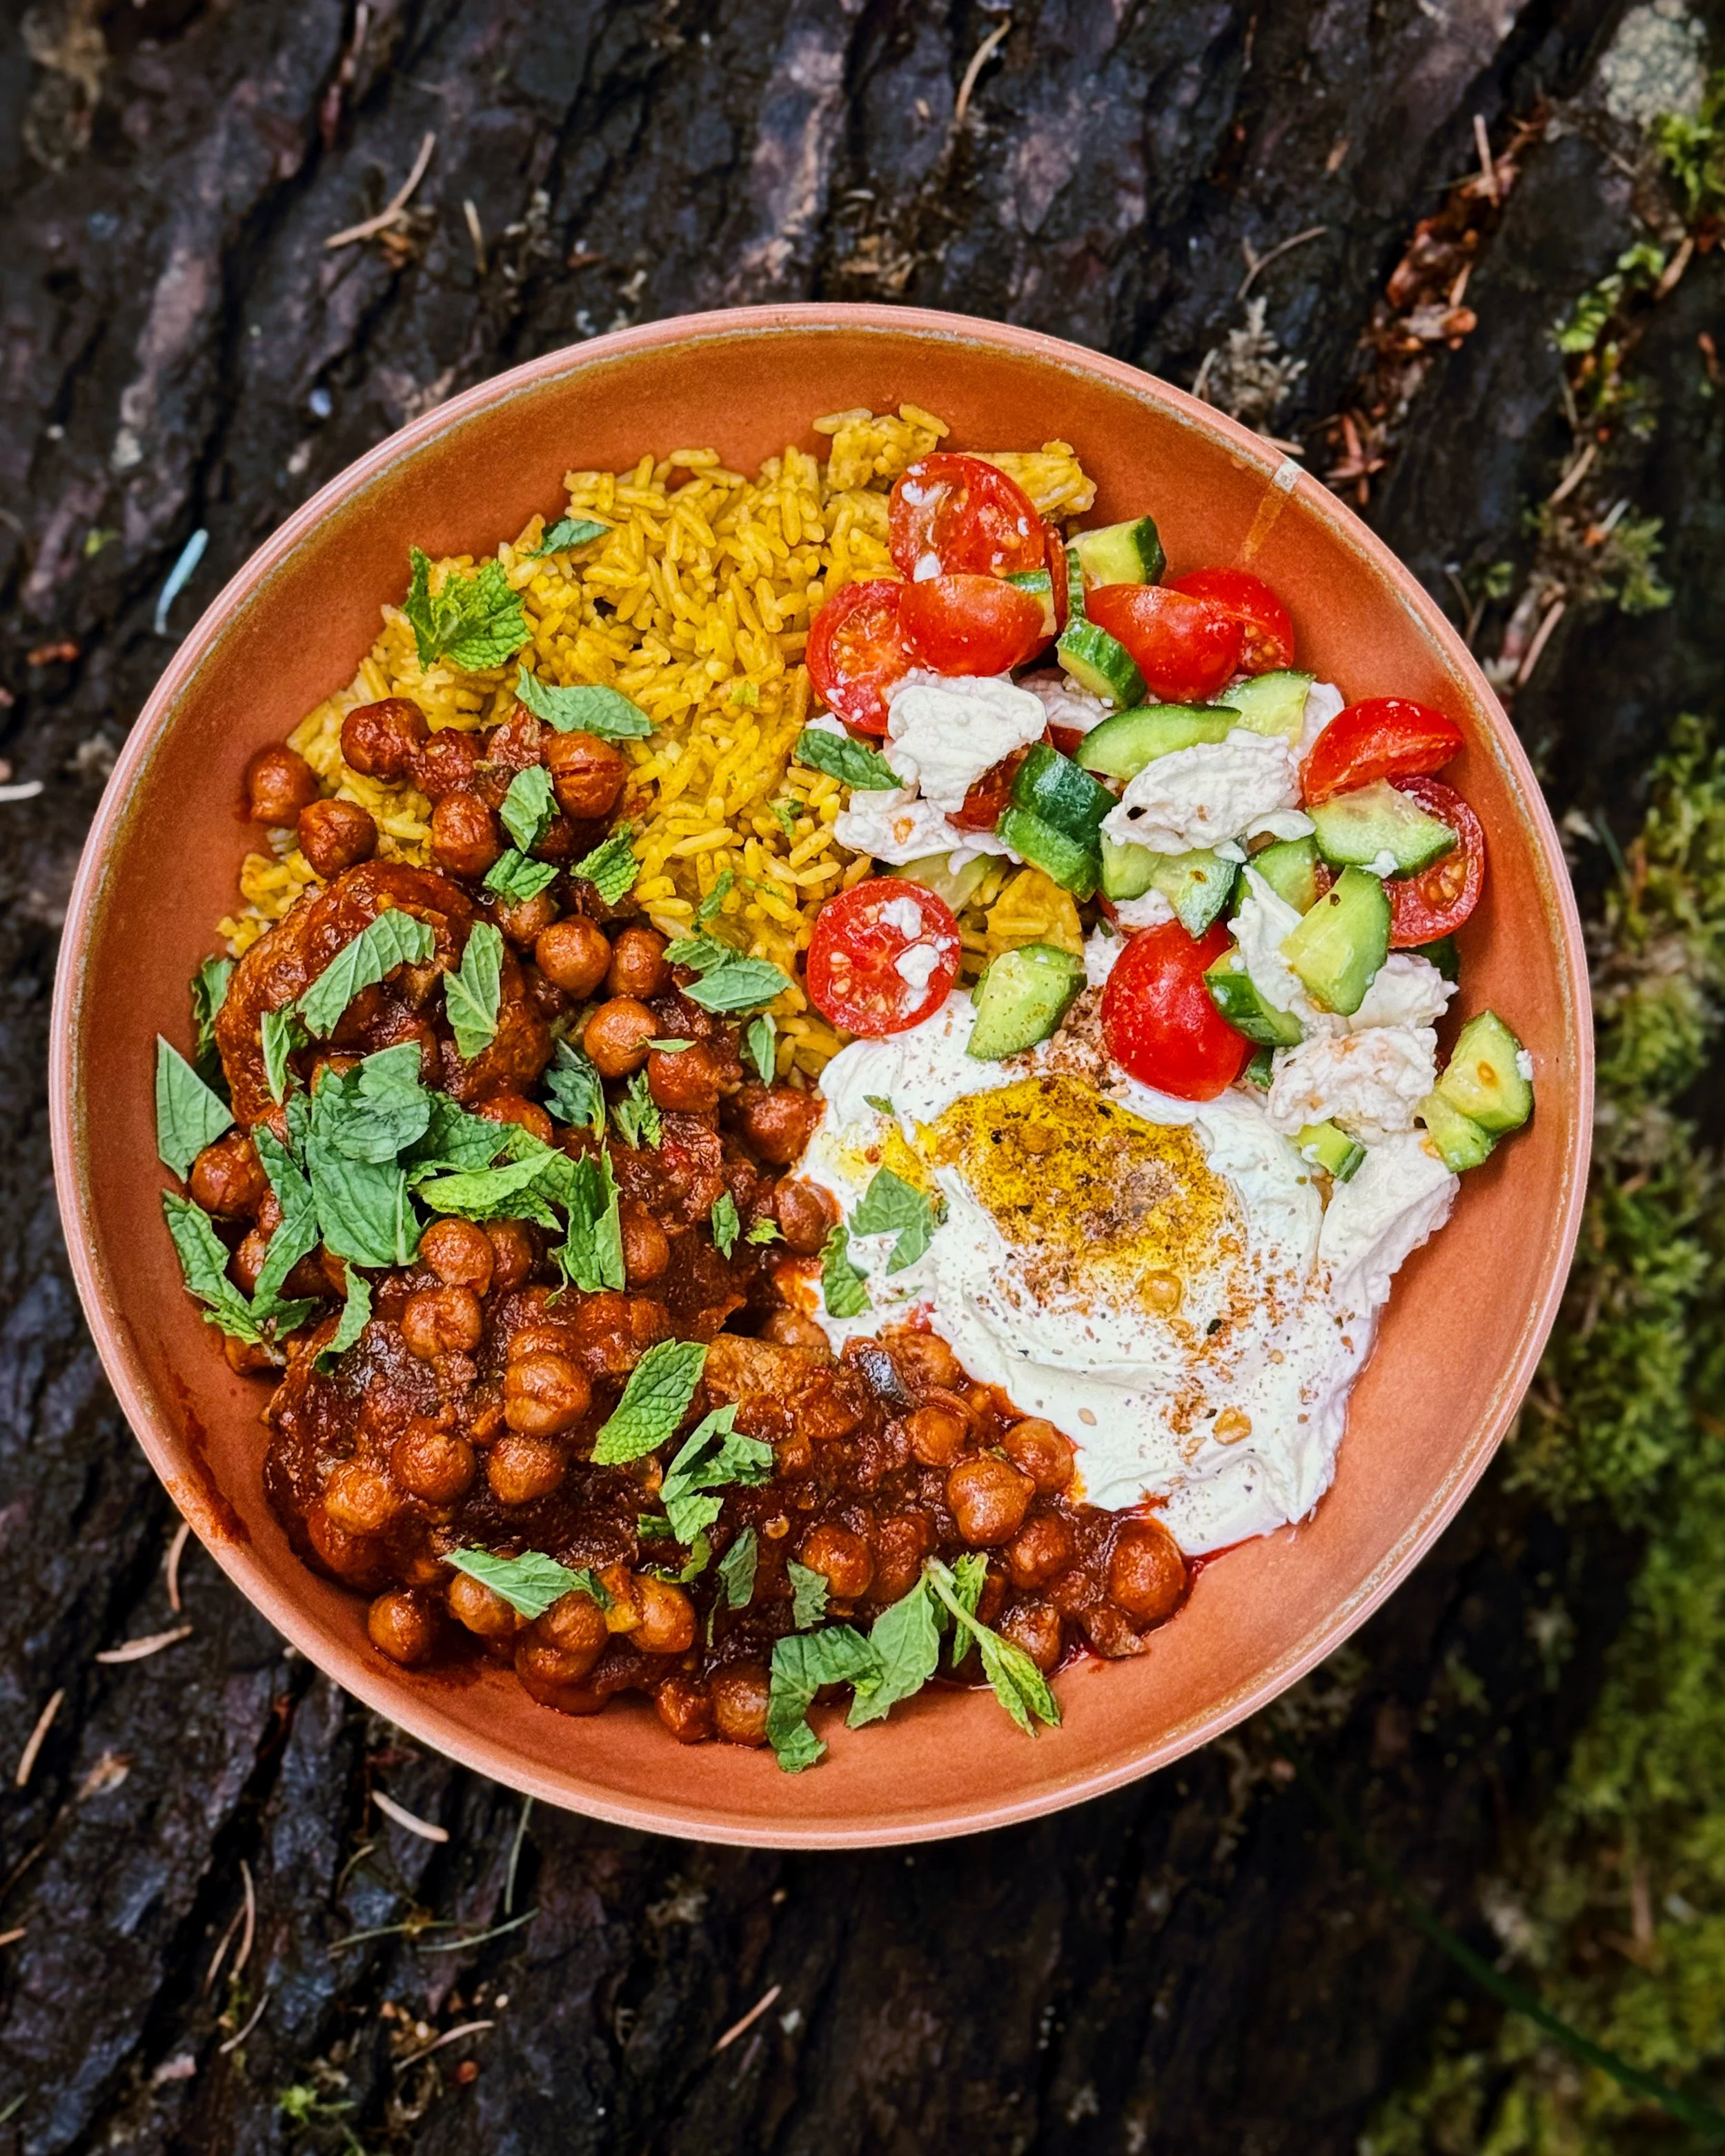
Unlike the other meal concepts on this list that I tried to keep flexible for common ingredients, this dish relies heavily on a partial can of Heyday Canning Co’s Sauce Harissa Lemon Chickpeas. I stumbled upon this product while stocking up and it ended up being an incredibly convenient and flavorful item to have in my RV pantry; I used about one-third of the can for a shakshuka-like dish and the rest as a sauce for the kofte here. If you don’t happen to have this product with you, you could still make the kofte without the sauce; it’s a bowl formula I rely on both at home and when glamping. Some sort of “Middle Eastern” or North African spice blend will set you up for success with making these meatballs (I got mine from the Grand Bazaar in Istanbul years ago and it still tastes fantastic) and you could simply brown them in your camping pan and serve them with the other accoutrements shown in the photo.
For the tomato and cucumber salad, I added torn pieces of fresh mozzarella because I had that already opened in my RV fridge. Cubed feta, halloumi, or even monterey jack could work well here or you could skip the cheese entirely.
For the rice, I have had some trouble finding a good product to accompany this type of dish. I’ve tried a microwaveable packet of saffron rice and a chicken broth rice as seen here, but was not in love with either. I have tried a few microwaveable lentil packets that I’ve enjoyed; those would indeed work well here too. You could also omit the rice and grab some fresh pitas or naan to serve instead.
Ingredients
3/4 lb ground meat, such as beef or lamb or a mix of both
your choice of Middle Eastern/North African spice blend
1 bread loaf endcap
filtered water or milk
Garliki fermented garlic paste or chopped garlic
salt, to taste
olive oil
2/3 can Heyday Canning Co’s Sauce Harissa Lemon Chickpeas
1 handful cherry tomatoes, halved
1 persian cucumber, diced
1/2 lemon, juiced
cheese, cubed (optional)
1 packet rice or lentils
yogurt/labneh/sour cream/crema
mint or parsley, chopped (optional)
Procedure
Tear the bread into small pieces and add enough water to moisten. Combine with meat and spice blend. Add garlic, and salt if needed. Mix together thoroughly and form meatballs, small patties, or your desired kofte shape.
Heat some olive oil in your camping pan on medium-high heat. Brown the kofte. Reduce heat to low and pour in the harissa chickpeas. Cook together until the chickpeas are heated through.
In the meantime, combine tomatoes, cucumber, lemon juice, cheese (if using) to make the salad. Salt to taste.
Microwave the rice/lentils according to package instructions.
Plate the rice/lentils, saucy kofte and chickpeas, and salad. Add a dollop of yogurt/labneh/sour cream/crema topped with a drizzle of olive oil and a dash of spice. Finish off with fresh herbs, if you have them.
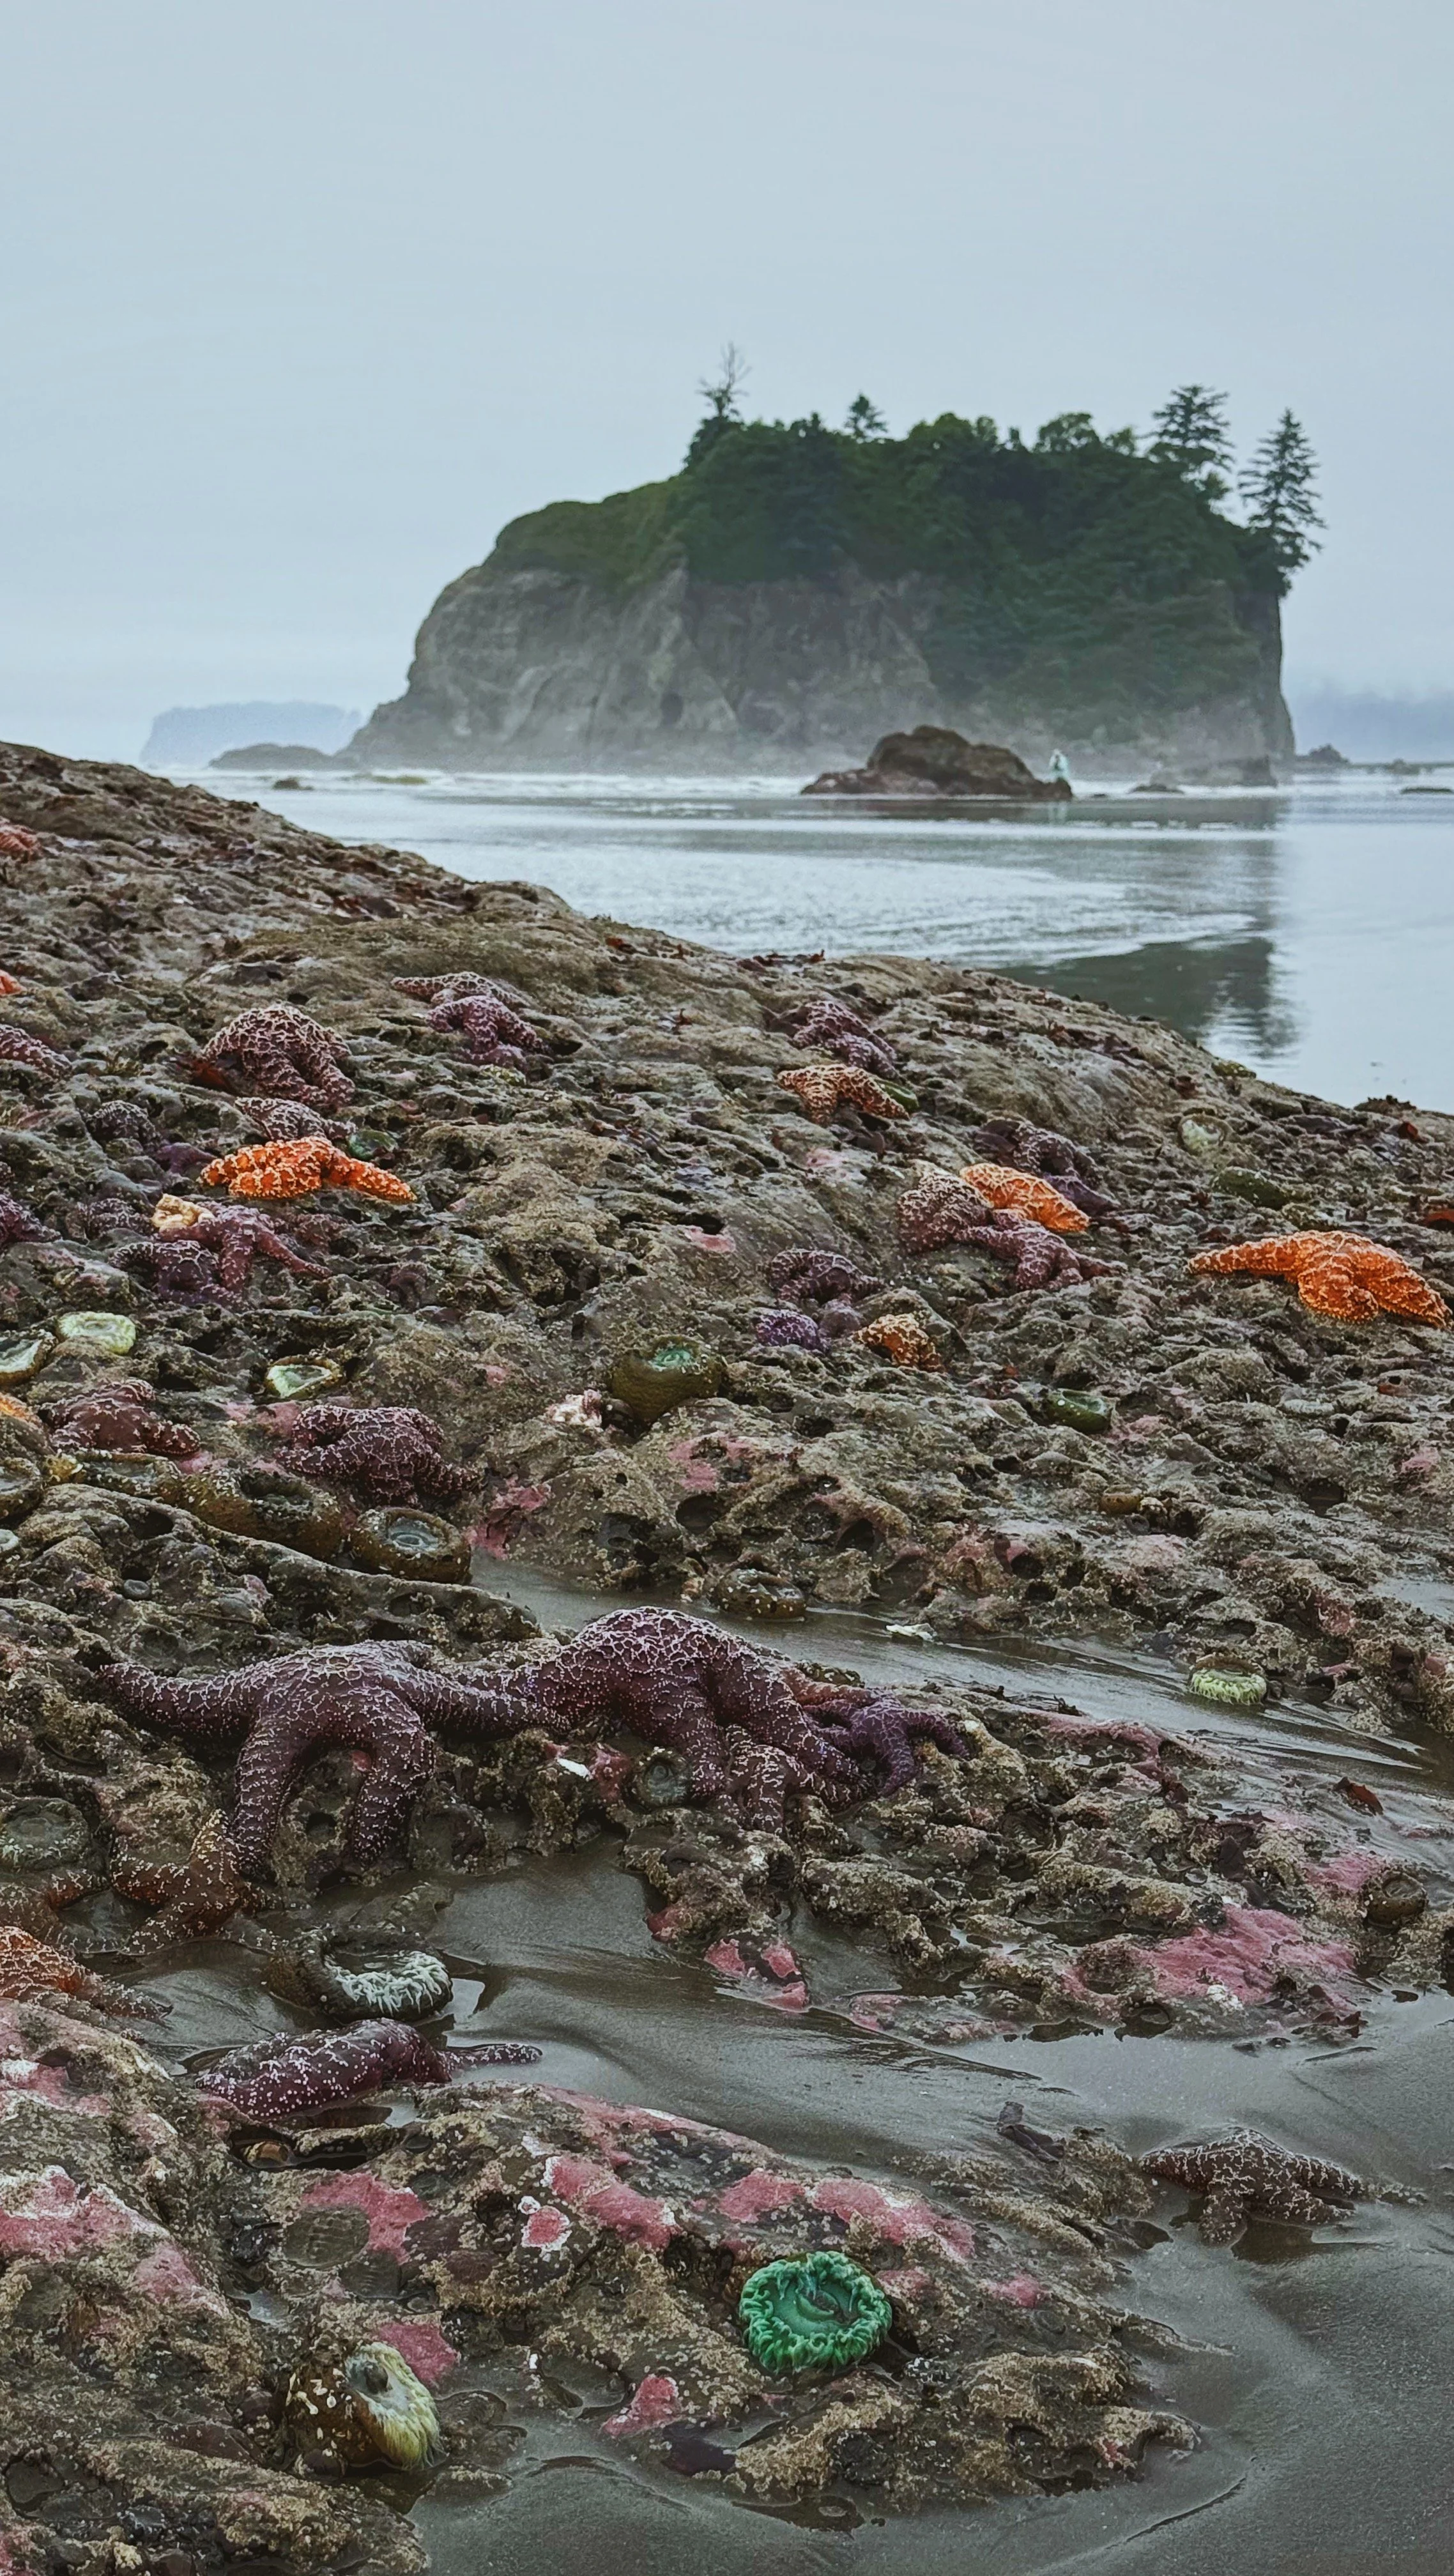
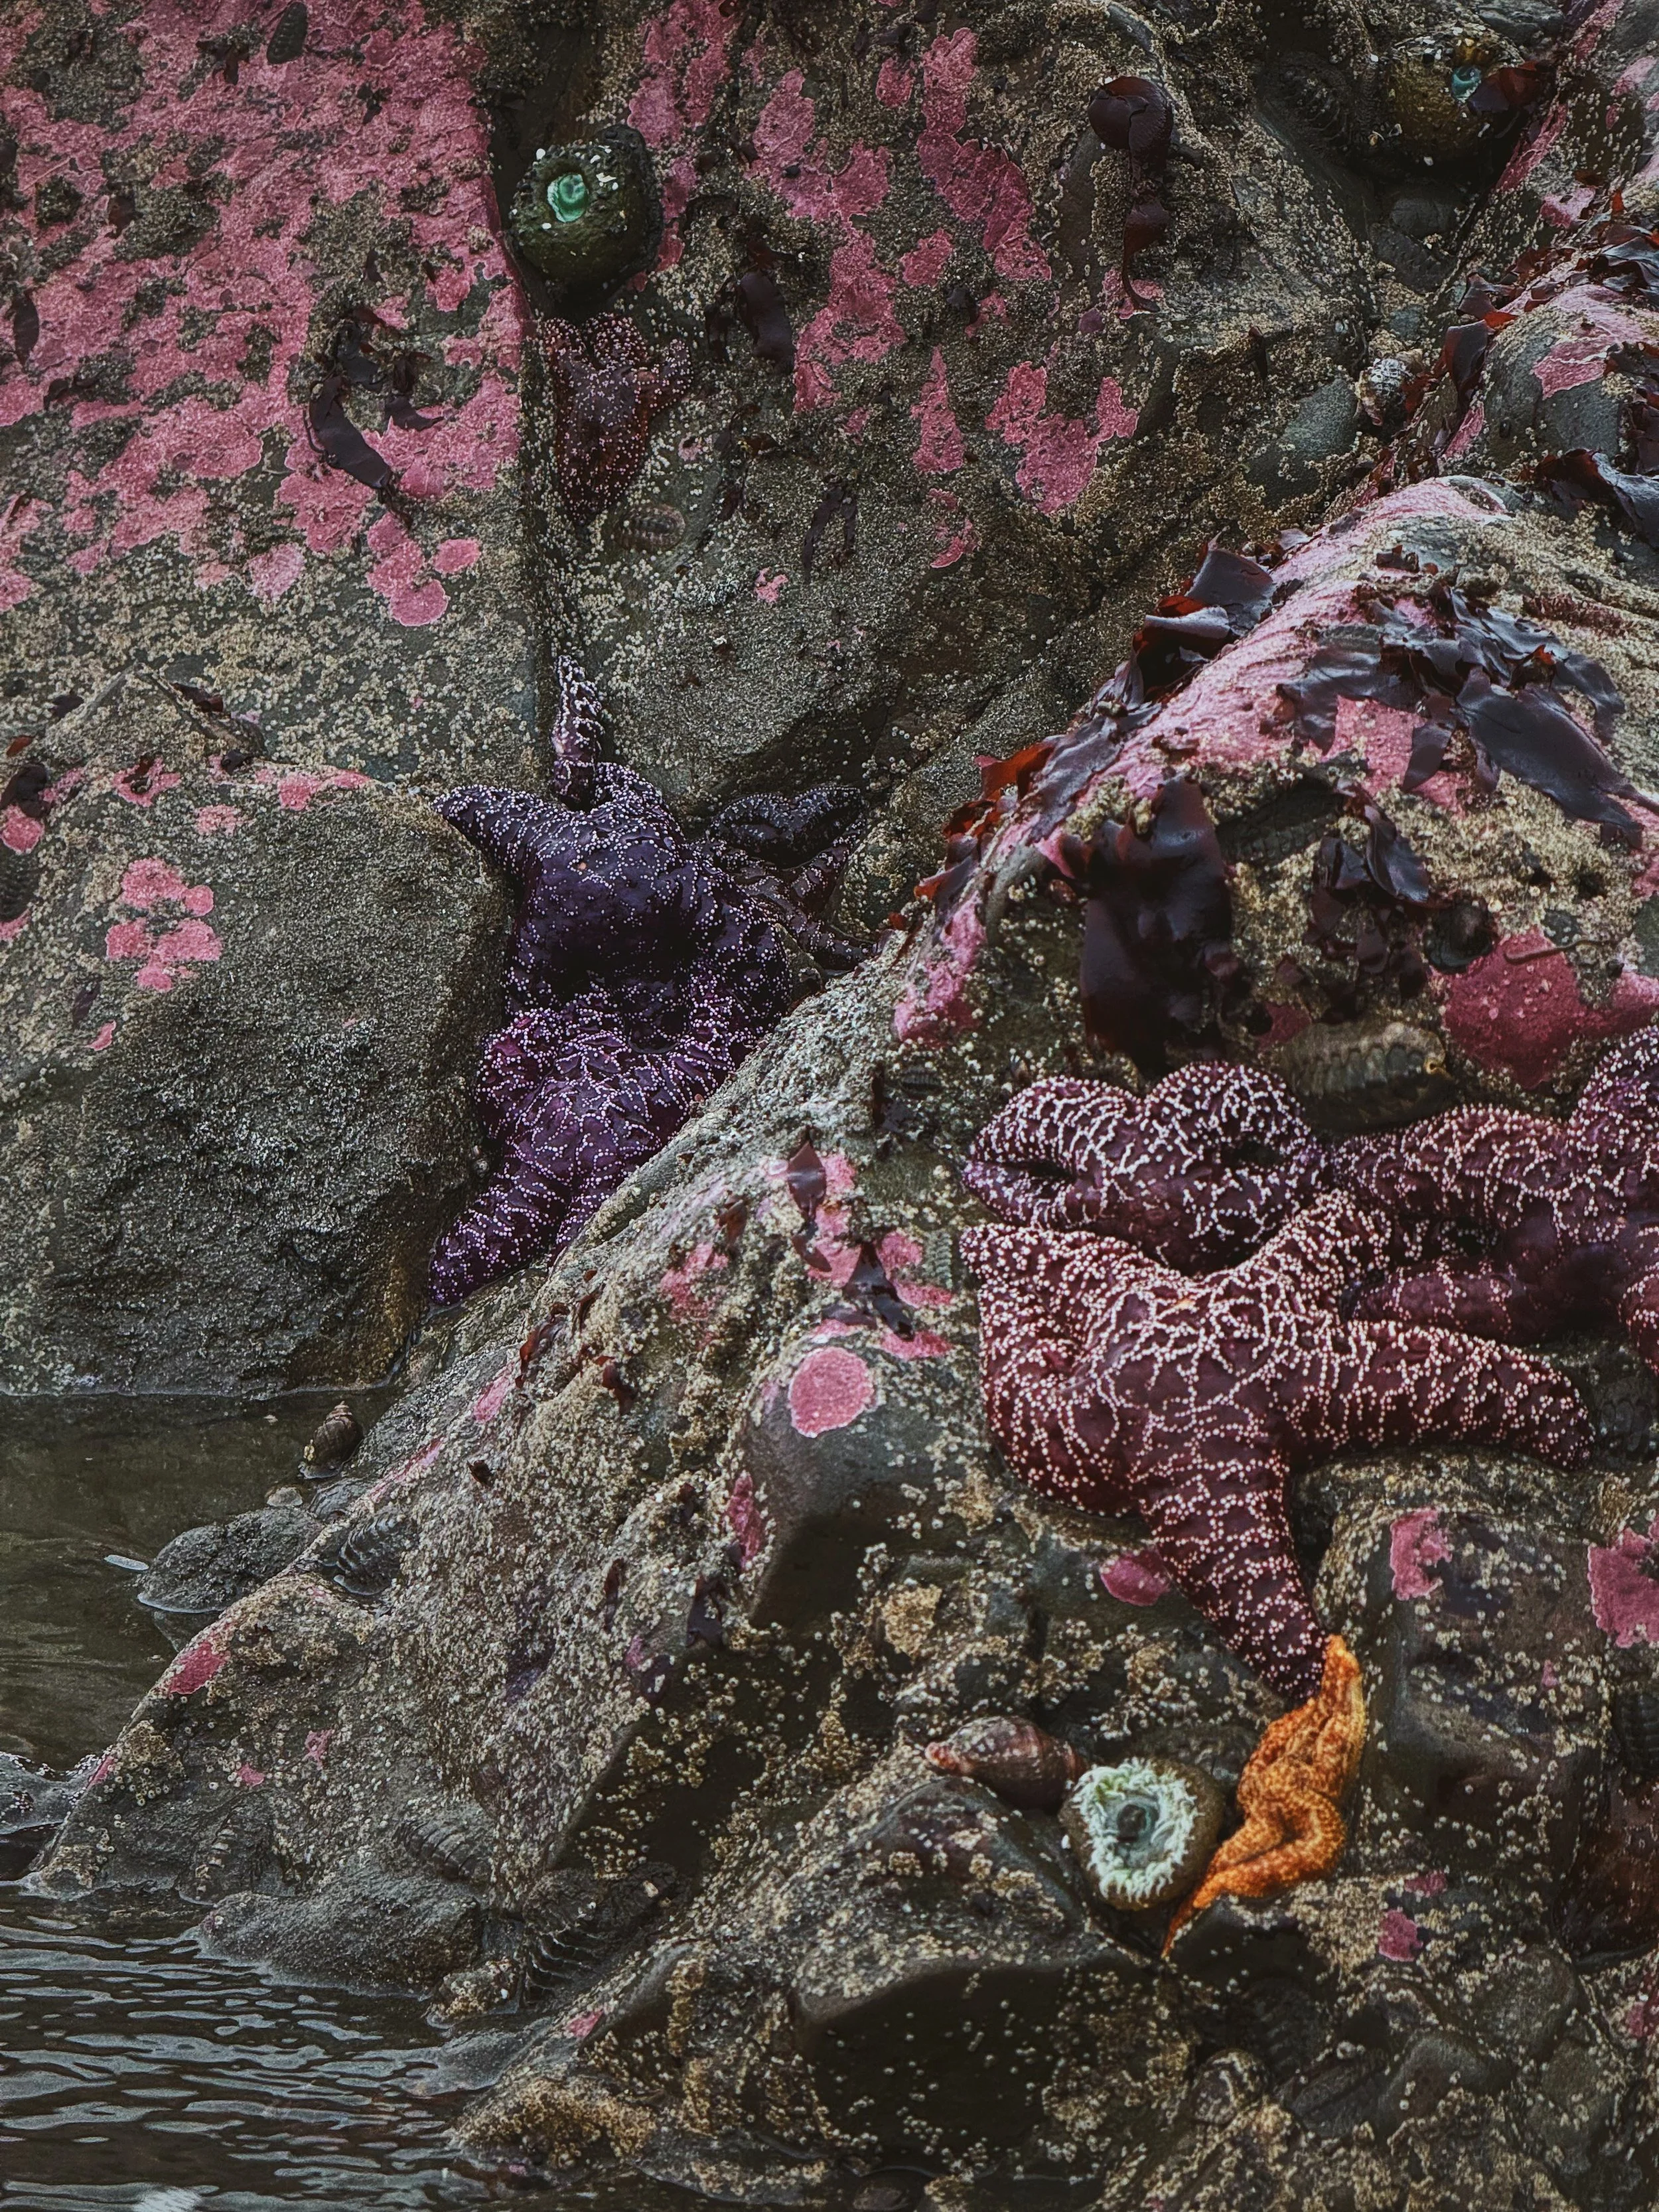
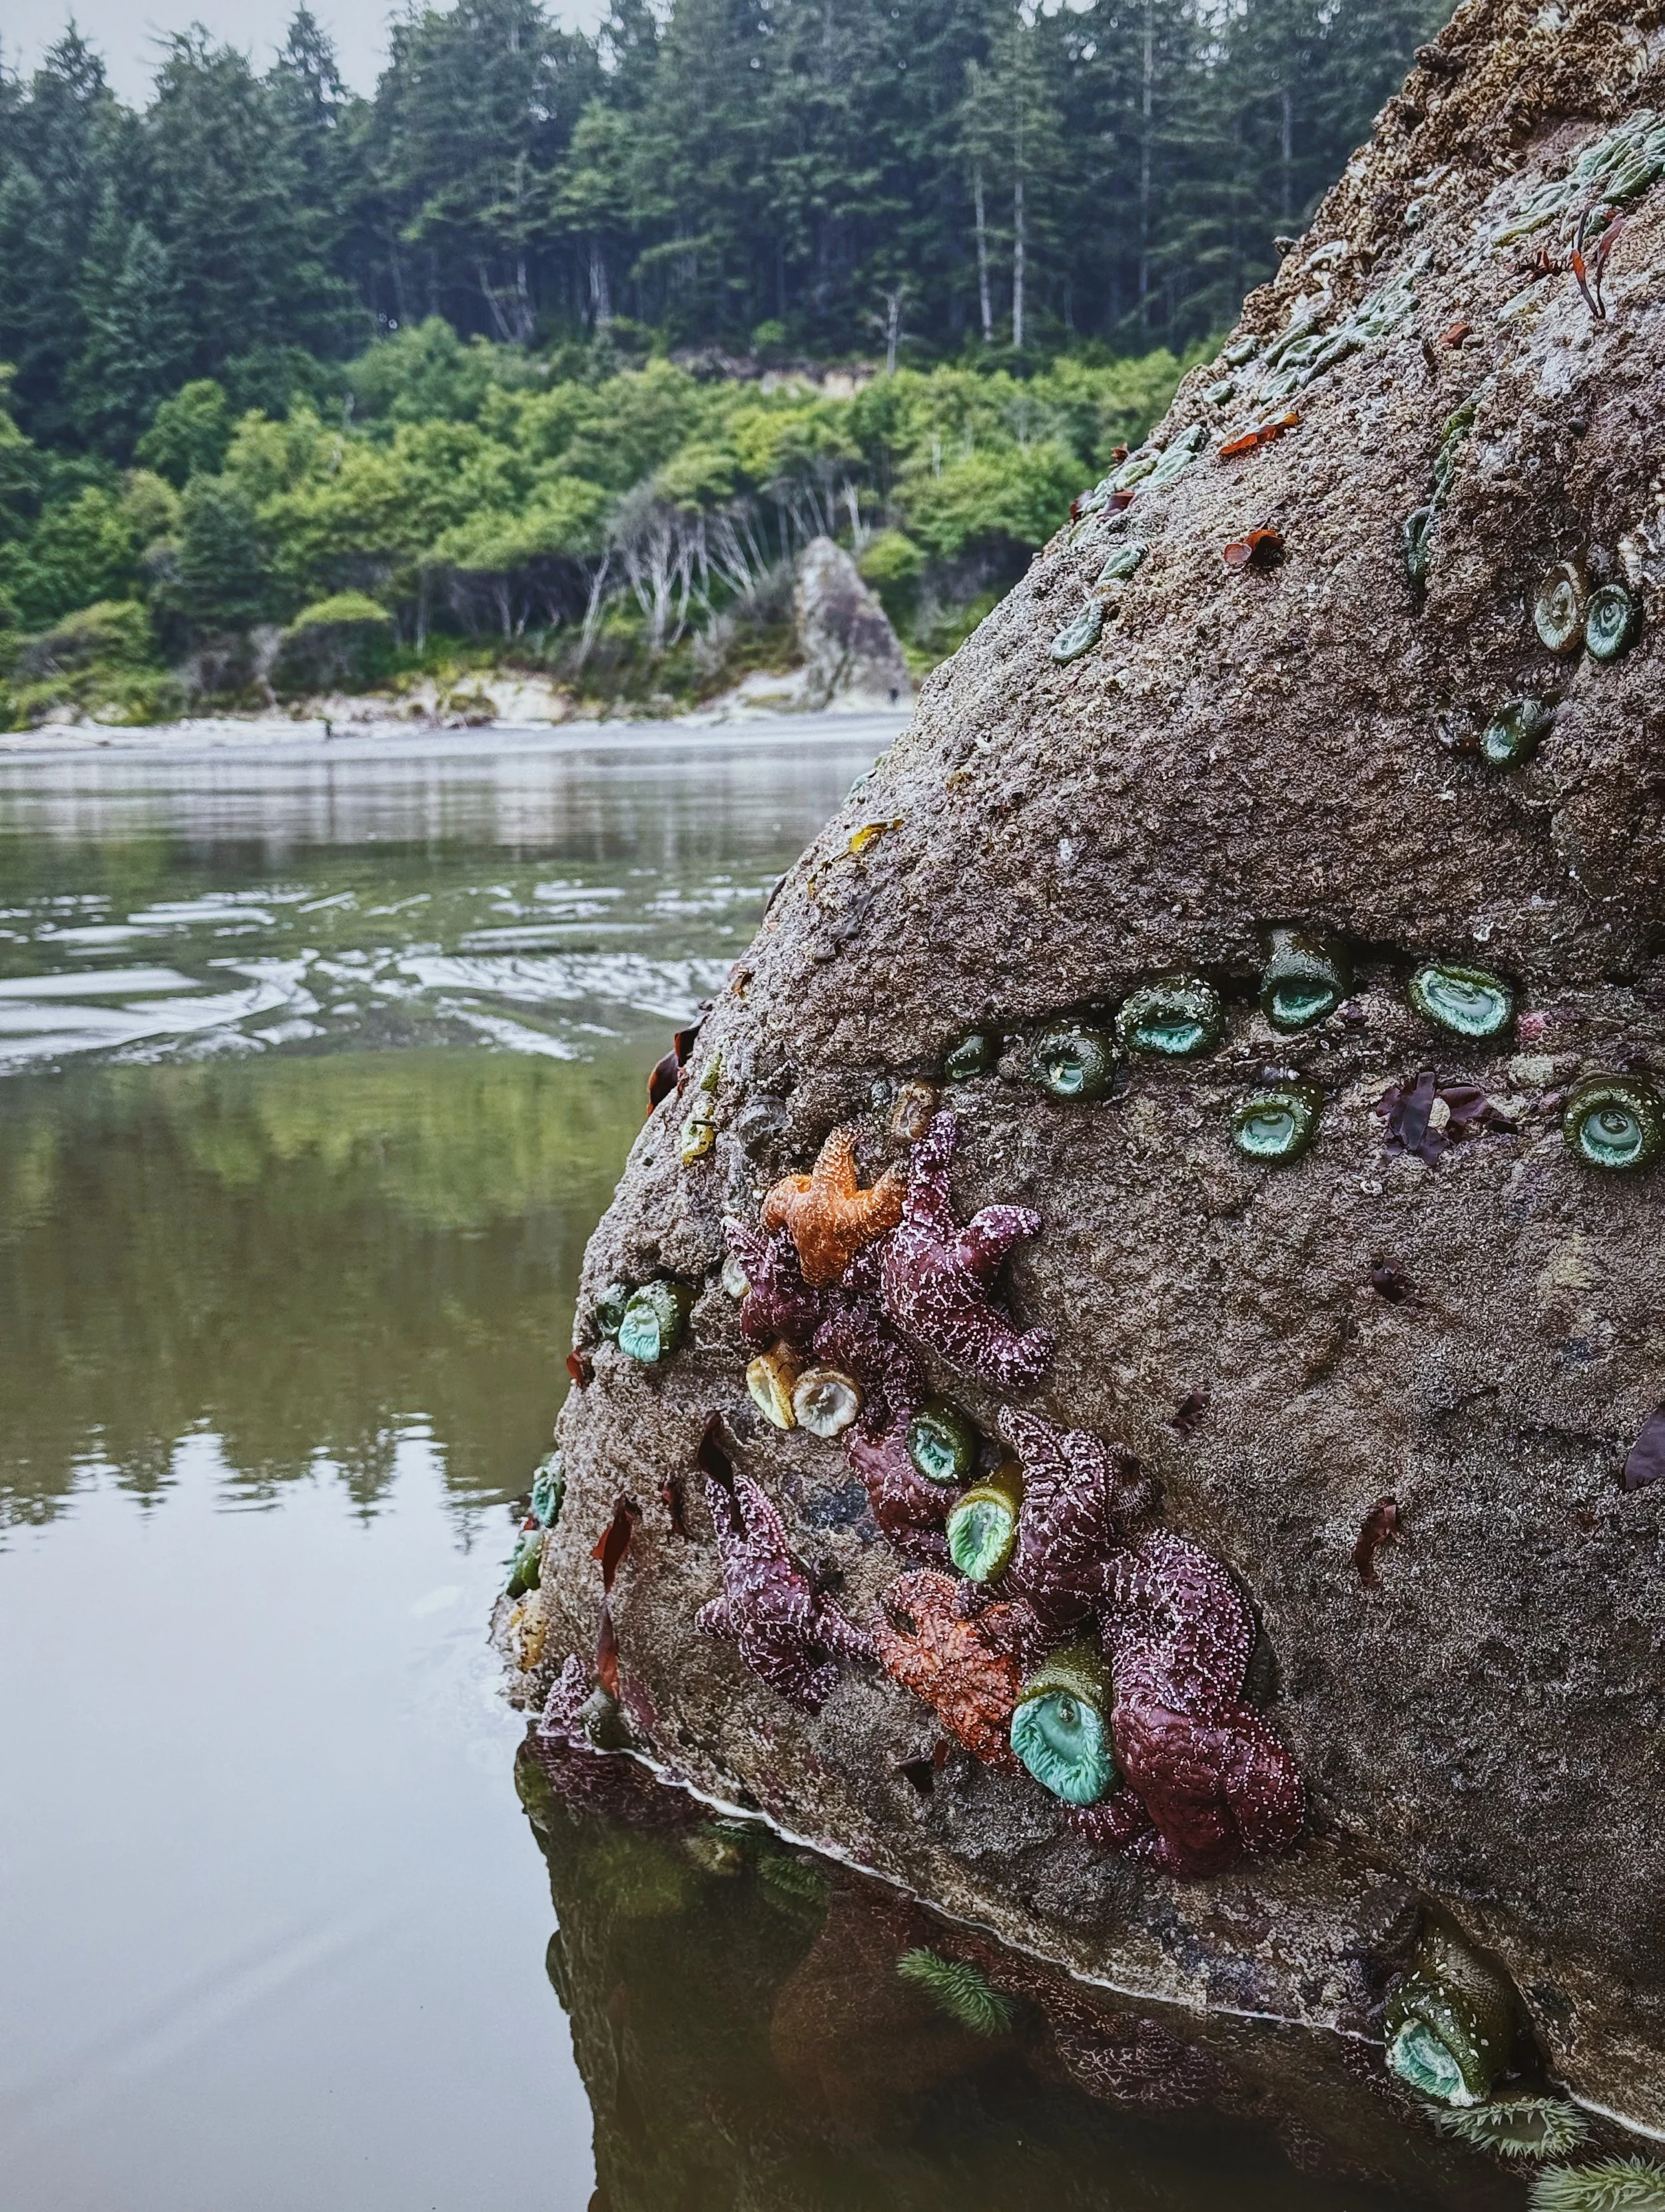
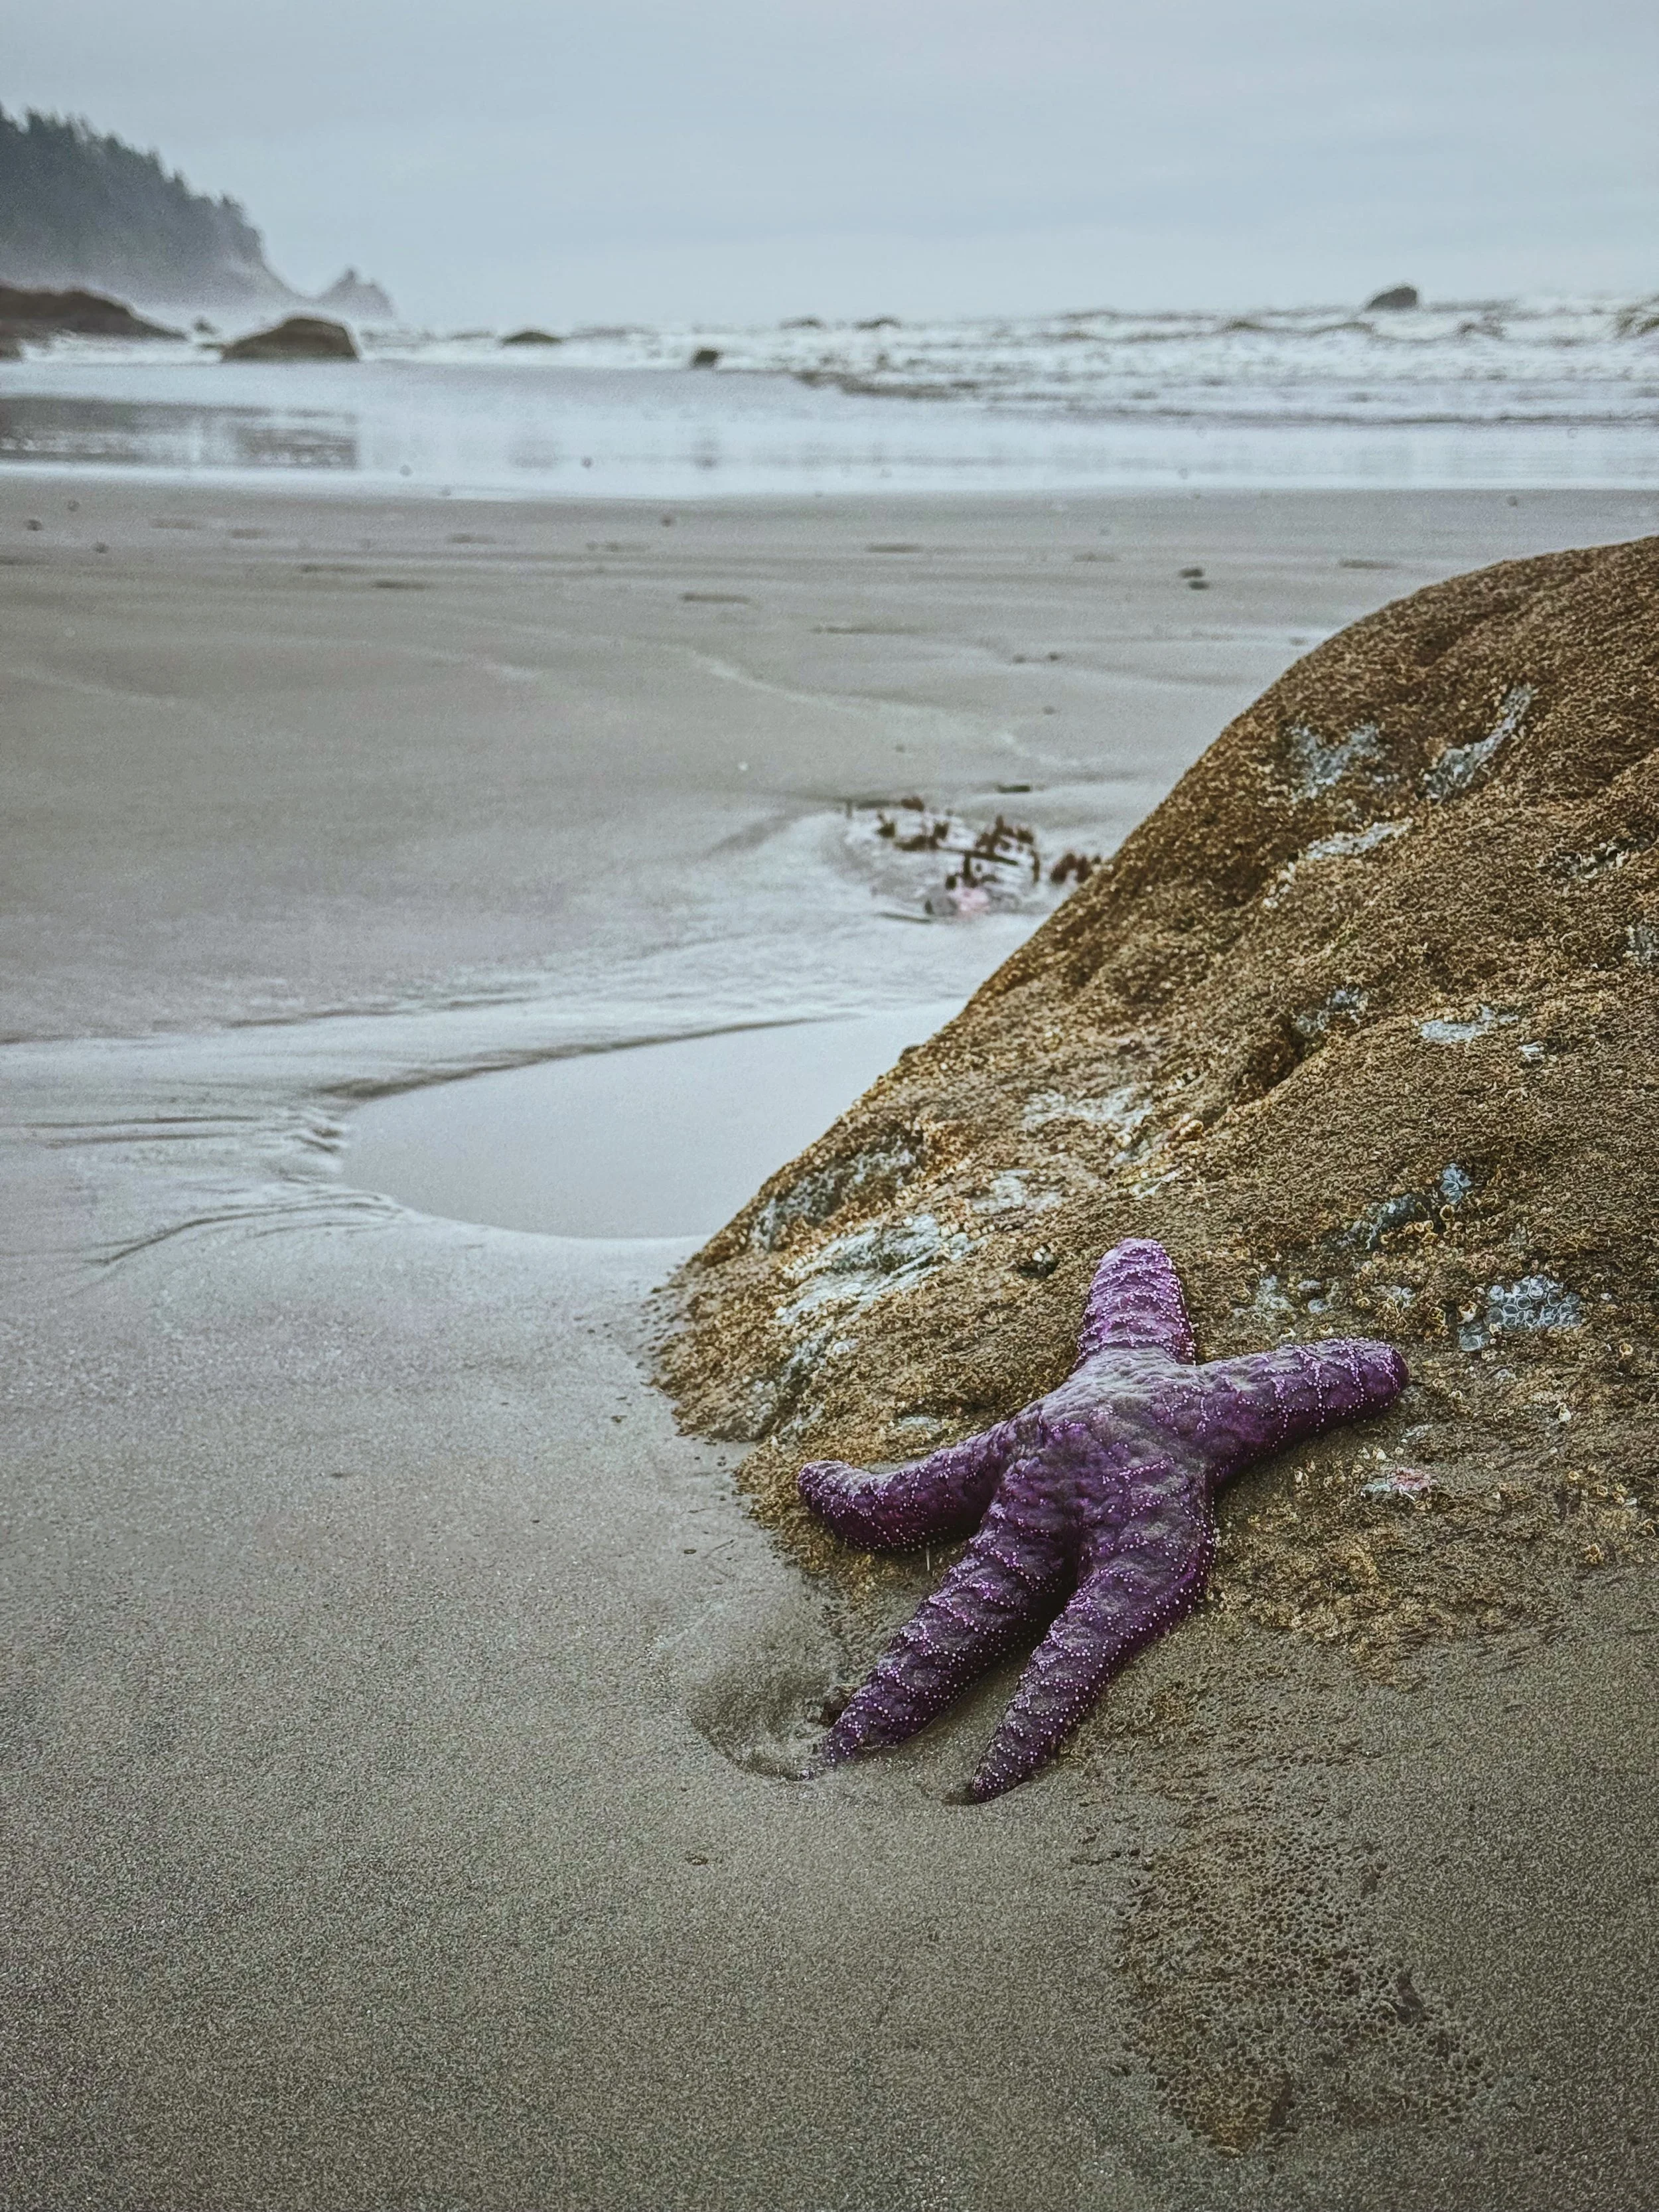
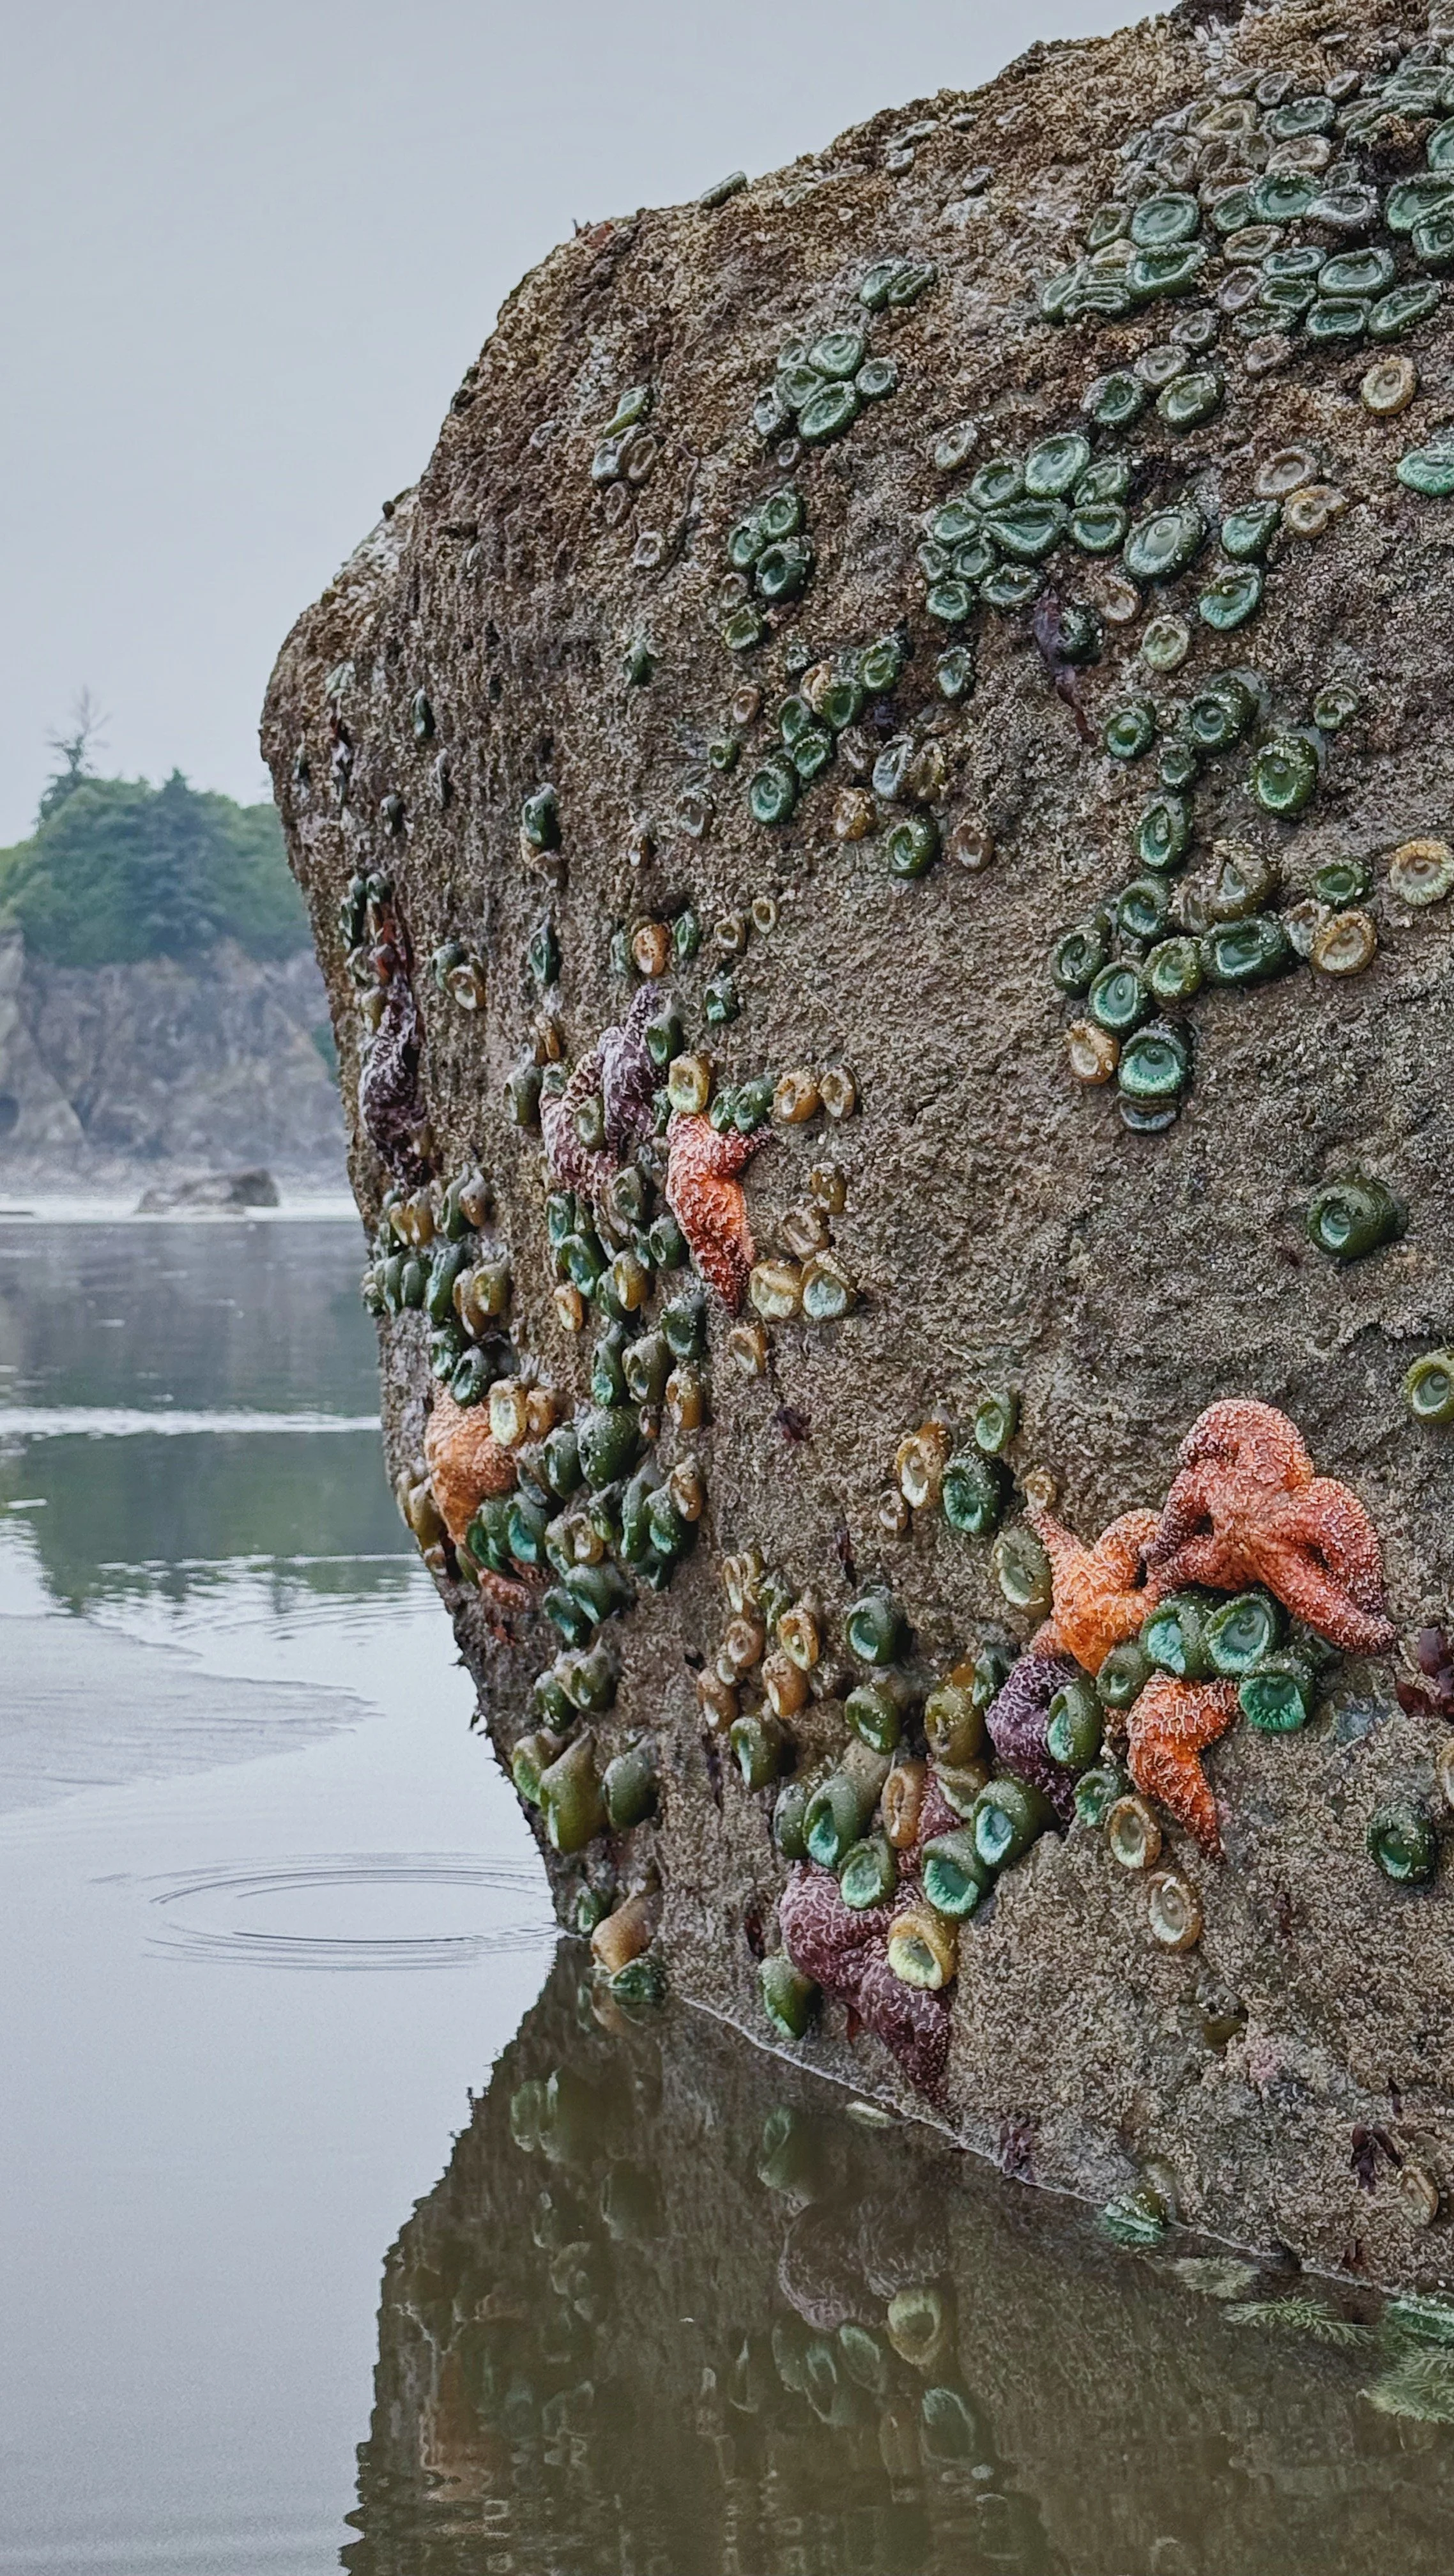
Thank you for reading! The rest of this post will be a collection of photos I took while tide-pooling at Ruby Beach in Olympic National Park. I was able to visit at an extremely low tide of –2’10” on July 15, 2026 (one of the lowest tides of the year!) and was in awe of how many magnificently colored sea creatures I got to see.