Slow Cooker Chicken Adobo Ramen

I grew up hardly knowing my own grandparents across the ocean, and it was just me, my parents, and my sister here in the States. But my parents' host mom—the woman who opened her home to them when they first arrived as immigrants—was from the Philippines and she continued to be a mother figure to my parents and a grandmother figure to me well after my parents got settled. I call her Lola, the Filipino term for a grandma. So even though I am not Filipino, I grew up eating lots of chicken adobo during visits to my Lola’s house.

I remember my Lola's version of chicken adobo being more tangy/vinegary and more brothy than other versions I've had at restaurants as an adult. There was something about that soy and vinegar sauce that was always so appetizing; the kind of thing that you have to reawaken your tastebuds when you don’t think you feel like eating. I felt I could drink it by the bowlful! Which is why I developed this fusion recipe where the chicken adobo braising liquid becomes the base for a noodle soup.

The key steps to making this recipe are:

  • Browning the chicken. This renders out the excess fat from the chicken skin, giving you a glorious schmaltz that will be used later.

  • Braising the chicken in a slow cooker. I opted to go the slow cooker route to keep the recipe low maintenance. The browned chicken thighs are given a chance to soak up the flavors from a braising liquid made up of soy sauce, vinegar, lots and lots of garlic, and black peppercorns.

  • Making the broth. Blending together the strained braising liquid and all that soft garlic creates an emulsified broth that is rich and almost creamy. It has a much more concentrated flavor than a traditional soup ramen.

  • Frying the garlic chips. That saved chicken fat goes into making the most delicious garnish of fried garlic chips, which in turn infuses the chicken fat with some of that garlic flavor.

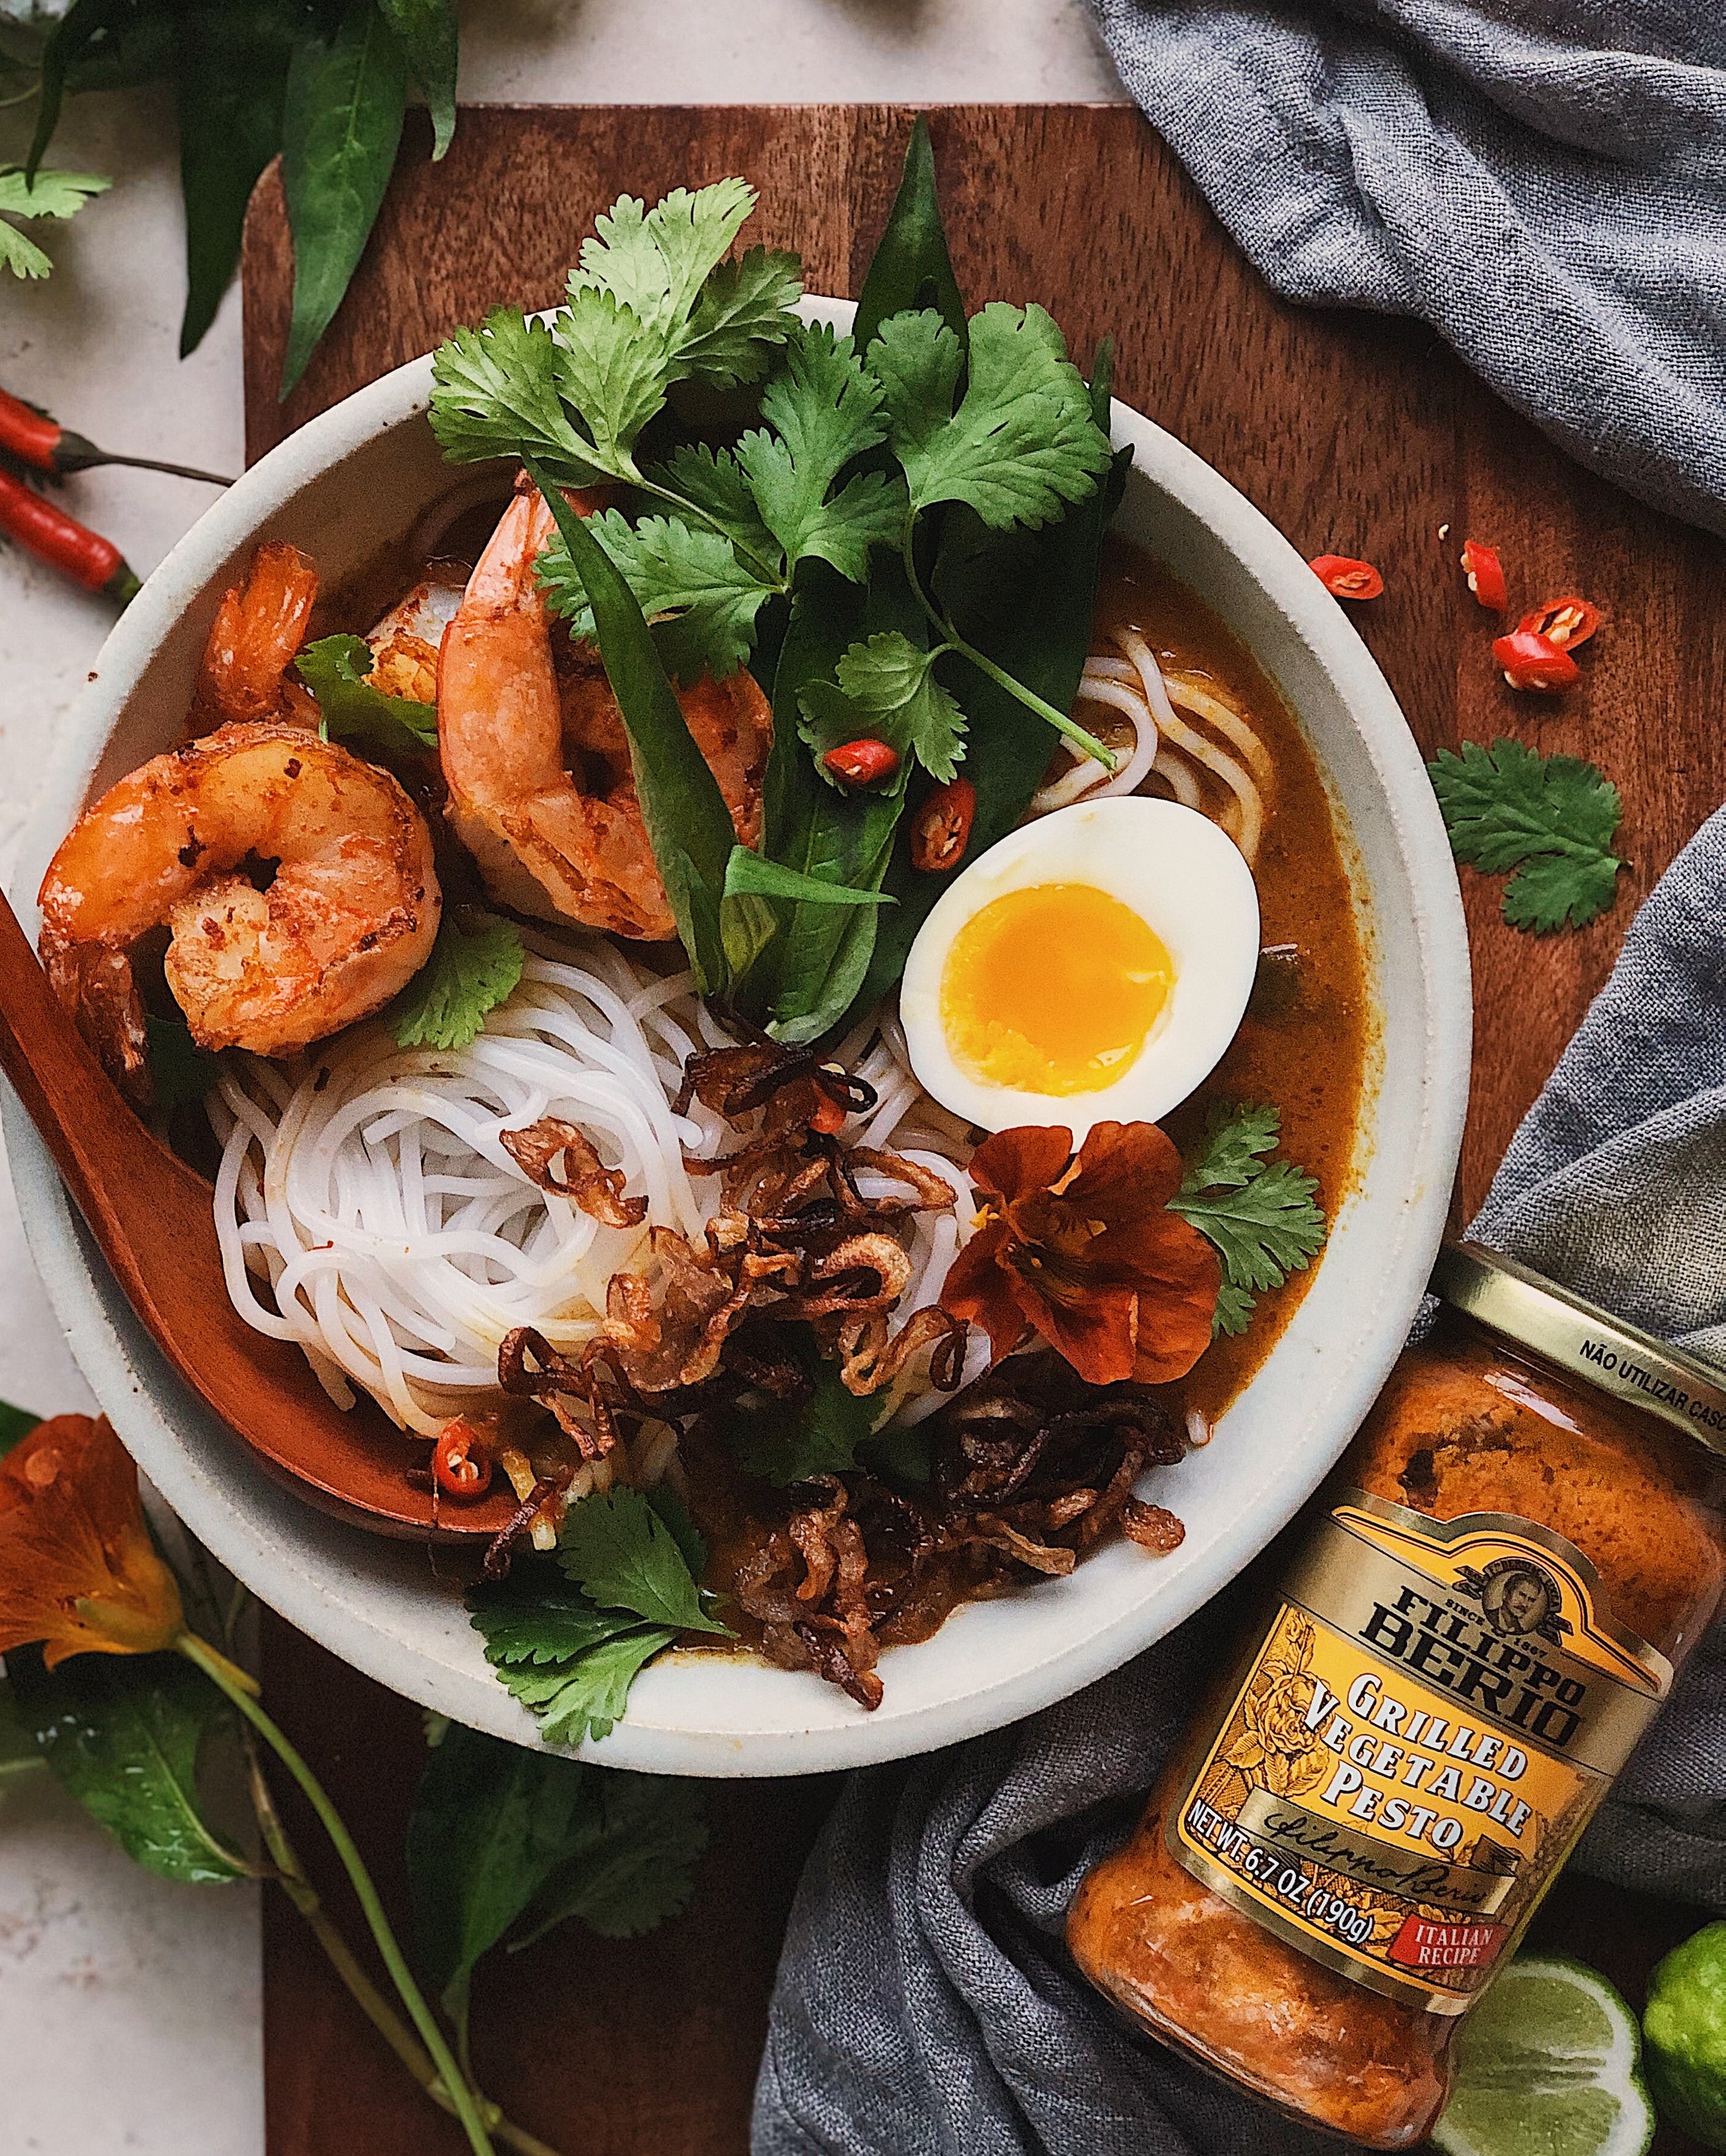
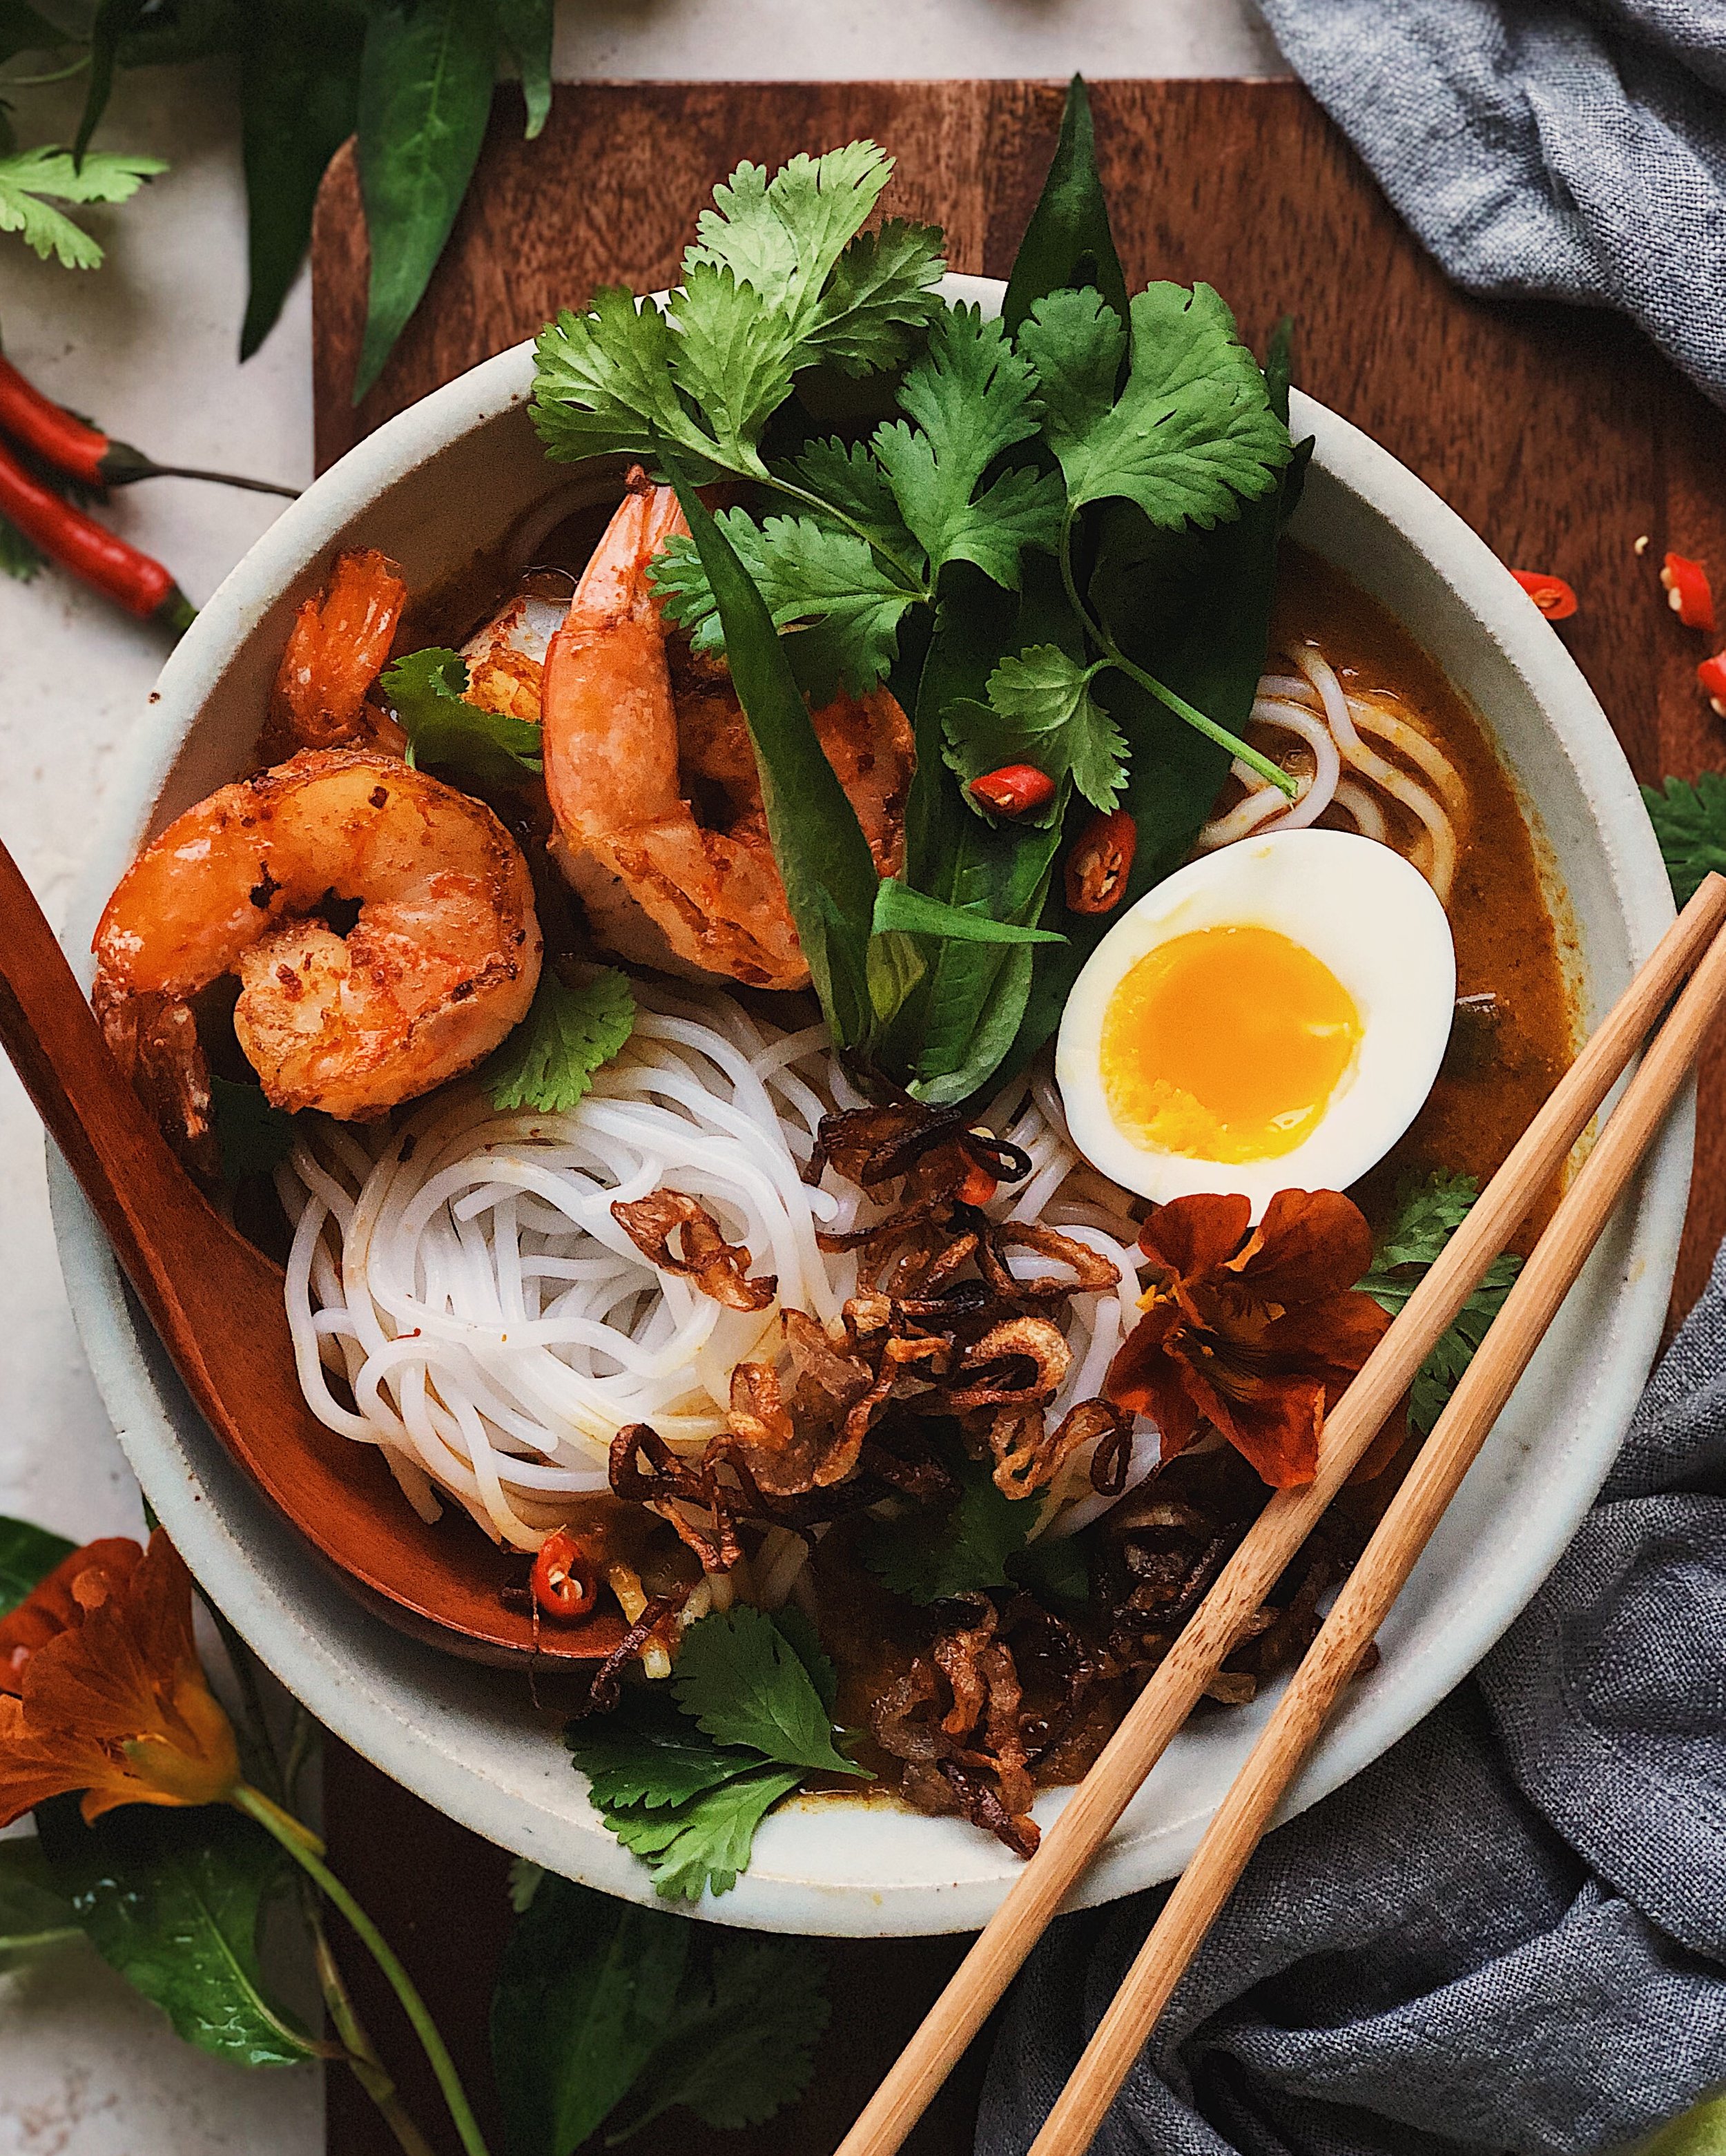
  • Frying the egg. Inspired by Filipino silog, I decided this ramen needs to get topped with a beautiful fried egg.

  • Boiling the noodles and assembling the bowl. I chose to keep the thigh whole but you can also shred it up before serving if you don’t want the recipients to have to maneuver with the bone.

  • Finally, that schmaltzy goodness from before gets drizzled over the whole bowl as a finishing touch at the end.

Click here to get the recipe on the Pete and Gerry’s site!

Thank you so much to Pete and Gerry’s for sponsoring this recipe!

Recipe: Cheesy Curry Noodle Soup with No-Waste Broth

For this recipe, I partnered with Filippo Berio to share an easy idea for how we can reduce food waste when cooking at home. Filippo Berio is committed to learning more about sustainability in production practices (including protection of olive trees, olive groves, enhancing olive biodiversity and enhancing production efficiency when creating oil) and they are also committed to helping cooks at home reduce waste in their own kitchens. 

The pandemic and last year’s lockdown definitely changed the way that I grocery shop but I feel very lucky and privileged to say that I was able to develop some positive new habits from it. One of the things I continue to do is hold on to my food scraps and use them to make a flavorful broth. I always saved the roasted chicken or duck carcasses to make into soup (something I learned from my parents, who would usually use them to make a Cantonese soup with pickled mustard greens) but now I also hold on to things like onion peels, bones, herb stems, and any tops and bottoms of veggies that I typically trim off. I keep adding them to a container in my freezer and because of my job, it really does not take long to accumulate enough to make a big pot of broth. The container fills up so quickly after a couple of big shoot days that it really makes me realize how wasteful I was when I wasn’t saving my scraps before; they truly still have so much flavor left in them that would have otherwise been discarded.

The food scraps broth that I made for this recipe works as a fantastic base for anything your heart desires for soup season, but one tip I will share with you is that stirring in one of Filippo Berio’s incredible pestos is an easy way to bring complex flavor to the broth and transform it into a unique soup. I don’t think a lot of people think to use pesto in soup, but there is a ramen place in the SF Bay Area that does it to make a great fusion ramen, and I’ve been so inspired from that to make various fusion-y noodle soups. 

This particular recipe is special because it is a fusion of my and my spouse’s cultures. One of the things that he and I bond over is our love for noodles—coming from an Italian American family, he grew up eating lots of pasta with tomato sauces and pestos while I grew up in my Malaysian Chinese family having stir-fried noodles and noodle soups such as wonton mee and curry laksa. This recipe is sort of like a curry laksa with an undercurrent of homestyle Italian cooking. I used Filippo Berio Grilled Vegetable Pesto in place of a Malaysian laksa paste to bring robust umami to the soup and because of the puréed grilled veggies and the Grana Padano cheese in it, the soup gets a satisfying creaminess that we Malaysians know as lemak, without the use of the traditional coconut milk found in curry laksa. The result is cheesy, spiced (but not that spicy, imo), and very slurp-worthy.

Making this fusion curry noodle soup can be broken down into three phases:

Making the broth: All those food scraps that have been accumulating in the freezer get another chance to give you their wonderful flavors by simmering into a lovely broth. I always make this when I have a roast duck or chicken carcass on hand but if you don’t have one, you can boost the umami by adding a handful of dried shiitake mushrooms. This recipe will yield more that you need to make the two servings of noodle soup described, and you can also prepare the broth in advance. Keep it in a jar in the fridge for a couple of days or reuse a ramen takeout container and freeze it for longer storage.

Transforming the broth into tasty curry soup: Whisking the broth together with Filippo Berio Grilled Vegetable Pesto immediately gives it homestyle Italian flavor and some creaminess. Then, adding curry powder, fish sauce, and sambal oelek brings in some Southeast Asian flavors to make it into a wonderful fusion soup. For the curry powder, I used an Indian curry powder recommended for chicken but even the generic curry powder in the spice section of a Western grocery store would work fine. 

Preparing the toppings: I used Filippo Berio Extra Light Olive Oil to fry some shallots and pan-sear some big shrimp to top my laksa-inspired curry noodle soup. There are so many variations of laksa in Malaysia and there’s no hard rule on what to put on top or even what noodles to use. In fact, many hawker stalls that serve laksa will have big vats of simmering broth and let you choose from a selection of noodles and toppings to add. Whatever you choose to top your cheesy curry noodle soup, Filippo Berio Extra Light Olive Oil is great for quickly pan-frying at high heat to crisp things up for good texture.

Curry laksa is all about cramming as many flavors as possible into a bowl of noodle soup and this fusion version is no exception!

How to Make Cheesy Curry Noodle Soup with No-Waste Broth

Ingredients for No-Waste Broth 

about 1 gallon of food scraps, such as vegetable ends, onion peels, and chicken bones
10 cups water

Ingredients for Soup

2 cups no-waste broth
1/2 cup Filippo Berio Grilled Vegetable Pesto
1 tbsp curry powder
2 tsp fish sauce
2 tbsp sambal oelek, or to taste

Ingredients for Noodle Bowl

1–2 tbsp Filippo Berio Extra Light Olive Oil
1 large shallot, thinly sliced*
6 shrimp, 13/15 sized, peeled and deveined*
1/4 tsp fine chili flakes
pinch of salt
12 oz cooked rice noodles
1–2 boiled eggs, peeled and halved
fresh herbs, such as cilantro and Vietnamese coriander
1–2 bird’s eye chilies, sliced (optional)
1 makrut or conventional lime, sliced into wedges (optional)

* Save these peels for the next batch of broth, or prep these ingredients in advance to use them in this one!

Procedure

To make the broth, combine the food scraps and the water in a stock pot and bring to a rapid boil. Reduce to a minimal simmer and continue to cook, uncovered, for 1 hour. Allow to cool slightly before using a fine sieve to remove the scraps, squeezing out as much liquid as possible before composting them. Cool and store the broth if making in advance, otherwise measure out the amount needed for the soup.

Combine all the soup ingredients in a small pot on low heat. Whisk together until fully incorporated and allow the soup to come to a simmer. Cover and keep warm while preparing the noodle bowls.

In a small skillet, combine 1 tablespoon oil and the shallots. Cook on low heat, stirring constantly, until the shallots are lightly browned and crisp. Place fried shallots on a paper towel to drain. 

In a small bowl, toss together shrimp, chili flakes, and salt. Use the same skillet for frying the shallots and add extra oil if needed. Heat the skillet on medium-high heat, then add the shrimp and cook for 1 minute on each side or until seared and cooked through.

Divide the noodles into two bowls. Pour over the hot soup, then top with shrimp, eggs, fried shallots, and fresh herbs. Serve with extra herbs, bird’s eye chilies, and lime wedges at the table, if desired.

Thank you so much to Filippo Berio for sponsoring this recipe! Visit their website to learn more about their authentic olive oils, made to the highest quality standard of excellence and craftsmanship.

Chicken Ramen with 40++ Cloves of Garlic

garlic_ramen.JPG

Ramen broth is one of those things that I think is less about strictly following a recipe, and more about following your heart. And my heart led me to this idea for turning the French classic “chicken and 40 cloves of garlic” into a ramen. So, be warned that what follows is just a loose guideline moreso than a recipe.

Ina Garten’s Chicken with Forty Cloves of Garlic was the first (only?) French “fancy” dish that I made regularly when I started cooking in college. Is it even fancy? It feels more like countryside/provençal vibes to me in hindsight but it felt very luxurious then. Back then, I also skipped the cognac and used two-buck Chuck for the white wine, which honestly still sounds perfectly good to me now. While other college kids were eating Top Ramen, I was ditching class and learning how to cook by watching hours and hours of the Food Network, seduced by the soothingness of Ina Garten’s voice. So, this recipe is a tribute to that time in my life.

How I even came up with the idea to turn this French chicken and garlic dish into ramen in the first place was when I came across Mandy Lee’s Vampire Slayer Ramen recipe, but I think you will find that these renditions of ramen are quite different from one another.

This awkwardly vague recipe should guide you to a very subtle, creamy broth that is naturally sweet from the braised garlic and some satisfying fall-of-the-bone wings that provide bites of umami as you slurp. As is a common practice with these creamy broths, I tried a version with Asian style unsweetened soy milk but did not notice it making much impact in taste or texture, so I left it out below. I kept the seasoning quite minimal, adding just enough salt to make the other flavors known, but you may find that a little drizzle of soy sauce might make things more in line with the saltier restaurant ramens you are used to.

One more thing I need to tell you about this, though, is that I experienced some pretty rowdy stomach noises in the 24 hours that followed. The kind that made me google “does garlic make you gassy”. (Spoiler alert: It does.) In my opinion, a small price to pay to indulge in a garlic lover’s noodle bowl dream. But you have been warned.

garlic-ramen.jpg

How to Make Chicken Ramen with 40++ Cloves of Garlic

Ingredients for the broth

6–8 party wings, flats recommended
salt
butter
40–50 cloves of garlic, peeled
1/2 onion
shao xing wine
24 oz high-quality bone broth
thyme
miscellaneous food scraps
soy sauce, to taste

For the Bowl

2 servings of fresh ramen noodles
5 cloves of garlic, thinly sliced
neutral oil
2 ramen eggs, plus a few spoons of marinade*
other garnishes, such as black garlic, seaweed snacks, sliced scallions, pea shoots (optional)

*I have found this recipe very helpful for making ramen eggs.

Procedure

To make the broth: Season wings all over with salt. In a large dutch oven, heat a generous knob of butter. Add chicken wings and brown on each side, lowering the heat as needed to avoid burning too quickly. Remove browned wings and add garlic and onion. Cook until they begin to caramelize, then deglaze the pot with a splash of shao xing wine. Add bone broth, a few sprigs of thyme, and whatever food scraps you have around for making stock (such as onion skins, carrot peels, bones, skin, etc). Return the wings to the pot. Cover and simmer on low until the wings are tender, then remove the wings and set aside.

Continue simmering the broth as desired, until the garlic cloves are mushy and it tastes naturally sweet from the aromatics. Remove thyme stems and any inedible food scraps. Transfer the remaining contents of the pot into a blender and carefully blend until completely smooth. (Please exercise caution when blending hot liquids, and allow the liquid to cool a bit first if you have time.) Return broth to the pot and season to taste. Keep warm on low heat while preparing the rest of the ramen bowls.

To make the wings: Bring some of the marinade from the ramen eggs to a simmer in a small pan. Add the cooked chicken wings and cook in the marinade, flipping occasionally, until the wings look flavorfully glazed and most or all of the marinade has evaporated.

To make the fried garlic chips: Spread the thinly sliced garlic out evenly in a small pan and add enough oil to cover. Fry on medium low to low heat until the garlic starts to turn golden brown (watch carefully). Remove pieces as they brown and transfer to a paper towel. Reserve the garlic-infused oil when the frying is complete.

To assemble: Cook noodles and divide between 2 bowls. Top with wings and egg, then pour in the broth from the side. Garnish with garlic chips and any other toppings. Drizzle some garlic-infused oil over the top.

Shortcut Beef Rendang Sauce for Biang Biang Noodles

RendangNoodles1.JPG

Lunar New Year is coming up, and for the occasion, we Chinese folks eat long noodles to symbolize longevity. Well, there is no longer type of noodle than a biang biang noodle! In some restaurants, bowls of biang biang noodles are served up where the entire dish comprises of one super long noodle. I’m not THAT good at noodle stretching yet, but I am pretty proud of how long I can get the biang biang noodles I make at home, and I believe you can make those super long noodles at home too! You can find my easy recipe for how to make them here!

Even though biang biang noodles famously come from the Xi’an area of China, they are a glorious blank canvas for any sort of sauce. For this batch of biang biang noodles, I was in the mood for something inspired by the Malaysian flavors that are a big part of my heritage. Malaysian curries and stews are so loaded with flavor—usually a mix of chilies, spices, lemongrass, and coconut—and the wide, chewy noodles always go great balanced with punchy flavors like these. For this fusion dish, I took inspiration from fellow Malaysian-Chinese food enthusiast Jun Loh and his Rendang Rigatoni. Rendang is an iconic Malaysian stewed beef dish, simmered in coconut milk until the solids separate from the oil and get caramelized and sticky, acting as glue to encase the tender pieces of meat with spices. It’s usually eaten with rice. If you’ve seen my goulash-inspired spaghetti and meatballs recipe, though, you’ll know that I love converting beef stew gravies into pasta sauces, so Jun’s idea of turning rendang into a twist on bolognese really spoke to me. I’ve made Jun’s recipe before and it was awesome, a combination of two of my great loves (pasta and Malaysian food).

When I make the noodles from scratch, though, I tend to get lazy with the sauces. So, much like my version of cumin lamb noodles, this vague sauce recipe leans heavily on a storebought paste to make easy work of getting those rendang flavors. I like using this rendang paste; I can find it at most large Asian supermarkets in my area. Give it a taste and decide how much of it you want to use. For sauces like this, listening to your tastebuds is more important than following an exact recipe. The ingredients described below go great together and are tried and true combinations in Malaysian cooking, so you really can’t go wrong throwing them together in different quantities. Don’t expect a very “wet” sauce though; much like how rendang is thick and paste-like, you should aim for something that just coats the noodles and doesn’t weigh them down.

I admit that this noodle dish isn’t the prettiest, so especially if you are serving it for Lunar New Year, I recommend you make some pickled red chilies to go on top! In Malaysia, pickled green chilies are served as an accompaniment to wonton mee, but I like to pickle red Fresno chilies (especially when I grow them in my backyard in warmer months). I always keep a jar in my fridge, made loosely based on this recipe.

RendangNoodles2.JPG

Awkwardly Vague instructions for Beef Rendang Noodles

Ingredients

3/4 lb ground beef
1/4 onion, finely diced
2 cinnamon sticks
lots of chopped garlic
1 tsp cumin
1 tbsp Chinese or Korean chili flakes
pinch of salt
~ 1/2 cup Malaysian rendang curry paste (like this one)
1/2 cup coconut cream
1/2 pandan leaf, finely shredded (optional)
juice from 1 lime
coconut oil
Thai basil, for garnish
cilantro, for garnish
pickled red chilies
raw hand-pulled noodles

Procedure

Prepare your large pot of boiling water for the noodles.

In a wok, heat oil and stirfry onions. Add cinnamon stick and stirfry until fragrant. Add beef and garlic. Season with cumin, chili flakes, and salt. Continue to stirfry until beef looks just about cooked. Add curry paste and stir to combine. Mix in coconut cream and pandan leaf. Mix in lime juice. Simmer on low.

Cook biang biang noodles as described in the noodle recipe.

Add cooked noodles directly on top of sauce mixture. Toss to coat the noodles and add extra salt if necessary, to taste.

Garnish with Thai basil and cilantro. If desired, add pickled red chilies on top.

Recipe: Spaghetti and Meatballs Paprikash

LilyMorello_SpagMeatballsPaprika_01b.JPG

When I was growing up, having spaghetti for dinner was the ultimate treat. There was nothing fancy involved at all—just dry boxed pasta, sauce directly from a jar, and copious amounts of that powdered parmesan from the green can—but it was just so different from the Chinese home cooking that was the norm in my household, that the joy I felt on those nights is probably akin to the level of joy that most kids felt when getting to go to Disneyland. I even remember my dad joking at some point that I would marry an Italian person because my love for pasta was so strong (which somehow actually ended up coming to fruition—hence, why this Malaysian-Chinese-American girl sports an Italian last name at the top of this website).

Those beloved spaghetti nights didn’t even involve meatballs, so growing up, the fabled “spaghetti and meatballs” seemed like something that only existed in cartoons. And despite it not being a tangible entity in my childhood, as an adult, I can’t help but attach the stigma of spaghetti and meatballs being a kid’s dish. However, I think I have come up with a different version of spaghetti and meatballs, fit for an adult making up for lost time.

LilyMorello_SpagMeatballsPaprika_04.JPG

Since paprika goes gorgeously with tomatoes, I decided to use this as my key to making a really special version of spaghetti and meatballs. I associate paprika with a couple of really awesome tomatoey beefy dishes out there. Goulash, native to Hungary, but adapted to various other cuisines, is a true celebration of paprika; the old Hungarian origins were a soup/stew in which herdsmen relied on the beauty of sweet paprika to bring flavor to the beef, but modern versions have since been enhanced with the addition of tomatoes. I love the Viennese derivative, a thick dark gravy of paprika and tomato paste, sweetened by caramelized onions, that clings to its fellow plate inhabitants. I also thought of the meatballs that get served as Spanish tapas, so snackable in part because of their tomato sauce flavored with smoky paprika. These dishes were all points of inspiration for my spaghetti and meatballs.

The end result is a smoky, sweet, thick tomato sauce—somewhat resembling a gravy—that coats every meatball and spaghetti strand that gets tossed in it. The meatballs are light and bouncy to balance with the dense sauce. I based my sauce recipe mostly on the Viennese version of goulash, but I used Spice Tribe’s lovely Spanish Pimentón de la Vera to bring a more smoky umami flavor. This gorgeously fragrant paprika is one of my favorites from Spice Tribe’s single origin line because a little sprinkle on top of anything really transforms the aroma of any dish and makes my mouth water before I even take the first bite. But here, I really let it be the star, resulting in a sweet, smokey, rich version of spaghetti and meatballs—universes away from those old childhood days of longing for the tomato sauce from the jar.

LilyMorello_SpagMeatballsPaprika_03.JPG

I’m calling this recipe my “Spaghetti and Meatballs Paprikash”. Paprikash is derived from the Hungarian word for paprika and is used to describe those paprika-based Hungarian stews that seem to be the origin of all the goulashes around the world that followed. Though there is really not much Hungarian at all about this pasta dish, the name is meant to be a nod to what are possibly some of the oldest paprika-appreciation meals.

LilyMorello_SpagMeatballsPaprika_02.JPG

How to Make Spaghetti & Meatballs Paprikash

Ingredients for the Meatballs

1/2 cup panko breadcrumbs
1 egg
1 tbsp milk
1 lb ground beef
2 cloves garlic, minced
1/2 tsp Spice Tribe Pimentón de la Vera
2 tbsp parsley, chopped
1/2 tsp salt
neutral cooking oil

Ingredients for the Sauce

3 tbsp butter
2 large yellow onions, thinly sliced
4 cloves garlic, minced
2 tsp caraway seeds, toasted and ground
2 tbsp fresh marjoram, finely chopped
3 tbsp tomato paste
3 tbsp Spice Tribe Pimentón de la Vera
2 tbsp red wine vinegar
1 tbsp worcestershire sauce
1 tbsp sugar
1 cup high-quality bone broth
1 cup beef broth
1 14-oz can crushed tomatoes
salt, to taste

For the Final Dish

1 lb dry spaghetti
salt
fresh marjoram or parsley, for garnish
grated parmesan cheese (optional)

Procedure

To make the meatball mixture, beat together the egg and milk in a small bowl, then add the panko breadcrumbs. Allow the panko to soak up the moisture while prepping the other ingredients. In a separate mixing bowl, combine ground beef, garlic, Spice Tribe Pimentón de la Vera paprika, parsley, and salt. Fold together or mix with hands to combine, then add the panko mixture and mix again just until homogenous. Chill in the refrigerator while you start the sauce.

For the sauce, combine butter, onions, and a couple generous pinches of salt in a large dutch oven set on medium heat. Cook, stirring regularly with a wooden spoon, until the tips of the onions start to brown, about 5–7 minutes. Lower the heat to medium-low and cook until all of the onions are soft and completely golden brown, about 20–25 minutes more. 

Add garlic, caraway, marjoram, and tomato paste; stir together and allow these new ingredients to become fragrant, about 1–2 minutes. Then add Spice Tribe Pimentón de la Vera paprika, vinegar, worcestershire sauce, and sugar. Scrape off anything stuck to the bottom of the pot, then add bone broth. 

Turn the heat back up to medium and cook, stirring, until the mixture holds together and is thick enough to leave a clean trail when the spoon glides against the bottom of the pot. Turn off the heat and carefully transfer the mixture to a blender. Add half of the beef broth to help cool the mixture and blend until smooth (please exercise caution when blending hot liquids).

Return the mixture to the pot and add the remaining beef broth, plus crushed tomatoes. Simmer with the lid slightly ajar on low for 30–45 minutes until the sauce starts to thicken and cling to the spoon.

In the meantime, roll the chilled meatball mixture into 1-inch balls (about 18–20 balls). Heat a small amount of oil in a nonstick skillet, and add the meatballs. Sauté until the meatballs are slightly browned all around their exterior. Transfer the meatballs to the sauce and discard the rendered fat. Bury the meatballs in the sauce and continue to cook, covered, on low until the meatballs are cooked through and the sauce reaches the consistency of thick gravy, about 15 more minutes.

While the meatballs finish cooking in the sauce, bring a large pot of water to a boil. Salt generously and cook spaghetti according to package instructions. Add cooked pasta directly to the sauce and toss everything together. Garnish with fresh herbs, and serve with freshly grated cheese, if desired.

Thank you so much to Spice Tribe for sponsoring this recipe! Check them out on Instagram here or visit their website to purchase high quality spices and unique small-batch spice blends.

Recipe: Chajang Rabokki

rabokki1.JPG

I think that some of the world’s greatest dishes are ones where the names make it obvious that two awesome things were combined to make one even more awesome and delicious thing. Take rabokki for example. The word is a combination of ramyeon (Korean instant ramen noodles) and tteokbokki (stir-fried rice cakes). Carbs on carbs, essentially, but two very different textures. The rice cakes provide chew, as well as big surface area to get some extra flavor from the frying, while the noodles are a conduit for all the sauce.

The more common form of rabokki that I have seen is the kind in the typical red spicy-sweet tteokbokki sauce that can be found from street vendors. It’s often served with cheese and boy is it indulgently delicious.

But there’s also the super umami-y chajang rabokki. You may be familiar with chajang and not realize it. Perhaps you picked up a packet of instant Chapagetti to make your own chapaguri (known as “ram-don” if you’ve only read the English subtitles) after watching the movie Parasite. The cha- in Chapagetti or chapaguri is a reference to the chajang sauce (also spelled jajang). The defining ingredient in this sauce is black bean paste, giving the noodles and rice cakes, and everything it touches, that rich dark color that you just know is going to taste good.

For this version of chajang rabokki, I took combining carby things to an even more extreme level by adding Bibigo Chicken & Vegetable Steamed Dumplings into the mix. I mean, they also add some protein, and I think the lovely pleated dumplings add a lot visually, so why not? I refrained from adding cheese this time, but that wouldn’t be a bad idea either. In fact, add whatever odds and ends you have in your fridge or freezer because it will all be good coated in that deep black bean sauce.

Lily_Dec1_Banner.JPG

How to Make Chajang Rabokki

Ingredients

1 cup Korean rice cakes, or tteok
5 tsp Korean black bean paste, or chunjang
4 tsp Bibigo Hot & Sweet Go-Chu-Jang Sauce
1 tbsp gochugaru
1 tsp sugar
1 1/2 cups bone broth
1/4 onion, thinly sliced
1 scallion, thinly sliced
2 cloves garlic, minced
1 cup Korean fish cakes, or eomuk, cut into bite-sized pieces
1 package Bibigo Chicken & Vegetable Steamed Dumplings
1 package instant noodles


Procedure

If rice cakes are frozen, soak in cold water for 10 minutes to thaw. Skip this step if rice cakes are fresh.

Mix together black bean paste, Bibigo Hot & Sweet Go-Chu-Jang Sauce, gochugaru, and sugar together in a small bowl to make the sauce.

In a wide, shallow pot, combine the broth with onions, garlic, and whites of the scallions, reserving the green parts for garnish. Bring to a boil. Then add sauce, dumplings, rice cakes, and fish cakes. Cook for 2 minutes on medium-high heat.

Add the noodles to the pot and continue to boil until noodles are cooked and the dumplings are heated through, about 2–3 minutes.

Remove from heat and toss together to make sure everything is coated with sauce. Plate and garnish with the remaining green scallions.

Thank you so much to Bibigo USA for sponsoring this recipe! For more recipe ideas and to learn more about their products, visit their website!

Shortcut Mala Cumin Lamb for Biang Biang Noodles

BiangBiang5.JPG

To be clear, these are not your traditional or typical Xi’an cumin lamb noodles. If you are looking for a recipe for those, I am afraid you have come to the wrong place (especially since this is not really a recipe at all). I love those noodles too, and have very fond, special memories of trying them for the first time at Xi’an Famous Foods during a solo trip to New York, being blown away about how they somehow exceeded the hype.

But while this recipe is obviously inspired by those flavors, I personally don’t like the idea of trying to replicate a specific restaurant dish at home. Maybe that’s just me. Restaurant cookbooks are gorgeous to look at, but I never buy them. I am happy to accept the reality that the force of my home gas range is never going to replicate that of a restaurants, my 0 days of professional culinary training is not going to produce the same outcome as those who have studied and devoted their lives to the culinary arts. And anyway, I like (liked—before Covid) the idea of going to a restaurant to eat dishes that are wholly different from what I can cook myself at home.

So I am calling this my Cumin Lamb Noodles, but they are very different cumin lamb noodles from what you’ve likely to experienced in a restaurant before. They are a sort of hybrid of a Xi’an-inspired dish and the texture of bolognese but also heavy on the mala (numbing spicy) associated with Szechuan cuisine. Using ground lamb means not worrying about sliced meat getting tough and overcooked, and it almost becomes a part of the sauce—something that can cling to those wide swaths of noodles. I use this storebought mala hot pot mix (link) for the base of the sauce because I am not an expert at Chinese spice blends in the slightest and this is a shortcut recipe, after all.

I really do recommend that you make your own wide biang biang noodles for this (recipe here) but if you are too lazy or don’t have time, I totally get it. Due to their short-lived nature, I have never seen biang biang noodles sold at the Asian grocery store before, so if you are looking for a storebought alternative to use with this sauce, I recommend buying fresh pappardelle.

The recipe below is awkwardly vague because I really don’t believe in measuring when it comes to sauces for noodles. Let it guide you in your interest in making a Xi’an x Szechuan x bolognese hybrid, but be sure to adjust the seasoning to your taste.

BiangBiang7.JPG

Awkwardly Vague instructions for Ground Lamb Cumin Noodles

Ingredients

3/4 lb ground lamb
1/2 small onion, sliced
lots of chopped garlic
lots of cumin
salt
a squeeze of tomato paste
~ 1 oz Szechuan mala hot pot base (like this one)
a heaping tablespoon of gochugaru
avocado oil
cilantro, for garnish
raw hand pulled noodles

Procedure

In a wok, heat oil and stirfry onions. Add lamb and garlic. Season with pinch of salt, lots of cumin. Squeeze in some tomato paste and mix everything together.

Heat some oil (1/6 cup-ish) in separate pot until almost smoking.

At the same time, turn down wok to low heat and cook biang biang noodles in pot of boiling water as described in the noodle recipe.

Add cooked noodles on top of lamb.

Add Szechuan hot pot sauce and gochugaru. Pour hot oil on top of gochugaru.

Toss to combine. Garnish with cilantro.

BiangBiang4.JPG

Recipe: Biang Biang Noodles (Hand-Pulled Noodles)

07331D00-31AF-4958-9427-06161A606FB5.JPG

If you are here, you probably already know something about biang biang mian—delicious hand-pulled, hand-torn wide noodles that are delightfully chewy and a wonderful blank canvas to capture spicy mala flavors. Legend has it that the Chinese character for biang is the most complicated to write, and that it will break any kind of Chinese input method if you try to type it.

To be honest I am not an expert on biang biang noodles; all I know is how I personally like them, and I wanted to figure out a way to go about making them that was easy for me. For example, I wanted to be able to use my stand mixer for the kneading, especially since the dough is a little tougher compared to, say, a simple bread dough. I also wanted to produce a method that allowed me to have fun actually stretching the noodles by hand and banging (or bianging?) them against the counter. So I tested and tested until I got something I was happy with.

My version is adapted from Woks of Life and Strictly Dumpling, so I want to make sure to give them credit. And the image above was inspired by this photo by My Homestyle Life.

BiangBiang1.JPG
BiangBiang3.JPG

If you are looking for a sauce to accompany these noodles, might I recommend something with loads of chili oil and fragrant ground lamb? You can find out how to make that here.

BiangBiang4.JPG

How to Make Biang Biang Noodles

This recipe makes 2 large servings.

Ingredients

1 3/4 cup bread flour*
1/4 cup all purpose flour
1 tsp kosher salt
3/4 cup hot water
neutral oil

* I tested various combinations of bread flour + AP flour for this and found these ratios to produce my ideal texture for the noodles. Can you do all AP flour? Probably! But the noodles will not have the same chew that I like.

Procedure

Whisk together flours and salt in your stand mixer bowl. Fit the stand mixer with the dough hook. Turn on to the lowest speed and slowly add the water.

Knead dough on medium-high for 10 minutes, then check the texture. If the dough is very sticky, add 1/2–1 teaspoon AP flour. Continue kneading on medium-high for 10 more minutes. At this point, the dough should feel firm and should not be sticky at all. Try to pinch and pull away a small amount (see photo above). Dough should not snap right away, but should not feel totally stretchy either.

Knead a few times by hand to form a smooth ball. Return to the mixing bowl and cover bowl with a damp cloth (no greasing necessary yet). Allow to rest for 30 minutes.

Divide dough into 6 portions. Avoid handling each portion too much but shape it into a small log, about 4 inches long. Place logs on your largest baking sheet and pour some neutral cooking oil over them. Make sure each log is thoroughly coated in oil. Cover with plastic wrap and rest for 1 hour or until the dough feels soft and pliable.

(After one hour, I place a large pot of water on the stove to bring to a boil while I am stretching the noodles. If there is other prep work I need to do for the sauce, I do it all in this time too, so everything is ready to go the moment the noodles are cooked. Click here for the sauce recipe that you see in the photos.)

Work one log at a time, and keep the others covered. On a lightly floured surface, roll the log into a rectangle that is about 3 inches tall and 2 inches longer than a chopstick. Use a chopstick to press two perforations into the rectangle, dividing it into 3 even sections (see photo above). Grab each end and gently stretch the dough, occasionally whacking it into compliance against the counter top. The perforations made by the chopstick will begin to form tears in the dough as you stretch. When the dough is thin enough or you feel you can’t stretch any further, tear along these lines to make one long noodle. Drape the noodle over the oiled baking sheet and cover with plastic wrap while you make the other noodles.

Lower the noodles carefully into the water and then immediately start agitating them with extra long chopsticks to avoid them clumping together. Keep them moving in the water for 90 seconds (2 minutes if they feel on the thicker side) and then immediately transfer them to the sauce, and toss to combine.

If you want to make the noodles in advance, I recommend keeping the rested dough in log form, coated in oil and tightly covered. Store in the fridge and bring up to room temp before stretching. Once the noodles are formed, you don’t want them to sit for long, and they need to be served immediately after boiling.

Easy Chili Oil Noodles

Welcome to the first installment of a series I am going to call “Awkwardly Vague Recipes by Lily Morello”. Most of the time, I don’t measure when I am just cooking for myself/my household, so when anyone asks me how I made something, this generally sums up the nature of my trying to recall and explain what I did after the fact. Except now people actually want to recreate the dishes that I share on my Instagram account, so I know I really need to get better at, at least, taking notes while I cook.

The problem is, some recipes are really not meant to be confined to a strict recipe. At least not with measurements and a specific order of operations, or any of those details. A lot of cooking involves seasoning and balancing flavors to taste—to match the preferences of the chef, or the eater. I may like things spicier or more sour than the next person, and I’m not going to be the one to dictate how much seasoning to put in a sauce for someone with different seasoning preferences than mine. In these cases, awkwardly vague is the only way to go.

I put together this recipe as a last minute idea for a Lunar New Year themed dish. I happened to have Hokkien-style noodles already open in my fridge, so that is what ended up in the dish. I grew up eating noodles at celebrations to promote longevity, and golden-colored things for prosperity, so I think these noodles fit perfectly in the Lunar New Year spirit.

This time, I took photos to help visualize all the unmeasured ingredients (please ignore the reflection of my camera mount). But seriously, feel free to add more or less depending on what you like!

How to Make Super Easy Chili Oil Noodles

Get a pot of water boiling. You can use this for your noodles, and any vegetables you feel like blanching to include in the dish.

Select a bowl from which you’d like to eat your noodles. You’ll be able to mix the sauce and eat out of the same bowl, so there’s fewer dishes to be done! To that bowl, add some black vinegar, a scoop of chili oil, some sesame oil, and a drizzle of kecap manis (Indonesian dark sweet soy sauce).

4BE49FC7-B5CB-43F4-AA86-C9E5FD8E3931.JPG
C5D5186A-C095-4295-971A-F1D2C2E7CCEB.JPG

Mix everything together to make your sauce.

Add your piping hot noodles to the bowl, and mix everything together. You can really use any noodles you like, as long as you know how to cook them to the texture you desire. You could even use pasta!

0A409228-AFC3-48CD-864F-275D5D6C340E.JPG

That’s honestly it. At this point, you could add blanched vegetables (I used broccoli rabe), or a poached egg, or whatever toppings and mix-ins you desire. Maybe add a flourish of chopped scallions or herbs, or a dash of sesame seeds for garnish if you are plating it for the ‘gram, but otherwise, there are really no rules. Just yummy, spicy, tangy, sweet noodles.

Recipe: Slow Cooker Short Rib Pho

shortribphonoodlesoup.JPG

Huge disclaimer: This is not a traditional/authentic or proper pho recipe in any way. I am very much a home cook, and this recipe is my practical solution for making a comforting noodle soup with all the pho flavors at home, without a lot of active maintenance. Things I associate with making a proper pho include: using a variety of beef bones for a rich complex flavor, using all whole spices, and skimming the scum and impurities off the top of the broth for several hours to produce a completely clear broth. This recipe does not involve any of these things! You could choose to run the entire broth through a fine sieve before serving, but I do not do this since I am not looking to impress anyone at home.

The key to compensating for the lack of effort in this recipe is using a good store-bought bone broth—this basically becomes the stand-in for buying, cleaning, roasting, and boiling all those aforementioned beef bones. For Bay Area folks, I recommend the one found in the frozen section at Berkeley Bowl, that seems to be made in-house. I’ve also tried Bonafide Provisions beef bone broth and that worked well too. You are looking for something that is heavy in natural collagen from the bones and doesn’t have other added flavorings; it’s usually kept frozen and something that is sold as shelf stable is not gonna cut it in terms of richness. You want a broth that sticks to the noodles.

Now let’s talk about fresh garnishes. In that first photo, you’ll see mint, red veined sorrel, and rau răm (Vietnamese coriander?) that I grew in my backyard. These are probably not authentic pho garnishes either! From what I understand, different regions in Vietnam tend to serve different herbs depending on what grows prevalently. At restaurants near me, I see Thai basil served with pho. I like to think I am keeping to the spirit of using regional produce by using what is growing in my garden. But again, I am not making any claims of being any sort of authority on the matter here. If making this in the winter when my garden is looking lackluster, I use Thai basil and cilantro from the store.

Although it does take (inactive) time, I think of this as a cheater shortcut pho recipe that will fill your house with the smell of pho and fill your belly with beefy joy—even though it’s a little on the scrappy unrefined side.

Recipe_ShortRibPho_01.JPG

How to Make Shortcut Slow Cooker Short Rib Pho

(Makes 4 servings)

Ingredients for Broth

4–6 short ribs (about 2.5 lbs), cut into separate rib pieces
five spice powder
salt
pepper
1 sweet onion, quartered
2–4 tbsp fish sauce
32 oz high-quality beef bone broth, defrosted
several cloves of garlic, crushed and peeled
several ginger slices
2 tbsp brown sugar
8–10 star anise
neutral cooking oil
water

Ingredients for Pho Assembly

1 package (14 oz) dry flat rice noodles
1 shallot or 1/8 small red onion, very thinly sliced
2 tbsp cilantro, chopped

Optional Garnishes for Serving

1 lime, cut into wedges
1 fresh jalapeño or serrano chili pepper, sliced
1–2 scallions, thinly sliced
fresh herbs, such as Thai basil, extra cilantro
sriracha and hoisin sauce, for dipping

Procedure

Generously (very generously!) rub salt, pepper, and five spice onto the rib pieces and heat up a large pan on the stove on high. Once hot, turn down to medium-high and add a splash of oil, then the beef short ribs and sweet onion. Seer all sides of the short ribs and onions, adding the garlic and ginger halfway through the process. After ribs are seared and aromatics are charred, dump everything into the slow cooker.

Turn the heat down to low and add 2 tablespoons of fish sauce and a splash of water to deglaze the pan. Add all the pan bits to the slow cooker along with the star anise and brown sugar. Add the bone broth plus about 32 oz of water

Set the slow cooker to high and cook for 4 hours.

In the meantime, prep the fresh ingredients.

Cook pho noodles according to the instructions on the package, or until they are just barely al dente. The hot broth will soften them even further.

Carefully remove the short ribs from the broth. If desired, remove the meat from the bone and slice (or, serve the bowls with meat attached to the bones). At this point, taste the broth for seasoning and add more fish sauce if desired.

To assemble, place cooked noodles in a bowl. Ladle the hot broth on top, add the short rib, and garnish with the thinly sliced onion and cilantro. Serve everything else on the side along with some Sriracha and hoisin sauce.

This recipe was originally written for my friends at Nomtastic Foods.