Recipe: Mini Frittata Muffins with Lap Cheong and Scallions

I used to make these mini frittata muffins as a go-to recipe for parties and potlucks when I was in college and into my early twenties. It is a super easy recipe with the help of instant buttermilk pancake mix, and you can add whatever fillings you would normally enjoy inside a quiche or frittata. Over a decade later, and with much more appreciation for the flavors associated with my Chinese heritage, I decided to revisit the old tried and true recipe and incorporate lap cheong (Chinese sweet sausage) and scallions. (I’m actually pretty obsessed with the combo of lap cheong, scallions, and cheese these days. You can find my recipe for stuffed cheesy bread with these ingredients here.) The end result is the flavors you’d expect in a Chinese-American fusion breakfast, in a nicely portable format.

Back when I was making this recipe all the time, I called them “quiche muffins” because I didn’t really understand the nuances of all the different baked egg dishes out there but in reality the texture is much more like a frittata—a frittata that is slightly leaning in the direction of a biscuit, in a muffin wrapper.

About substitutions: Feel free to swap things out according to your tastes or put your own cultural spin on it. Approach the ingredients as you would if you were making a quiche or omelette; if it makes sense to pre-cook the ingredient for one of these preparations, you should do the same here. Any grated semi-soft cheese would work, as well as crumbled chèvre or feta (though you may want to reduce the amount if using a soft cheese due to the added moisture).

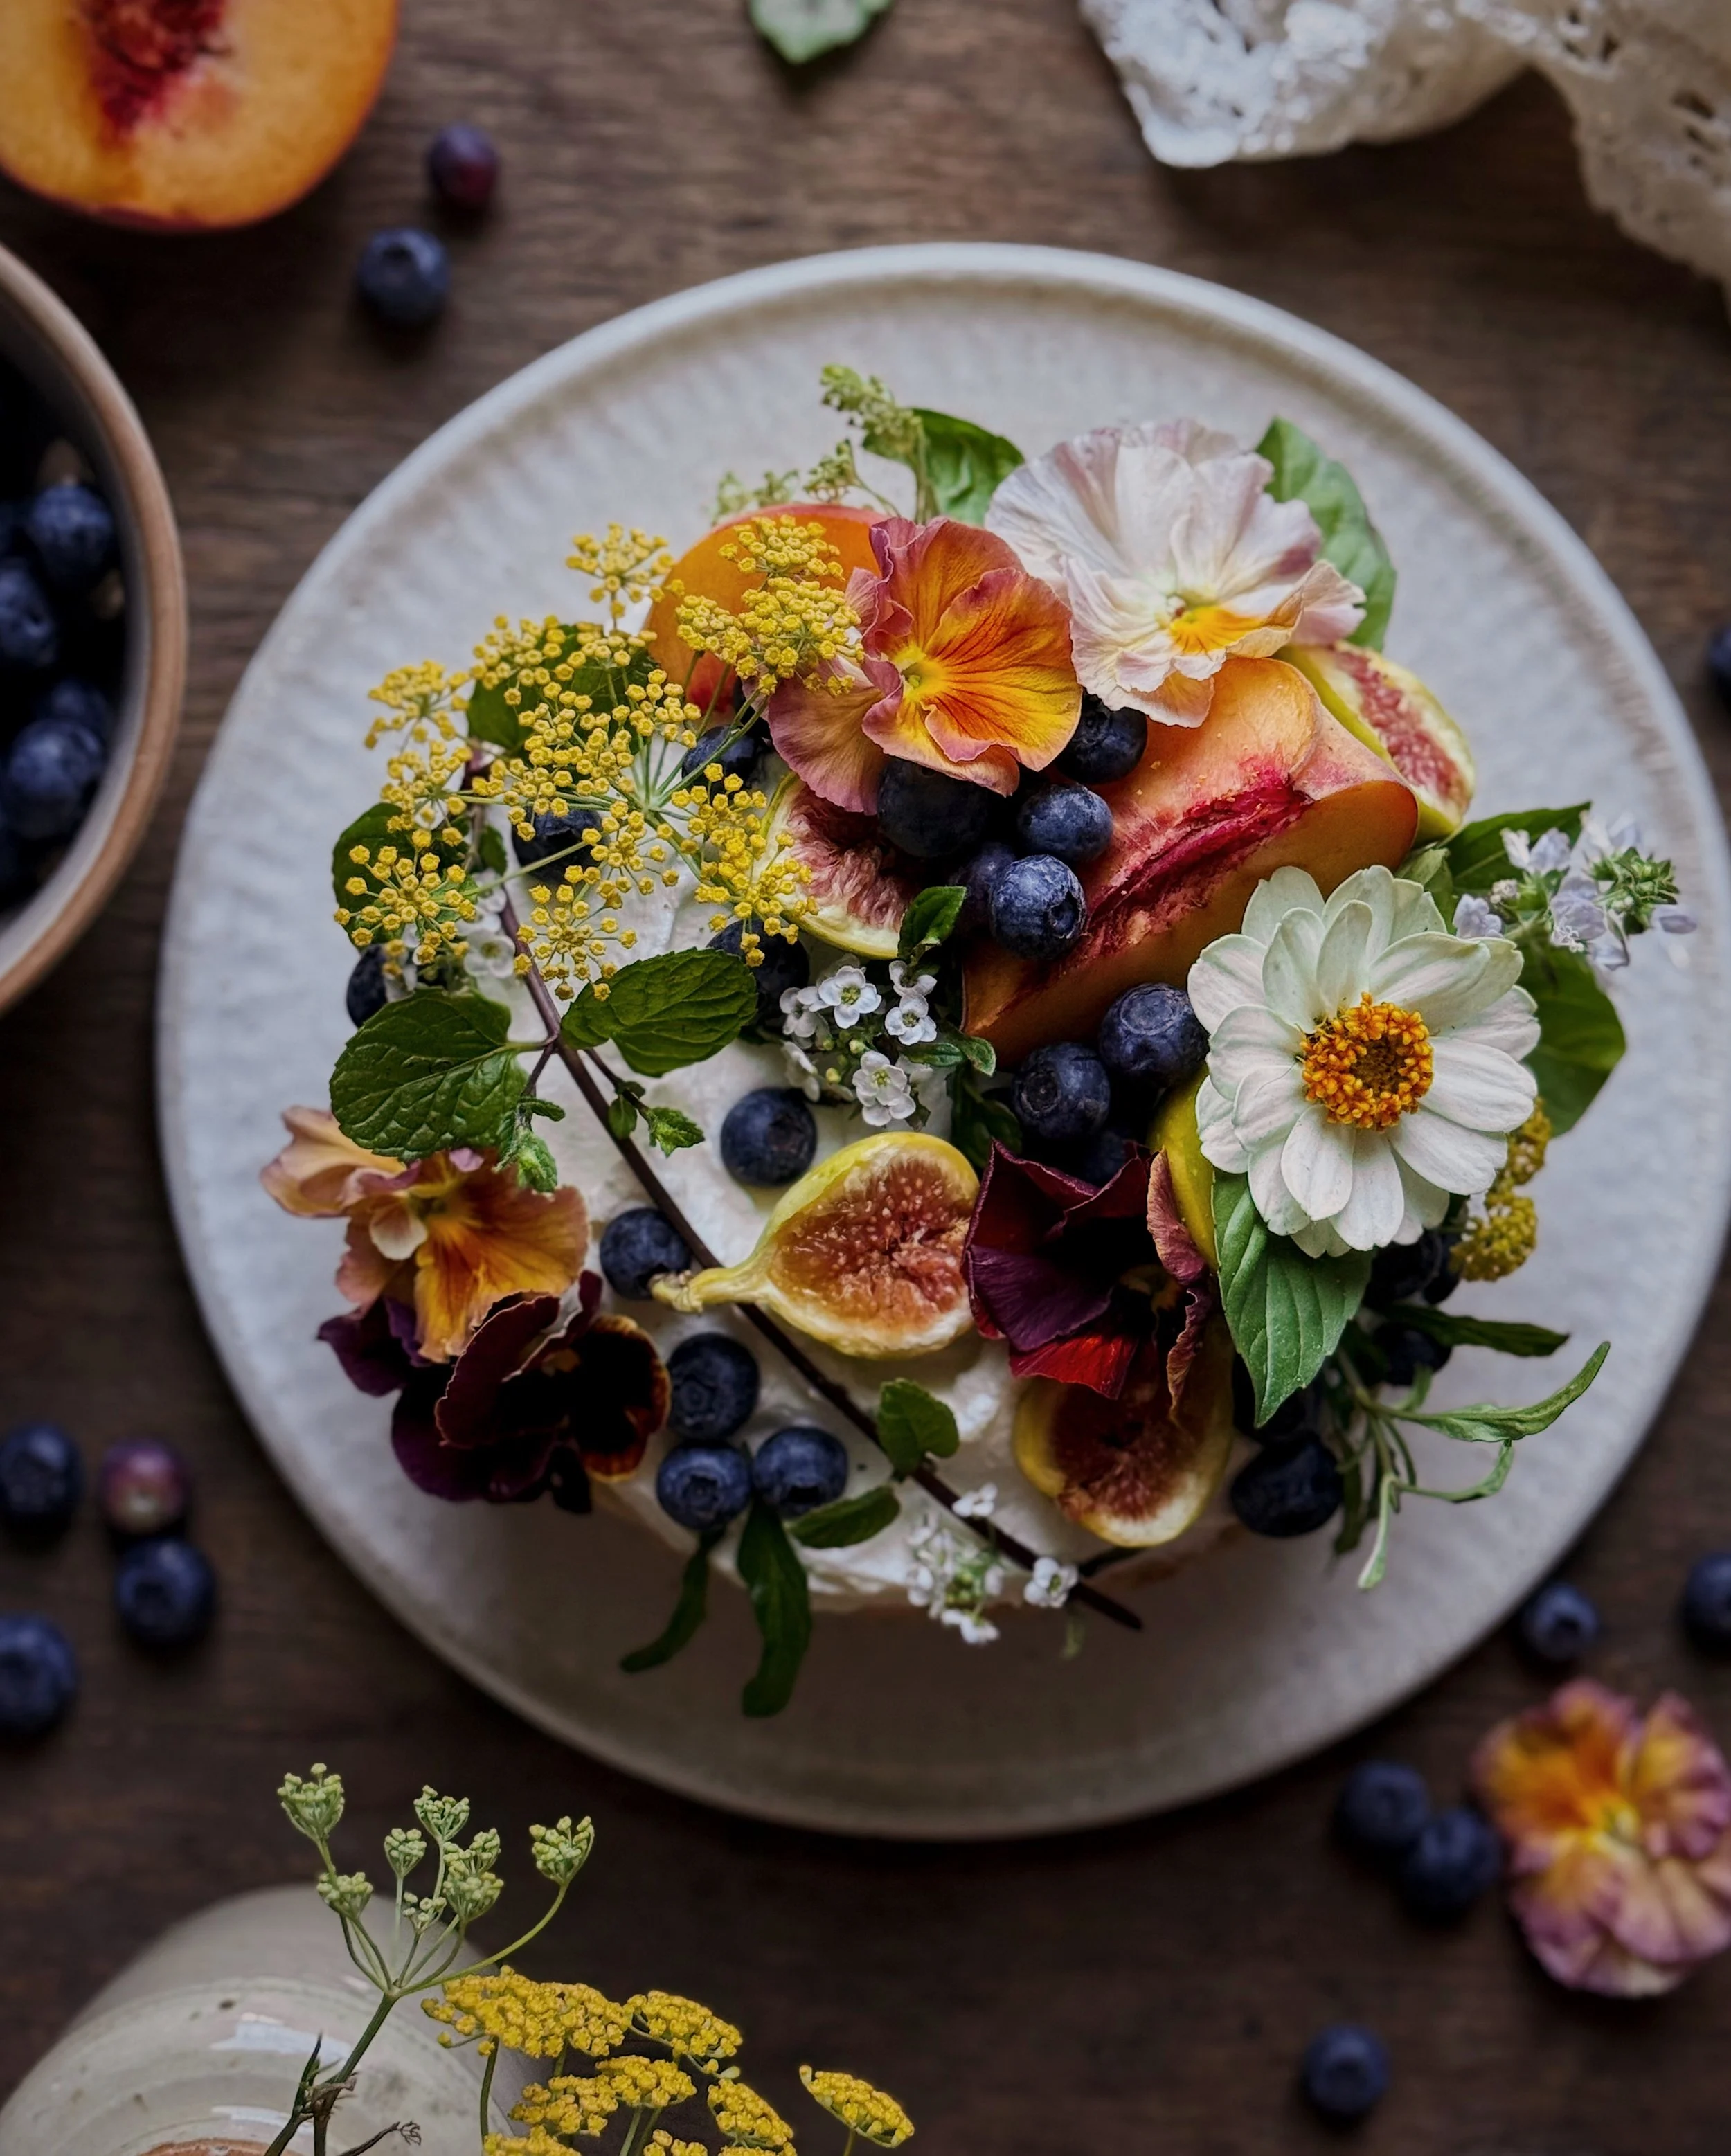
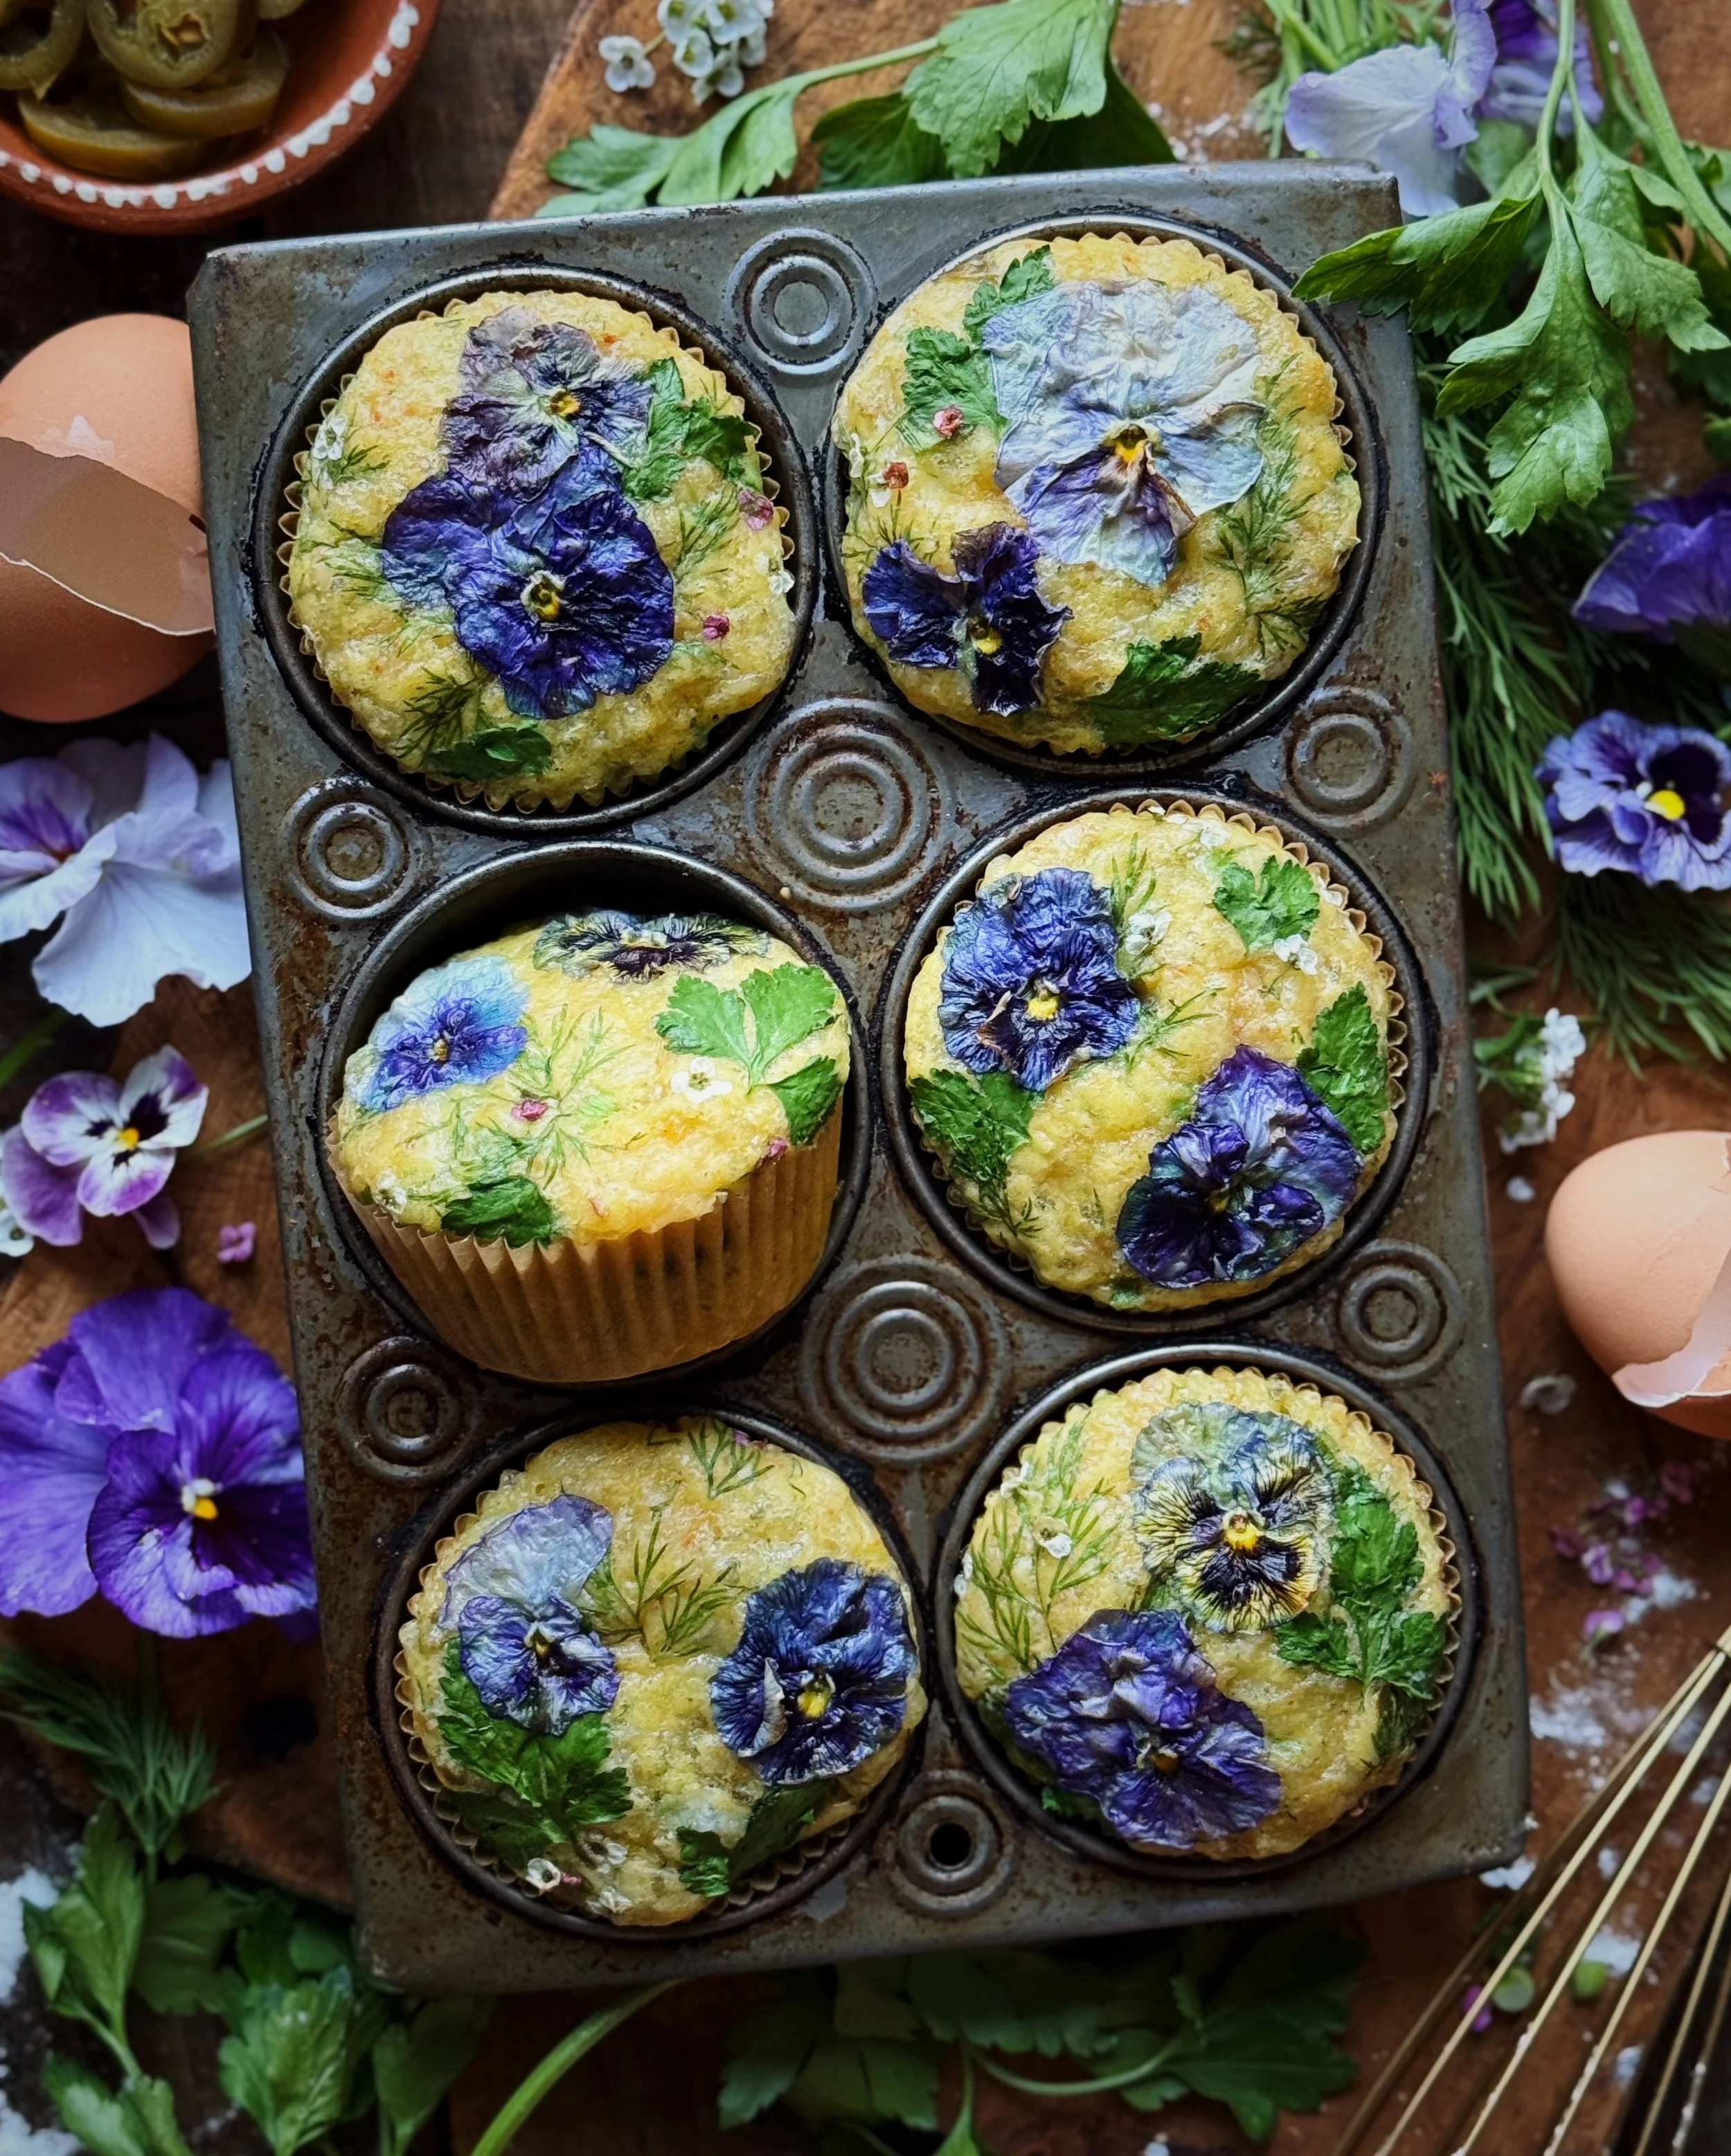
Now, about the edible flowers. This recipe is great for the completely unnecessary but very Instagram worthy edible flower treatment because the batter is quite wet. Anything where the delicate flowers petals and herbs are in contact with moisture in the oven is going to help keep their color and shape better (compared to, say, a shortbread cookie). Here, I used calendulas, wood sorrel, violas, wild fennel, lemon balm, and oregano—a combination of foraged and home grown. As these were baking, I also watched over them like a wistful (but much less anxious) Great British Bake-Off contestant. Because the calendula flowers have layered petals, I would gently press down the top layers as they curled up in the oven to stay in contact with the batter, and that’s how I was able to help maintain their shape despite the heat. Here is what these cuties looked like before baking:

This recipe was adapted from Allrecipes.

How to Make Mini Frittata Muffins with Lap Cheong and Scallions

(Makes 6 muffins)

Ingredients

3 eggs
2/3 cup American style dry buttermilk pancake mix
~2 cups grated cheddar
2 lap cheong sausages
2 scallions, chopped
nonstick spray or 6 muffin liners

Procedure

Preheat oven to 350°F. Line or grease muffin tins.

Peel off and discard the outer casing of the lap cheong and cut into 1/8”–1/4” pieces. In a small skillet, fry the lap cheong on medium heat until cooked through. Drain on a paper towel and allow to cool slightly.

Beat eggs thoroughly in a mixing bowl. Stir in pancake mix. Then fold in cooked lap cheong, scallions, and cheese.

Divide the batter among the muffin tins, filling them only two-thirds of the way. If desired, decorate with herbs and edible flowers.

Bake for 12–15 minutes or until an inserted toothpick comes out clean. Allow them to cool and set slightly before removing and enjoying.

These photos were shot in partnership with Pete and Gerry’s. To find their free range organic eggs near you, click here.

Steak and Caprese Toasts

For when all you want to eat during the summer is caprese made from fresh garden grown tomatoes, but you need some protein too.

I don’t normally serve toast for dinner. I try to cook up a “real” meal for Spouse and I in the evenings but I must say that this toast recipe is definitely dinner status. Maybe it was a little overkill to use such a nice cut of steak for toast, but it tasted really good so I have no regrets. I also didn’t want the risk of us biting into the toasts, and having fatty bits dragging too much steak along with the bite because we couldn’t cut through cleanly with our teeth.

There are a few phases to making these but the good news is that it all gets done in the same cast iron pan. And in the end, you’ll have a world of flavor—tender steak with richness from the butter it was seared in, crunch and carbs from the toast, creaminess from burrata, fresh herbaceousness from basil, and brightness from burst tomatoes tossed in a quick vinaigrette. ⁣

How to Make Steak and Caprese Toast

Ingredients

8 oz tenderloin or filet mignon steak, at room temp
kosher salt
freshly ground black pepper
4 slices of good bread
lots of olive oil
1 tbsp salted butter
10 oz cherry tomatoes
1 clove garlic, thinly sliced
1/2 tsp honey
2 tsp white wine vinegar
8 oz burrata
fresh basil leaves

Procedure

Generously season steak with salt and pepper.

Heat a cast iron skillet on medium high. Generously drizzle olive oil. Fry bread in the olive oil on both sides until golden, then remove and set aside.

Add butter to the skillet and then add the steak. For medium rare, cook steak undisturbed for ~3 minutes on each side. Transfer steak to a grooved cutting board to rest for at least 10 minutes.

Reduce heat to medium. Add 2 tablespoons of olive oil, followed by the cherry tomatoes, 1/4 teaspoon salt, and garlic. Let tomatoes char on one side before turning. Cook tomatoes until they start to burst, about 4–5 minutes total. Shut off heat.

Combine honey and vinegar in a small bowl. Spoon in the charred tomatoes and mix gently to combine.

Slice the steak thinly.

Assemble the toasts. First, divide the burrata among them, then the steak. Then spoon some of the tomato mixture over each. Garnish with the basil leaves.

For more toast inspiration, check out all the posts with the “toast post” tag here.

Recipe: Stone Fruit & Herbed Goat Cheese Tart with Cheesy Crust & Hot Honey Butter

For this recipe, I partnered with Danish Creamery to celebrate my favorite time of the year—stone fruit season! I came up with the idea for this tart because I love making hybrid baked goods in the summer that feature raw seasonal produce in all of their peak-flavor glory. I still want the satisfaction of crafting and baking some kind of base or crust—something where I can proudly say “I made this from scratch!”—but when fruits are already ripe and bursting with their natural juices, I think baking them is honestly a waste, so I add them at the end to be enjoyed fresh.

So, this tart features a snappy cheesy buttery shortcrust, which gets baked solo and then gets filled by a creamy blend of whipped goat cheese and fresh herbs and topped with fresh, raw stone fruit before getting finished off with a drizzle of hot honey butter. Because my taste preferences are always leaning towards savory, I love to experiment with combining sweet fruit with savory ingredients and I think that the balance is just wonderful; it allows for savoring the natural sweetness of a beautifully ripe fruit without limiting the result to something that can only be served as a dessert. Instead, I recommend that this sweet-savory beauty be considered for your next al fresco brunch or picnic potluck; it holds up well when made a bit ahead so it would certainly be a low-stress addition to any sun-soaked gathering where smiles and good vibes are the objective.

Though the nectarines, apricots, and pluots are obviously the star here, don’t sleep on this cheesy crust! I am so proud of how much flavor I was able to pack into something that is often overlooked or perceived as just a vessel when it comes to tart making, and it is definitely a recipe that I will be using as a base for more than just the fruit tart idea you see here. Loaded with asiago cheese and high-quality butter, this savory shortcrust is so snappy and yummy that it would even be delicious broken up into chunks and eaten alone as a snack! This sturdy shortcrust is what helps make this tart a good menu item for summer gatherings, and the munchable texture is a result of keeping all the ingredients super cold while putting together the dough and keeping the moisture content to a minimum. Using Danish Creamery European Style Sea Salted Butter, which has a higher butterfat content than most other European butters, is one trick I used getting the right texture and flavor for the crust. A good butter is key for a shortbread or shortcrust, and Danish Creamery’s  butter is made with just high-quality cream and a touch of sea salt, slow churned for a rich flavor that really sets this shortcrust dough recipe up for durable and delicious success.

I also used Danish Creamery’s European Style Sea Salted Butter in the hot honey butter drizzle that serves as the finishing touch for this tart. This creation is something akin to drizzling a dessert with salted caramel at the end, but I think the hint of spicy chili mixed with the honey and the salted butter is the perfect way to really bring together this combination of sweet and savory flavors. You will end up making more than you need for the tart when following the recipe below, and I recommend saving the extra to drizzle on toasts, pizza, or anything where a little spicy indulgence is welcomed.

This stone fruit and herbed goat cheese tart is made up for the following components:

  • Cheesy Shortcrust: A durable tart shell is what holds all the magic together, but it also brings plenty of its own flavor. I start by cutting Danish Creamery European Style Sea Salted Butter into small cubes and then freezing them—keeping the crust ingredients super cold is what gives you a short, crisp, snappy texture instead of a dreaded soggy bottom, so planning a little ahead and giving the cubes of butter time to freeze will make that goal easier. The rich, creamy butter, made with cream from healthy grass-fed California cows, becomes the savory foundation that gets supplemented with asiago cheese and black pepper to give the crust its addictive flavor. While using high-quality butter should be a given for a crust like this, there’s also an unexpected ingredient: vodka. Using vodka instead of water further ensures that this crust does not get bogged down by moisture; it brings together all the dry ingredients but evaporates quickly in the bake, along with any concerns about having alcohol in your pastry. These ingredients get pulsed together in the food processor and then pressed into the tart pan, so you don’t even have to bother with rolling. 

  • Herbed Goat Cheese: Whip together room temp chèvre with Greek yogurt and fresh chopped herbs to form the first layer of filling that goes inside the cheesy tart shell. Not only does the mixture help hold the stone fruit in place if you choose to arrange it in a decorative manner, but the tangy, creamy goat cheese and herbs are such a lovely flavor complement. You can really use any soft herbs of your choosing here but I opted for chives, basil, and thyme.

  • Stone Fruit: This is the main event! In case you didn’t know,  the term “stone fruit” refers to fruits like peaches and apricots that have a singular stone-like pit inside to house the seed. Feel free to use a medley of nectarines, apricots, and pluots like I did, or whatever is your personal fave. When selecting your stone fruit for this tart, seek ones that are fragrant but still have some firmness to them, so that they are easy to slice and will keep well on top of the tart. You can either slice them thinly and arrange them like I did, or opt for chunkier wedges that you can just dump into a somewhat-even layer on top.

  • Hot Honey Butter: This finishing touch brings a unique spicy kick to the sweet-savory creation and helps to unite all the other flavors. A mix of gochugaru (Korean red chili flakes) and red chili pepper flakes are given a chance to bloom in a bit of velvety Danish Creamery European Style Sea Salted Butter before being combined with honey. This recipe yields more than what is needed for the tart; save the extra in a microwave-safe jar and heat for a few seconds to improve viscosity for drizzling on other creations afterward.

How to Make the Stone Fruit & Herbed Goat Cheese Tart

Ingredients for Crust

1 stick Danish Creamery European Style Sea Salted Butter, cut into 1/4”-inch cubes then frozen
1 1/4 cup all purpose flour
1/2 cup asiago, grated then chilled
1/2 tsp kosher salt
1/2 tsp freshly cracked black pepper
4–6 tbsp vodka, chilled

Ingredients for Filling

5 oz goat cheese/chèvre, at room temperature
4 tbsp Greek yogurt, drained
1/2 tsp chives, finely chopped
1 1/2 tsp thyme leaves
2 tbsp basil leaves, finely chopped
2–3 stone fruits, sliced
fresh herbs and edible flowers, for garnish (optional)

Ingredients for Honey Butter

1 tbsp Danish Creamery European Style Sea Salted Butter
1 tsp gochugaru/Korean chili flakes
1/2 tsp red pepper flakes
3 tbsp honey

Special Equipment

food processor
tart pan with removable bottom
dry beans or pie weights

Procedure

To make the crust, add flour, asiago, salt, and pepper to a food processor and pulse briefly to combine. Scatter in frozen butter cubes and pulse until the texture resembles wet sand. Add 1 tablespoon of vodka and pulse a couple of times; repeat, adding 1 tablespoon of vodka at a time and pulsing briefly after each, until the mixture looks like it is just barely starting to form clumps. Dump mixture into tart pan and use a spoon to quickly press mixture evenly against the bottom and sides, keeping everything as cold as possible. (A sheet of wax paper could also aid in smoothing out the mixture). Chill unbaked tart shell in the freezer for 20 minutes or in the refrigerator for 1 hour or up to overnight.

Preheat oven to 400°F. 

Dock chilled shell with a fork to prevent it from warping and puffing while baking. Line with parchment paper or foil and fill with dry beans or pie weights. Place the tart pan on a baking sheet and bake for 20 minutes. Gently remove the lining and weights, then bake for an additional 20 minutes, or until the crust is golden brown. Allow to cool to room temperature before filling.

In the meantime, combine goat cheese, yogurt, and chopped herbs in a mixing bowl. Using a hand mixer, whip together until incorporated and fluffy. Set aside.

When the tart shell is cooled, spread the goat cheese mixture in an even layer. Arrange sliced stone fruits on top. 

To make the hot honey butter, add butter to a small stainless steel pot and heat on medium-low. When the butter is completely melted, reduce heat to low and add gochugaru and pepper flakes; stir continuously with a silicone spatula for 1–2 minutes, allowing the spices to bloom and the mixture to get completely foamy. Add honey and keep stirring until the mixture becomes completely foamy again. Remove from heat and once the bubbling resides, drizzle hot honey butter immediately over the tart, to taste. 

If desired, garnish with pretty edible flowers and herbs.

Thank you so much to Danish Creamery for sponsoring this recipe! Visit their website to learn more about their legacy of carefully-crafted Old World-quality butter made with milk from family farms since 1895.

Recipe: Mala Marinated Tomato Salad (with Burrata)

This is this one of those recipes that is meant to help off-season tomatoes reach a higher potential but that would also be so good with ripe tomatoes in season. The background for this idea is really not all that complicated: I love the classic Sichuan mala smashed cucumber salad and I also love salads that revolve around tomatoes. So, why not use that same Sichuan-inspired, numbing-spicy dressing for tomatoes instead of cucumbers?

Sichuan cucumber salad is really the only raw Chinese salad I can think of. The cucumbers are typically smashed first, but lately I have been seeing a lot of recipes on the ‘gram where the cucumbers are cut in a special way to make a cool spiraled effect. The dressing typically leans on the classic Chinese vinegars (rice vinegar and black vinegar), garlic, and soy sauce; and my favorite versions are the ones that also include mala, or numbing-spicy, chili oil made with Sichuan pink peppercorns. It is crisp, cold, and refreshing. It appears as an appetizer on Chinese restaurant menus among other cold dishes like couple’s delight but I love making my own version at home as a side dish (I guess like Korean banchan) when I cook up a really heavy and hearty Asian meal of any sort. The tangy, tingly, crunchy cucumbers are a perfect balance to braised or grilled meats.

While cucumbers will always be a sidekick in my mind, tomatoes can definitely be a main character. In adapting my Sichuan-inspired salad dressing for tomatoes, what I ended up with was, I guess, a Chinese fusion version of a caprese salad. I ended up serving it with burrata and basil (yes, the crazy purple leaves you see are a type of basil called “wild magic”!), and Spouse and I thoroughly enjoyed it as a main course, spooning the tomatoes onto crusty bread. But you can definitely skip out on the burrata and herbs, and serve this marinated tomato salad as an appetizer or side dish.

This recipe involves three different stages of flavor building.

  • Salting the tomatoes. This is a good practice regardless of the time of year, whenever raw tomatoes make an appearance because the salt really helps bring out the best flavor that your tomato has to offer. Because I tested this recipe when tomatoes were not yet in season, I used more salt than would be needed for really amazing tasting ripe tomatoes. Keep this in mind when you are at this stage of making the recipe. You can use whatever tomatoes you’d like; I recommend a medley of heirloom tomatoes and cherry tomatoes to keep things looking interesting. Just cut them into bite-sized chunks with plenty of open surface area to absorb all the flavors of the marinade.

  • Marinating the tomatoes in the dressing. I like to allow the raw garlic and the tomatoes to sit for a bit in a more concentrated vinegar mixture so the garlic has the opportunity to pass on some of its punchy flavor to everything else in the mix.

  • Adding the chili oil. This recipe uses my easy mala chili oil recipe, which you can find here; note that my recipe is a lot less salty than many commercial chili oils, so you may want to keep that in mind if you are opting to use a storebought one. This step is very much to-taste, depending on how tingly you want your tomato salad to be. I recommend adding a tablespoon at a time and tasting along the way. If you do opt to make the caprese-esque version shown in the photos, I recommend not going full-blast with the chili oil in the tomato mixture and reserving some to drizzle over the burrata as a finishing touch.

How I Make Mala Marinated Tomato Salad

Ingredients

2 lbs tomatoes, cut into bite-sized chunks*
1/2–3/4 tsp kosher salt
2–3 cloves garlic, minced
1 tbsp Chinese black vinegar
3 tbsp rice vinegar
1 1/2 tsp sugar
1/2 tsp fish sauce
2–4 tbsp mala chili oil
8 oz burrata (optional)
basil leaves (optional)

*If using cherry tomatoes, cut them in half so they can absorb the flavors from the dressing.

Procedure

In a large bowl, add tomatoes and salt and toss to combine.

In a separate small bowl, whisk together garlic, both vinegars, sugar, and fish sauce. If you are very impatient, microwave the mixture for 10 seconds to help dissolve the sugar. Once the sugar is dissolved, add the dressing to the tomatoes and mix gently but thoroughly to coat. Allow to marinate for at least 10 minutes. (I recommend 20–30 minutes for off-season tomatoes.)

Add chili oil to your taste and mix gently to combine.

For optional “caprese” version: Spoon tomatoes and some dressing into a serving dish. Tear burrata into large globs and distribute amongst the tomatoes. Drizzle additional chili oil over the burrata. Garnish with basil. Serve with toasts or crusty bread.

How I Make Crispy Smashed Potatoes

smashedpotatoes.JPG

Smashed potatoes have become one of my favorite formats of potatoes in my life. And they are super easy to make, though—like all good things—they do take a little bit of time. First you have to boil the potatoes until they are completely soft, then you smash them to expose some fluffy creaminess from inside, and then you roast them until their the paper thin skins and the craggy surfaces created by smashing get browned and crispy. I didn’t realize until I started making these that even though I eat a lot of potatoes, I rarely eat them in a way where I can truly taste the pure flavor of the potato itself. In the photo above there are mini red skinned potatoes and purple ones. Spouse and I found that while we enjoyed every potato on the tray, there was something about the red skinned potatoes that had a little bit of extra something in their natural flavor that we preferred over the little purple ones. I encourage you to get whatever types of tiny potatoes you can find and try making this recipe with them, to see if you can taste a difference—for science.

Below is my recipe for how I make my smashed potatoes, which have become a go-to side or snack on many an occasion in my household. Some suggestions for how to enjoy them are:

To season the potatoes shown here, I used Spice Tribe’s Haitian-inspired Mama Manje blend and this made the house smell SO GOOD while the potatoes were baking, so I definitely recommend this blend. (I received this product as part of a paid partnership with Spice Tribe but this recipe is not sponsored and I gladly use their products in my everyday cooking). This blend does not contain any salt, so I have control over how much salt I add to the potatoes. However, you can use whatever seasoning blend you want; just check to see if it has salt and avoid oversalting if it does. For herbs, I used chopped chives, oregano, and lemon thyme, but you can use whatever fresh herbs you love; potatoes are great with pretty much anything, after all! The flower petals are dianthus from my garden; they are safe to eat but really there for the aesthetics.

How to Make Crispy Smashed Potatoes

Ingredients

1 pound mini potatoes
1 1/2 tsp kosher salt, divided, plus more to taste
3 tbsp extra virgin olive oil, divided
1/2 tsp low-sodium or salt-free spice blend*

*I like to use Spice Tribe’s Mama Manje blend or Fly by Jing’s Mala Spice Mix.

Procedure

Add cleaned potatoes to a pot and cover with water. Bring to a boil and add 1 teaspoon of salt.

In the meantime, preheat the oven to 450°F.

Continue boiling potatoes until very soft and a fork pokes through with no resistance, about 20–25 minutes. Drain and allow to cool slightly.

In a large mixing bowl, combine potatoes, 2 tablespoons olive oil, 1/2 teaspoon salt (or to taste), and the spice blend of your choice. Toss to coat the potatoes in the oil and spices.

Dump the potatoes and any excess oil/seasoning onto a large sheet pan. Use the back of a fork to gently press down and smash the potatoes. Drizzle with the remaining olive oil.

Bake for 25 minutes or until you notice some browning on the fluffy parts.

Recipe: Strawberry Herb Biscuits

For this recipe, I partnered with Danish Creamery to share something that captures the promise of sunny days and a beautiful spring season. And to me, bright, ripe strawberries are the sign of the peak of spring. Growing up in the agricultural Central Valley, it used to make me so happy to see little farm stands popping up everywhere we drove, with painted wooden signs pointing to cartons full of freshly picked strawberries. It was a marker for those perfect spring days when it was a joy to be outside; the ones that came sandwiched in between foggy, frosty winters and scalding summers.

Now that I am in San Francisco, the seasons are not quite so distinct, weather-wise, but I still live for how the changing of the seasons becomes evident in the produce aisle. We have strawberries all year but they definitely do not taste the same when they are not in season! 

I got the idea to fold fresh strawberries into my base biscuit recipe from a local bakery that had strawberry scones, but I can’t resist a good biscuit. These might look a bit like scones from the outside, but trust that inside you will find a hint of savory and lots of tender layers. These joys are all thanks to the perfectly creamy 85% butterfat Danish Creamery European Style Sea Salted Butter, which I freeze and then grate to form the dough. I have found this technique to be way easier than cutting all that butter into tiny cubes or rubbing them into pea-sized kernels. The grating of the slow-churned velvety butter and a quick series of letter folds of the dough are my tricks to getting these beautiful biscuits every time—the kind that you don’t even need a knife to split open because you’ve created all those wonderful layers.

And once they are out of the oven and as soon as they are cool enough for you to be able to stand prying them open without burning your fingerprints off, spreading on more of that creamy butter (and maybe just a tiny sprinkle of flaky salt) is all these biscuits need to be enjoyed to their full potential. No jam necessary because that sweet strawberry goodness is already baked in! Danish Creamery European Style butters are carefully crafted using the same recipe they’ve been using since 1895 plus high-quality cream from family farms in California’s Central Valley (where I’m from!) so you can bet that it is mighty tasty slathered on all your home-baked biscuits.

What you need to know about the ingredients for this Strawberry Herb Biscuit recipe:

  • butter: Great butter is one of the most critical ingredients for making biscuits, both for the taste and texture. I used Danish Creamery European Style Sea Salted Butter because of Danish Creamery’s legacy for producing an old world style butter with a high butterfat content, made with milk from healthy cows that munch on grass on wide open California family farms. Freezing and then grating the butter makes short work of incorporating this decadent butter into the biscuit dough in a way that will create lovely layers as they bake up in the oven. Don’t sweat it if a bit of butter gets left stuck on the grater—there should still be plenty of buttery goodness to make your biscuits nice and yummy. 

  • Greek yogurt: While many biscuit recipes call for sour cream, Greek yogurt is what I always have already in my fridge and I’ve found it works great. There is plenty of creaminess already in the dough from all that high-quality butter, so using Greek yogurt has an added plus of making the biscuits a little healthier (...not that we’re concerned about that here!) Before using, stir up your Greek yogurt to create a uniform consistency. If the yogurt feels dry and thick like cream cheese, add a teaspoon of water to thin it out.

  • strawberries: This recipe is all about celebrating strawberry season, so be sure to use strawberries that are firm but sweet. If you’re making this Strawberry Herb Biscuit recipe with off-season fruit, you may wish to add an extra tablespoon of sugar into the batter. As you’re handling the dough, do so gently to avoid completely smashing the bits of strawberry that are mixed in; a little moisture running out of them is expected and is nothing to sweat about but you want to keep the pieces relatively intact. 

  • fresh herbs: I love the combination of strawberry and basil for the perfect sweet-savory balance that is encapsulated by this biscuit recipe. I also used lemon thyme because the stems are much more tender than French thyme and simply require a rough chop without picking the tiny leaves. You can certainly sub in your favorite thyme, or other herbs that pair well with strawberries like sage or tarragon. Just be sure to leave out any hard stems.

One last note:

You definitely don’t need to decorate your biscuits with edible flowers like I did, but you know I can’t resist pressing pretty blooms onto all my bakes when my backyard garden is thriving in the spring. I used violas, as well as the leaves of lemon balm, lemon thyme, and parsley. I’m guessing they successfully lured you into coming to this recipe, but now that you’re here, I assure you that it’s the good butter that is key to making these delicious springtime indulgences, and they will taste just as good with or without the floral decor.

How to Make Strawberry Herb Biscuits

Ingredients

2 1/2 cups AP flour, plus extra for dusting
1 3/4 tsp baking powder
1/2 tsp baking soda
1–2 tbsp sugar
1/2 tsp kosher salt
10 tbsp Danish Creamery European Style Sea Salted Butter, frozen
4 tbsp honey, divided
1 1/4 cup Greek yogurt, stirred
1 cup strawberries, stems removed, cut roughly into 1/4” pieces (about 7–9 strawberries)
1 tbsp lemon thyme, tough stems removed and coarsely chopped
2 tbsp basil leaves, coarsely chopped

Procedure

Combine flour, baking powder, baking soda, sugar, and salt in a large bowl and whisk together.

Grate in the frozen butter using the large holes of a box grater; toss together with the dry ingredients as you go, to avoid clumps. Then, toss all the butter and dry ingredients together gently so each shaving of butter is separated and coated with the dry ingredients. Drizzle 3 tablespoons of honey evenly over the mixture.

Add strawberry pieces and chopped herbs to the mixture and gently combine.

Create a well in the center of the mixture. Pour yogurt in the well, then slowly incorporate the flour mixture into the wet yogurt . Once all the yogurt is absorbed, resulting in a craggy texture, use hands to gather the dough together and fold it on itself a few times until it is a cohesive dough.

Dump dough onto a cold work surface and try to work quickly and keep everything cold during the folding process. Dust work surface with flour and do so generously throughout the process as needed to prevent sticking. Use hands to shape dough into a rectangle, then use a dusted rolling pin to roll into a rectangle roughly 8 inches wide by 12 inches tall. Fold down the top third and then fold up the bottom third (like you would fold a letter). Flip and rotate 90 degrees and repeat the shaping, rolling, and folding sequence. Flip and rotate again, then do the sequence one more time, so you have done 3 sets of letter folds total.

Roll out the dough one more time, to a rectangle slightly larger than 8 inches x 12 inches. Using a sharp knife dusted in flour, cut the rectangle into 6 even sections by pushing the knife straight down firmly to avoid any sort of sawing motion (that could seal the layers and prevent the biscuits from puffing up). If desired, trim off a tiny amount of dough from all the outer edges of the rectangle to create sharper edges and discard the excess dough—this will also result in a more puffed-up biscuit.

Place biscuits on a parchment-lined baking tray. Freeze for 10 minutes.

While biscuits are in the freezer, preheat oven to 425°F.

Combine remaining 1 tablespoon of honey with 1 tablespoon of water and whisk together until homogeneous. Brush evenly over the tops of biscuits.

If desired, gently press edible flowers and herb leaves on top of the biscuits for decoration. If biscuits do not feel chilled when done decorating, return them to the freezer for another 5–10 minutes before baking.

Bake for 17–20 minutes, or until the biscuits are golden. Enjoy by splitting open with your hands and spreading halves with softened Danish Creamery European Style Sea Salted Butter.

Thank you so much to Danish Creamery for sponsoring this recipe! Visit their website to learn more about their legacy of carefully-crafted Old World-quality butter made with milk from family farms since 1895.

Recipe: Chicken Meatball Skewers with Craggy Crispy Potatoes & Spiced Ketchup

Maybe this is a surprising tale to tell as a food blogger but my family does not have a bunch of family recipes that have been passed down from generation to generation. There is one cookbook that I remember my mom using, that she brought with her from Malaysia and we have a few tried and true recipes from there. And she also has her famous (among friends) curry puff recipe that I definitely need to get from her. For the most part, though, when I am feeling nostalgic for the food memories that make me feel connected to my family and my heritage, I have to try to recreate them from memory.

But, sometimes, as the great Ina Garten says, “storebought is fine”!

My parents are I are all about using store-bought pastes to recreate our favorite Malaysian dishes sometimes, and guess what? They turn out plenty delicious. A good prepared spice paste will have all the flavor complexity that requires time to develop and will save you the time and hassle of cleaning mortars and pestles and food processors.

Another great thing about a storebought spice paste is that it makes it easy to get creative. For example, I do have my own from-scratch chicken satay recipe but using a spice paste such as Asian Home Gourmet’s Marinade for Meat Satay allows me to easily incorporate those flavors of satay that are so nostalgic to me into other meals. This spice paste can be purchased at Millenniyum.com. (I am really lucky to have access to lots of great grocery stores near where I live, but if you have trouble finding the special Southeast Asian ingredients I use in a lot of my recipes, then Millenniyum is a great place to order them online. They carry a variety of products that I would consider to be iconic to stocking a Southeast Asian pantry.)

A lot of times when I am coming up with ideas for fusion dishes, what sparks the idea is looking at commonalities among foods from different cultures—I love encountering these connections because it further proves my belief that it is through food that people of different cultures can find the best channels of communication. There are many other cultures besides my own that have iconic versions of meat on a stick, and kofta kababs are another favorite example of mine. It may be spelled kofta, köfte, kefta or other variations, but throughout the Levant and Arabic cultures, there is some version of ground meat served molded around skewers—a meatball kebab.

I love that the ground meat mixture is such a wonderful carrier of flavor, so I thought creating a meatball version of chicken satay would be a great, texturally-new way to experience one of my favorite flavor combos. Since I was drawing inspiration from kofta kababs anyways, I decided to combine my chicken meatball satay with crispy potatoes, reminiscent of those Turkish fast casual stands all over Europe that pair shawarma and kebabs with fries. Since I didn’t need the whole packet of Asian Home Gourmet Marinade for Meat Satay in my marinade, I was also able to use some to amp up plain ol’ ketchup to make an incredible dipping condiment for my super crispy potatoes.

This latest culinary fusion of mine is made up of the following components:

  • chicken meatball skewers: A cross between Southeast Asian chicken satay and Arab kofta kebabs; ground chicken is mixed with Asian Home Gourmet Marinade for Meat Satay and some binders to create a meatball mixture that is loaded with the flavor of chicken satay. This mixture is quite sticky if you use a 96% lean/4% fat ground chicken like I did; I recommend chilling it for a bit to get it to firm up more and continuously dipping your fingers into some water while you are molding the mixture around skewers, to prevent it from sticking to your hands. The slightly messy process will be well worth it when you end up with an incredibly tender meatball texture for your meat skewers. I cooked the meatball skewers in a pan with a large flat base that could easily accommodate the length of the skewers, rotating regularly with tongs to keep their shape. Satay and kebabs are both typically grilled, but I thought this pan fried method would help make this recipe more accessible, and something that could be made year round.

  • craggy crispy potatoes: In place of french fries, I made these craggy crispy potatoes that are so incredibly addictive. First I boil baby potatoes in salted water until they are completely soft. When they are slightly cooled and totally dry, I rip them apart with my hands and that creates all kinds of irregular craggy surfaces, that when crisped up in a deep frying phase turns into all these wonderful crispy edges. Just look at how golden and delicious they look in the photos!

  • spiced ketchup: Whisking together some regular ketchup with some of that Asian Home Gourmet Marinade for Meat Satay will transform it into a condiment that tastes so full of complex spices. It is perfect for those potatoes but you may just want to end up getting extra spice paste packets to make this for all your other favorite deep fried carb formats.

  • other serving suggestions: I opted to serve my skewers and fried potatoes on top of naan and a big smear of yogurt, and finished things off with micro cilantro and cucumber ribbons. I completely recommend this combo, which further serves to bridge the gap between things served with satay and things served with kebabs. However, these are an optional finishing touch.

How to Make Chicken Meatball Skewers with Craggy Crispy Potatoes & Spiced Ketchup

(Makes about 12 skewers)

Ingredients

1 packet Asian Home Gourmet Marinade for Indonesian Meat Satay

Ingredients for Chicken Meatball Skewers

1/3 cup panko breadcrumbs
1 egg, beaten
1 tbsp cilantro, finely chopped
1 lb ground chicken (96% lean/4% fat recommended)
2–3 tbsp cooking oil

Ingredients for Crispy Potatoes

1 lb baby yukon gold potatoes
1 1/4 tsp kosher salt, divided
2–4 cups vegetable oil (or high smoke point oil) for deep frying
2 tbsp ketchup

Ingredients for Serving (Optional)

flatbreads, such as naan
cucumbers, sliced
yogurt
cilantro or micro cilantro

Procedure

Combine breadcrumbs and egg and allow to sit for 2–3 minutes so breadcrumbs absorb egg and become soggy. Then, combine all meatball ingredients and 4 teaspoons of Asian Home Gourmet Marinade for Indonesian Meat Satay. Mix thoroughly until homogenous. Refrigerate meatball mixture to allow it to become more firm while preparing the potatoes.

In a medium pot, combine potatoes with 6 cups of water, or enough to completely cover the potatoes in 2 inches of water. Bring to a boil and add 1 teaspoon of salt. Continue boiling potatoes until they begin to crack, about 25–30 minutes. Drain completely and allow to cool.

Prepare the spiced ketchup by combining ketchup with the remaining Asian Home Gourmet Marinade left in the packet. Whisk until homogeneous. Set aside until ready for serving.

In a heavy pot, heat up enough frying oil to be deeper than the size of the largest potato. Prepare a small baking tray lined with paper towels. When boiled potatoes are cool enough to handle, gently break into large chunks with your hands to create irregular craggy pieces—halves for smaller potatoes and quarters for larger ones. When oil starts to shimmer, test it by adding a tiny piece of potato to the oil; if it bubbles vigorously, the oil is hot enough. Working in batches if necessary to not crowd the pot, deep fry potatoes until golden brown, about 3–5 minutes per batch. Remove from oil and drain on prepared paper towels. 

Once all potatoes are fried, remove paper towels and place fried potatoes directly on tray. Toss potatoes with remaining 1/4 teaspoon salt (or salt to taste). Place potatoes in the oven and turn on to 175°F to keep warm while preparing the skewers.

Begin forming the meatball skewers by moistening hands with water to prevent sticking, then scoop about 1/4 cup of the chilled meatball mixture and mold into a long shape around a wooden skewer. Repeat with the remaining meatball mixture.

Use a skillet large enough for the skewers to lie flat or a flat griddle pan; heat on medium. Add enough cooking oil to thinly coat bottom of pan. Working in batches if needed, place prepared meatball skewers in heated pan and cook for 5–7 minutes, using tongs to rotate regularly to maintain the rounded shape. Add cooking oil as needed and repeat until all the meatball skewers are lightly browned on the outside and cooked through.

To make the serving suggestion shown in the photos, spread a thin layer of yogurt over flatbreads, then top with skewers and potatoes; garnish with cucumbers and micro cilantro. 

Serve the spiced ketchup on the side for dipping the potatoes.

Thank you so much to Millenniyum for sponsoring this Asian Home Gourmet recipe! Check them out on Instagram here or visit their website to purchase Southeast Asian pantry essentials.

My Lazy Caesar Salad Dressing Recipe

Call me basic but I am a sucker for a good caesar salad. I know all about how the dramatic tableside-tossed caesar salad spectacle was invented in Mexico but to me, the best caesar salads are the ones that are served up at nice pizza spots—they have to be good so that people actually enjoy eating them instead of just ordering them out of obligation to have something leafy and green to go with their pizza. I love the ones where a nice, thick, anchovy-based dressing is evenly coating every lettuce leaf before being dusted in freshly grated parmesan cheese, and I actually look forward to them just as much as I look forward to the pizza!

The original caesar salad dressing allegedly wasn’t all that thick and didn’t even contain anchovies, but for once, I have to argue that time and adaptations have improved the recipe. So, the dressing I’m paying tribute to here is the modern version that most Americans are probably more familiar with nowadays.

The bottled caesar salad dressings from the grocery store just don’t cut it for me, though. They just don’t have the same special umami. So, I always make my own. But keep in mind that I am really quite lazy. Salads are a go-to for weekday lunches at my place but in those instances I am most definitely not busting out a mortar and pestle for pounding an anchovy paste nor any sort of food processor/immersion blender to make a thick emulsion, nor do I wish to clean any of those instruments thereafter. So, this is my lazy cheater version of a caesar salad dressing that I am willing to throw together on weekdays, and I finally really tried to get the measurements right so I could share it with you.

The secret ingredient in my cheater caesar dressing recipes is fish sauce. It’s my secret ingredient in a lot of recipes, really, but I don’t think it could be any more fitting than in this one. After all, caesar dressing gets its distinct umami undercurrent from salted anchovies getting turned into a paste—fish sauce is exactly that same flavor in convenient bottled liquid form! I thought I was pretty dang clever when I first came up with this hack.

Rather than having to worry about combining egg and oil just right to create a thick emulsion, my other cheat is to use yogurt to get a nice thick dressing. Some recipes use a jarred mayo, but yogurt is perhaps a bit healthier (and less off-putting for mayo haters like my spouse). I always have some Greek yogurt in my fridge, and including it in any dressing guarantees a nice creamy and thick consistency. The resulting dressing does not taste identical to the kind I love at nice pizza joints but rather like a good yogurty version of it. For quick weekday lunches, it does the trick and is plenty tasty!

To make the salad shown in the photos, I tossed baby gems lettuce leaves with enough dressing to thinly and evenly coat the leaves and then tossed the dressed leaves with lots and lots of freshly grated parm. I made crispy prosciutto by baking twisted up slices of prosciutto on a parchment-lined tray at 425°F for 10 minutes. Then, I made grilled cheese sandwich with a cheddar and gruyere blend and cut it up into 1-inch cubes to use as croutons. A sprinkle of chopped chives and more grated parm were the finishing touches.

How I Make My Lazy Caesar Salad Dressing

Ingredients

2 cloves garlic, pressed or microplaned
3 tbsp lemon juice (from about 1 lemon)
1 tsp apple cider vinegar
1 tbsp fish sauce
1/2 cup + 2 tbsp Greek yogurt
1 tsp dijon mustard
1/4 cup extra virgin olive oil
freshly cracked black pepper, to taste
1/2 cup freshly grated parmesan cheese

Procedure

Combine the garlic, lemon juice, vinegar, fish sauce, yogurt, and mustard in a bowl. Whisk thoroughly to combine. Add the olive oil and pepper and whisk again until homogenous. Finally, add the parmesan cheese and whisk thoroughly once again.

(This recipe makes enough dressing for 4–6 two-person meal salads. Add dressing to prepared lettuce leaves one tablespoon at a time and toss thoroughly after each addition until leaves are evenly and thinly coated. Then toss dressed leaves with extra freshly grated parmesan to taste. Serve with chunky croutons on top, or go crazy and add whatever you like!)

Baguette au Brie with Roasted Tomatoes

In Berkeley, California, my college town, there is the cutest little Provençal restaurant called La Note where baguette au brie is on the menu. I have many fond memories of eating at La Note, one of those places choc-a-bloc with mismatched wood chairs and vintage French mixing bowls, mugs, and salt and pepper shakers that you would expect to find in some grandma’s country cottage. It was too expensive for us to eat there as poor college students so I never went while I was in school at UC Berkeley. And it is one of those places that draws crowds and over an hour’s long waitlist for their weekend brunch. So, there was only a very specific window of my life when I could have eaten at La Note—one where I was old enough to afford a cute brunch treat but young enough to have the patience to wait that long for a table—and sadly, that window has now passed, in favor of my current curmudgeonly state.

But when I did eat there for brunch, my go-to choice was the baguette au brie and I would never skimp on the buy-up to add roasted tomatoes. I remember the tomatoes being very simply done, maybe not even the most flavorful and just a quick blister with a little sprinkle of herbes de provence. But somehow that combo of the crusty baguette, that rich creamy brie, and the juicy tomatoes translated to perfection in its simplicity when all chewed together in my mouth.

A sad early attempt at food photography, circa late 2013.

What’s nice about such a simple yet perfect combination is that it can easily be replicated at home! I’ve been doing as much for years but now I finally have some nice photos to show for it. I’m also sharing one of my earliest attempts at taking food photography seriously, above, and I hope you can see some improvement has been made since then. Incidentally, that old photo from 2013 was taken with a real DSLR camera, whereas the hero photo on this post was taken with my iPhone (as is my modus operandi these days)—proof, I hope, that it’s not about the equipment when it comes to taking a good food photo. (If you are interested in hearing more about how I shoot professionally on an iPhone now, check out my interview on the My Food Lens podcast here.)

Anyway, about this recipe. Obviously not a “recipe” recipe because toasty bread based meals like these are, I believe, so much more about what feels like the right amounts (or the amounts that fit) verses exact measurements. Just use a good French baguette, the creamiest European style butter, and your favorite brie. For the roasted tomatoes, mine are probably much more time consuming that what they did at La Note, but it shows in the amount of flavor that they will bring if you use my technique—found here.

How to Make Baguette au Brie with Roasted Tomatoes

Ingredients

1 French baguette, halved lengthwise
brie, sliced somewhat thinly
European style salted butter, softened
roasted tomatoes (see recipe here)
fresh herbs, such as thyme or oregano (optional)
cracked black pepper (optional)

Procedure

Slice baguette halves into desired lengths. Generously spread butter over the cut surfaces. Arrange an even layer of brie slices on top. Place on a baking sheet and put under the broiler; watch carefully and broil until the brie just begins to melt.

Immediately place slices of roasted tomato on top of the melted brie. If desired, garnish with fresh herbs and finish off with pepper.

For more toast inspiration, check out all the posts with the “toast post” tag here.

How I Make Roasted Tomatoes (in the Winter)

I miss tomato season. Seeing piles of heirloom tomatoes at the store and being able to pop down to my backyard to pull off ripe cherry tomatoes from the vine brings me unparalleled joy. But when we’re in the dregs of winter and the piles of (albeit pretty) citrus and root veg are just not cutting it for me, I get my tomato fix by roasting them to concentrate what flavors those crummy winter tomatoes grown who-knows-where have to offer. I go to Costco and get a few big containers of them so I can make a big batch; in past years they’ve been roma tomatoes but this year they had camparis, which looked surprisingly red and vibrant.

The purpose of this post is to share with you how I roast tomatoes in the winter. I am sure there are other ways to do it but I started doing this years and years ago and I have always been thrilled with the results so I haven’t bothered to experiment with other processes. My way—and here’s your warning—takes a bit of time and can get pretty messy. But think of it as a metamorphosis because this process will take your sad, bland, mealy off-season tomatoes and transform them into delicate morsels of concentrated tomato flavor, a little sweet and tangy like the best ripe tomato and with a silky, rich mouthfeel from mingling with all that good extra virgin olive oil. Their flavor is very similar to sun-dried tomatoes but of course they are soft and juicy instead of hard and wrinkly.

There are no measurements for this recipe because it’s the technique that’s important. Season things conservatively to your taste and let the concentrated tomato flavor be the star. Keep in mind that the tomatoes will really shrink down as they get rid of their excess moisture; about 4–6 pounds of tomatoes ends up being only one pint jar full of these glorious bursts of flavor.

The key to my method (and what makes it messy) is having the tomato slices spend some time on a hot griddle before they go into the oven. There will be oil splatter. But not only does this allow them to get a bit of sear right away but more critically, it causes the tomatoes to release their excess water, which you can then drain away (and use in pasta sauce) before placing the slices on a baking tray for roasting. Otherwise, you would end up with tomato slices poaching or simmering in their own juices instead of allowing their flavors to get concentrated by way of roasting.

I like to line my largest metal baking trays with foil for easy clean-up before I add the tomatoes. I’ve read that you are not supposed to cook tomatoes or other acidic things on aluminum foil but I have also read that the reaction is not enough to cause any concern. (I’m still alive!) You are welcomed to try your own large, flat baking vessel and an alternative form of protection like parchment paper, but I have not tried these methods and cannot guarantee the same results!

Here is some visual inspiration for how to use the literal fruits of your labor:

How I Make Roasted Tomatoes

Ingredients

4 lbs (or more!) of firm, off-season tomatoes
extra virgin olive oil
kosher salt
a few garlic cloves, thinly sliced
fresh thyme, rosemary, and/or oregano

Procedure

Cut tomatoes lengthwise into 1/2-inch pieces. Drain off any excess juices and seeds.

Preheat oven to 400°F. Line large rimmed baking trays with foil for easier clean-up.

Heat a large, flat, non-stick griddle pan on high heat. Drizzle some olive oil across the cooking surface, then add as many tomato slices as will fit in a single layer. Drizzle more olive oil over the tomatoes, and season with a light, even sprinkle of kosher salt. (Note: There will be splatter as the tomatoes release juices that get incorporated with the hot oil.)

After 1–2 minutes, regularly check the tomato slices that are on the hottest part of the pan. When some searing is visible, start carefully flipping the tomato slices. When the other sides begin to sear, transfer tomatoes to lined baking trays. Pour away any excess oil and tomato juices/seeds (but save all this to incorporate into a future pasta dish!). Repeat the griddle process as needed until all the tomato slices have been seared.

Lightly drizzle more olive oil over the tomatoes. Place trays of tomato slices in the preheated oven. Set the oven temperature down to 325°F. Bake for 20 minutes.

Remove the trays from the oven and scatter garlic slices and herbs over the tomatoes. Return trays to the oven for another 30 minutes of baking.

Allow roasted tomato slices to cool and set before transferring to a jar. I like to cover them in olive oil before storing them in the fridge.

Recipe: Lap Cheong and Scallion Stuffed Cheesy Bread

lapcheongscallioncheesebread.JPG

I wanted to test this idea of stuffing focaccia with cheese for another project and I decided to try it out with one of my favorite ingredient combos. To be honest, I can’t think of an exact traditional dish that combines lap cheong (sweet Chinese sausage), scallions, and cheese but they do make me think of the smells of a Taiwanese bakery where you can find hot dog buns, scallion buns, and the like.

Lap cheong can be found at any Asian market. This low sodium option from Kam Yen Jan is my favorite one to get. The casing is very thin and I like to peel it off and crumble the sausage by hand for more organically shaped pieces, but you could also just slice it up. It is a fatty, slightly sweet, and intense savory flavor that tends to be used in moderation in Chinese dishes. But this recipe is not about moderation!

I shared a photo of this in my Instagram stories and got a lot of reactions to it, but I don’t think the photo is quite insta-worthy so I am just going to share the recipe here.

How to Make Lap Cheong & Scallion Stuffed Cheesy Bread

Ingredients

2/3 cup warm water*
1 tsp honey
1 1/2 tsp dry active yeast
1 3/4 cups all purpose flour
1/8 cup olive oil plus extra for drizzling
1/4 tsp kosher salt
3 lap cheong (sweet Chinese sausages)
1 cup grated fontina cheese (or mozzarella or white cheddar)
1 bunch scallions, chopped

* I have found that hot water from my tap works well for blooming yeast.

Procedure

In the bowl of your stand mixer, gently combine water, honey, and yeast. Allow the yeast to “bloom” for 5–10 minutes in a warm place until there is a fine foam on top.

Fit your stand mixer with the dough hook. Set the mixer to low speed and gradually add 1 3/4 cups flour, then 1/8 cup olive oil and salt. Turn up the speed of the mixer to medium-low and allow the dough to be kneaded for 4 minutes. If the dough has not pulled away from the sides of the bowl, add an additional 1 tablespoon of flour. Continue to knead for 1–2 minutes. Dough should be sticky but you should be able to easily remove it from the dough hook.

Scrape the dough out of the bowl and form a ball. Generously coat the inside of the bowl with olive oil. Roll the ball of dough around in the olive oil until coated. Cover with a damp towel and place in a warm spot to proof for 60 minutes, or until it has doubled in size.

In the meantime, remove the casing from the lap cheong and crumble into small pieces. Cook on medium heat in a small skillet until just heated through. Drain away excess rendered fat.

When the dough has had its first rest, gently fold in three-quarters of the chopped scallions and divide the dough in half. Coat the inside of a 10-inch cast iron skillet with olive oil. Use your fingers to gently press down half of the dough into the skillet, forming an even layer. Press the other half of the dough onto a large plate, to roughly the same size as the skillet. Cover both halves and let rest for another 20 minutes.

Meanwhile, place a rack one-third from the top of your oven and preheat to 400°F.

Press the relaxed dough in the skillet so it fully covers the bottom. Sprinkle the sausage on top and then roughly two-thirds of the cheese spread in an even layer. Top with the other half of the dough and pinch to seal the edges together. Dimple the surface of the dough with your fingers, drizzle generously with olive oil, and top with the remaining cheese and scallions.

Bake for 25–28 minutes or until the top is lightly browned. For neater bread sticks, allow to cool slightly before slicing—or, if you don’t care about that and live for danger, cut immediately and enjoy the skin-scalding gooeyness.

Food Photography with a Phone - Interview with the My Food Lens Podcast

Yes, it’s true—everything that you see on this website, as well as my Instagram, to-date, was shot and edited on my iPhone X.

How I got here was entirely from a combination of happenstance and laziness but at this point, one thing I am most proud of with my work is becoming a champion of phone photography. If I can help others feel encouraged to see that the quality of a photo is about the skill of the photographer and not having “better” (read: more expensive) camera gear, I can die happy knowing I made a positive impact on the world, helping to make one form of artistic expression feel more accessible to more people.

My friend Dyutima recently gave me the opportunity to share this message by inviting me onto her podcast, My Food Lens. This was such a fun experience for me; being someone who doesn’t absorb information as well through audio input, I actually had never listened to a podcast at all prior to listening to my own interview! I was actually pretty shocked, and pleasantly surprised, that listening back to my own voice did not feel completely obnoxious to me, and I am so grateful for the positive feedback I have received so far. Dyutima made me feel like I was just chatting away with a friend that I was meeting “face to face” for the first time, after corresponding for so long via direct messages.

In the episode linked below, I tried to share answers to the following questions:

  • Phones can be tricky because of their wide angle lens and lens distortion. What would be your 5 main tips for killer phone photography?

  • How important is light in phone photography? How do you work with light shooting with a phone? Do you use manipulators, is there a specific part of the house you shoot in?

  • What are your key styling techniques that are suited for photographing with a phone?

  • What is your editing application of choice and are there any hacks you can share?

  • Has photographing with a phone ever held you back from approaching clients or striking a deal?

  • Is it challenging to work with brands if one photographs with a phone? How do you navigate through it?

  • Who would you say phone photography is for? Influencers, social media content creators, professional photographers?

  • If someone chooses to shoot with a phone, how can they grow as a photographer? What skills should they focus on to improve their photography?

If you’ve been wishing to learn more about my process for shooting and editing all my photos on my phone (including all my client work!), give one of these a listen:

Yee Sang (Prosperity Toss Salad)

I wrote up a little recipe for Kvarøy Arctic Salmon to share how to incorporate salmon into a feast for the Lunar New Year. I really liked how the photos turned out—I tried to style the yee sang in a more modern, creative way. I’m really grateful to have sponsors that give me lots of freedom to tell me stories and represent my culture.

You can read more about yee sang and the symbolism of all the ingredients in my Instagram post.

Slow Cooker Chicken Adobo Ramen

I grew up hardly knowing my own grandparents across the ocean, and it was just me, my parents, and my sister here in the States. But my parents' host mom—the woman who opened her home to them when they first arrived as immigrants—was from the Philippines and she continued to be a mother figure to my parents and a grandmother figure to me well after my parents got settled. I call her Lola, the Filipino term for a grandma. So even though I am not Filipino, I grew up eating lots of chicken adobo during visits to my Lola’s house.

I remember my Lola's version of chicken adobo being more tangy/vinegary and more brothy than other versions I've had at restaurants as an adult. There was something about that soy and vinegar sauce that was always so appetizing; the kind of thing that you have to reawaken your tastebuds when you don’t think you feel like eating. I felt I could drink it by the bowlful! Which is why I developed this fusion recipe where the chicken adobo braising liquid becomes the base for a noodle soup.

The key steps to making this recipe are:

  • Browning the chicken. This renders out the excess fat from the chicken skin, giving you a glorious schmaltz that will be used later.

  • Braising the chicken in a slow cooker. I opted to go the slow cooker route to keep the recipe low maintenance. The browned chicken thighs are given a chance to soak up the flavors from a braising liquid made up of soy sauce, vinegar, lots and lots of garlic, and black peppercorns.

  • Making the broth. Blending together the strained braising liquid and all that soft garlic creates an emulsified broth that is rich and almost creamy. It has a much more concentrated flavor than a traditional soup ramen.

  • Frying the garlic chips. That saved chicken fat goes into making the most delicious garnish of fried garlic chips, which in turn infuses the chicken fat with some of that garlic flavor.

  • Frying the egg. Inspired by Filipino silog, I decided this ramen needs to get topped with a beautiful fried egg.

  • Boiling the noodles and assembling the bowl. I chose to keep the thigh whole but you can also shred it up before serving if you don’t want the recipients to have to maneuver with the bone.

  • Finally, that schmaltzy goodness from before gets drizzled over the whole bowl as a finishing touch at the end.

Click here to get the recipe on the Pete and Gerry’s site!

Thank you so much to Pete and Gerry’s for sponsoring this recipe!

Recipe: Lobster Bao with Ginger and Garlic Butter

lobster bao

Here’s an easy recipe idea for if your Chinese New Year celebrations are on the smaller scale this year. I took the idea of combining lobster with melted butter from a Connecticut style lobster roll and put an Chinese-inspired twist to it by adding aromatics such as ginger, garlic, and scallions into the butter. I stuffed the fragrant lobster meat into steamed bao, which can be bought from an Asian grocery store and stashed in your freezer.

I think of lobster as a celebratory food. It is often a part of Chinese New Year menus and other celebratory banquets where expensive seafood is served as a sign of prosperity. It is also red, a lucky color in Chinese cuisine. As I was researching Lunar New Year foods and customs, though, I learned that some believe lobster to be unlucky for the new year because they can crawl backward. This was my first time learning such a contradiction among different cultures that celebrate this holiday and I thought it was super interesting that this contrast existed. If you plan to make this recipe as part of your own celebration, please do proceed with caution that some consider lobsters a lucky part of a Lunar New Year meal while others might consider it less auspicious.

Stuffed bao represent little purses and are also considered a lucky food in Chinese culture. Many of the foods with good symbolism for the new year are meant to represent something having to do with wealth and prosperity. The more luxurious the ingredients, the better to welcome in the new year, but I wanted my more modern recipe to be more accessible, too. I used precooked lobster and tobiko for the bao you see in the photos but you could certainly upgrade to more high end ingredients if you wish.

How to Make Lobster Bao with Ginger and Garlic Butter

Ingredients

8 oz pre-cooked lobster meat*
2 frozen storebought baos
1/4 cup salted butter
2 inches of ginger, peeled
2–3 cloves garlic, minced
white parts of 2 scallions, thinly sliced
2 tsp chives, chopped
2 tsp tobiko or caviar
yellow edible flowers, for garnish (optional)

*I used a thawed frozen pack of cooked knuckle and claw meat. Alternatively, you could blanch a couple of lobster tails, discard the shells, and chop the meat into chunks.

Procedure

Drain any excess liquid from the lobster meat and set meat aside.

Finely grate the ginger, then gently squeeze out the excess water. You do not need to wring out all the moisture; the ginger should feel like a damp clump.

Prepare the bao. Place them in a parchment paper lined steamer, and place the steamer over simmering water in a wok or pan. Steam until the bao are soft and fluffy and heated through, about 5 minutes. Shut off the heat.

Melt the butter in a small saucepan on medium-low heat. Add the ginger and the scallion whites and allow to fry gently, stirring continuously, until the aromatics just start to color. Add the garlic and turn down the heat to low; continue to stir, allowing the garlic to slowly cook and infuse the butter. When the garlic just starts to color, add the lobster meat. Toss together to coat the lobster in the butter then remove from the heat.

Stuff the lobster pieces equally in the bao and serve the extra butter on the side. Top the lobster with chives and fish roe (tobiko or caviar).

Optionally, decorate with some edible yellow flower petals to complete that lucky red and gold color combo before serving.

Recipe: Eggs in Easy Red Pepper Sauce with Chili Butter

I love myself some shakshuka but there is just one problem: every time I think about making it, I am hit with anxiety over how the eggs will turn out. Either I make the wells in the sauce too small and the egg whites end up running away all over the surface of the dish or the yolk ends up breaking or getting overcooked. I have tried maybe over a dozen times and getting those perfect sunny-side-up eggs poached in the shakshuka tomato sauce has felt completely impossible (I am now convinced that all those photos online of perfect shakshuka were photoshopped).

So, I started brainstorming ideas for shakshuka-adjacent recipes that are just as big on flavor and runny egg deliciousness without the anxiety. I feel confident in my ability to make regular poached eggs, so this recipe involves making the sauce and eggs separately and then plating them together at the end to form a low-stress dish that you won’t be able to resist scooping into with a nice crusty piece of toast.

For the sauce, I thought I’d go for something as easy as possible, which is one of those sauces where you literally just throw everything in a blender and blitz it together. Since it is not tomato season at the moment and I have been feeling rather uninspired by the winter produce that is in season, it was a good time for me to play around with just using up pantry items. Whether you are still burnt out from cooking up a storm during the holidays or you are just feeling lazy about venturing out to the grocery store in the cold, this is the recipe for you. The sauce is inspired by romesco sauce, a Catalonian roasted tomato and pepper sauce, but it utilizes jarred bell peppers and tomato paste instead. To make up for the sort of one-note flavors of the jarred ingredients, seasoning is everything in a blender sauce like this! I reached for my go-to all purpose seasoning blend—Spice Tribe’s Haitian-inspired Mama Manje—and it instantly transformed the sauce from tasting rather flat and bland to having incredible depth of flavor. I’ve found in general that this seasoning blend is capable of rescuing anything from blandness with its unique combination of green bell pepper, onion, thyme, cinnamon, garlic, ginger, habanero, and star anise.

And then to add a little something extra to the dish, it all gets finished off with my favorite recipe for chili butter. The dish has plenty of flavor already with the romesco-like sauce and the perfectly poached eggs nestled into it, and a sprinkle of fresh herbs and cheese, but a finishing touch of melted butter infused with Spice Tribe Maras chile flakes takes the whole thing from a casual breakfast affair to an indulgent brunch for kicking off a gorgeous lazy Sunday. There is just something about the flavor that blooms out of bubbling together some salted butter and those chile flakes that is so good with those luscious runny egg yolks. It’s the kind of melted chili butter you’d typically find on top of Turkish eggs or çılbır and I started making it when I developed this recipe for Spice Tribe but I find myself finishing off many dishes this way.

This dish is simple to make but it certainly won’t taste like it! It’s also pretty flexible as long as you capture the basic ideas. Here are the different components that make up the dish:

  • The sauce: Kind of inspired by Spanish romesco sauce but way way easier because you just throw jarred bell peppers, almonds, tomato paste, good quality spices, garlic, olive oil, and vinegar into a blender and blend until smooth. You can use whatever almonds you have on hand as long as they are unsalted, and you might even be able to get away with salted almonds and just not add more salt. Don’t skimp on the Spice Tribe Mama Manje blend though, or you’ll end up with something that tastes rather flat and boring.

  • Eggs: The soft poached eggs with runny yolks that ooze into the yummy sauce are what make the dish, in my opinion. But if you don’t feel confident in your ability to poach eggs, fried eggs would also work great for this dish. Soft-boiled eggs, boiled for 6–7 minutes, would also be amazing. It’s meant to be low-stress so do what is easiest for you.

  • Fresh herbs and cheese on top: A little bit of freshness from some green herbs and some extra creamy umami from cheese are not critical, but they do much to enhance the dish in terms of taste, texture, and visual impressiveness. You can definitely use whatever herbs and crumbly cheeses you have on hand.

  • Melted chili butter drizzle: The finishing touch, this is what takes the dish to another level of brunch luxury, to see the spicy butter flow and pool in all the swirls of the sauce. And this extra little step is super easy too—just melt some butter, add the Spice Tribe Maras chile flakes, and allow the flavor the bubble and bloom for a bit before spooning it over your masterpiece.

How to Make Eggs in Easy Red Pepper Sauce with Chili Butter

Ingredients For the Red Pepper Sauce

12 ounces jarred roasted red bell peppers, drained
1/3 cup unsalted roasted almonds, roughly chopped
3 tablespoons tomato paste
3 garlic cloves
1 1/2 teaspoons Spice Tribe Pimentón de la Vera
1/2 teaspoon Spice Tribe Mama Manje Haitian Blend
2 tablespoons extra virgin olive oil
2 teaspoons red wine vinegar
1/2 teaspoon kosher salt (or to taste)

Ingredients For the Chili butter

1/4 cup salted butter
2 teaspoons Spice Tribe Maras Chile Flakes

Ingredients to Assemble the Dish

4 eggs, poached
1/4 cup queso fresco or feta, crumbled
Fresh herbs, such as parsley or dill, for garnish
Black pepper, to taste
Toasts, for serving

Procedure

Combine all sauce ingredients in a blender and blend until smooth. Transfer to a small pot and simmer on low until heated through and slightly thickened, about 5–10 minutes.

In a separate small saucepan, melt butter on low. Just as butter starts to bubble, add the Spice Tribe Maras chile flakes. Stir gently and continuously until foamy and fragrant. Remove from heat.

Spoon sauce into serving bowl(s). Nestle poached eggs into the sauce and top with cheese, herbs, and pepper as desired. Briefly warm up spicy butter again if needed, then pour over the plated ingredients. Serve with toasts on the side.

Thank you so much to Spice Tribe for sponsoring this recipe! Check them out on Instagram here or visit their website to purchase high quality spices and unique small-batch spice blends.

Recipe: Cheesy Prosciutto and Pesto Puff Pastry Tarts

For this recipe, I partnered with Filippo Berio to share an idea for an unfussy snack or appetizer that is perfect for last-minute gatherings during the holidays. These little handheld tarts capture all the elements of a nibble board—two kinds of cheeses, salty prosciutto, a nice savory condiment, sweetness from the pomegranate arils, and herbaceous basil leaves for freshness—but everything is encased in a lovely, elegant looking puff pastry. 

In no way am I trying to knock nibble boards or charcuterie boards, but have you ever tried actually enjoying one of these at a party? You wait for that break in the conversations when someone else is sharing an anecdote so you don’t have to talk, and—excited to seize the opportunity to enjoy some delicious cheese and charcuterie piled onto a delicious crispy cracker—you take that long awaited bite, only for the cracker to shatter embarrassingly as it makes contact with your teeth, causing all its precariously-placed toppings to fly everywhere. Perhaps I can only speak from personal experience but if so, I am saving you from ever meeting that terrible fate by telling you to make this recipe instead.

I always keep a stockpile of Filippo Berio pestos on hand because they are so super convenient. They are great for when I am too busy to make dinner and need something to toss together with the frozen ravioli I always keep in the freezer and I also find them so useful for when I need a bold tasting condiment for things like toasts, snack or salad platters, and sandwiches.

Much like putting together a nibble board or charcuterie board is choosing your own eating adventure, so are these tarts. Each component could be swapped out for something else in the same category that better suits your tastes. Only one of the cheeses gets baked into the puff pastry tart shells, and then everything else gets added after baking. We’re kind of treating the pastry as a slice of toast, but the delicate buttery layers will feel so much more like a special occasion. These tarts are a great way to upcycle what you happen to have in your fridge, and the pesto will really help to bring all the elements together.

Here’s what you’ll need:

  • Frozen puff pastry dough: Having a stash of this in your freezer will allow you to make elegant and impressive baked delicacies with minimal effort. I usually thaw mine in the fridge overnight but in a pinch, a brief stint on the countertop should be enough. For this recipe, you just need to be able to easily score the dough, so even partially thawed would be fine if you have surprise holiday visitors; you may just need to add a couple minutes to the baking time.

  • Freshly-grated fontina: I love the way the savory, nutty flavors of fontina work in this savory tart, but any smooth semi-hard cheese would work here. Always remember to grate it yourself instead of using pre-grated stuff, for the right kind of melty goodness!

  • Burrata: I am obsessed with burrata! There is something about those loose, creamy cheese curds that just feels like such an indulgence to me. If you have trouble finding burrata I would suggest substituting a fresh ricotta, but even a creamy soft chevre would be yummy here!

  • Prosciutto: Sliced so thin that you can almost see through it, prosciutto is a go-to charcuterie choice in my household. I think its delicate appearance contributes to the appeal of these tarts. 

  • Filippo Berio Classic Pesto: I find that having some kind of tasty herbaceous condiment really helps tie everything together when combining elements of sweet and savory, so this convenient version of traditional Genovese pesto really hits the spot.

  • Pomegranate Arils: I love how these let out a nice, juicy, slightly tart burst as they pop in your mouth. Not only are these the sweet component of the tarts, but I also think that adding these plus leafy herbs to any dish instantly makes it look festive, kind of like holly. However, I think swapping in kumquat slices or even thinly sliced pears or apples would work well here if that’s what you have.

How to Make Cheesy Prosciutto and Pesto Puff Pastry Tarts

Ingredients

1 sheet frozen all-butter puff pastry, thawed
flour, for dusting
1 egg, beaten, for eggwash (optional)
1 packed cup fontina cheese, freshly grated
4 oz burrata
2–3 oz thinly sliced prosciutto
4–6 tsp Filippo Berio Classic Pesto
3–4 tbsp pomegranate arils
fresh basil leaves, for garnish

Procedure

Preheat oven to 400°F and line a large baking sheet with parchment paper.

Dust worksurface with flour and unfold puff pastry sheet. Gently roll out puff pastry dough to smooth out any creases and create an even rectangle about 1/6-inch thick. Cut sheet into 4 equal pieces (about 4” x 5 1/2”). Place puff pastry pieces on prepared baking sheet, at least 1 inch apart.

Using the tip of a sharp knife, score a rectangle into each piece of puff pastry, about 1/4 to 1/2 inch inward from the edges. If using eggwash, brush a small amount onto the outer frames only, taking care to avoid excess eggwash from dripping over the edge of the dough or inside the scored line (which would seal the pastry layers together and prevent them from puffing); discard or store remaining egg.

Divide the grated cheese onto the centers of each piece of puff pastry. Bake for 10–14 minutes, or until tarts are puffy and golden. 

Immediately tear up burrata and divide evenly among the baked tarts, allowing the residual heat to melt it slightly. Roughly tear prosciutto and place onto the tarts, then drizzle pesto over each. Top with pomegranate arils and garnish with fresh basil leaves.

Thank you so much to Filippo Berio for sponsoring this recipe! Visit their website to learn more about their authentic olive oils, made to the highest quality standard of excellence and craftsmanship.

Recipe: Tomato Soup with Pepperoni and Cheese Toast Tops

So we all know that the very best part of French onion soup is the bread and cheese topper that goes over the soup: that delicious gratinated crostini that forms a lid for you to push through to get to the rest of the contents of the bowl, where the top is covered in a very generous layer of melted cheese and the underside is soaked through with the cozy, soul-warming broth. I learned a new word as I was researching for this recipe, and that word was gratinated—which, according to ol’ Merriam and Webster means “to cook with a covering of buttered crumbs or grated cheese until a crust or crisp surface forms”. Well, why can’t other soups have gratinated toasts as blankets to keep them warm?

They obviously, surely, can and may—and I thought there was no more deserving soup than a simple tomato one. We all already know that tomato soup pairs perfectly with toasted bread and melted cheese, seeing as a grilled cheese sandwich and a bowl of tomato soup has long had a honorary place in the Culinary Couples Hall of Fame. So I decided to take this union to the next level by taking my trusty, amazingly easy tomato soup recipe and give it a melted cheese toastie top. But then my mind went to how tomato soup is basically like a brothy tomato sauce, and how tomato sauce + bread + melted cheese = pizza toast, and how pepperoni and cheese is the ultimate pizza combo…and that is how we ended up here: tomato soup with pepperoni and cheese toast tops.

And it is every bit as good as you might dream it would be.

Some notes about the ingredients for my tomato soup with pepperoni and cheese toppers:

  • The base of this recipe is whole peeled canned tomatoes. There are a lot of varieties out there and I have found quite a vast difference in salt content and the natural sweetness of the tomatoes. Therefore, this recipe has lots of notes about tasting along the way and seasoning according to your tastes. You might also notice that whole peeled canned tomatoes sometimes come in purée and other times come in a thin liquid. You will want to add more liquid to the soup if you are using ones that come with a thick purée. Do they really have to be San Marzano style? No. But it is typically what I look for because…just because.

  • My go-to way of seasoning any tomato-based sauce or soup is with fish sauce. Trust me on this one. There is something about the acidity of the tomatoes and the salty, funky fish sauce umami that works so well for bringing out the best of tomato flavor. I promise that it won’t actually taste like fish, but instead like tomatoes that have been cooked with love and with some sort of flavorsome mystery ingredient. I am a diehard fan of the Three Crabs brand of fish sauce, by the way.

  • Check the size of your bread. You will want something that can lie flat against the surface of the soup inside the soup crock, so that it forms a nice topper over the soup without the edges getting burned. You will also want something nice and crusty, so that it doesn’t completely disintegrate the moment it is placed on top of the soup. You’ll be toasting it first, and then putting it on top of the soup, and then melting the cheese over it under the broiler.

  • Use the type of cheese that works for you but make sure it’s freshly grated. Any semi-hard white block cheese should work well for this; I used a young gouda but you could go with mozzarella or pay homage to the French onion soup inspiration with gruyere. Any cheese you associate with melting. But be sure to grate it yourself instead of using the pre-grated stuff in order to get a nice cohesive consistency.

  • And finally, how do I turn pepperoni into those iconic, inviting little cups of grease? I get a whole stick of pepperoni in natural casing and slice it myself. This article on Serious Eats goes into detail about what type of pepperoni gets cuppy when cooked. I used Boar’s Head Natural Casing Traditional Pepperoni and it has always served me well. (Shoutout to my friend Peggy for pointing me in the right direction on this.)

That all being said, this recipe is so dang flexible. Skip the pepperoni if you want. Use a few tiny baguette slices instead of one slice of toast covering the whole top. Use a damn boxed tomato soup if you really must. At the end of the day you are talking about tomatoes, bread, cheese, and some fire magic to melt it all together, and (as long as you are being safe about that fire bit) you’re gonna end up with something good.

How to Make Tomato Soup with Pepperoni & Cheese Toast Tops

Ingredients for Soup

1/4 cup butter
1 medium sweet onion, peeled and cut into wedges
6–8 garlic cloves, peeled and smashed
1 28-oz can of whole peeled San Marzano tomatoes*
1–2 tsp fish sauce
1–2 tsp sugar (optional)
cracked black pepper, to taste (optional)

Ingredients for Toast Toppers

2 small slices crusty bread**
1+ cup freshly grated cheese, such as young gouda, gruyere, monterey jack, or mozzarella
8–12 slices pepperoni with natural casing
herbs for garnish, such as basil, thyme, or oregano

*If using “tomatoes in purée”, see extra note in Procedure.
**Check that the bread slices fit within your soup crocks in order to form a “topper” over the soup

Procedure

In a medium dutch oven or pot, melt butter on medium-low heat. Add onions and sweat until they turn translucent and edges are beginning to caramelize. Add garlic, turn heat down to low, and stir regularly until garlic is fragrant and starts to turn golden. Add can of tomatoes.

Scrape up any bits stuck to the pot and carefully transfer contents of pot to a blender. Add 3/4 cup water (or, if using “tomatoes in purée” add 1 1/4 cup water). Blend until liquified, then pour back into pot.

Stir in 1 teaspoon of fish sauce. Check for seasoning. If soup tastes a bit weak in tomato flavor, add 1 to 2 teaspoons of sugar.

Simmer uncovered on low, stirring occasionally, until soup is heated through and starts to bubble or simmer. Check for seasoning again and add additional fish sauce or sugar as needed. Season with black pepper if desired. Cover and keep warm.

Lightly toast slices of bread with your preferred method of toasting.

Spoon soup into 2 oven-safe soup crocks. Top each with a piece of toast. Divide cheese between the two toasts.

Position an oven rack so crocks can be close to the broiler flame. For easy transportation, place crocks on a sturdy sheet pan before positioning under broiler. Watch carefully while broiling. Broil until cheese just starts to melt, then top cheese toasts with pepperoni and continue to broil until cheese is completely melted and pepperoni has curled up to form cups. (Alternatively, you could follow these same steps using a kitchen blowtorch instead of a broiler if you make sure to move the torch around to distribute heat evenly.)

Remove soup crocks and garnish with fresh herbs before serving.

One last reminder about safety…I consider this recipe to be pretty easy but it does involve FIRE. Whether you choose to use your oven’s broiler setting or a blowtorch, keep a close watch on your precious soup toppers. Once the cheese starts to melt, you’ll be surprised how quickly it can die a charred death under an unsupervised broiler. Use oven-safe containers. Don’t let your bread catch on fire. Basically, you don’t want yourself or your culinary creation to end up like Andy:

Image via @foone on Twitter, from Apple’s Oregon Trail

Recipe: Chicken and (Chinese) Dumplings

Having grown up in a household where at least 4 different languages/dialects were randomly slung around, it is no wonder that I was linguistically confused throughout my childhood. My parents were young kids when Malaysia got its independence from the British, so the English I learned from them at home was the British English (with a Malaysian twist) they learned there, and there were always random words from Cantonese, Hokkien, and Bahasa Malaysia sprinkled in. So imagine my confusion as a child going to school for the first time in America; I thought  “airplane” and “aeroplane” were two different forms of aircrafts and I spent my childhood being a rather quiet kid because I was just so worried about saying the wrong words all the time. Fortunately, I eventually learned enough American English to earn a degree in it, and those days of me being quiet are long over!

Even so, these semantic quirks seemed to continue well into my adulthood. Back when I had a sad job as a textbook editor with no time to go out for lunch breaks, I bought some cans of chicken and dumplings to bring to the office. I guess the image on the can was not enough to inform me otherwise, and I excitedly pictured myself microwaving a nice cozy bowl of creamy American style soup (which I loved) loaded with the wontons from the dumpling soup of my childhood. Up until that point, the only dumplings I knew of were Asian dumplings. So boy was I surprised when out of the can plopped some lumps of solid dough in place of the meat-stuffed purses I imagined.

I grew to appreciate those strange (to me) dough globs bobbing in what I learned was a classic comfort food of the American South. But I always thought that my interpretation of chicken and (Chinese) dumplings needed to exist too! I love having partners like Filippo Berio who are willing to entertain my weird personal stories and support me in turning them into reality. Since we were already breaking away from the norm, I decided to use Filippo Berio Extra Virgin Olive Oil to sauté my veggies and cook flour into a sort of roux-like base that gives this winter warmer its body and heartiness. Olive oils may be associated with Mediterranean cooking, but they can be used to create a variety of dishes from around the world; Filippo Berio offers a whole range of high quality olive oils with different properties and flavor profiles, depending on what type of cooking you are doing. I used their extra virgin olive oil because I knew it would bring a richness to the dish as well as a beautiful golden color; if my soup looks a little more glowy and inviting than the typical pale chicken and dumplings, that’s why!

Some notes about the ingredients:

  • Boxed broth is absolutely fine for this recipe, but I encourage you to save up your produce scraps, chicken bones, and leftover Thanksgiving turkey carcass and make your own delicious no-waste broth! You can read about how to do that in my previous post with Filippo Berio right here.

  • Filippo Berio Extra Virgin Olive Oil is fruity and grassy and I love it for sautéing vegetables. Though this recipe does not involve making a traditional roux, sautéing the vegetables in this oil and then adding a little bit of flour to the mix is what helps give this soup body and adds to its complexity of flavor.

  • I’m calling this recipe “chicken and dumplings” but in this case, the chicken is actually IN the dumplings! Ground chicken and mild leeks are the main ingredients in the dumpling filling. If you can find it, go for ground chicken thigh meat which is more moist. And be sure to only use the tender white and light green portions of the leek.

  • I use shaoxing wine and soy sauce for this recipe, not just in the dumplings but to season the soup as well. It is a fusion dish, after all! If you do not have shaoxing wine, you can sub in dry sherry in a pinch.

  • If you go to an Asian grocery store for your dumpling wrappers, you may be spoilt for choice. Since these dumplings are going to be boiled, most options will work for this recipe no problem. I usually get the ones that are for potstickers.

How to Make Chicken and (Chinese) Dumplings

Ingredients for the Dumplings

1/2 lb ground chicken
1 cup leeks (light tender parts only), finely chopped
4 cloves garlic, minced
2 tbsp fresh parsley, chopped
1 sprig (1–2 tsp) rosemary leaves , finely chopped
1 tbsp shaoxing wine
1 tbsp soy sauce
1/8 tsp white pepper
1/4 tsp salt
18–20 round dumpling wrappers

Ingredients for Soup

1/3 cup Filippo Berio Extra Virgin Olive Oil
1 small yellow onion, diced
2 carrots, cut into 1/4-inch slices
2 celery stalks, cut into 1/4-inch slices
4 cloves garlic, minced
1/2 tsp salt, plus more to taste
2 tbsp AP flour
1/4 tsp cracked black pepper
3 cups unsalted or low sodium chicken or turkey broth
1 tbsp shaoxing wine
1 tsp soy sauce
2 dried bay leaves
1/2 tsp dried oregano
1/2 cup frozen peas, thawed
3/4 cup evaporated milk
fresh herbs (such as oregano, rosemary, or thyme), for garnish (optional)

Procedure

To make the dumplings, combine all of the listed dumpling ingredients (except the wrappers!) in a mixing bowl and mix thoroughly. Scoop about 1 tablespoon of filling into the middle of a wrapper. Dip a finger into water and paint a wet ring along the edges of the wrapper. Fold the wrapper in half to seal in the filling, taking care to press out air bubbles. If desired, bring the two sides of the semicircle together and overlap to form a loop, using water to help stick the dough together; or, fold to your desired dumpling shape. Place on a tray lined with parchment paper. Repeat until all the filling is secured into dumplings. Refrigerate dumplings until ready to use.

Add Filippo Berio Extra Virgin Olive Oil to a soup pot on medium-high heat. Add onion and when it starts to sizzle, sauté until it begins to turn translucent. Add carrots and celery and sauté for 1 minute, then add garlic and salt. Sauté until the garlic begins to color and carrots and celery start to soften, about 4–5 minutes. Sprinkle flour and pepper into the pot and cook, stirring, until the flour at the bottom of the pot begins to turn golden, about 2 minutes. 

Gradually stir in the broth, scraping the bottom of the pot with a wooden spoon to scrape up the flour and make sure it incorporates with the broth without clumping. Stir in shaoxing wine, soy sauce, bay leaves, and dried oregano. When the soup begins to bubble, turn heat to the lowest setting and simmer, uncovered, for 10 minutes or until carrots are almost the desired tenderness. 

Add peas and evaporated milk. Stir together and season with salt to taste. Turn up heat to high and gently add the dumplings, making sure they are fully submerged in the liquid. Allow the dumplings to cook through, about 4–5 minutes.

Spoon into bowls, making sure everyone gets enough of all the goodies, especially the dumplings. Optionally, garnish with fresh herbs before serving.

Thank you so much to Filippo Berio for sponsoring this recipe! Visit their website to learn more about their authentic olive oils, made to the highest quality standard of excellence and craftsmanship.

Loaded Sweet Potato Breakfast “Toasts”

For this recipe, I’ve swapped out my usual beloved toasted bread for autumnal slabs of roasted sweet potato and topped them with twists on all the goodies from a big savory breakfast.

  • roasted sweet potato slices: These serve as the main carb here, and the vehicle for transporting all the other delicious toppings to your main face hole. Sweet potatoes have that subtle natural sweetness that is in all good fall recipes. Roasting them turns them into soft comfort food, yet they stay sturdy enough to act as “toasts”.

  • crispy prosciutto: Crisping up the prosciutto on the same sheet pan while you’re roasting the sweet potatoes turns them into these super savory chips that are like a dainty version of bacon.

  • cheddarized scrambled eggs: This is what I call my favorite way to make scrambled eggs. They’re based off Gordon Ramsey’s low and slow method but at the very end before the eggs are fully cooked, some sharp cheddar gets folded in so there’s also gooey, melty cheesiness in the mix.

  • crème fraîche: Inspired by the sour cream that tops a perfect loaded baked potato, I finished these off with a dollop of crème fraîche to pull everything together before sprinkling on a little bit of fresh thyme and microgreens for freshness, and some smoky paprika.

Click here to get the recipe on the Pete and Gerry’s site!

Thank you so much to Pete and Gerry’s for sponsoring this recipe!