Melt-in-Your-Mouth Chili Garlic Eggplant Salad on Labneh

Eggplants, aubergines, brinjals. I never understood why people don’t like them. I think people who say it’s a texture thing are eating ones that are not cooked properly. People who say they are bitter must be eating ones that aren’t fresh. When cooked properly and at the right time, eggplants—especially Chinese and Japanese eggplants—shouldn’t be anything but silky flavor sponges. And this recipe features these long eggplants in their very best form, with a completely melt-in-your-mouth texture and a rich, tangy, fragrant, and numbing spicy sauce that is absolutely addictive.

Chili garlic eggplant—as in, the stir-fry kind found on many Chinese restaurant menus in the US—used to be the thing I’d make to treat myself when my anti-eggplant spouse was out of town. He has since come around to admitting that he actually does enjoy eggplant, just not in the crappy eggplant parms he had during his Italian-American upbringing. So I get to have stir-fried chili garlic eggplant a lot more often nowadays. But this is not a recipe for that dish.

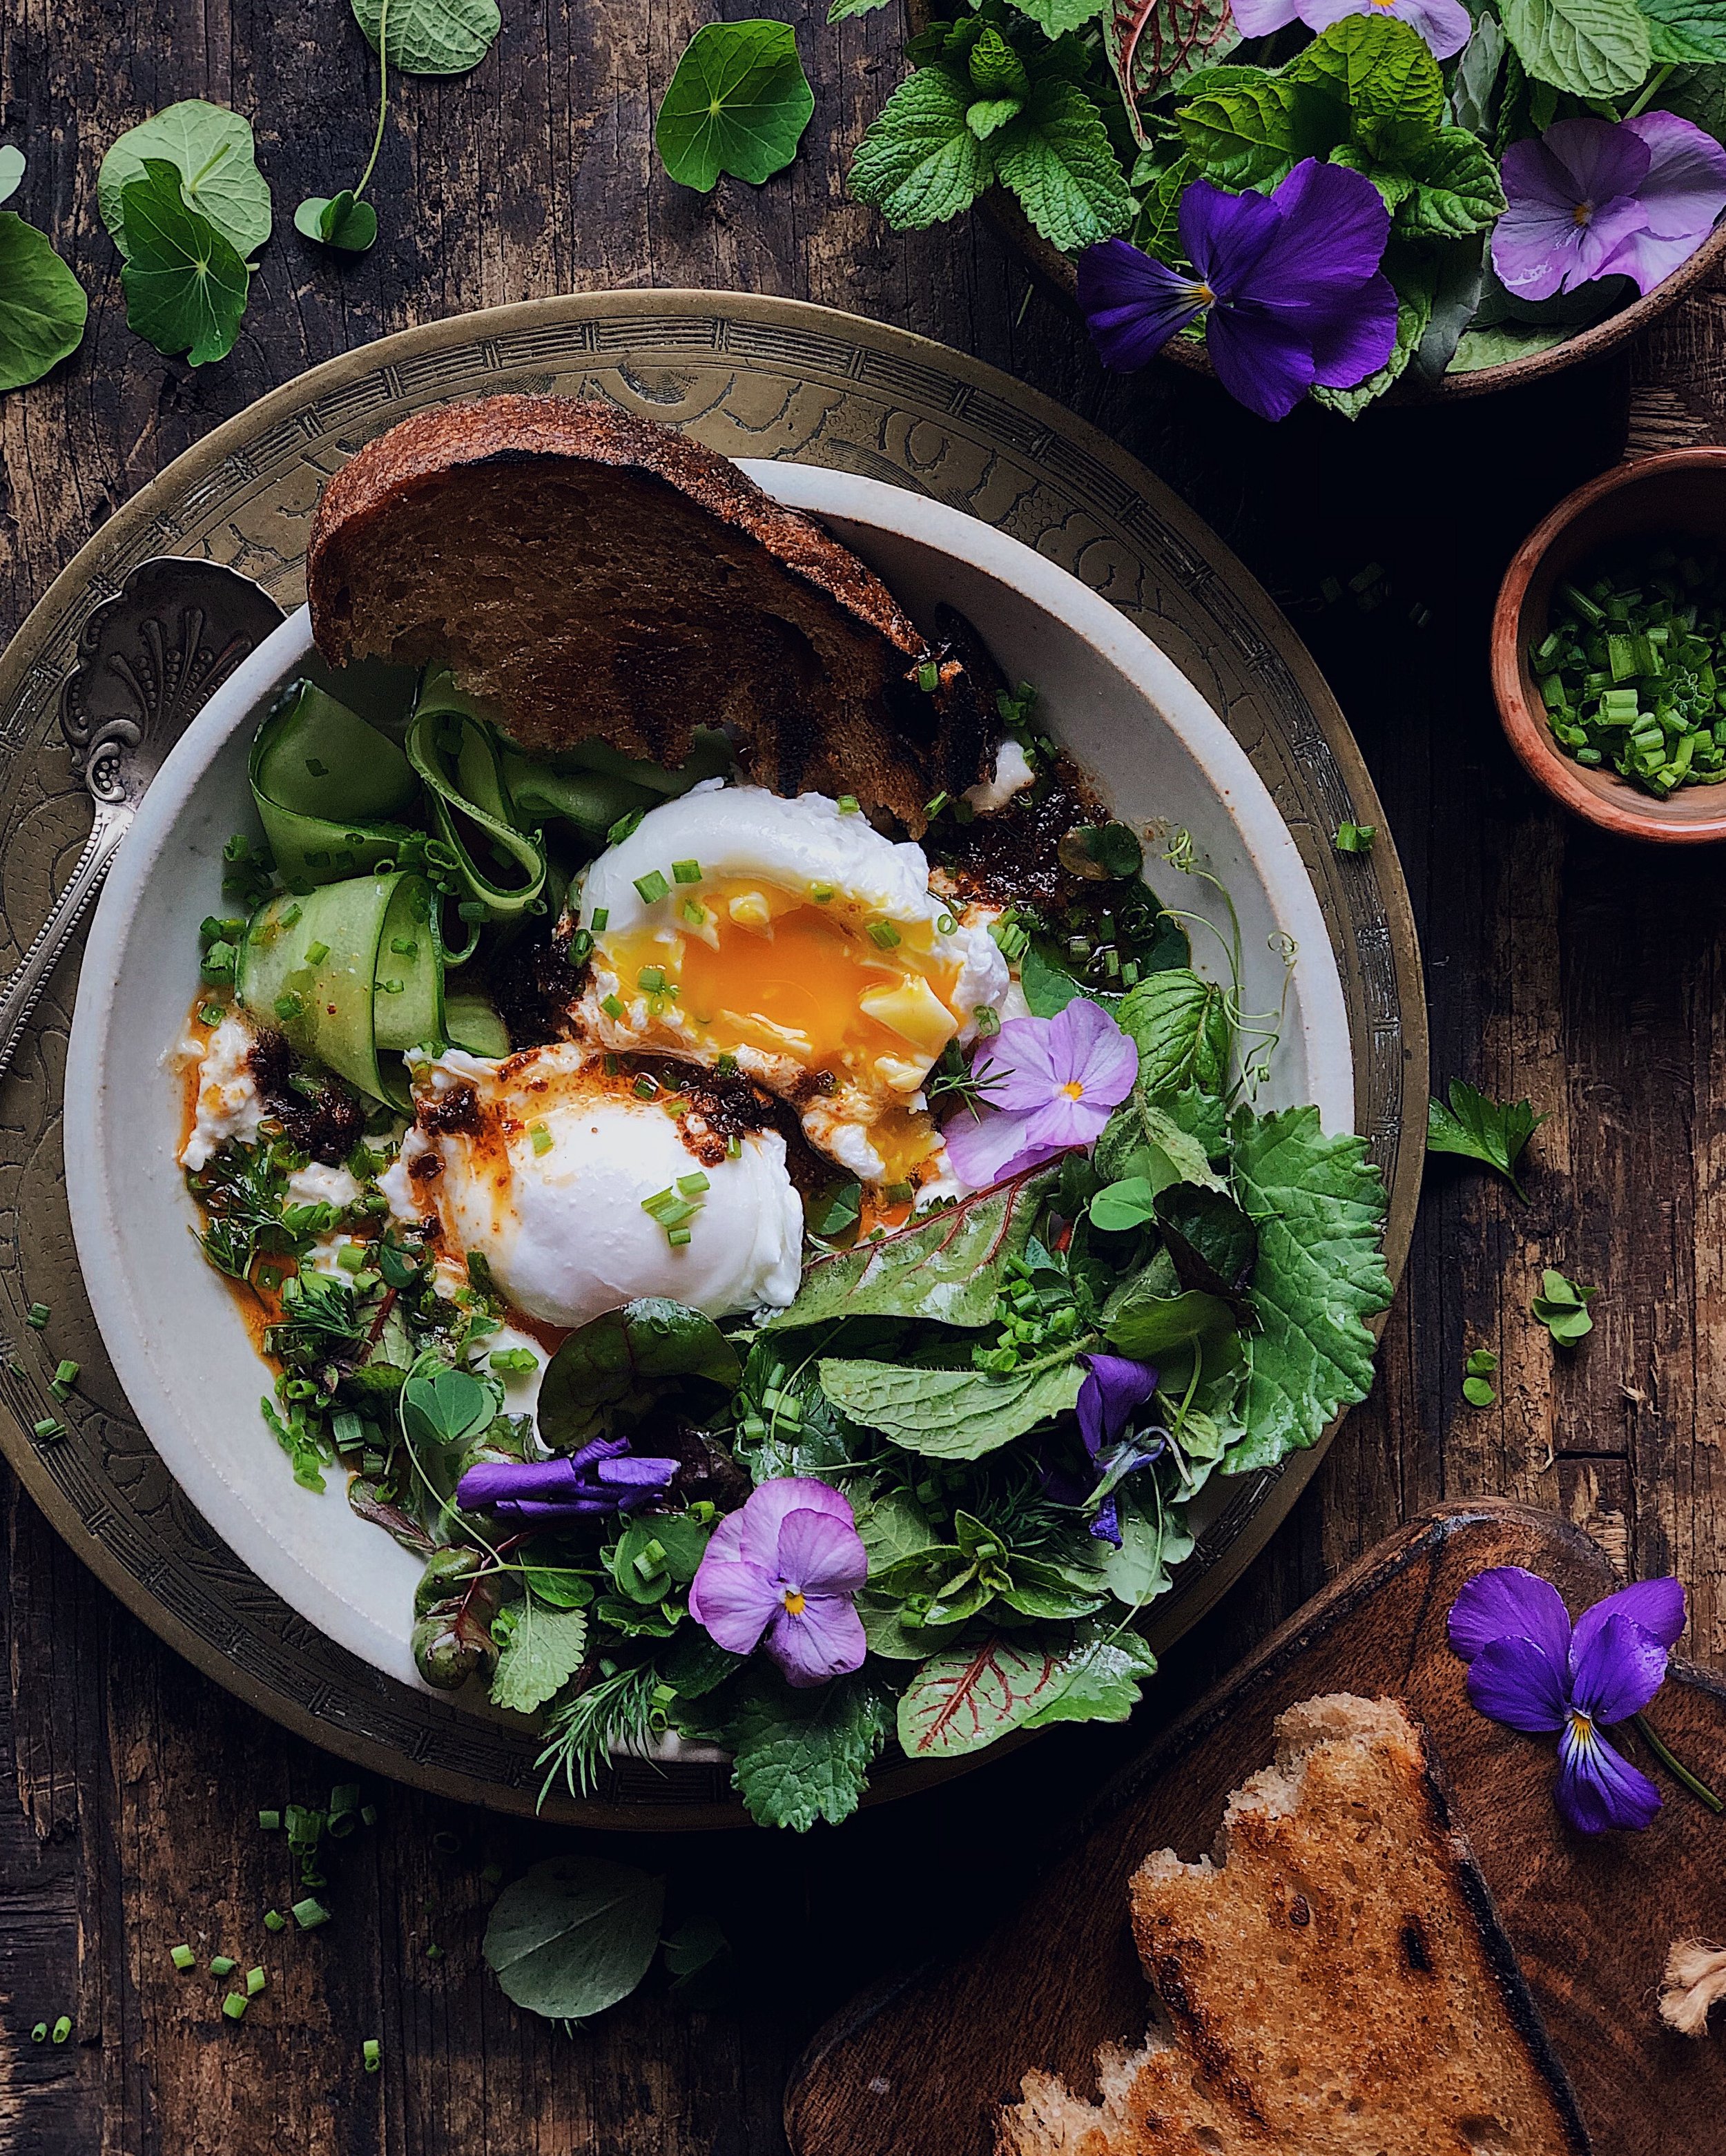
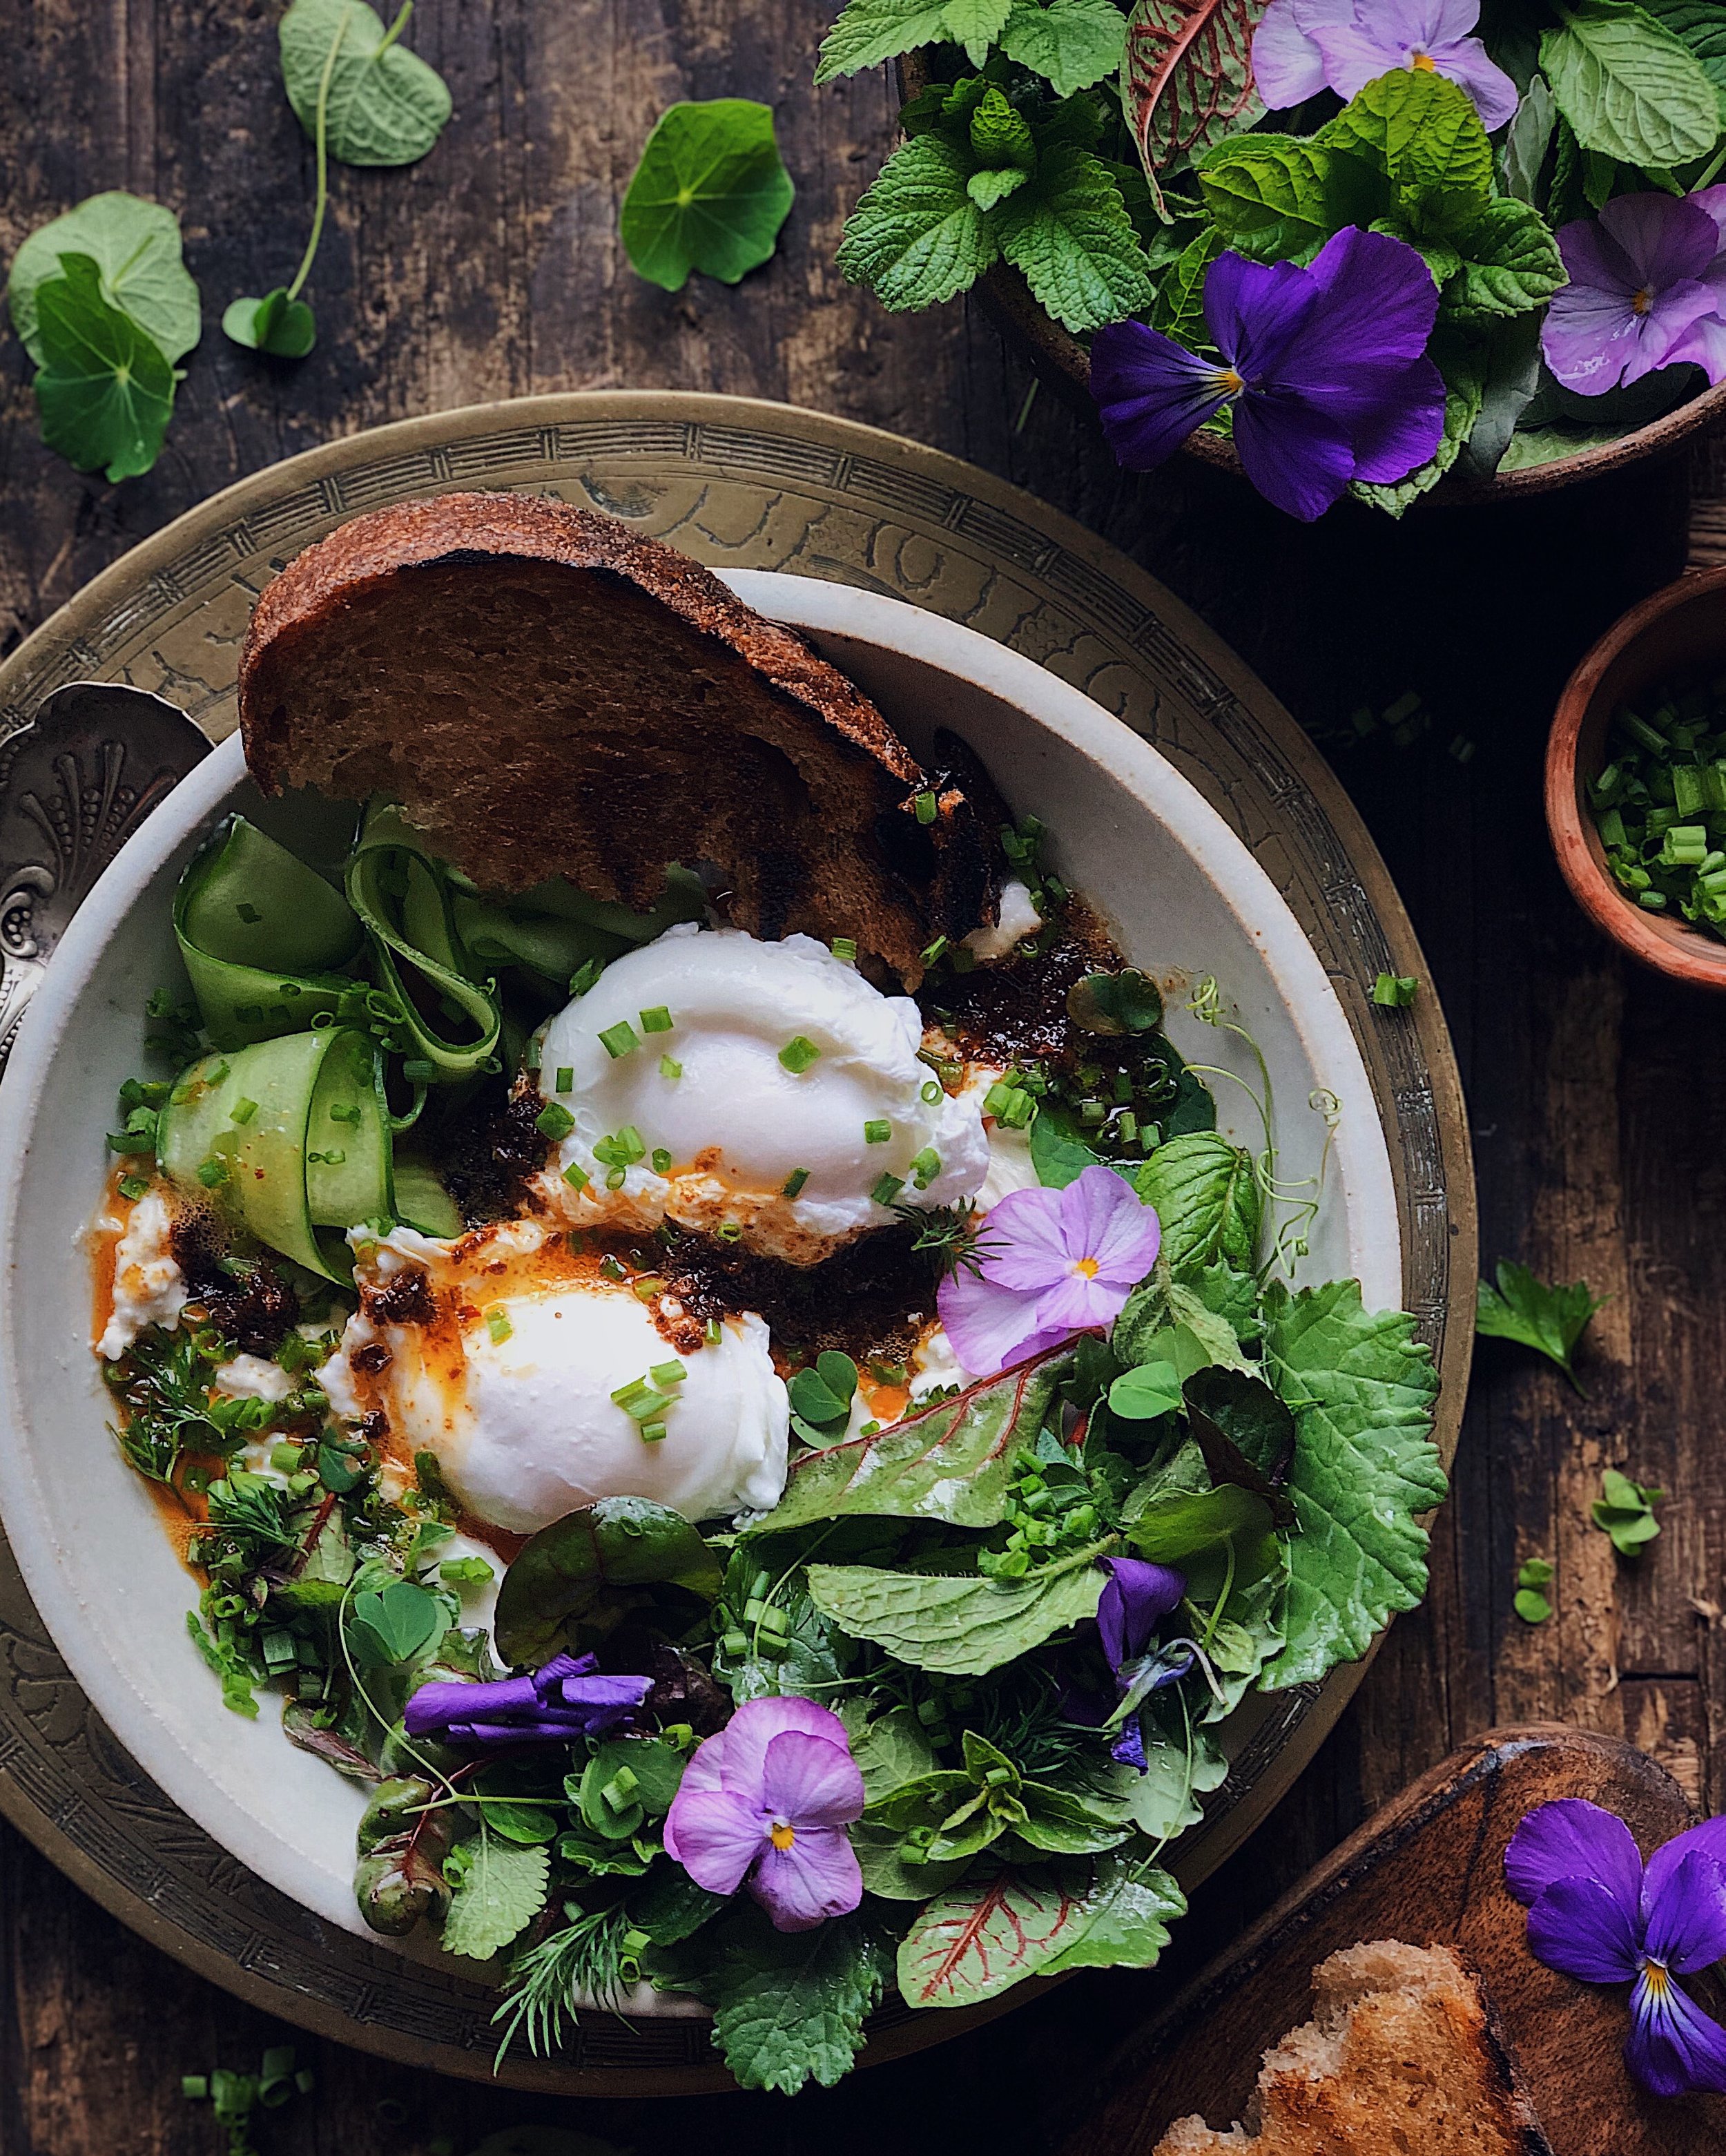
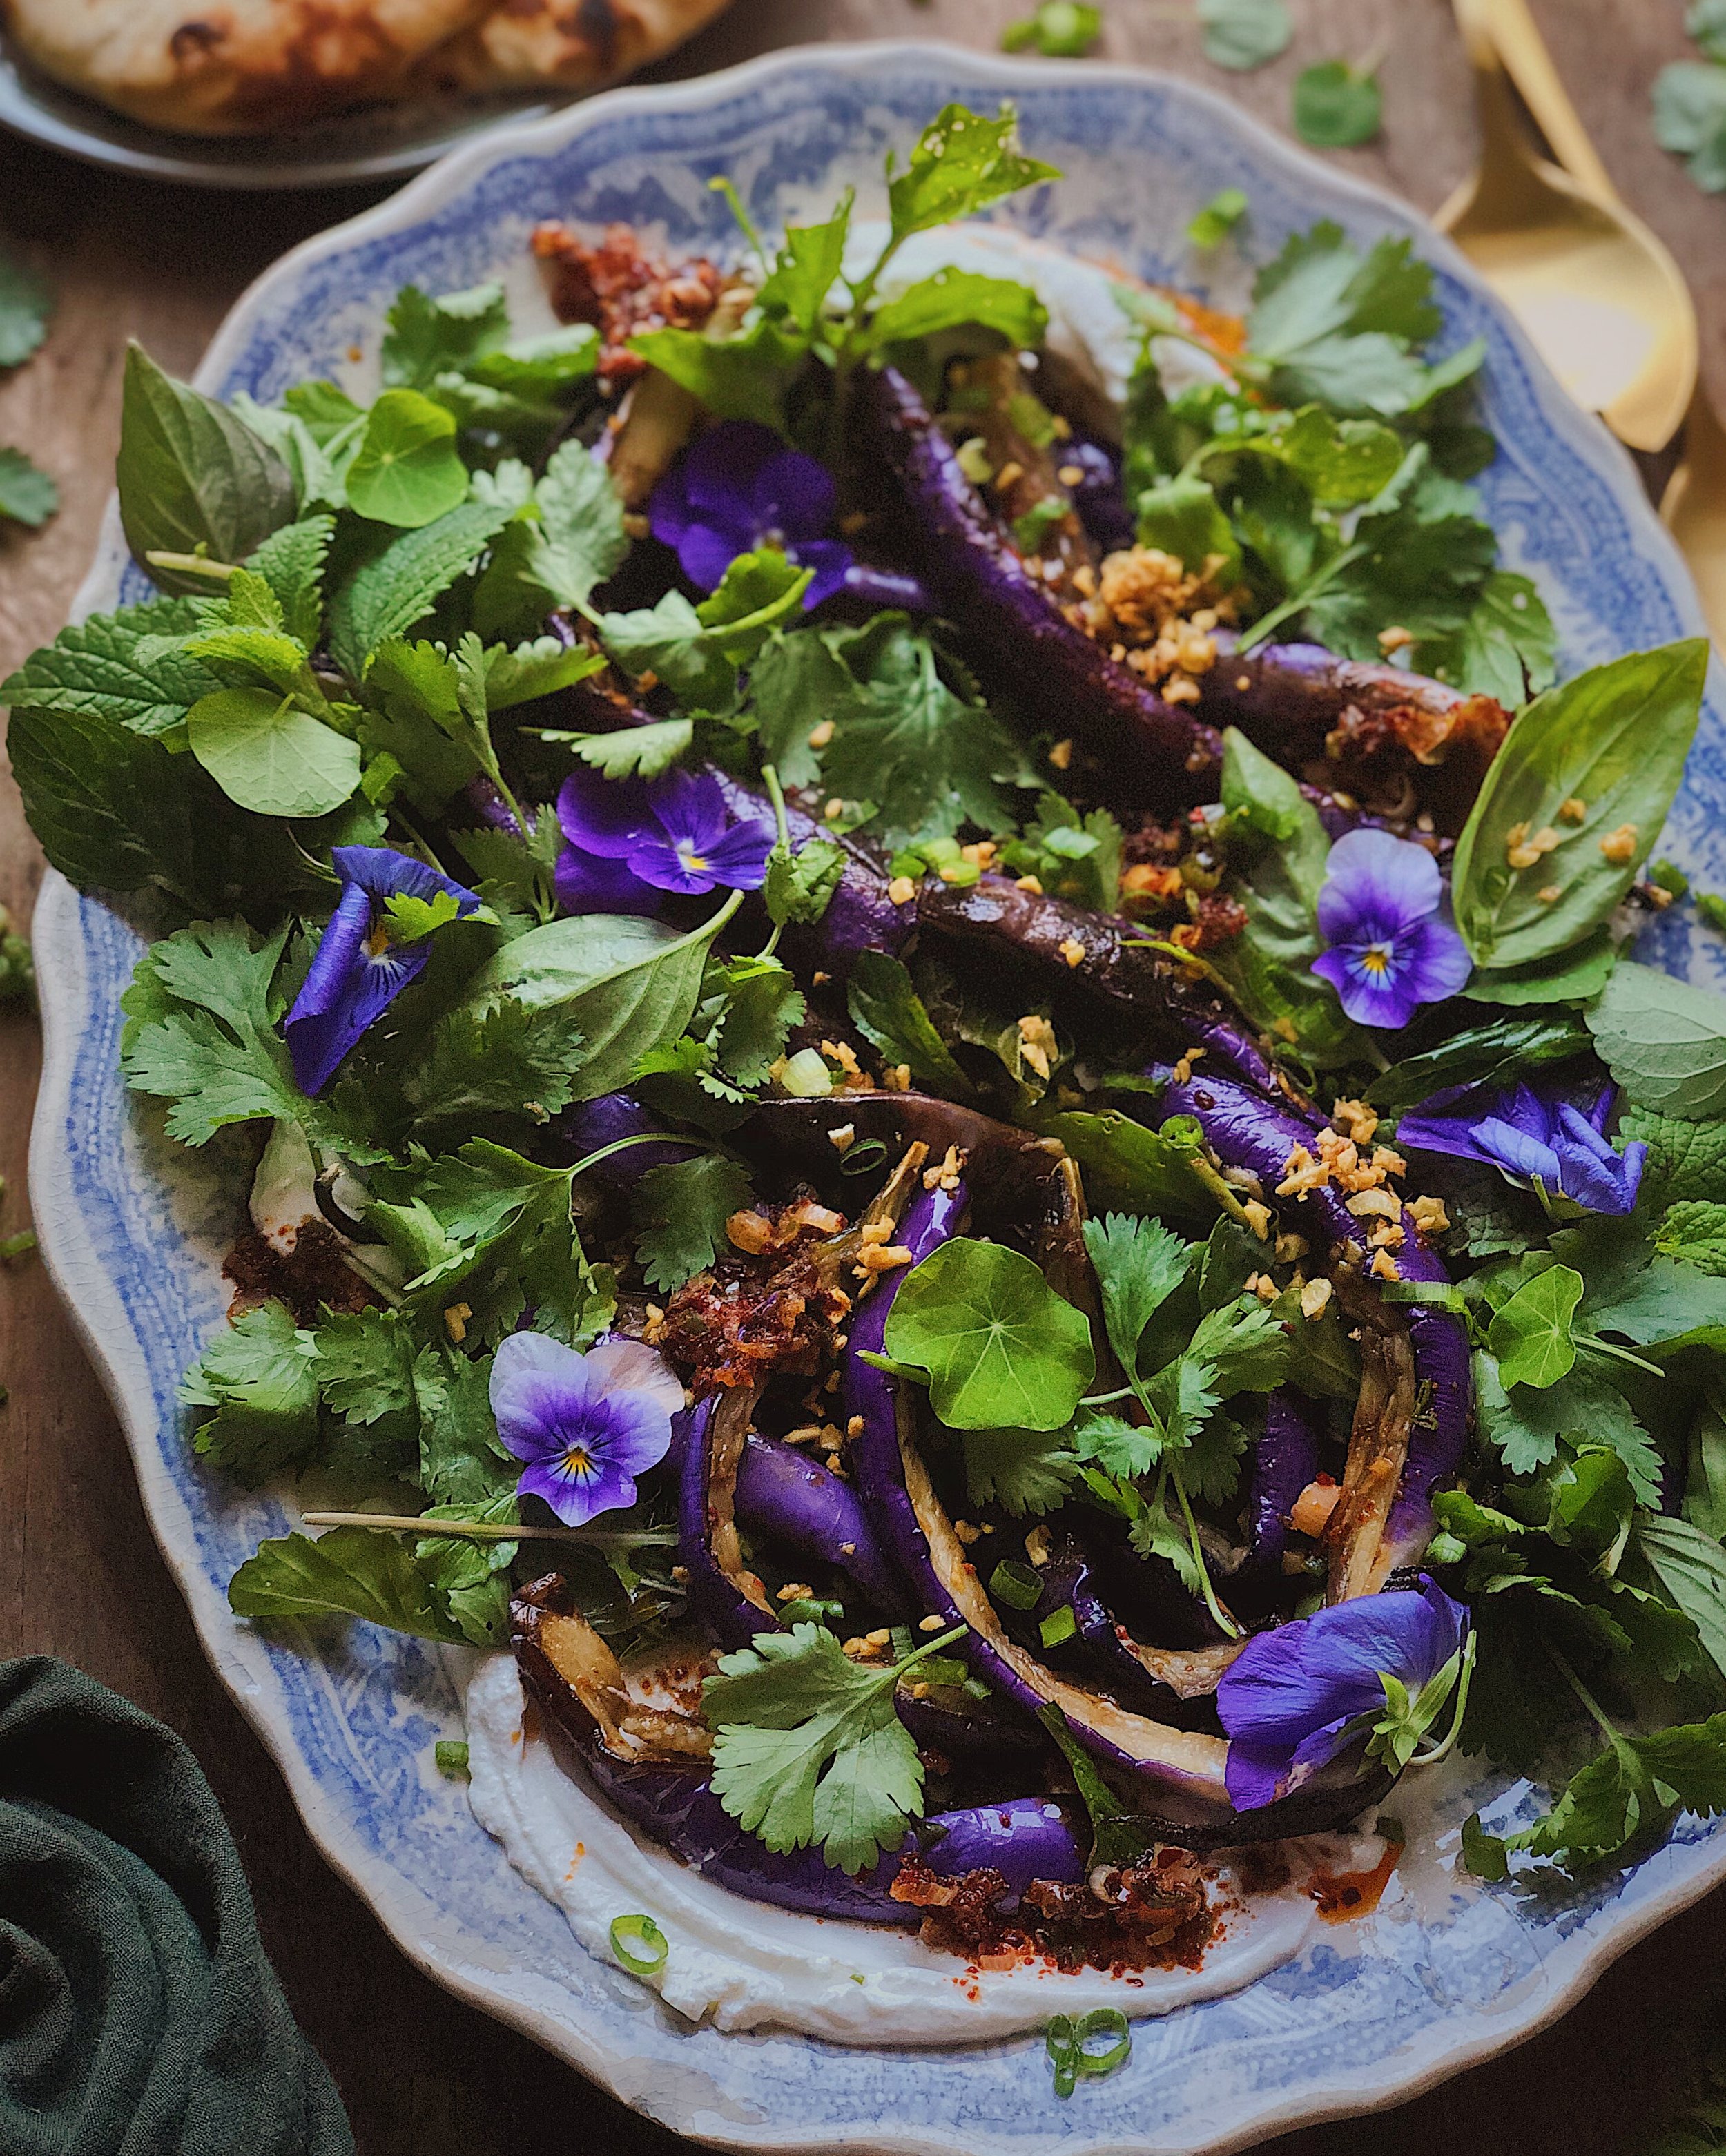
I just got back from London where I had dinner at Ottolenghi and every single dish we ordered came with some pool of creamy dippable/scoopable yumminess beneath or next to wonderful soft vegetables, whether it was yogurt, labneh, toum, or whipped feta. It was all so good, and fueled my obsession for serving absolutely everything on a pool of labneh, as if it wasn’t maxed out already (see: here, here, here). So when I got home, I was determined to make my own eggplant-on-labneh dish, but I wanted to put a Chinese spin on it. This is the recipe for that dish.

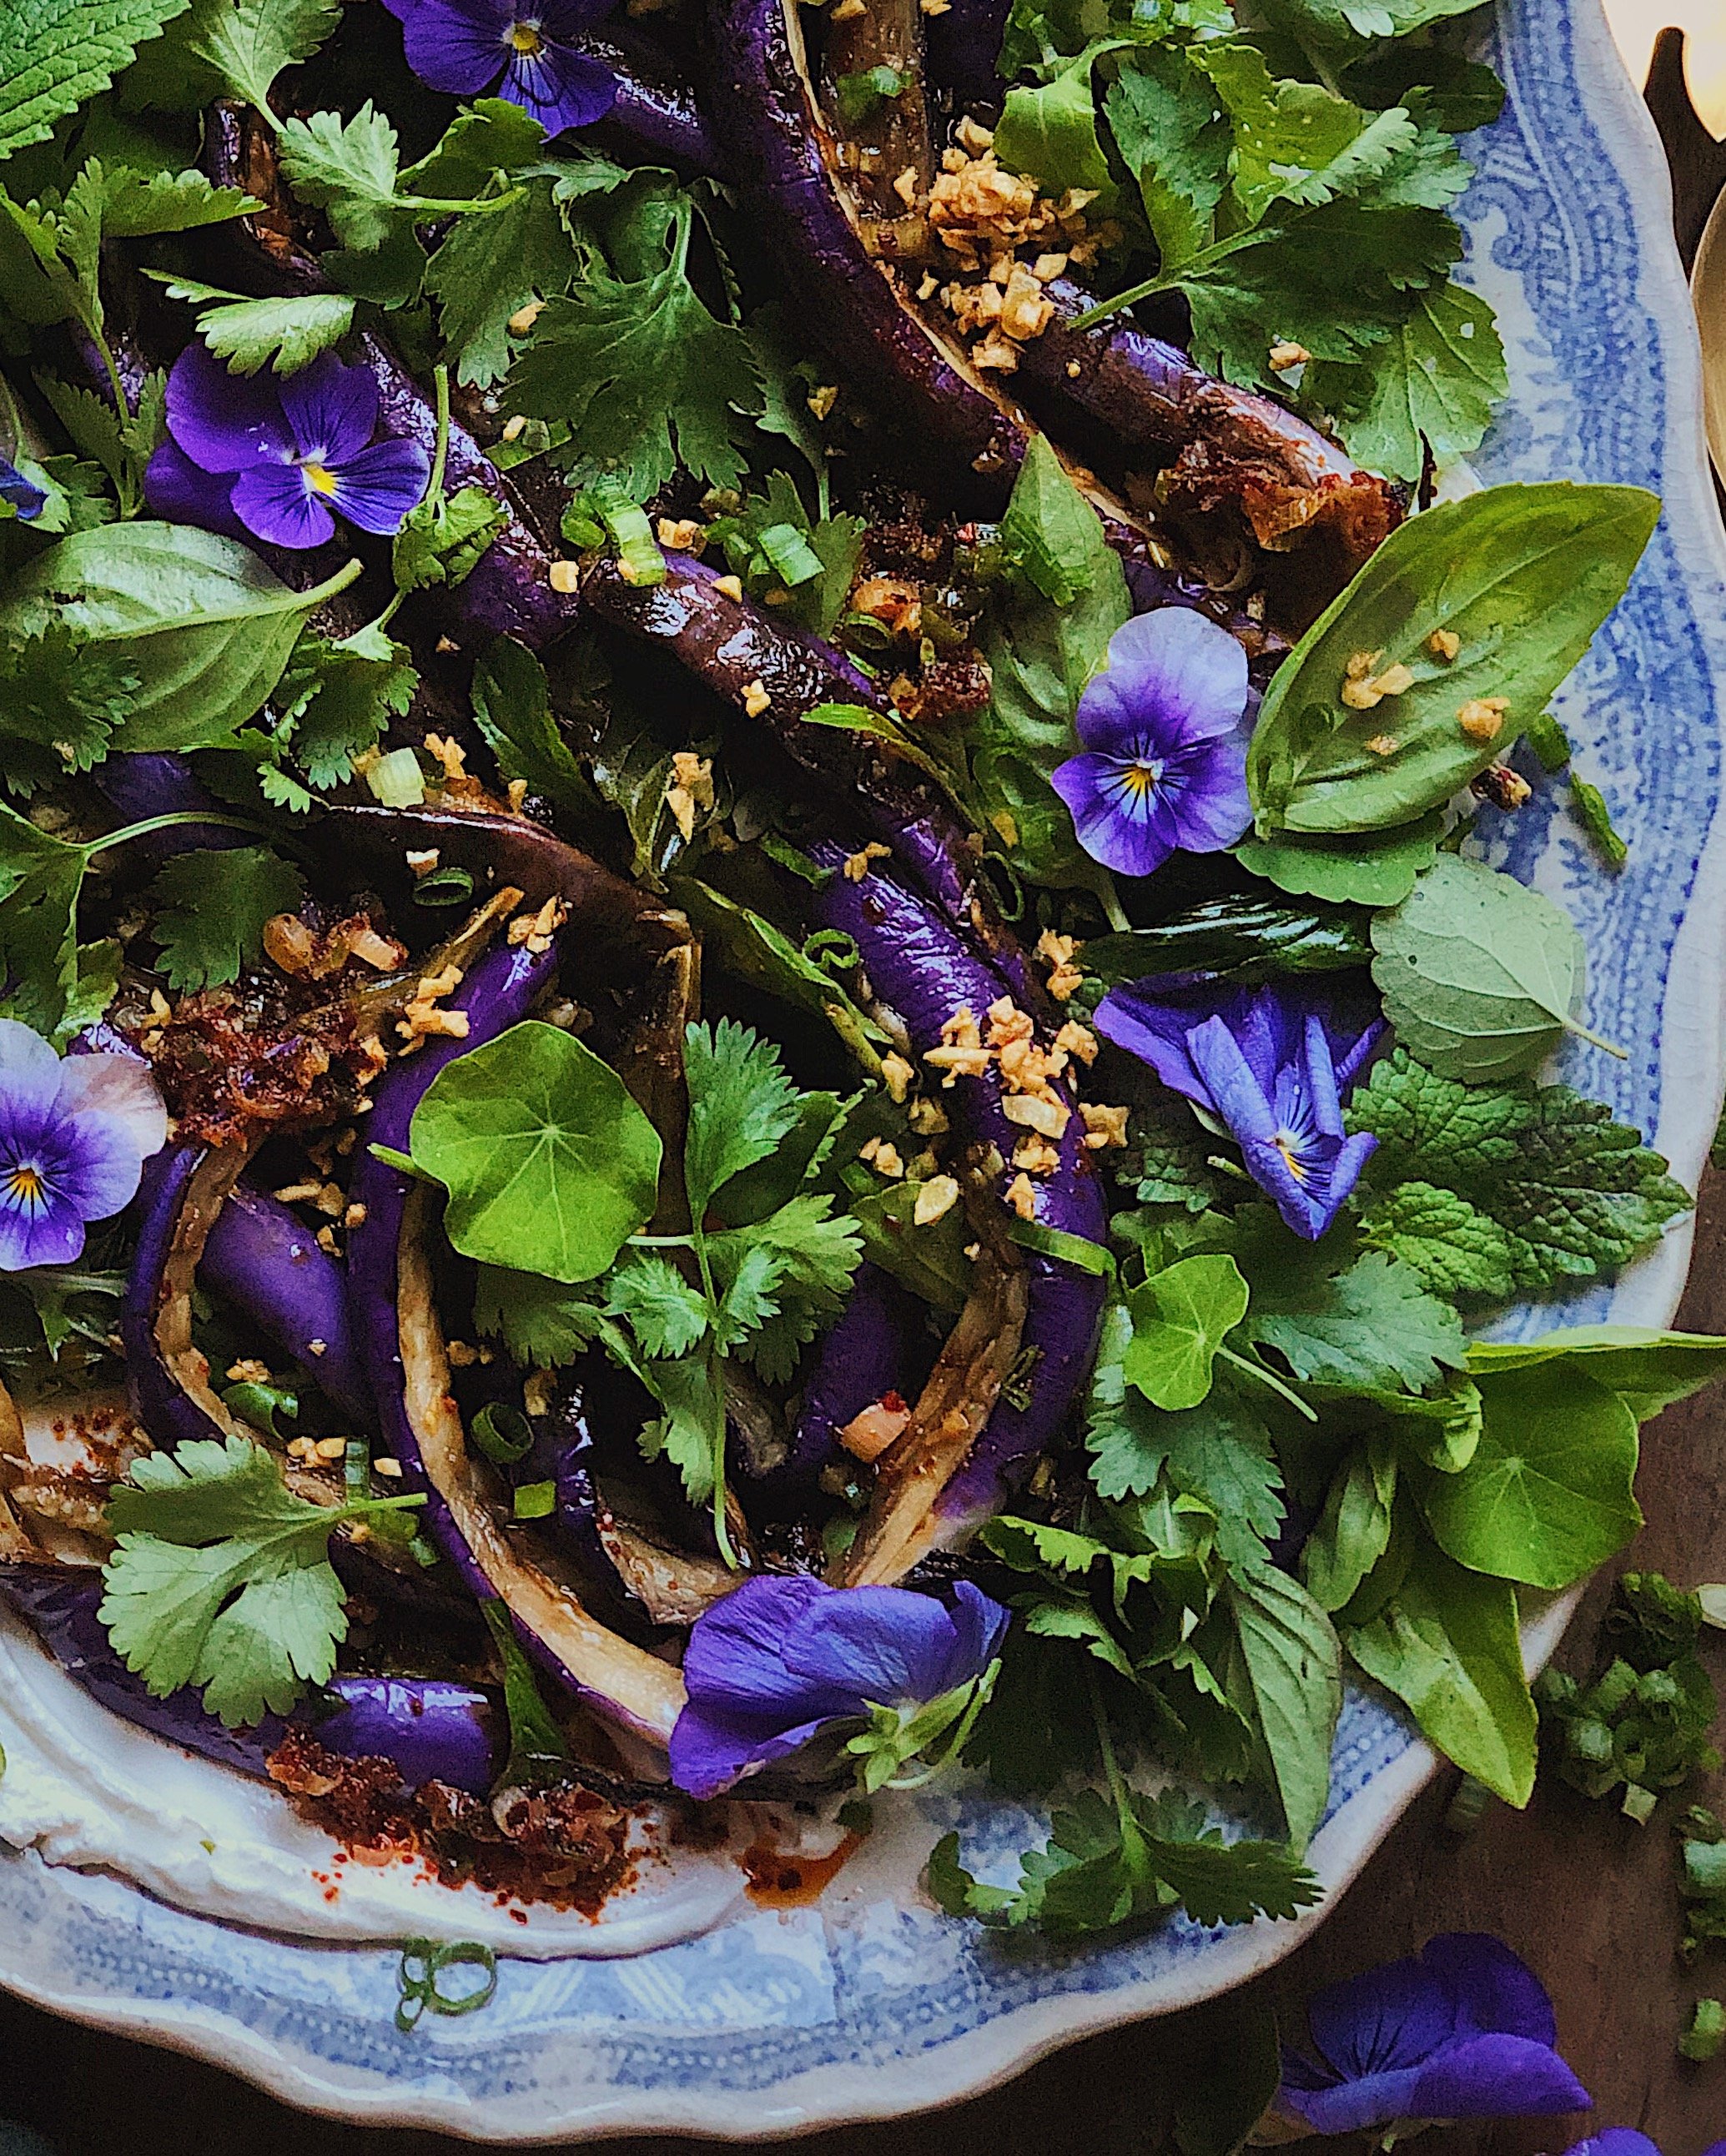
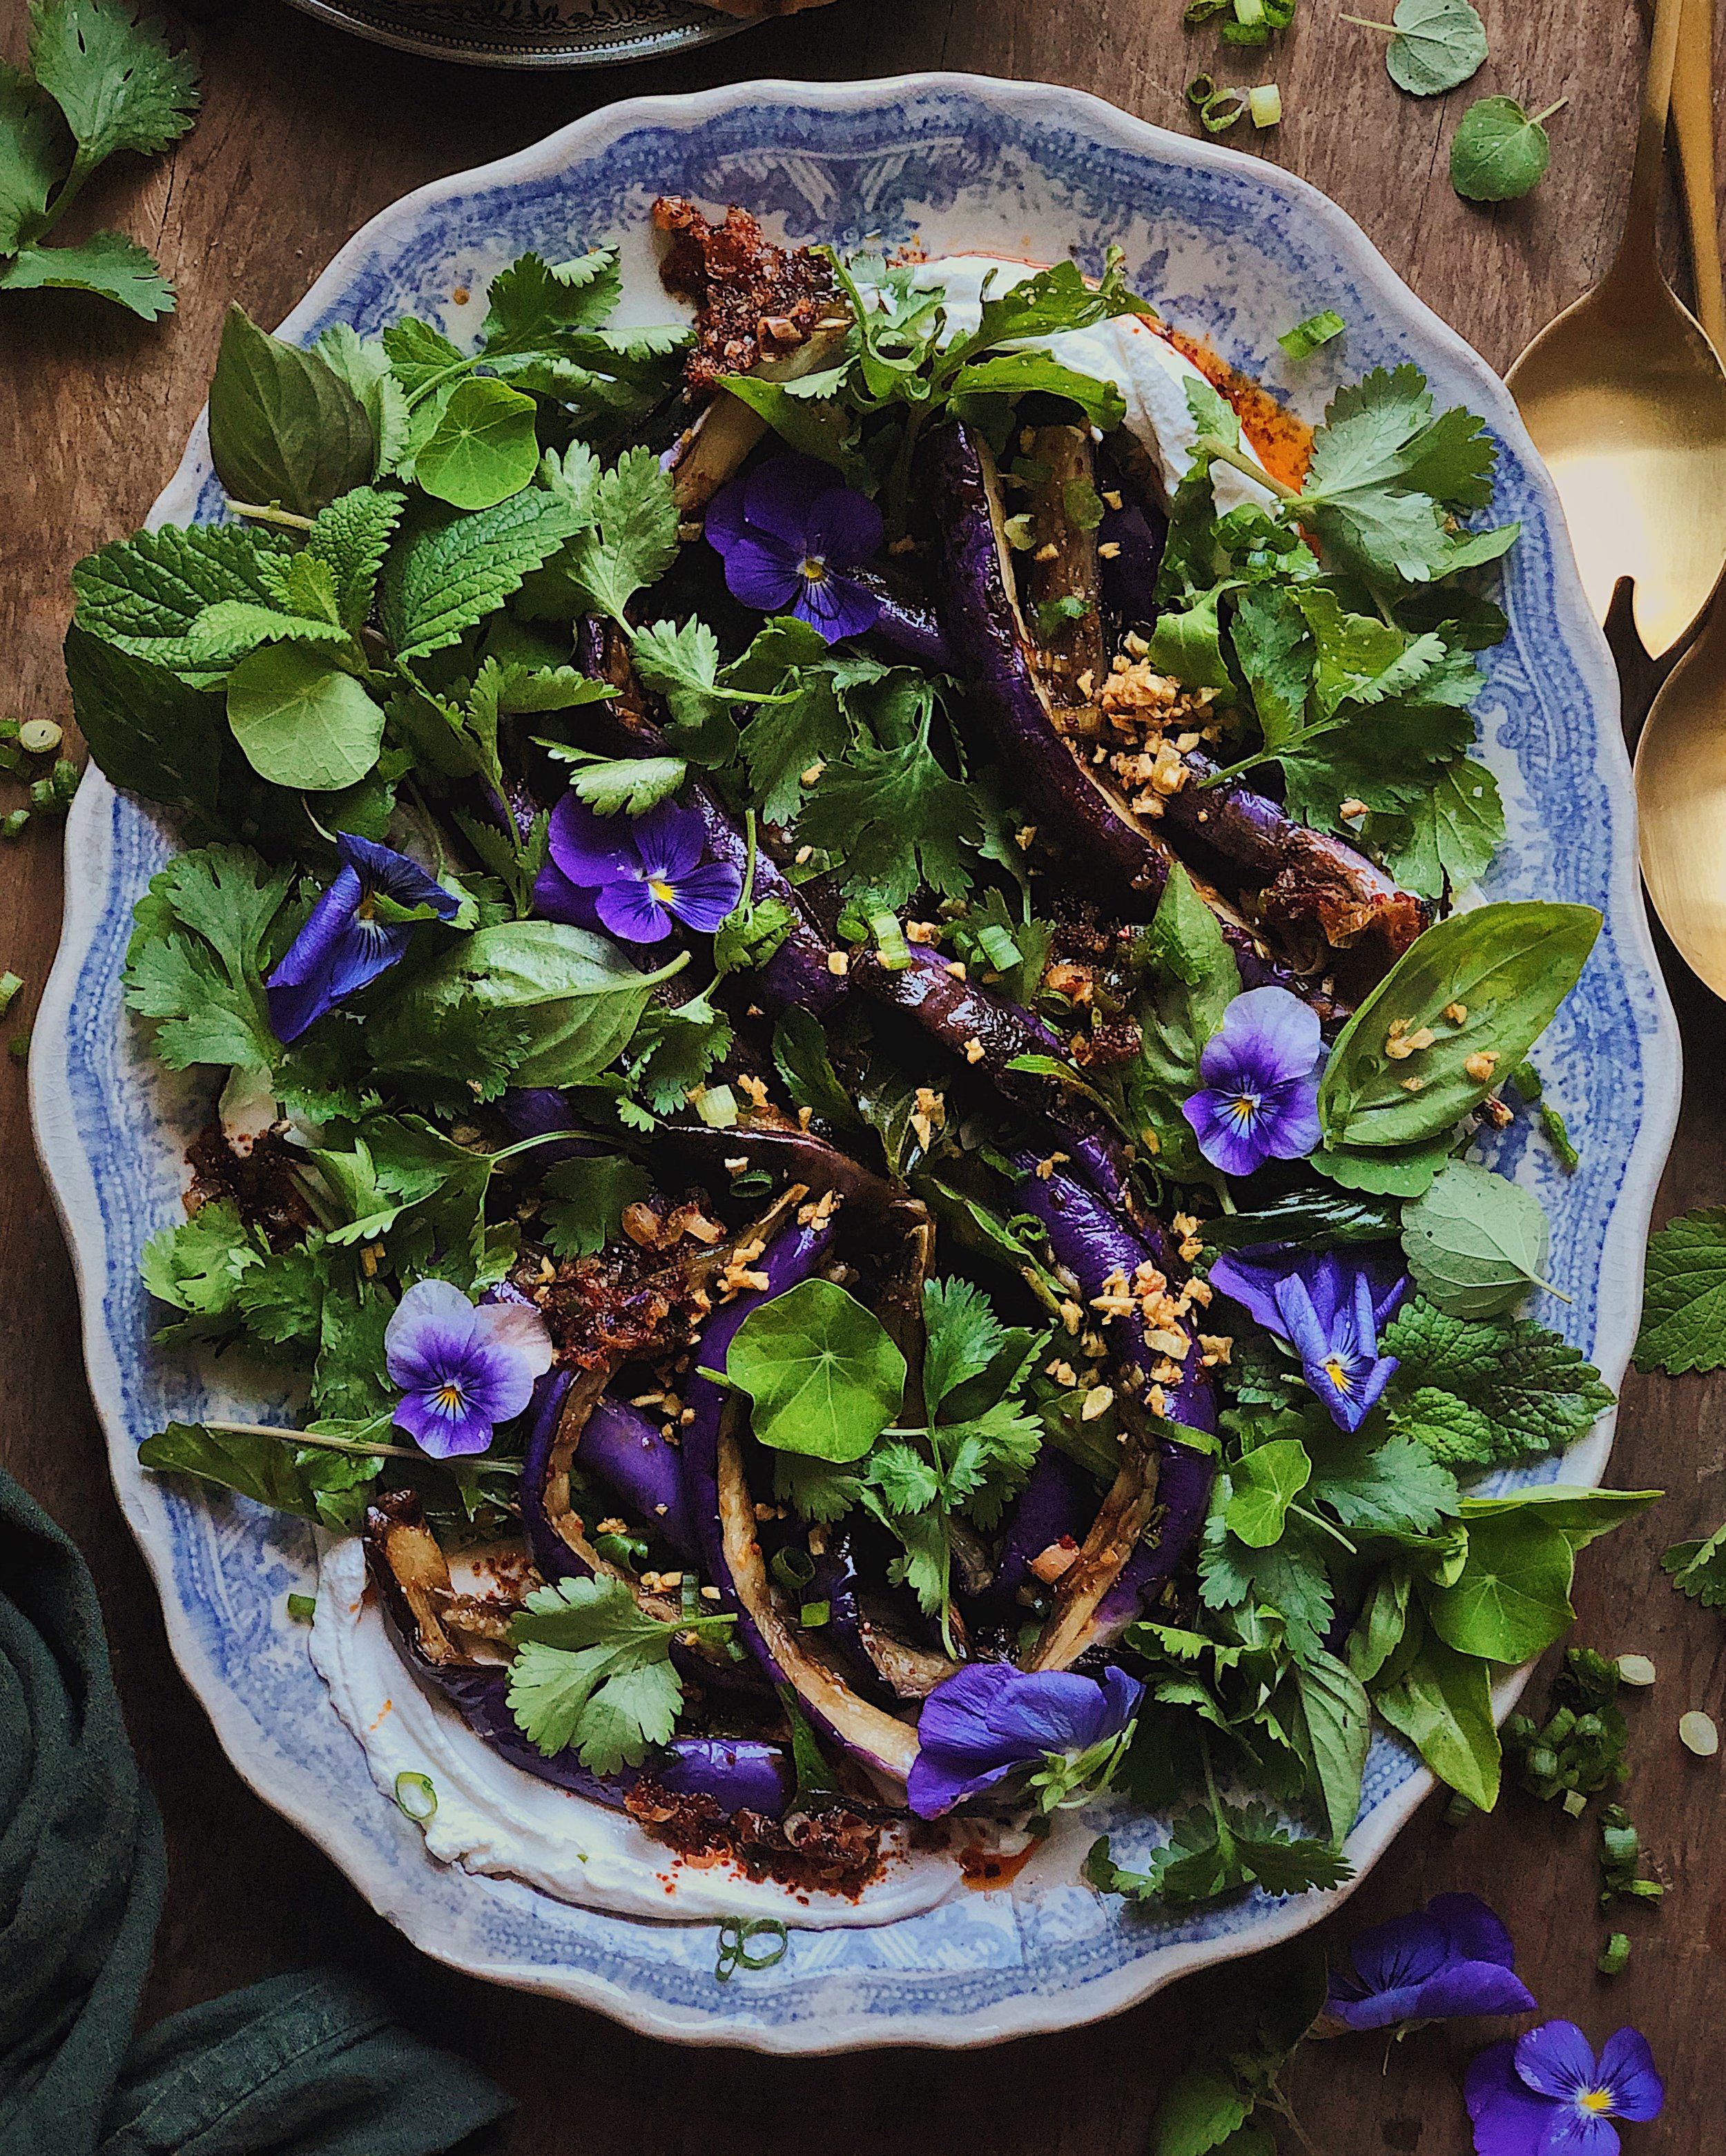
One thing I was determined to do with this recipe was make sure that the beautiful purple color of the eggplant was preserved and the eggplant did not turn brown when cooked. I was so happy that this cooked eggplant turned out a shade that almost exactly matched the purples I have going on in my garden. Here are some useful resources I came across when I was researching how to preserve the purple color of eggplants after cooking:

I ended up going with an oil blanching technique because I wanted the eggplants to be ultra silky soft but also have a hint of caramelization from the cooking.

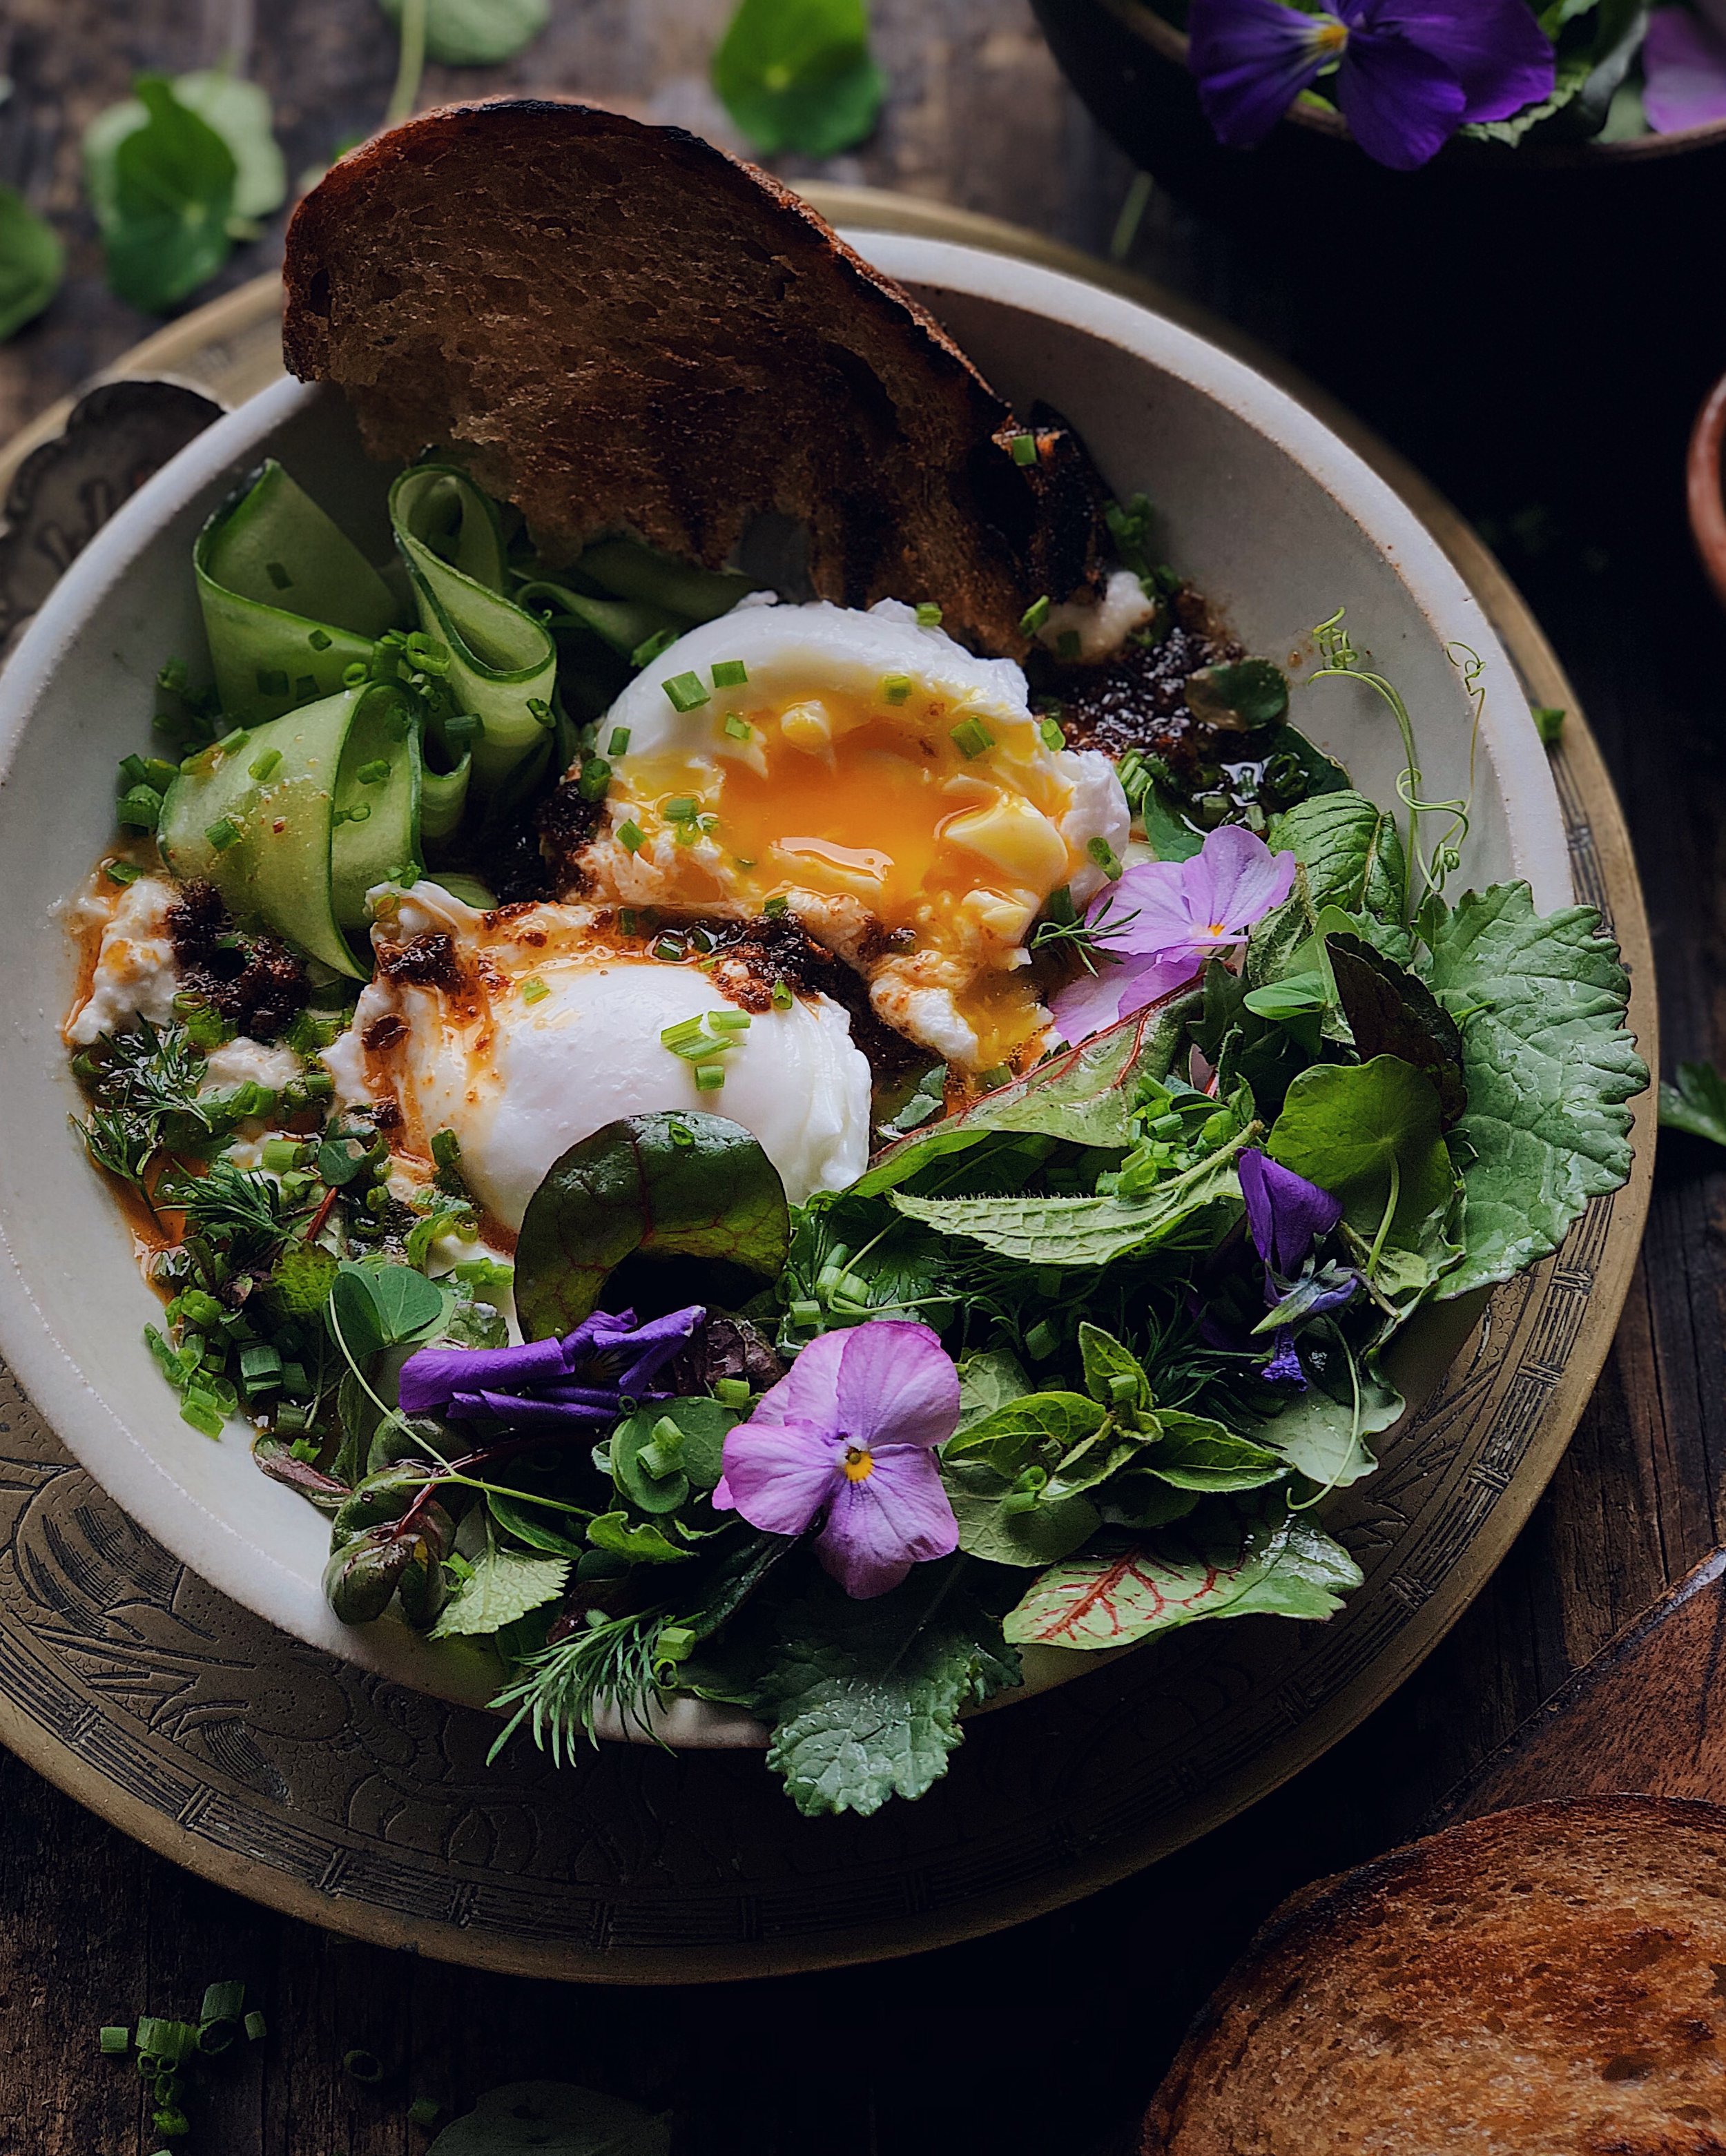
So what does this dish taste like? This dish combines my homemade numbing chili oil + my usual Chinese cold appetizer dressing + silky eggplant + an herby salad + creamy labneh. It’s like the smashed cucumber salad you get at a Sichuan restaurant but with much gentler textures and kicked up a few notches of luxury. It might be the best eggplant dish I’ve ever had and it’s definitely the best I’ve ever made. Note that for experimentation purposes I used a medley of all sorts of herbs (mint, cilantro, Thai basil, Italian basil, arugula, nasturtium, lemon balm) to build out the salad component of this eggplant salad—so that’s what’s in the photos—but I found that the bites with the cilantro tasted far better than the others, so that’s what’s reflected in the written recipe below.

This recipe was adapted from Brandon Jew of Mister Jiu’s.

Awkwardly Vague instructions for Melt-in-your-Mouth Chili Garlic Eggplant Salad on Labneh

Ingredients

2 Chinese eggplants cut into long wedges
4 cups water
2 tbsp kosher salt
vegetable oil, for frying
3 cloves garlic, finely chopped
1 tbsp extra virgin olive oil
2 scallions, thinly sliced, white and green parts divided
1 1/2 tsp sugar
2 tbsp rice vinegar
1 tbsp chinkiang vinegar
1 tbsp soy sauce
1 tbsp homemade mala chili oil, plus more to taste
labneh
cilantro

Procedure

In a large bowl or rectangular tub, dissolve the salt in the water. Add eggplant, and place a plate or something on top to make sure it’s all fully submerged. Let brine for 1 hour.

In the meantime, combine the garlic and olive oil in a small pan and fry gently on medium low, stirring continuously. Once the garlic starts to turn golden, remove from heat and keep stirring to allow the residual heat to cook the garlic through. Then, drain off the oil into a separate bowl and set both aside.

Heat enough vegetable oil to deep fry the eggplant in a Dutch oven. In the meantime, pat the eggplant dry.

Dry off your brining bowl and use it to make the dressing. Whisk together the garlic-infused olive oil plus the white parts of the scallions, sugar, both vinegars, soy sauce, and 1 tablespoon of chili oil. Set aside.

On another burner/hob, get a dry wok ready on very high heat.

Oil blanch all the eggplant by adding it at once to the dutch oven. Once you start to see some browning on the edges, remove the eggplant and allow it to drain well. Then, add it to the super hot dry walk, cut side down. As you start to see caramelization occurring, remove the pieces of eggplant from the wok and add it to the dressing bowl.

After all the eggplant has been caramelized and blistered, toss it around in the dressing.

Coat your serving platter with a thin, swoopy layer of labneh. Add the eggplant. Drizzle on extra chili oil to taste. Then sprinkle on the fried garlic, sliced scallion greens, and lots of cilantro.

Poached Eggs in Burrata and Sambal Butter

I don’t have an exact recipe for this but it is maybe my favorite breakfast that I have ever made for myself so I had to document it here, if anything so that I could remember what I did. This is another poached egg bowl born out of my obsession for çilbir, which is known in English as Turkish eggs. Çilbir is a dish of garlicky yogurt topped with poached eggs and then drizzled with a chili butter made with a Turkish chili. This one has those general components (creamy base, eggs, spicy melted butter) but done a little differently in favor of some of my other obsessions.

This post is not sponsored but it uses some of my favorite storebought products to bring together a most epic of flavor combos:

  • Toom garlic dip: I love this when I am too lazy to make Lebanese toum from scratch

  • BelGioioso black truffle burrata: My absolute favorite burrata, I’m obsessed! Great stracciatella action inside with a thin casing and the perfect amount of truffle flavor.

  • Azalina’s sambal: A Malaysian company local to me in SF! I feel grateful to have them around to stay connected to the flavors of my heritage.

  • Mizkan Sushi Seasoning: This is my cheat for when I want a simple salad vinaigrette and I am too lazy to make one.

This dish also includes a beautiful little salad that I made out of mostly things I “foraged” from my backyard garden. Now that my edible garden is well underway and in full bloom, I love being able to go out there and snip little bits of leaves from here and there to make an herbaceous salad whenever I want to bring some freshness to a dish. This would also be great with a salad of any tender herbs you have remnants of in your fridge, or mild cresses, or baby arugula.

Oh yes, and a delicious bread is an absolute must to serve with this dish, to spoon on all the creamy goodness and mop up the bowl. Here, I had it with slices of a garlic loaf from my favorite Bay Area bakery, Wild Flower Bread!

Awkwardly Vague instructions for Poached Eggs in Burrata and Sambal Butter (with a little herby salad)

Ingredients

2 eggs
white vinegar, for poaching eggs (optional)
scoop of Lebanese toum (garlic dip)
4 oz ball of black truffle burrata
1 persian cucumber, sliced into ribbons with a veggie peeler
4 tbsp salted butter
Malaysian sambal
a small handful of fresh tender greens
seasoned sushi vinegar
chopped dill
chopped chives

Procedure

Make the poached eggs. (I keep wavering between doing the whirlpool method vs not. In this case I thought the shape would be better for the dish without the whirlpool so here’s what I did instead:) Bring about 4 inches of water to boil in a pot. Crack the eggs into small bowls. Turn the heat down to low, add a small splash of vinegar, and slowly tip in the eggs. Turn the heat up to medium-low and allow eggs to poach for 3 minutes. Transfer eggs to an ice bath.

Smear a scoop of toum into the bottom of your bowl. Break up the burrata and add it evenly on top of the toum to form a base for the eggs.

Arrange the cucumber ribbons and poached eggs on top.

In a small pan, melt the butter on medium-low heat. When it starts to foam, add in as much sambal as is to your taste. Break down the sambal paste with a spatula and mix it in with the butter until fully incorporated.

Toss your little collection of greens with a splash of the sushi seasoning.

Pour the sambal butter over everything in the bowl. Add the salad to one side and then sprinkle dill and chives over everything.

Serve with some amazing bread.

Recipe: Chili Cheese Scones

For this recipe, I partnered with Cabot Creamery to create my version of a baked goodie that I think gets totally overlooked: savory scones! I feel like sweet scones get all the love, but as a diehard member of Team Savory for life, what I like about savory scones is that they can be such a satisfying handheld snack or a way to round out a real meal. 

These scones are filled with a combo of green chilies, scallions, black pepper, and lots of high quality Cabot Vermont Sharp Cheddar. The inspiration for this flavor grouping comes from Indian-style chili cheese toast, which I first experienced at a Bombay-inspired restaurant in London called Dishoom. There, the pairing of chili cheese toast and eggs is called Eggs Kejriwal. I’ll still go to Dishoom whenever I’m in London, but at home, I was happy to find it was easy to replicate the chili cheese toast and was blown away by how good the simple combo of chopped green chilies, scallions, black pepper, and melted cheddar tasted together. It really is an example of the whole being more than just the sum of its parts and I think a lot of credit can be given to the power of a high-quality sharp white cheddar, when it is all gooey and melty, for bringing everything together.

So when Cabot Creamery asked me to come up with a recipe to show off one of their wonderful cheddars, I thought it would be tasty to put the flavors of one of my favorite toasts into the lovely portable format of a scone. But despite the inspiration coming from London, these aren’t going to be the dry, crumbly, or bland scones you might get with an afternoon tea service. These are flavor-packed American style scones and they are super tender and light!

I opted to use Cabot Vermont Sharp Cheddar for this recipe, which has such a nice bold sharp cheddar taste. Cabot is a co-operative owned by farm families throughout New England & New York and 100% of profits go back to the farmers, which I think is so cool for a brand that is so widely distributed. They are also the world’s first dairy co-op to get a B Corp certification. This particular cheese offering from them has a creamy texture and buttery richness to it, and is equally as good for just snacking on alone as it is getting baked into scones—which made it really hard for me to resist eating it while I was prepping the ingredients to shoot this recipe. 

These scones are nice and cheesy, with a little bit of kick from the chilies, and a unique spiced undertone from the coriander seeds and black pepper. I hope you’ll give them a try!

What you need to know about the key ingredients for this Chili Cheese Scone recipe:

  • Butter: Freezing the butter and then grating it is my go-to technique for any sort of baked pastry that I want to be airy and flakey. No one wants overly-dense, hard scones. In contrast, the frozen butter, and keeping everything as cold as possible in general, allows for the creation of steam inside the scones as they bake, which form air pockets that keep the texture light. I used Cabot Salted Butter for this recipe to add an extra note of rich savoriness.

  • Cheddar: The cheddar is really the star of these cheesy scones! I went for the Cabot Vermont Sharp Cheddar, which I think has a great classic sharp cheddar taste that really holds up nicely mixed into these scones. However, I think that Cabot Creamery’s Seriously Sharp Cheddar would also be great here. Be sure to grab one of their cheese bars and grate it fresh for this recipe.

  • Green Chilies: The green chilies are what give the scones a nice little spicy kick. I used a mixture of jalapenos and serranos here (2 very large jalapenos and 1 long serrano) but you could also choose one or the other. I removed the pith and seeds from the jalapenos because I don’t care for the texture but kept it all in for the thinner serrano and this brought a noticeable amount of heat to the scones. If you remove all the pith, the scones will be much milder.

  • Scallions: Chopped scallions add a nice savory and aromatic flavor to the scones. They get sweeter when the scones are baked and taste so good with the cheddar!

  • Black Pepper: This adds a zingy spiced component to the scones. Please do not use the ground pepper that comes out of a store-bought spice jar. Whole black peppercorns and a pepper mill on a coarser setting, and subsequently nice freshly-cracked pepper, is what will give you the flavor impact you want.

  • Coriander Seeds: Sometimes when I make chili cheese toast, I also include cilantro, or coriander. For my scones, I opted to include coriander seeds because I think they bring such a great mysterious and complex spice flavor without adding any extra spicy heat. I measured out the whole seeds first, then toasted them in a dry pan until they became fragrant, then pulsed them a couple of times in a spice grinder. If you have a mortar and pestle that would be even better. You want to crush them up and get them to release their aroma but you don’t need a fine powder.

A couple of other techniques to get the best scones:

  • Like I mentioned before, keeping everything cold is what gives you scones that are tender and airy instead of dense and firm. Popping the scones in the freezer while you wait for your oven to heat up will help the scones poof up instead of spreading out.

  • Creating letterfolds with the dough before cutting out the scones is what gives them those nice layers similar to an American style biscuit. You can definitely just gather the dough together and cut out the scones right away, but this extra step of flattening it out and folding the slab of dough a few times is a quick trick that makes them extra special.

How to Make Chili Cheese Scones

(Makes 8 scones)

Ingredients

2 cups AP flour, plus extra for dusting
2 1/2 tsp baking powder
1 tbsp sugar
1/4 tsp kosher salt
1 tsp freshly cracked black pepper
1 tbsp whole coriander seeds, toasted and then coarsely ground
2/3 cup heavy cream
1 egg
6 oz Cabot Vermont Sharp Cheddar, grated
1/2 packed cup scallions, chopped
1/2 cup jalapeno or serrano peppers, cut into 1/8” dice (see note*)
1/2 cup (1 stick) Cabot Salted Butter, frozen
1 tbsp Cabot Salted Butter, melted
Cilantro leaves, for decoration (optional)


Notes

* You can control the level of spicy heat in the scones by how much of the pith you choose to include. The majority of a chili pepper’s heat comes from the pith.

Procedure

Combine the flour, baking powder, sugar, salt, pepper, and ground coriander seed in a large mixing bowl and whisk together.

Set aside a few pinches of the grated Cabot Vermont Sharp Cheddar for topping off the scones later.

Into the dry ingredients, stir in the rest of the cheddar, plus the chopped scallions and chilies.

In a separate bowl, whisk together the heavy cream and egg.

Working quickly with cold hands, grate the stick of Cabot Salted Butter into the dry ingredient mixture, tossing together the ingredients along the way to ensure even distribution. 

Drizzle in about one-third of the wet ingredients. Incorporate gently with some of the dry ingredients. Continue gradually incorporating the wet and dry ingredients together, taking care to not overstir. (Mixture can be clumpy and uneven.)

Dump the mixture onto a work surface and gently press together with your hands until it all sticks together. Lightly flour a work surface, then shape the dough into a rough rectangle, about 6x9. Lightly flour the surface of the dough, then fold down the top third and fold up the bottom third (like you would fold a letter). Flip and rotate 90 degrees and repeat the shaping, rolling, and folding sequence. Flip and rotate again, then do the sequence one more time, for 3 sets of letter folds total.

Then, fold the dough in half and shape it into a flat circle, about 7-8 inches in diameter. Cut the dough into 8 equal wedges. Transfer to a parchment-lined baking sheet and place in the freezer for 15 minutes.

In the meantime, place an oven rack one-third from the top of the oven and preheat oven to 400°F.

Brush melted butter on the tops of the chilled biscuits. Sprinkle remaining cheddar on top. If desired, decorate with fresh cilantro leaves.

Bake for 25–27 minutes, or until tops begin to get golden.

Thank you so much to Cabot Creamery for sponsoring this recipe! Visit their website to find out where you can get their delicious cheeses, such as their naturally-aged cheddars, near you!

Recipe: Heart-Shaped Garlic Butter Parm Pretzels

These cuties are the texture of a soft American mall pretzel with the extra garlicky goodness of a garlic knot. When you typically make pretzels, you would cut slashes in the dough before baking to allow the dough to expand without cracking the dark brown malty exterior you get from boiling in an alkaline solution. However, I did not do that here. The result was this unusual crackled texture, which gave the garlic butter something to stick on to!

These are such a fun treat for your valentine, friend, or galentine, or anyone in your life who appreciates some freshly-baked carbs. And they are also great for when you are looking for a special baking project to do just for you!

Soft pretzel dough recipe adapted from Sally’s Baking Addiction.

How to Make Heart-Shaped Garlic Butter Parm Pretzels

Ingredients

3/4 cup warm water
1 tsp (slightly heaped) active dry yeast
1 tbsp honey
1 tbsp butter, melted and cooled
2 tsp brown sugar
1/2 tsp salt
2 cups AP flour, plus more for dusting
nonstick cooking spray
3/8 tbsp salted butter
2 garlic cloves, minced
garlic salt, to taste
finely grated parmesan, to taste
1–2 tsp parsley leaves, finely chopped

For the Water Bath

9 cups water
1/2 cup baking soda

Procedure

Combine warm water, yeast, and honey in the bowl of your stand mixer and stir gently. Allow yeast to bloom and foam up for 5 minutes.

Add butter, brown sugar, and salt, and stir together. Fit stand mixer with the dough hook and turn on to the lowest setting. Begin adding flour, 1/2 cup at a time, until a dough starts to come together. Use a rubber spatula to scrape everything together. If the dough is sticky, add a little bit more flour.

Turn the mixer to medium high and knead the dough for about 5 minutes until it feels smooth and bouncy. Turn the dough onto a clean worksurface and roll into a smooth ball. Grease the inside of the mixing bowl, and place the ball of dough back inside. Cover with a damp towel and allow to rest in a warm place for 20 minutes.

On a lightly floured worksurface, divide the rested dough into 8 equal pieces and roll each piece into a rope, about 16 inches long.

In a large pot, combine water and baking soda for water bath and bring to a boil. Preheat oven to 425°F.

While waiting for the water to boil, twist and pinch together the ends of each rope and shape into a heart.

Use a pancake turner/spatula to gently place one pretzel at a time in boiling water bath for 10 seconds on each side, then place on a parchment-lined baking tray with plenty of clearance around each. Adjust the shapes as needed. Make a small cut into the inner bottom tip of the heart shape, to help define the point better.

Combine butter, garlic, and garlic salt in a small bowl and heat for about 30 seconds in the microwave. Brush some of the mixture on to the pretzels. Sprinkle parmesan cheese on top. Bake for about 15 minutes, or until they are puffed and a rich golden brown.

While pretzels are baking, add parsley to the remaining garlic butter mixture. Brush more of this mixture on the pretzels when they come out of oven.

Easy Salmon Cakes Using Tinned Smoked Salmon

I wrote up a recipe for Kvarøy Arctic Salmon for these cute little salmon cakes, which I served on top of a bed of labneh, with a lightly dressed salad of tender herbs and pomegranate arils. One of those meals that is super easy (since the salmon in the tins is already smoked and flavorful) and yet looks special and fancy. Combining lovely delicate leafy herbs with pomegranate arils gives any dish an instantly festive look.

You can get the recipe for these easy salmon cakes on Kvarøy Arctic’s website.

Also, I just really love the packaging design of the Fishwife salmon tins…

Mini Salmon and Kabocha Squash Pot Pies

I wrote up a recipe for Kvarøy Arctic Salmon for mini pot pies filled with a creamy, hearty filling of salmon, kabocha squash, and corn. This was inspired by the herring and pumpkin pie from the Studio Ghibli movie Kiki’s Delivery Service. Ages ago, my friend Sandy gave me the idea to try to recreate the fish pastry design from the movie and I finally was able to do a version that I was really proud to share.

I am pretty late to watching all the Studio Ghibli movies. I watched Kiki’s Delivery Service for the first time last year. I happened to be in Stockholm when I watched it, and then found out the next day that the city in the movie was actually inspired by Stockholm! So I got to see one of the buildings that was recreated in the movie right after. Because the experience was so serendipitous, this movie will have a special place in my heart.

You can get the recipe for these pot pies on Kvarøy Arctic’s website.

Recipe: Brown Butter Sweet Potato Sage Streusel Muffins

For this recipe, I partnered with Danish Creamery to come up with a tasty fall treat. I love baking in the fall, warming up the house with the smell of cozy spices. But as you may know by now, I do not have the biggest sweet tooth, so I wanted to create a recipe for something that feels like a treat and has all the best of flavors that the season has to offer but is *not too sweet*. These muffins are made by first making brown butter with Danish Creamery European Style Sea Salted Butter to give it a wonderful nuttiness, before using it in a batter that’s loaded with sweet potato, fresh chopped sage, and Chinese five spice, sweetened with maple syrup. The streusel topping is also made with brown butter and I added a touch of salt and ground peanuts, giving it a little bit of a sweet-salty vibe that I think is quite addictive!

I’m calling these “muffins” but don’t expect the bready, crumbly kind—these are rich and moist from all that brown butter and fresh mashed sweet potato. The texture on the inside is going to be similar to a decadent carrot cake or banana bread but to provide a nice contrast, the streusel topping is crumbly and light, almost like the edges of a cookie.

With the brown butter being such a major ingredient in both components, you’re going to want to use a high-quality butter to start. Danish Creamery European Style Sea Salted Butter is made with just high-quality cream and a touch of sea salt and it is slow-churned in small batches for a velvety texture and rich flavor. It contains 85% butterfat, which beats out most other European style butters that contain 82%–83%. Browning butter is actually a good way to determine the richness of a butter; avoid butters that create a lot of splatter as they are melting, as that is an indication of their higher water to fat ratio. This butter, on the other hand, melted very smoothly and foamed up gently before turning the rich amber-colored liquid gold that is toasty brown butter!

Let’s get into the details of what you’ll need to do to get these lovely autumnal muffins.

Key ingredients for the brown butter sweet potato muffin base:

  • Brown Butter: What is brown butter? To make brown butter, all you need is good quality butter like Danish Creamery European Style Sea Salted Butter (and a pot and a spatula)! Nothing else goes into it; you are simply cooking the butter and toasting the milk solids in it to intensify the flavor. Bring the butter to room temp first, then cut it into a few smaller pieces and put it in a light colored pot or pan; you’ll want to be able to watch the color so a dark pan is not recommended. Cook the butter on medium-low heat, swirling or gently stirring occasionally until it starts to get foamy. Once it starts to foam up, stir constantly for 2–3 minutes, watching the color. Once the color starts to change, take it off the heat and keep stirring until all the foam subsides, and what you’ll be left with will smell amazing and resemble the color of amber; if you remember the color of the stuff they extracted the dinosaur DNA from in Jurassic Park, that’s the color you want! (But it’ll be way tastier.)

  • Mashed Sweet Potato: This recipe requires the real stuff: fresh mashed sweet potato. You will need about 1 large-ish sweet potato to get the 1 cup needed for this recipe. I have tested this recipe with both steamed and roasted sweet potato and both turned out great. I do not recommend cooking your sweet potato by microwave as that will probably dry it out. My favorite method is roasting. To roast sweet potatoes: Preheat the oven to 425°F. Wash the sweet potatoes and prick them all over with a fork. Place the sweet potatoes directly on the middle rack of the oven. Place a foil-lined baking sheet underneath them to catch anything that drips. Bake for 40–50 minutes or until they are completely soft inside. You should be able to scrape them easily from the skins and mash them up with just the slightest amount of pressure. You do not need a perfectly smooth purée for this recipe but there shouldn’t be big lumps. This can most definitely be done ahead; just bring it to room temp before using it in the batter.

  • Sage: I used 2 tablespoons of finely chopped sage for this recipe. I know that sage can be pretty divisive, but I love it. To me, it’s one of the flavors that makes Thanksgiving food special, even more so than the pie spices and the fall gourds. I actually felt that there could’ve been more sage flavor, but Spouse, who is not as much a fan of sage, thought that it was enough to notice it’s there without being at all bothered by it. I think that sage lovers could bump this all the way up to 3 tablespoons if they wanted. Conversely, if you hate sage, you can totally leave it out.

  • Maple Syrup: I used maple syrup as the only sweetener in the muffin batter because it brings a gentle sweetness and complements fall flavors so well. And ol’ maple syrup will do, as long as it’s the real stuff. 

  • Chinese Five Spice Powder: I wanted to do something a little different for fall baking here, so instead of a blend of classic American pie spices, I used Chinese five spice powder. What is five spice? It doesn’t always have only five spices, but the number five is called out because the ingredients are meant to represent the five elements in Chinese mythology. It typically has cinnamon, star anise, clove, fennel, and sichuan pepper. I opted for this because it is a pantry staple for me and I liked that it is a little bit more savory-leaning. You can substitute a pumpkin pie spice blend if you don’t have it, but I find that the heavy cinnamon content in those makes the blends a bit stronger than five spice, so I’d reduce the amount if making this substitution.

Things to know about making the streusel topping:

Once again, you’ll be making brown butter for the streusel that goes on top of the muffins, giving them that appealing, crackly mushroom top. You could brown all the butter for the recipe at once and then measure it out for each component; however, I found it was easier to do them separately and use the measurement markings on the butter wrapper. Either way, you will want to make the streusel first anyway to give it a little bit of time to chill. 

In addition to the brown butter, the other key ingredients for the streusel are a touch of five spice, dark brown sugar, regular white sugar, kosher salt, and unsalted roasted peanuts. 

Why roasted peanuts?  I included finely chopped peanuts in my streusel because I wanted the crumbly topping to have a salty-sweet quality to it, in the vein of kettle corn or salted caramel. The peanuts helped bring in a savory quality as well as nice texture to the streusel mixture, and combined with the kosher salt, the result is definitely a nice little touch of a salty balance for the maple and sweet potato muffin base. You can substitute in any nut you’d like for this. If you have a nut allergy, you could also sub in breadcrumbs, or finely crushed chicharrones!

How to get the most visually appealing muffins: 

To get bakery-style muffins that are nice and full with a mushroom top, there are a couple of special but easy tricks I used here that I will now share with you. (Note that in the photos, I used a vintage muffin tin that is proportioned a little differently but to actually test the recipe and bake the muffins shown, I used a modern, standard muffin tin and standard paper liners.)

You’ll notice that this recipe makes 9 muffins. I filled the muffin cups all the way to the top using an ice cream scooper to scoop out the batter into a nice domed shape. The amount of batter will rise and fill out the muffin cups nicely this way. You can certainly divide the batter into 12 muffin cups, but they just won’t have the muffin top you see in the photos, and you’ll want to test for doneness a couple minutes early.

Another major trick is to give the muffins a burst of high heat at first to get the tops to really rise up, and then lower the temp for them to bake evenly through the rest of the way. I start the oven at 425°F for the first 5 minutes, and then turn it down to 350°F for the rest of the time. You can skip this step if you don’t have time to watch the oven, and just bake them at 375°F for 20–25 minutes.

The last tip is to really pile on the streusel topping. Even if the top looks totally covered when you first put the muffins in the oven, keep in mind that as they rise, the surface area of the tops will increase, creating gaps in between the chunks of streusel. This recipe makes a very generous amount of streusel for if you are making 9 muffins; you might not end up using every single crumb of it, but get on them as much as the muffin tin will allow to get fully streusel-covered muffins in the end. 

Now that you know all my tricks for how to produce aesthetic muffins, happy baking!

How to Make Brown Butter Sweet Potato Sage Streusel Muffins

(Makes 9 muffins)

Ingredients for the Streusel

5 tbsp Danish Creamery European Style Sea Salted Butter, cut into chunks
1/3 (packed) cup dark brown sugar
2 tsp sugar
1/2 tsp Chinese five spice powder
2/3 cup all purpose flour
1/4 cup roasted unsalted peanuts, finely chopped
1/2 tsp kosher salt

Ingredients for the Muffin Batter

1/2 cup (1 stick)  Danish Creamery European Style Sea Salted Butter, cut into chunks
1 3/4 cup all purpose flour
1 tsp baking powder
1 tsp baking soda
1 1/4 tsp Chinese five spice powder
1/2 tsp kosher salt
1/2 cup + 1 tbsp maple syrup
1/4 cup milk or nut milk
1 cup sweet potato, cooked and mashed*
2 eggs, beaten
2 tbsp sage, finely chopped


Notes

* Recommended method for mashed sweet potato: Preheat the oven to 425°F. Wash the sweet potato(es) and prick all over with a fork. Place directly on the middle rack of the oven. Place a foil-lined baking sheet on the rack below. Bake for 40–50 minutes or until completely soft inside. You should be able to scrape the flesh easily from the skins and mash with slight pressure. Sweet potato mash can be made ahead. Measure 1 cup and allow to come to room temperature before using in the recipe.

Procedure

To make the streusel: 

Brown the butter: Cook the butter on medium-low heat, swirling or gently stirring occasionally until it starts to get foamy. Once it starts to foam, stir constantly for 2–3 minutes, watching the color. Once the color starts to change, take off the heat and keep stirring until all the foam subsides. The melted butter should now be the color of amber. Set aside.

Whisk together brown sugar, sugar, and five spice in a small bowl. Mix in brown butter. Add flour, chopped peanuts, and salt. Use a folding and pressing motion with a spoon or spatula to gently combine everything together; texture should be similar to a dry shortbread dough. Pack together into a disk and place in the fridge to chill for 5–10 minutes; it should feel slightly firmer but not be hard or solid.

To make the muffin batter:

Preheat oven to 425°F.

Follow the same instructions above to make brown butter. Set aside and allow to cool slightly.

In a medium bowl, whisk together flour, five spice, baking powder, and baking soda.

Once brown butter has cooled, transfer to a mixing bowl. Stir in salt, maple syrup, milk, sweet potato mash, eggs, and sage in that order. Gently fold in one third of the dry ingredients at a time. Combine until just homogenous. Batter should be thick but wet.

To assemble:

Line or grease 9 cups in a standard muffin tin. Divide the batter evenly among the 9 lined cups (using an ice cream scooper is recommended for this). 

Use your hands to crumble up the disk of streusel dough into mixed sized chunks ranging from the size of a pea to finer crumbs. Cover the tops of the muffin batter with the streusel and press in gently.

Bake at 425°F for 5 minutes, then reduce the oven temperature to 350°F and bake for an additional 15–18 minutes. Muffins are cooked through when an inserted toothpick comes out clean. Allow to set for about 3–5 minutes before transferring to a cooling rack. If desired, add a sage leaf on top of each to garnish. 

Once fully cooled, store leftover muffins in an airtight container. However, the streusel will soften over time.

Enjoy them on their own, or give them a swipe of some softened Danish Creamery European Style Sea Salted Butter for some extra indulgence.

Thank you so much to Danish Creamery for sponsoring this recipe! Visit their website to learn more about their legacy of carefully-crafted Old World-quality butter made with milk from family farms since 1895.

Recipe: Miso Garlic Butter Noodles with Lobster Tails

For this recipe, I partnered with Danish Creamery and created a dish that feels completely luxurious and indulgent, yet is actually simple and quick to make. A wonderful, umami-rich miso butter with a sweet undertone is infused with lots and lots of garlic and this forms the sauce that coats every strand of noodle before the whole lot is topped with pan-seared lobster tails slathered in the extra miso garlic butter. It’s good for when you want to make a home cooked meal that feels special but you don’t actually want to spend that much time on it. 

This noodle recipe combines two amazing and easy Asian-American dishes: Vietnamese-American garlic noodles and Japanese-American miso butter pasta. I make a lot of fusion food because often when I think about what I feel like cooking, I think of two things I’m craving and then explore what it would be like to combine them. And when I realized how well these dishes would overlap, it was way too obviously meant to be to pass up. 

Garlic noodles were actually invented by a Vietnamese chef right here in San Francisco and it was one of the first dishes I had after moving in to the city over 10 years ago (though not at the original restaurant). At the time, I was still terrified of driving downtown and still not all that into Asian food; I was still in my phase of wanting to binge on all the Western foods I didn’t get to have very much of when I was growing up. But my new landlady at the time recommended a Vietnamese restaurant right in our neighborhood and I fell in love with their garlic noodles. I think that was really a turning point in my exploration of food—especially Asian x Western fusion food.

This dish doesn’t require a whole lot of ingredients so it’s important that the ones that are in it are good. Ultimately the foundation for the sauce here is butter, and I used Danish Creamery European Style Unsalted Butter, which is slow-churned in small batches for a velvety texture and rich flavor. This extra time and extra care make the butter so extra delicious. As I folded it in with the mellow, slightly sweet miso, I knew things were gonna be good! And then allowing that miso butter to melt slowly over low heat with lots and lots of chopped garlic to get it infused with that garlic flavor—absolutely dreamy!

Here are some notes about the short list of key ingredients you’ll need to make this dish:

  • White Miso: White miso is the most mellow and mild of the types of miso you would find at a specialty foods store or Asian supermarket. It is made of fermented soybeans like other misos but also has rice and barley. It’s important to use the right miso here as the mellowness and sweetness of white miso is what you want to make that subtle but luxurious miso butter. I would not recommend substituting other types of miso, which may be too salty.

  • Butter: This recipe utilizes Danish Creamery European Style Unsalted Butter and the starchy water from parboiling the noodles to create a very simple emulsified sauce for the noodles. Danish Creamery’s European Style butters contain 85% butterfat (which is more than most other European style butters) and that’s what helps make  the sauce for this recipe rich and dreamy.

  • Garlic: This isn’t one of those recipes that just uses a couple cloves of garlic! When I say “garlic noodles” I mean it. This recipe uses a whole head of garlic—about 10–12 cloves—and gently infuses garlic flavor into the miso butter over low heat before the whole mixture is tossed with the noodles to coat them. Don’t worry about chopping them up super fine, I think being able to see the bits of chopped garlic is welcomed in this dish. 

  • Noodles: I used fresh Chinese style enriched egg noodles to make this dish. These noodles come in the refrigerated section of Asian supermarkets and they only need to be parboiled very quickly in boiling water to rinse off the excess starch before they can be incorporated into a stir fried noodle dish like this. You could definitely also use spaghetti; in that case I recommend cooking it until about 1 minute short of al dente.

I got the idea to top my miso garlic butter noodles with lobster from a night market that pops up in the SF Bay Area; one of the stalls served up a split open lobster on garlic noodles but I don’t really understand how you’re supposed to eat it with no shell cracker and when you’re at an event where most people eat standing. So instead of getting it there, I created my own version that I could enjoy in the comfort of my own home. I opted to just use lobster tails because I thought they’d be much less intimidating than working with a whole lobster; I wanted this recipe to be genuinely easy in hopes that you’ll try it!

Some alternative versions:

At the core of this recipe is delicious and easy miso garlic butter noodles! Feel free to leave out the lobster entirely, and the result will be a plate of the most flavorsome dream for lovers of carbs and garlic. Just reduce the amounts for the butter, miso, and garlic to about 75% if you decide to serve just the noodles alone. 

You could also substitute shrimp in place of the lobster tails. Skip the step of parboiling the lobster and instead cook them in a hot pan on each side, just until they change color and start to curl. Follow the rest of the recipe as written, then add the shrimp after the noodles are coated in the sauce and give everything a few extra tosses.

How to Make Miso Garlic Butter Noodles with Lobster Tails

Ingredients

1 stick Danish Creamery European Style Unsalted Butter, softened to room temperature
1/4 cup white miso paste
2 6–7 oz lobster tails, fresh or completely thawed
10–12 cloves garlic (about 1 head), roughly chopped
3 tbsp oyster sauce
8–10 oz fresh Chinese-style thin egg noodles
Thai basil, for garnish (optional)
2 tbsp tobiko, or other fish roe (optional)
4 lemon wedges, for serving (optional)

Procedure

In a small bowl, combine the butter and miso paste and mix together until smooth and homogenous. Set aside.

Use a sharp pair of kitchen shears to split each lobster tail lengthwise.

Bring a large pot of water to a boil. Add the lobster tail halves and boil for about 3 minutes or until shells are bright red and meat has started to firm (they should not yet be cooked through). Pull them out of the boiling water and carefully pat away excess water with paper towels. Set aside to continue to dry off.

Add noodles to the boiling water and parboil for 1 minute, or according to package instructions. Reserve about 3/4 cup of starchy water before draining the noodles. Rinse noodles thoroughly in cold water to remove excess starch and prevent overcooking. Set aside to drain thoroughly. 

Heat a large skillet or wok on medium heat. Add about a tablespoon of the miso butter mixture, swirl to coat the bottom of the pan, then add the lobster tails, cut side down. Sear for about 1 minute, or until lobster meat has some browning on the surface.  Turn off heat, flip tails over, cover, and allow the residual heat from the pan to cook the lobster tails through, about 1–2 minutes. Remove them from the pan. If there is charred residue inside the pan, safely wipe it off using tongs and a damp paper towel.

Add the remaining miso butter mixture into the pan and set heat on low. Once it starts to melt, add chopped garlic. Cook garlic on low heat, stirring constantly to allow it to infuse the butter, for about 5 minutes, or until the edges of the garlic start to turn golden. Turn up the heat to medium-high;  immediately add oyster sauce, stir to combine, then add noodles and about 1/4 cup of the reserved cooking water. Toss vigorously to combine, adding more water a little at a time if needed to help the sauce coat the noodles. Once sauce is distributed evenly, continue to stirfry until there is no longer excess water.

Use tongs to transfer noodles to a serving dish. Top with lobster tails, then scoop the remaining fried garlic mixture from the pan and spoon it on top of the lobster tails. If desired, garnish with Thai basil and scoop small mounds of tobiko over the lobster tails before enjoying immediately.

Thank you so much to Danish Creamery for sponsoring this recipe! Visit their website to learn more about their legacy of carefully-crafted Old World-quality butter made with milk from family farms since 1895.

Recipe: Apricot and Brie Tart

I wanted to make a bunch of apricot rosettes and what better way to display them than in a sweet and savory tart?

Once I have finished working on a recipe I really am happy with, I try to get as much out of it by riffing on it and using it in different contexts. Recipe testing is time consuming, and I am determined to get my time’s worth by using that recipe over again. For this tart, I made the same cheesy, savory short crust shell that I developed for a sponsor for this mixed stone fruit and goat cheese tart here. I love this crust recipe because it’s cheesy and peppery and unlike what you’d expect for a fruit tart. It has a serious snap to it, and enough flavor that it could really stand alone, but it is also perfect for tarts that have a savory cheese filling. The dough comes together very easily in a food processor, though you do have to plan ahead a bit and freeze the cubed butter. The actual labor involved is low, though, so you can save your energy for rolling up those pretty apricot roses!

In reality though, this is still going to taste good if you just cut up your apricots into little pieces and dump them onto the tart. I am completely willing to admit that slicing up a bunch of apricots and then wrapping the slices round and round each other to form a bunch of rosettes is not a normal way for someone to spend a summer afternoon. But would you have clicked on this recipe if the tart didn’t look this pretty? I personally find it sort of therapeutic to focus on delicately handing tiny pieces of produce for a bit, and at this time of year, I’ll find any excuse to immerse myself in stone fruit.

Here is a detailed walkthrough of how to make this apricot and brie tart:

  • Make the tart shell/crust: You will need to plan ahead here, because you’ll need to cut butter into small cubes, freeze them, make the dough, press it into the tart tin, and then let that chill. This tart utilized the tart crust recipe found here. Follow the “ingredients for crust” section and the first step of the procedure and that will take you up to the point where you have your chilled raw crust that is ready for baking action. That’s where the story picks up over here with a different filling, this time celebrating the beautiful delicate combo of brie and apricots.

  • Bake the crust and brie: First, you will blind bake just the raw crust for 20 minutes with some sort of pie weights to keep its shape and prevent it from puffing up in the tin. (I line my crust with foil and then use dried beans as a cheap alternative to buying pie weights.) Then you will bake the crust until it is nearly golden brown and pretty much fully baked. For the last 5 minutes, you’ll add slices of brie to melt across the bottom. I used this goats milk brie, but a more traditional version will be just as tasty. Just make sure you are getting as even of a layer as you can when you are slicing and placing the cheese; it doesn’t matter if the pieces of cheese look weird because they will get fully covered.

  • Spread the jam: After the brie has been melted, it will cover the bottom of the shell more evenly. Then you’ll want to add a layer of apricot jam or preserves. Feel free to swap for a different flavor but I wanted to keep the flavors simple in this one so I stuck with apricot. This sticky jam layer is going to be what holds the apricot roses in place.

  • Make and place the apricot rosettes: To make the rosettes, I first cut the apricots lengthwise into thin slices. I’ll use the thinnest pieces for the centers of the rosettes, rolling them into as tight of a spiral as I can, and then I will wrap a few pieces around it before placing it into the jam layer. Then I will tuck a few more pieces around it until I am happy with the size and fullness of the rosette. Keep doing that until all the big gaps are filled.

  • Glaze the apricots: Whisk together a little honey and water to form a glaze; microwave the mixture a little if needed to help dissolve the honey. When the glaze is back to room temp, brush this over the apricots. It will give them a shiny look and prevent them from browning if you are making this a bit ahead of serving.

  • Fill in the gaps with herbs: If you wish to, you can fill in any gaps in between the rosettes with fresh herb leaves to give the tart a very full and finished look. I used oregano here because I had a lot in my garden, but small basil or mint leaves would honestly be a better flavor pairing. You could also fill the gaps with pitted cherries—I think that’d look lovely. I also sprinkled a little bit of lemon thyme on the tart, which added a nice herbal aroma.

  • Cut in with a very sturdy, sharp knife and enjoy!: The crust is quite short and snappy so you’ll need a good knife to press through for cutting clean wedges. It may feel like a shame to cut into it after making all those roses, but food—even pretty food—is meant to be eaten!

How to Make the Apricot & Brie Tart

Ingredients

1 chilled, unbaked cheesy shortcrust from this recipe
5 oz brie cheese, cut into 1/8"-inch slices
5–6 tbsp apricot jam or preserves
3–4 apricots, thinly sliced
1/2 tsp honey
1 tsp warm water
fresh herbs for garnish (optional)

Special Equipment

food processor
tart pan with removable bottom
dry beans or pie weights

Procedure

Preheat oven to 400°F. 

Dock chilled shell with a fork to prevent it from warping and puffing while baking. Line with parchment paper or foil and fill with dry beans or pie weights. Place the tart pan on a baking sheet and bake for 20 minutes.

Gently remove the lining and weights, then bake for an additional 15 minutes.

Add brie in an even layer over the bottom of the tart shell. Bake for an additional 5 minutes, or until brie is melted and crust is golden brown.

Spread apricot jam or preserves in an even layer over the brie.

Form rosettes with the slices of apricots and arrange them in the tart. The apricot jam will help hold them in place.

Whisk together honey and water and brush over the apricot rosettes to give them a shiny, glazed look.

Garnish with fresh herbs if desired. Oregano, mint, or basil leaves could be used to fill in gaps between the rosettes.

Recipe: Mini Frittata Muffins with Lap Cheong and Scallions

I used to make these mini frittata muffins as a go-to recipe for parties and potlucks when I was in college and into my early twenties. It is a super easy recipe with the help of instant buttermilk pancake mix, and you can add whatever fillings you would normally enjoy inside a quiche or frittata. Over a decade later, and with much more appreciation for the flavors associated with my Chinese heritage, I decided to revisit the old tried and true recipe and incorporate lap cheong (Chinese sweet sausage) and scallions. (I’m actually pretty obsessed with the combo of lap cheong, scallions, and cheese these days. You can find my recipe for stuffed cheesy bread with these ingredients here.) The end result is the flavors you’d expect in a Chinese-American fusion breakfast, in a nicely portable format.

Back when I was making this recipe all the time, I called them “quiche muffins” because I didn’t really understand the nuances of all the different baked egg dishes out there but in reality the texture is much more like a frittata—a frittata that is slightly leaning in the direction of a biscuit, in a muffin wrapper.

About substitutions: Feel free to swap things out according to your tastes or put your own cultural spin on it. Approach the ingredients as you would if you were making a quiche or omelette; if it makes sense to pre-cook the ingredient for one of these preparations, you should do the same here. Any grated semi-soft cheese would work, as well as crumbled chèvre or feta (though you may want to reduce the amount if using a soft cheese due to the added moisture).

Now, about the edible flowers. This recipe is great for the completely unnecessary but very Instagram worthy edible flower treatment because the batter is quite wet. Anything where the delicate flowers petals and herbs are in contact with moisture in the oven is going to help keep their color and shape better (compared to, say, a shortbread cookie). Here, I used calendulas, wood sorrel, violas, wild fennel, lemon balm, and oregano—a combination of foraged and home grown. As these were baking, I also watched over them like a wistful (but much less anxious) Great British Bake-Off contestant. Because the calendula flowers have layered petals, I would gently press down the top layers as they curled up in the oven to stay in contact with the batter, and that’s how I was able to help maintain their shape despite the heat. Here is what these cuties looked like before baking:

This recipe was adapted from Allrecipes.

How to Make Mini Frittata Muffins with Lap Cheong and Scallions

(Makes 6 muffins)

Ingredients

3 eggs
2/3 cup American style dry buttermilk pancake mix
~2 cups grated cheddar
2 lap cheong sausages
2 scallions, chopped
nonstick spray or 6 muffin liners

Procedure

Preheat oven to 350°F. Line or grease muffin tins.

Peel off and discard the outer casing of the lap cheong and cut into 1/8”–1/4” pieces. In a small skillet, fry the lap cheong on medium heat until cooked through. Drain on a paper towel and allow to cool slightly.

Beat eggs thoroughly in a mixing bowl. Stir in pancake mix. Then fold in cooked lap cheong, scallions, and cheese.

Divide the batter among the muffin tins, filling them only two-thirds of the way. If desired, decorate with herbs and edible flowers.

Bake for 12–15 minutes or until an inserted toothpick comes out clean. Allow them to cool and set slightly before removing and enjoying.

These photos were shot in partnership with Pete and Gerry’s. To find their free range organic eggs near you, click here.

Steak and Caprese Toasts

For when all you want to eat during the summer is caprese made from fresh garden grown tomatoes, but you need some protein too.

I don’t normally serve toast for dinner. I try to cook up a “real” meal for Spouse and I in the evenings but I must say that this toast recipe is definitely dinner status. Maybe it was a little overkill to use such a nice cut of steak for toast, but it tasted really good so I have no regrets. I also didn’t want the risk of us biting into the toasts, and having fatty bits dragging too much steak along with the bite because we couldn’t cut through cleanly with our teeth.

There are a few phases to making these but the good news is that it all gets done in the same cast iron pan. And in the end, you’ll have a world of flavor—tender steak with richness from the butter it was seared in, crunch and carbs from the toast, creaminess from burrata, fresh herbaceousness from basil, and brightness from burst tomatoes tossed in a quick vinaigrette. ⁣

How to Make Steak and Caprese Toast

Ingredients

8 oz tenderloin or filet mignon steak, at room temp
kosher salt
freshly ground black pepper
4 slices of good bread
lots of olive oil
1 tbsp salted butter
10 oz cherry tomatoes
1 clove garlic, thinly sliced
1/2 tsp honey
2 tsp white wine vinegar
8 oz burrata
fresh basil leaves

Procedure

Generously season steak with salt and pepper.

Heat a cast iron skillet on medium high. Generously drizzle olive oil. Fry bread in the olive oil on both sides until golden, then remove and set aside.

Add butter to the skillet and then add the steak. For medium rare, cook steak undisturbed for ~3 minutes on each side. Transfer steak to a grooved cutting board to rest for at least 10 minutes.

Reduce heat to medium. Add 2 tablespoons of olive oil, followed by the cherry tomatoes, 1/4 teaspoon salt, and garlic. Let tomatoes char on one side before turning. Cook tomatoes until they start to burst, about 4–5 minutes total. Shut off heat.

Combine honey and vinegar in a small bowl. Spoon in the charred tomatoes and mix gently to combine.

Slice the steak thinly.

Assemble the toasts. First, divide the burrata among them, then the steak. Then spoon some of the tomato mixture over each. Garnish with the basil leaves.

For more toast inspiration, check out all the posts with the “toast post” tag here.

Recipe: Stone Fruit & Herbed Goat Cheese Tart with Cheesy Crust & Hot Honey Butter

For this recipe, I partnered with Danish Creamery to celebrate my favorite time of the year—stone fruit season! I came up with the idea for this tart because I love making hybrid baked goods in the summer that feature raw seasonal produce in all of their peak-flavor glory. I still want the satisfaction of crafting and baking some kind of base or crust—something where I can proudly say “I made this from scratch!”—but when fruits are already ripe and bursting with their natural juices, I think baking them is honestly a waste, so I add them at the end to be enjoyed fresh.

So, this tart features a snappy cheesy buttery shortcrust, which gets baked solo and then gets filled by a creamy blend of whipped goat cheese and fresh herbs and topped with fresh, raw stone fruit before getting finished off with a drizzle of hot honey butter. Because my taste preferences are always leaning towards savory, I love to experiment with combining sweet fruit with savory ingredients and I think that the balance is just wonderful; it allows for savoring the natural sweetness of a beautifully ripe fruit without limiting the result to something that can only be served as a dessert. Instead, I recommend that this sweet-savory beauty be considered for your next al fresco brunch or picnic potluck; it holds up well when made a bit ahead so it would certainly be a low-stress addition to any sun-soaked gathering where smiles and good vibes are the objective.

Though the nectarines, apricots, and pluots are obviously the star here, don’t sleep on this cheesy crust! I am so proud of how much flavor I was able to pack into something that is often overlooked or perceived as just a vessel when it comes to tart making, and it is definitely a recipe that I will be using as a base for more than just the fruit tart idea you see here. Loaded with asiago cheese and high-quality butter, this savory shortcrust is so snappy and yummy that it would even be delicious broken up into chunks and eaten alone as a snack! This sturdy shortcrust is what helps make this tart a good menu item for summer gatherings, and the munchable texture is a result of keeping all the ingredients super cold while putting together the dough and keeping the moisture content to a minimum. Using Danish Creamery European Style Sea Salted Butter, which has a higher butterfat content than most other European butters, is one trick I used getting the right texture and flavor for the crust. A good butter is key for a shortbread or shortcrust, and Danish Creamery’s  butter is made with just high-quality cream and a touch of sea salt, slow churned for a rich flavor that really sets this shortcrust dough recipe up for durable and delicious success.

I also used Danish Creamery’s European Style Sea Salted Butter in the hot honey butter drizzle that serves as the finishing touch for this tart. This creation is something akin to drizzling a dessert with salted caramel at the end, but I think the hint of spicy chili mixed with the honey and the salted butter is the perfect way to really bring together this combination of sweet and savory flavors. You will end up making more than you need for the tart when following the recipe below, and I recommend saving the extra to drizzle on toasts, pizza, or anything where a little spicy indulgence is welcomed.

This stone fruit and herbed goat cheese tart is made up for the following components:

  • Cheesy Shortcrust: A durable tart shell is what holds all the magic together, but it also brings plenty of its own flavor. I start by cutting Danish Creamery European Style Sea Salted Butter into small cubes and then freezing them—keeping the crust ingredients super cold is what gives you a short, crisp, snappy texture instead of a dreaded soggy bottom, so planning a little ahead and giving the cubes of butter time to freeze will make that goal easier. The rich, creamy butter, made with cream from healthy grass-fed California cows, becomes the savory foundation that gets supplemented with asiago cheese and black pepper to give the crust its addictive flavor. While using high-quality butter should be a given for a crust like this, there’s also an unexpected ingredient: vodka. Using vodka instead of water further ensures that this crust does not get bogged down by moisture; it brings together all the dry ingredients but evaporates quickly in the bake, along with any concerns about having alcohol in your pastry. These ingredients get pulsed together in the food processor and then pressed into the tart pan, so you don’t even have to bother with rolling. 

  • Herbed Goat Cheese: Whip together room temp chèvre with Greek yogurt and fresh chopped herbs to form the first layer of filling that goes inside the cheesy tart shell. Not only does the mixture help hold the stone fruit in place if you choose to arrange it in a decorative manner, but the tangy, creamy goat cheese and herbs are such a lovely flavor complement. You can really use any soft herbs of your choosing here but I opted for chives, basil, and thyme.

  • Stone Fruit: This is the main event! In case you didn’t know,  the term “stone fruit” refers to fruits like peaches and apricots that have a singular stone-like pit inside to house the seed. Feel free to use a medley of nectarines, apricots, and pluots like I did, or whatever is your personal fave. When selecting your stone fruit for this tart, seek ones that are fragrant but still have some firmness to them, so that they are easy to slice and will keep well on top of the tart. You can either slice them thinly and arrange them like I did, or opt for chunkier wedges that you can just dump into a somewhat-even layer on top.

  • Hot Honey Butter: This finishing touch brings a unique spicy kick to the sweet-savory creation and helps to unite all the other flavors. A mix of gochugaru (Korean red chili flakes) and red chili pepper flakes are given a chance to bloom in a bit of velvety Danish Creamery European Style Sea Salted Butter before being combined with honey. This recipe yields more than what is needed for the tart; save the extra in a microwave-safe jar and heat for a few seconds to improve viscosity for drizzling on other creations afterward.

How to Make the Stone Fruit & Herbed Goat Cheese Tart

Ingredients for Crust

1 stick Danish Creamery European Style Sea Salted Butter, cut into 1/4”-inch cubes then frozen
1 1/4 cup all purpose flour
1/2 cup asiago, grated then chilled
1/2 tsp kosher salt
1/2 tsp freshly cracked black pepper
4–6 tbsp vodka, chilled

Ingredients for Filling

5 oz goat cheese/chèvre, at room temperature
4 tbsp Greek yogurt, drained
1/2 tsp chives, finely chopped
1 1/2 tsp thyme leaves
2 tbsp basil leaves, finely chopped
2–3 stone fruits, sliced
fresh herbs and edible flowers, for garnish (optional)

Ingredients for Honey Butter

1 tbsp Danish Creamery European Style Sea Salted Butter
1 tsp gochugaru/Korean chili flakes
1/2 tsp red pepper flakes
3 tbsp honey

Special Equipment

food processor
tart pan with removable bottom
dry beans or pie weights

Procedure

To make the crust, add flour, asiago, salt, and pepper to a food processor and pulse briefly to combine. Scatter in frozen butter cubes and pulse until the texture resembles wet sand. Add 1 tablespoon of vodka and pulse a couple of times; repeat, adding 1 tablespoon of vodka at a time and pulsing briefly after each, until the mixture looks like it is just barely starting to form clumps. Dump mixture into tart pan and use a spoon to quickly press mixture evenly against the bottom and sides, keeping everything as cold as possible. (A sheet of wax paper could also aid in smoothing out the mixture). Chill unbaked tart shell in the freezer for 20 minutes or in the refrigerator for 1 hour or up to overnight.

Preheat oven to 400°F. 

Dock chilled shell with a fork to prevent it from warping and puffing while baking. Line with parchment paper or foil and fill with dry beans or pie weights. Place the tart pan on a baking sheet and bake for 20 minutes. Gently remove the lining and weights, then bake for an additional 20 minutes, or until the crust is golden brown. Allow to cool to room temperature before filling.

In the meantime, combine goat cheese, yogurt, and chopped herbs in a mixing bowl. Using a hand mixer, whip together until incorporated and fluffy. Set aside.

When the tart shell is cooled, spread the goat cheese mixture in an even layer. Arrange sliced stone fruits on top. 

To make the hot honey butter, add butter to a small stainless steel pot and heat on medium-low. When the butter is completely melted, reduce heat to low and add gochugaru and pepper flakes; stir continuously with a silicone spatula for 1–2 minutes, allowing the spices to bloom and the mixture to get completely foamy. Add honey and keep stirring until the mixture becomes completely foamy again. Remove from heat and once the bubbling resides, drizzle hot honey butter immediately over the tart, to taste. 

If desired, garnish with pretty edible flowers and herbs.

Thank you so much to Danish Creamery for sponsoring this recipe! Visit their website to learn more about their legacy of carefully-crafted Old World-quality butter made with milk from family farms since 1895.

Recipe: Mala Marinated Tomato Salad (with Burrata)

This is this one of those recipes that is meant to help off-season tomatoes reach a higher potential but that would also be so good with ripe tomatoes in season. The background for this idea is really not all that complicated: I love the classic Sichuan mala smashed cucumber salad and I also love salads that revolve around tomatoes. So, why not use that same Sichuan-inspired, numbing-spicy dressing for tomatoes instead of cucumbers?

Sichuan cucumber salad is really the only raw Chinese salad I can think of. The cucumbers are typically smashed first, but lately I have been seeing a lot of recipes on the ‘gram where the cucumbers are cut in a special way to make a cool spiraled effect. The dressing typically leans on the classic Chinese vinegars (rice vinegar and black vinegar), garlic, and soy sauce; and my favorite versions are the ones that also include mala, or numbing-spicy, chili oil made with Sichuan pink peppercorns. It is crisp, cold, and refreshing. It appears as an appetizer on Chinese restaurant menus among other cold dishes like couple’s delight but I love making my own version at home as a side dish (I guess like Korean banchan) when I cook up a really heavy and hearty Asian meal of any sort. The tangy, tingly, crunchy cucumbers are a perfect balance to braised or grilled meats.

While cucumbers will always be a sidekick in my mind, tomatoes can definitely be a main character. In adapting my Sichuan-inspired salad dressing for tomatoes, what I ended up with was, I guess, a Chinese fusion version of a caprese salad. I ended up serving it with burrata and basil (yes, the crazy purple leaves you see are a type of basil called “wild magic”!), and Spouse and I thoroughly enjoyed it as a main course, spooning the tomatoes onto crusty bread. But you can definitely skip out on the burrata and herbs, and serve this marinated tomato salad as an appetizer or side dish.

This recipe involves three different stages of flavor building.

  • Salting the tomatoes. This is a good practice regardless of the time of year, whenever raw tomatoes make an appearance because the salt really helps bring out the best flavor that your tomato has to offer. Because I tested this recipe when tomatoes were not yet in season, I used more salt than would be needed for really amazing tasting ripe tomatoes. Keep this in mind when you are at this stage of making the recipe. You can use whatever tomatoes you’d like; I recommend a medley of heirloom tomatoes and cherry tomatoes to keep things looking interesting. Just cut them into bite-sized chunks with plenty of open surface area to absorb all the flavors of the marinade.

  • Marinating the tomatoes in the dressing. I like to allow the raw garlic and the tomatoes to sit for a bit in a more concentrated vinegar mixture so the garlic has the opportunity to pass on some of its punchy flavor to everything else in the mix.

  • Adding the chili oil. This recipe uses my easy mala chili oil recipe, which you can find here; note that my recipe is a lot less salty than many commercial chili oils, so you may want to keep that in mind if you are opting to use a storebought one. This step is very much to-taste, depending on how tingly you want your tomato salad to be. I recommend adding a tablespoon at a time and tasting along the way. If you do opt to make the caprese-esque version shown in the photos, I recommend not going full-blast with the chili oil in the tomato mixture and reserving some to drizzle over the burrata as a finishing touch.

How I Make Mala Marinated Tomato Salad

Ingredients

2 lbs tomatoes, cut into bite-sized chunks*
1/2–3/4 tsp kosher salt
2–3 cloves garlic, minced
1 tbsp Chinese black vinegar
3 tbsp rice vinegar
1 1/2 tsp sugar
1/2 tsp fish sauce
2–4 tbsp mala chili oil
8 oz burrata (optional)
basil leaves (optional)

*If using cherry tomatoes, cut them in half so they can absorb the flavors from the dressing.

Procedure

In a large bowl, add tomatoes and salt and toss to combine.

In a separate small bowl, whisk together garlic, both vinegars, sugar, and fish sauce. If you are very impatient, microwave the mixture for 10 seconds to help dissolve the sugar. Once the sugar is dissolved, add the dressing to the tomatoes and mix gently but thoroughly to coat. Allow to marinate for at least 10 minutes. (I recommend 20–30 minutes for off-season tomatoes.)

Add chili oil to your taste and mix gently to combine.

For optional “caprese” version: Spoon tomatoes and some dressing into a serving dish. Tear burrata into large globs and distribute amongst the tomatoes. Drizzle additional chili oil over the burrata. Garnish with basil. Serve with toasts or crusty bread.

How I Make Crispy Smashed Potatoes

smashedpotatoes.JPG

Smashed potatoes have become one of my favorite formats of potatoes in my life. And they are super easy to make, though—like all good things—they do take a little bit of time. First you have to boil the potatoes until they are completely soft, then you smash them to expose some fluffy creaminess from inside, and then you roast them until their the paper thin skins and the craggy surfaces created by smashing get browned and crispy. I didn’t realize until I started making these that even though I eat a lot of potatoes, I rarely eat them in a way where I can truly taste the pure flavor of the potato itself. In the photo above there are mini red skinned potatoes and purple ones. Spouse and I found that while we enjoyed every potato on the tray, there was something about the red skinned potatoes that had a little bit of extra something in their natural flavor that we preferred over the little purple ones. I encourage you to get whatever types of tiny potatoes you can find and try making this recipe with them, to see if you can taste a difference—for science.

Below is my recipe for how I make my smashed potatoes, which have become a go-to side or snack on many an occasion in my household. Some suggestions for how to enjoy them are:

To season the potatoes shown here, I used Spice Tribe’s Haitian-inspired Mama Manje blend and this made the house smell SO GOOD while the potatoes were baking, so I definitely recommend this blend. (I received this product as part of a paid partnership with Spice Tribe but this recipe is not sponsored and I gladly use their products in my everyday cooking). This blend does not contain any salt, so I have control over how much salt I add to the potatoes. However, you can use whatever seasoning blend you want; just check to see if it has salt and avoid oversalting if it does. For herbs, I used chopped chives, oregano, and lemon thyme, but you can use whatever fresh herbs you love; potatoes are great with pretty much anything, after all! The flower petals are dianthus from my garden; they are safe to eat but really there for the aesthetics.

How to Make Crispy Smashed Potatoes

Ingredients

1 pound mini potatoes
1 1/2 tsp kosher salt, divided, plus more to taste
3 tbsp extra virgin olive oil, divided
1/2 tsp low-sodium or salt-free spice blend*

*I like to use Spice Tribe’s Mama Manje blend or Fly by Jing’s Mala Spice Mix.

Procedure

Add cleaned potatoes to a pot and cover with water. Bring to a boil and add 1 teaspoon of salt.

In the meantime, preheat the oven to 450°F.

Continue boiling potatoes until very soft and a fork pokes through with no resistance, about 20–25 minutes. Drain and allow to cool slightly.

In a large mixing bowl, combine potatoes, 2 tablespoons olive oil, 1/2 teaspoon salt (or to taste), and the spice blend of your choice. Toss to coat the potatoes in the oil and spices.

Dump the potatoes and any excess oil/seasoning onto a large sheet pan. Use the back of a fork to gently press down and smash the potatoes. Drizzle with the remaining olive oil.

Bake for 25 minutes or until you notice some browning on the fluffy parts.

Recipe: Strawberry Herb Biscuits

For this recipe, I partnered with Danish Creamery to share something that captures the promise of sunny days and a beautiful spring season. And to me, bright, ripe strawberries are the sign of the peak of spring. Growing up in the agricultural Central Valley, it used to make me so happy to see little farm stands popping up everywhere we drove, with painted wooden signs pointing to cartons full of freshly picked strawberries. It was a marker for those perfect spring days when it was a joy to be outside; the ones that came sandwiched in between foggy, frosty winters and scalding summers.

Now that I am in San Francisco, the seasons are not quite so distinct, weather-wise, but I still live for how the changing of the seasons becomes evident in the produce aisle. We have strawberries all year but they definitely do not taste the same when they are not in season! 

I got the idea to fold fresh strawberries into my base biscuit recipe from a local bakery that had strawberry scones, but I can’t resist a good biscuit. These might look a bit like scones from the outside, but trust that inside you will find a hint of savory and lots of tender layers. These joys are all thanks to the perfectly creamy 85% butterfat Danish Creamery European Style Sea Salted Butter, which I freeze and then grate to form the dough. I have found this technique to be way easier than cutting all that butter into tiny cubes or rubbing them into pea-sized kernels. The grating of the slow-churned velvety butter and a quick series of letter folds of the dough are my tricks to getting these beautiful biscuits every time—the kind that you don’t even need a knife to split open because you’ve created all those wonderful layers.

And once they are out of the oven and as soon as they are cool enough for you to be able to stand prying them open without burning your fingerprints off, spreading on more of that creamy butter (and maybe just a tiny sprinkle of flaky salt) is all these biscuits need to be enjoyed to their full potential. No jam necessary because that sweet strawberry goodness is already baked in! Danish Creamery European Style butters are carefully crafted using the same recipe they’ve been using since 1895 plus high-quality cream from family farms in California’s Central Valley (where I’m from!) so you can bet that it is mighty tasty slathered on all your home-baked biscuits.

What you need to know about the ingredients for this Strawberry Herb Biscuit recipe:

  • butter: Great butter is one of the most critical ingredients for making biscuits, both for the taste and texture. I used Danish Creamery European Style Sea Salted Butter because of Danish Creamery’s legacy for producing an old world style butter with a high butterfat content, made with milk from healthy cows that munch on grass on wide open California family farms. Freezing and then grating the butter makes short work of incorporating this decadent butter into the biscuit dough in a way that will create lovely layers as they bake up in the oven. Don’t sweat it if a bit of butter gets left stuck on the grater—there should still be plenty of buttery goodness to make your biscuits nice and yummy. 

  • Greek yogurt: While many biscuit recipes call for sour cream, Greek yogurt is what I always have already in my fridge and I’ve found it works great. There is plenty of creaminess already in the dough from all that high-quality butter, so using Greek yogurt has an added plus of making the biscuits a little healthier (...not that we’re concerned about that here!) Before using, stir up your Greek yogurt to create a uniform consistency. If the yogurt feels dry and thick like cream cheese, add a teaspoon of water to thin it out.

  • strawberries: This recipe is all about celebrating strawberry season, so be sure to use strawberries that are firm but sweet. If you’re making this Strawberry Herb Biscuit recipe with off-season fruit, you may wish to add an extra tablespoon of sugar into the batter. As you’re handling the dough, do so gently to avoid completely smashing the bits of strawberry that are mixed in; a little moisture running out of them is expected and is nothing to sweat about but you want to keep the pieces relatively intact. 

  • fresh herbs: I love the combination of strawberry and basil for the perfect sweet-savory balance that is encapsulated by this biscuit recipe. I also used lemon thyme because the stems are much more tender than French thyme and simply require a rough chop without picking the tiny leaves. You can certainly sub in your favorite thyme, or other herbs that pair well with strawberries like sage or tarragon. Just be sure to leave out any hard stems.

One last note:

You definitely don’t need to decorate your biscuits with edible flowers like I did, but you know I can’t resist pressing pretty blooms onto all my bakes when my backyard garden is thriving in the spring. I used violas, as well as the leaves of lemon balm, lemon thyme, and parsley. I’m guessing they successfully lured you into coming to this recipe, but now that you’re here, I assure you that it’s the good butter that is key to making these delicious springtime indulgences, and they will taste just as good with or without the floral decor.

How to Make Strawberry Herb Biscuits

Ingredients

2 1/2 cups AP flour, plus extra for dusting
1 3/4 tsp baking powder
1/2 tsp baking soda
1–2 tbsp sugar
1/2 tsp kosher salt
10 tbsp Danish Creamery European Style Sea Salted Butter, frozen
4 tbsp honey, divided
1 1/4 cup Greek yogurt, stirred
1 cup strawberries, stems removed, cut roughly into 1/4” pieces (about 7–9 strawberries)
1 tbsp lemon thyme, tough stems removed and coarsely chopped
2 tbsp basil leaves, coarsely chopped

Procedure

Combine flour, baking powder, baking soda, sugar, and salt in a large bowl and whisk together.

Grate in the frozen butter using the large holes of a box grater; toss together with the dry ingredients as you go, to avoid clumps. Then, toss all the butter and dry ingredients together gently so each shaving of butter is separated and coated with the dry ingredients. Drizzle 3 tablespoons of honey evenly over the mixture.

Add strawberry pieces and chopped herbs to the mixture and gently combine.

Create a well in the center of the mixture. Pour yogurt in the well, then slowly incorporate the flour mixture into the wet yogurt . Once all the yogurt is absorbed, resulting in a craggy texture, use hands to gather the dough together and fold it on itself a few times until it is a cohesive dough.

Dump dough onto a cold work surface and try to work quickly and keep everything cold during the folding process. Dust work surface with flour and do so generously throughout the process as needed to prevent sticking. Use hands to shape dough into a rectangle, then use a dusted rolling pin to roll into a rectangle roughly 8 inches wide by 12 inches tall. Fold down the top third and then fold up the bottom third (like you would fold a letter). Flip and rotate 90 degrees and repeat the shaping, rolling, and folding sequence. Flip and rotate again, then do the sequence one more time, so you have done 3 sets of letter folds total.

Roll out the dough one more time, to a rectangle slightly larger than 8 inches x 12 inches. Using a sharp knife dusted in flour, cut the rectangle into 6 even sections by pushing the knife straight down firmly to avoid any sort of sawing motion (that could seal the layers and prevent the biscuits from puffing up). If desired, trim off a tiny amount of dough from all the outer edges of the rectangle to create sharper edges and discard the excess dough—this will also result in a more puffed-up biscuit.

Place biscuits on a parchment-lined baking tray. Freeze for 10 minutes.

While biscuits are in the freezer, preheat oven to 425°F.

Combine remaining 1 tablespoon of honey with 1 tablespoon of water and whisk together until homogeneous. Brush evenly over the tops of biscuits.

If desired, gently press edible flowers and herb leaves on top of the biscuits for decoration. If biscuits do not feel chilled when done decorating, return them to the freezer for another 5–10 minutes before baking.

Bake for 17–20 minutes, or until the biscuits are golden. Enjoy by splitting open with your hands and spreading halves with softened Danish Creamery European Style Sea Salted Butter.

Thank you so much to Danish Creamery for sponsoring this recipe! Visit their website to learn more about their legacy of carefully-crafted Old World-quality butter made with milk from family farms since 1895.

Recipe: Chicken Meatball Skewers with Craggy Crispy Potatoes & Spiced Ketchup

Maybe this is a surprising tale to tell as a food blogger but my family does not have a bunch of family recipes that have been passed down from generation to generation. There is one cookbook that I remember my mom using, that she brought with her from Malaysia and we have a few tried and true recipes from there. And she also has her famous (among friends) curry puff recipe that I definitely need to get from her. For the most part, though, when I am feeling nostalgic for the food memories that make me feel connected to my family and my heritage, I have to try to recreate them from memory.

But, sometimes, as the great Ina Garten says, “storebought is fine”!

My parents are I are all about using store-bought pastes to recreate our favorite Malaysian dishes sometimes, and guess what? They turn out plenty delicious. A good prepared spice paste will have all the flavor complexity that requires time to develop and will save you the time and hassle of cleaning mortars and pestles and food processors.

Another great thing about a storebought spice paste is that it makes it easy to get creative. For example, I do have my own from-scratch chicken satay recipe but using a spice paste such as Asian Home Gourmet’s Marinade for Meat Satay allows me to easily incorporate those flavors of satay that are so nostalgic to me into other meals. This spice paste can be purchased at Millenniyum.com. (I am really lucky to have access to lots of great grocery stores near where I live, but if you have trouble finding the special Southeast Asian ingredients I use in a lot of my recipes, then Millenniyum is a great place to order them online. They carry a variety of products that I would consider to be iconic to stocking a Southeast Asian pantry.)

A lot of times when I am coming up with ideas for fusion dishes, what sparks the idea is looking at commonalities among foods from different cultures—I love encountering these connections because it further proves my belief that it is through food that people of different cultures can find the best channels of communication. There are many other cultures besides my own that have iconic versions of meat on a stick, and kofta kababs are another favorite example of mine. It may be spelled kofta, köfte, kefta or other variations, but throughout the Levant and Arabic cultures, there is some version of ground meat served molded around skewers—a meatball kebab.

I love that the ground meat mixture is such a wonderful carrier of flavor, so I thought creating a meatball version of chicken satay would be a great, texturally-new way to experience one of my favorite flavor combos. Since I was drawing inspiration from kofta kababs anyways, I decided to combine my chicken meatball satay with crispy potatoes, reminiscent of those Turkish fast casual stands all over Europe that pair shawarma and kebabs with fries. Since I didn’t need the whole packet of Asian Home Gourmet Marinade for Meat Satay in my marinade, I was also able to use some to amp up plain ol’ ketchup to make an incredible dipping condiment for my super crispy potatoes.

This latest culinary fusion of mine is made up of the following components:

  • chicken meatball skewers: A cross between Southeast Asian chicken satay and Arab kofta kebabs; ground chicken is mixed with Asian Home Gourmet Marinade for Meat Satay and some binders to create a meatball mixture that is loaded with the flavor of chicken satay. This mixture is quite sticky if you use a 96% lean/4% fat ground chicken like I did; I recommend chilling it for a bit to get it to firm up more and continuously dipping your fingers into some water while you are molding the mixture around skewers, to prevent it from sticking to your hands. The slightly messy process will be well worth it when you end up with an incredibly tender meatball texture for your meat skewers. I cooked the meatball skewers in a pan with a large flat base that could easily accommodate the length of the skewers, rotating regularly with tongs to keep their shape. Satay and kebabs are both typically grilled, but I thought this pan fried method would help make this recipe more accessible, and something that could be made year round.

  • craggy crispy potatoes: In place of french fries, I made these craggy crispy potatoes that are so incredibly addictive. First I boil baby potatoes in salted water until they are completely soft. When they are slightly cooled and totally dry, I rip them apart with my hands and that creates all kinds of irregular craggy surfaces, that when crisped up in a deep frying phase turns into all these wonderful crispy edges. Just look at how golden and delicious they look in the photos!

  • spiced ketchup: Whisking together some regular ketchup with some of that Asian Home Gourmet Marinade for Meat Satay will transform it into a condiment that tastes so full of complex spices. It is perfect for those potatoes but you may just want to end up getting extra spice paste packets to make this for all your other favorite deep fried carb formats.

  • other serving suggestions: I opted to serve my skewers and fried potatoes on top of naan and a big smear of yogurt, and finished things off with micro cilantro and cucumber ribbons. I completely recommend this combo, which further serves to bridge the gap between things served with satay and things served with kebabs. However, these are an optional finishing touch.

How to Make Chicken Meatball Skewers with Craggy Crispy Potatoes & Spiced Ketchup

(Makes about 12 skewers)

Ingredients

1 packet Asian Home Gourmet Marinade for Indonesian Meat Satay

Ingredients for Chicken Meatball Skewers

1/3 cup panko breadcrumbs
1 egg, beaten
1 tbsp cilantro, finely chopped
1 lb ground chicken (96% lean/4% fat recommended)
2–3 tbsp cooking oil

Ingredients for Crispy Potatoes

1 lb baby yukon gold potatoes
1 1/4 tsp kosher salt, divided
2–4 cups vegetable oil (or high smoke point oil) for deep frying
2 tbsp ketchup

Ingredients for Serving (Optional)

flatbreads, such as naan
cucumbers, sliced
yogurt
cilantro or micro cilantro

Procedure

Combine breadcrumbs and egg and allow to sit for 2–3 minutes so breadcrumbs absorb egg and become soggy. Then, combine all meatball ingredients and 4 teaspoons of Asian Home Gourmet Marinade for Indonesian Meat Satay. Mix thoroughly until homogenous. Refrigerate meatball mixture to allow it to become more firm while preparing the potatoes.

In a medium pot, combine potatoes with 6 cups of water, or enough to completely cover the potatoes in 2 inches of water. Bring to a boil and add 1 teaspoon of salt. Continue boiling potatoes until they begin to crack, about 25–30 minutes. Drain completely and allow to cool.

Prepare the spiced ketchup by combining ketchup with the remaining Asian Home Gourmet Marinade left in the packet. Whisk until homogeneous. Set aside until ready for serving.

In a heavy pot, heat up enough frying oil to be deeper than the size of the largest potato. Prepare a small baking tray lined with paper towels. When boiled potatoes are cool enough to handle, gently break into large chunks with your hands to create irregular craggy pieces—halves for smaller potatoes and quarters for larger ones. When oil starts to shimmer, test it by adding a tiny piece of potato to the oil; if it bubbles vigorously, the oil is hot enough. Working in batches if necessary to not crowd the pot, deep fry potatoes until golden brown, about 3–5 minutes per batch. Remove from oil and drain on prepared paper towels. 

Once all potatoes are fried, remove paper towels and place fried potatoes directly on tray. Toss potatoes with remaining 1/4 teaspoon salt (or salt to taste). Place potatoes in the oven and turn on to 175°F to keep warm while preparing the skewers.

Begin forming the meatball skewers by moistening hands with water to prevent sticking, then scoop about 1/4 cup of the chilled meatball mixture and mold into a long shape around a wooden skewer. Repeat with the remaining meatball mixture.

Use a skillet large enough for the skewers to lie flat or a flat griddle pan; heat on medium. Add enough cooking oil to thinly coat bottom of pan. Working in batches if needed, place prepared meatball skewers in heated pan and cook for 5–7 minutes, using tongs to rotate regularly to maintain the rounded shape. Add cooking oil as needed and repeat until all the meatball skewers are lightly browned on the outside and cooked through.

To make the serving suggestion shown in the photos, spread a thin layer of yogurt over flatbreads, then top with skewers and potatoes; garnish with cucumbers and micro cilantro. 

Serve the spiced ketchup on the side for dipping the potatoes.

Thank you so much to Millenniyum for sponsoring this Asian Home Gourmet recipe! Check them out on Instagram here or visit their website to purchase Southeast Asian pantry essentials.

My Lazy Caesar Salad Dressing Recipe

Call me basic but I am a sucker for a good caesar salad. I know all about how the dramatic tableside-tossed caesar salad spectacle was invented in Mexico but to me, the best caesar salads are the ones that are served up at nice pizza spots—they have to be good so that people actually enjoy eating them instead of just ordering them out of obligation to have something leafy and green to go with their pizza. I love the ones where a nice, thick, anchovy-based dressing is evenly coating every lettuce leaf before being dusted in freshly grated parmesan cheese, and I actually look forward to them just as much as I look forward to the pizza!

The original caesar salad dressing allegedly wasn’t all that thick and didn’t even contain anchovies, but for once, I have to argue that time and adaptations have improved the recipe. So, the dressing I’m paying tribute to here is the modern version that most Americans are probably more familiar with nowadays.

The bottled caesar salad dressings from the grocery store just don’t cut it for me, though. They just don’t have the same special umami. So, I always make my own. But keep in mind that I am really quite lazy. Salads are a go-to for weekday lunches at my place but in those instances I am most definitely not busting out a mortar and pestle for pounding an anchovy paste nor any sort of food processor/immersion blender to make a thick emulsion, nor do I wish to clean any of those instruments thereafter. So, this is my lazy cheater version of a caesar salad dressing that I am willing to throw together on weekdays, and I finally really tried to get the measurements right so I could share it with you.

The secret ingredient in my cheater caesar dressing recipes is fish sauce. It’s my secret ingredient in a lot of recipes, really, but I don’t think it could be any more fitting than in this one. After all, caesar dressing gets its distinct umami undercurrent from salted anchovies getting turned into a paste—fish sauce is exactly that same flavor in convenient bottled liquid form! I thought I was pretty dang clever when I first came up with this hack.

Rather than having to worry about combining egg and oil just right to create a thick emulsion, my other cheat is to use yogurt to get a nice thick dressing. Some recipes use a jarred mayo, but yogurt is perhaps a bit healthier (and less off-putting for mayo haters like my spouse). I always have some Greek yogurt in my fridge, and including it in any dressing guarantees a nice creamy and thick consistency. The resulting dressing does not taste identical to the kind I love at nice pizza joints but rather like a good yogurty version of it. For quick weekday lunches, it does the trick and is plenty tasty!

To make the salad shown in the photos, I tossed baby gems lettuce leaves with enough dressing to thinly and evenly coat the leaves and then tossed the dressed leaves with lots and lots of freshly grated parm. I made crispy prosciutto by baking twisted up slices of prosciutto on a parchment-lined tray at 425°F for 10 minutes. Then, I made grilled cheese sandwich with a cheddar and gruyere blend and cut it up into 1-inch cubes to use as croutons. A sprinkle of chopped chives and more grated parm were the finishing touches.

How I Make My Lazy Caesar Salad Dressing

Ingredients

2 cloves garlic, pressed or microplaned
3 tbsp lemon juice (from about 1 lemon)
1 tsp apple cider vinegar
1 tbsp fish sauce
1/2 cup + 2 tbsp Greek yogurt
1 tsp dijon mustard
1/4 cup extra virgin olive oil
freshly cracked black pepper, to taste
1/2 cup freshly grated parmesan cheese

Procedure

Combine the garlic, lemon juice, vinegar, fish sauce, yogurt, and mustard in a bowl. Whisk thoroughly to combine. Add the olive oil and pepper and whisk again until homogenous. Finally, add the parmesan cheese and whisk thoroughly once again.

(This recipe makes enough dressing for 4–6 two-person meal salads. Add dressing to prepared lettuce leaves one tablespoon at a time and toss thoroughly after each addition until leaves are evenly and thinly coated. Then toss dressed leaves with extra freshly grated parmesan to taste. Serve with chunky croutons on top, or go crazy and add whatever you like!)

Recipe: Lap Cheong and Scallion Stuffed Cheesy Bread

lapcheongscallioncheesebread.JPG

I wanted to test this idea of stuffing focaccia with cheese for another project and I decided to try it out with one of my favorite ingredient combos. To be honest, I can’t think of an exact traditional dish that combines lap cheong (sweet Chinese sausage), scallions, and cheese but they do make me think of the smells of a Taiwanese bakery where you can find hot dog buns, scallion buns, and the like.

Lap cheong can be found at any Asian market. This low sodium option from Kam Yen Jan is my favorite one to get. The casing is very thin and I like to peel it off and crumble the sausage by hand for more organically shaped pieces, but you could also just slice it up. It is a fatty, slightly sweet, and intense savory flavor that tends to be used in moderation in Chinese dishes. But this recipe is not about moderation!

I shared a photo of this in my Instagram stories and got a lot of reactions to it, but I don’t think the photo is quite insta-worthy so I am just going to share the recipe here.

How to Make Lap Cheong & Scallion Stuffed Cheesy Bread

Ingredients

2/3 cup warm water*
1 tsp honey
1 1/2 tsp dry active yeast
1 3/4 cups all purpose flour
1/8 cup olive oil plus extra for drizzling
1/4 tsp kosher salt
3 lap cheong (sweet Chinese sausages)
1 cup grated fontina cheese (or mozzarella or white cheddar)
1 bunch scallions, chopped

* I have found that hot water from my tap works well for blooming yeast.

Procedure

In the bowl of your stand mixer, gently combine water, honey, and yeast. Allow the yeast to “bloom” for 5–10 minutes in a warm place until there is a fine foam on top.

Fit your stand mixer with the dough hook. Set the mixer to low speed and gradually add 1 3/4 cups flour, then 1/8 cup olive oil and salt. Turn up the speed of the mixer to medium-low and allow the dough to be kneaded for 4 minutes. If the dough has not pulled away from the sides of the bowl, add an additional 1 tablespoon of flour. Continue to knead for 1–2 minutes. Dough should be sticky but you should be able to easily remove it from the dough hook.

Scrape the dough out of the bowl and form a ball. Generously coat the inside of the bowl with olive oil. Roll the ball of dough around in the olive oil until coated. Cover with a damp towel and place in a warm spot to proof for 60 minutes, or until it has doubled in size.

In the meantime, remove the casing from the lap cheong and crumble into small pieces. Cook on medium heat in a small skillet until just heated through. Drain away excess rendered fat.

When the dough has had its first rest, gently fold in three-quarters of the chopped scallions and divide the dough in half. Coat the inside of a 10-inch cast iron skillet with olive oil. Use your fingers to gently press down half of the dough into the skillet, forming an even layer. Press the other half of the dough onto a large plate, to roughly the same size as the skillet. Cover both halves and let rest for another 20 minutes.

Meanwhile, place a rack one-third from the top of your oven and preheat to 400°F.

Press the relaxed dough in the skillet so it fully covers the bottom. Sprinkle the sausage on top and then roughly two-thirds of the cheese spread in an even layer. Top with the other half of the dough and pinch to seal the edges together. Dimple the surface of the dough with your fingers, drizzle generously with olive oil, and top with the remaining cheese and scallions.

Bake for 25–28 minutes or until the top is lightly browned. For neater bread sticks, allow to cool slightly before slicing—or, if you don’t care about that and live for danger, cut immediately and enjoy the skin-scalding gooeyness.

Yee Sang (Prosperity Toss Salad)

I wrote up a little recipe for Kvarøy Arctic Salmon to share how to incorporate salmon into a feast for the Lunar New Year. I really liked how the photos turned out—I tried to style the yee sang in a more modern, creative way. I’m really grateful to have sponsors that give me lots of freedom to tell me stories and represent my culture.

You can read more about yee sang and the symbolism of all the ingredients in my Instagram post.

Slow Cooker Chicken Adobo Ramen

I grew up hardly knowing my own grandparents across the ocean, and it was just me, my parents, and my sister here in the States. But my parents' host mom—the woman who opened her home to them when they first arrived as immigrants—was from the Philippines and she continued to be a mother figure to my parents and a grandmother figure to me well after my parents got settled. I call her Lola, the Filipino term for a grandma. So even though I am not Filipino, I grew up eating lots of chicken adobo during visits to my Lola’s house.

I remember my Lola's version of chicken adobo being more tangy/vinegary and more brothy than other versions I've had at restaurants as an adult. There was something about that soy and vinegar sauce that was always so appetizing; the kind of thing that you have to reawaken your tastebuds when you don’t think you feel like eating. I felt I could drink it by the bowlful! Which is why I developed this fusion recipe where the chicken adobo braising liquid becomes the base for a noodle soup.

The key steps to making this recipe are:

  • Browning the chicken. This renders out the excess fat from the chicken skin, giving you a glorious schmaltz that will be used later.

  • Braising the chicken in a slow cooker. I opted to go the slow cooker route to keep the recipe low maintenance. The browned chicken thighs are given a chance to soak up the flavors from a braising liquid made up of soy sauce, vinegar, lots and lots of garlic, and black peppercorns.

  • Making the broth. Blending together the strained braising liquid and all that soft garlic creates an emulsified broth that is rich and almost creamy. It has a much more concentrated flavor than a traditional soup ramen.

  • Frying the garlic chips. That saved chicken fat goes into making the most delicious garnish of fried garlic chips, which in turn infuses the chicken fat with some of that garlic flavor.

  • Frying the egg. Inspired by Filipino silog, I decided this ramen needs to get topped with a beautiful fried egg.

  • Boiling the noodles and assembling the bowl. I chose to keep the thigh whole but you can also shred it up before serving if you don’t want the recipients to have to maneuver with the bone.

  • Finally, that schmaltzy goodness from before gets drizzled over the whole bowl as a finishing touch at the end.

Click here to get the recipe on the Pete and Gerry’s site!

Thank you so much to Pete and Gerry’s for sponsoring this recipe!